Mounting the hood to the wall. Hose for exhaust: how to choose and install a corrugated pipe for ventilation
1) When mounting the hood with the use of boxes, a preliminary departure of the master for measurements is required - 500 rubles.
2) I drank a hose for broaching, rework in the air vent and corrugated hose is paid separately - 450/650 rub.
3) Cashless payment is possible with an additional charge of 2% to the amount, provided that the amount of the service exceeds 3 000 rubles.
The price of installation and installation of the hood depends on the type of equipment and the complexity of the work. Our specialists will be glad to offer you a complete connection of the exhaust hood, while you will be presented with a gift - up to 5 m of cable free of charge!
Complex installation of household equipment differs in cost from installation to ready-made communications.
The hood in the modern kitchen becomes an integral part. The functions performed by it are very extensive - removal of odors, steam, burning, air purification - all this can be done with a properly installed hood. However, the hood, like any other device, has strictly defined operating conditions and needs to be installed by a specialist.
Materials for installation of hoods
| Hood for extracting | |
| The box (plastic) | |
| Adapter (plastic) | |
| Turn for the box (plastic) | |
Knee joint (plastic) |
|
| Flange for air vent | |
| Metal clamp 145-160 mm |
The installation of the kitchen hood must be carried out in strict accordance with the instructions. Let's consider the basic stages of installation of the hood, which consist of mounting the hood, connecting to the ventilation, connecting to the electrical network and checking the operability of the appliance. 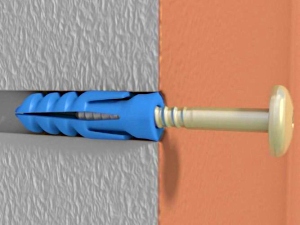 Proper installation to the ventilation system determines the speed of air purification, and a qualitative connection to the power supply and protection from power surges will provide safe operation. Unfortunately, the installation scheme of this equipment does not give a complete picture of some important nuances, therefore installation and installation of this device must be done only by a professional!
Meanwhile, it is important to keep in mind that the types of hoods are different. From this in many respects depends the feature of connecting the hood in the kitchen. The general rule is that the distance from the hood to the cooker should not be less than 75 cm.
When installing a built-in hood of electrical installation works it is necessary to produce and adjust the kitchen interior to the dimensions of the hood.
In principle, there are different types of dome and island type hoods. This is due to the peculiarities of their design. It should be taken into account that the island type hood does not cover the entire surface area over the kitchen stove. Dome hood, on the contrary - covers the hob completely and requires the required installation level.
Kitchen hoods of the Modern type mean, at installation, installation of a socket with grounding, placing the hood on the prepared fixtures, mounting the corrugated hose from the ventilation hole to the hood.
 The cost of installation of kitchen hoods in accordance with the type:
Kitchen hood "classical" (m \\ pcs) - 1950 rub. + cost of materials, or 2000 rubles when using customer's materials.
Kitchen hood "dome" (m / piece) 2000 rub. + cost of materials, or 2500 rubles when using customer's materials.
Kitchen hood "island" type - (m \\ pcs) - 4000 rub. + cost of materials, or 4500 rubles when using materials of the customer.
Price for materials:
| Material (m / piece) | Price, rub.) |
| Gofra 1 m | 800 |
| Plastic box 1 m | 600 |
| Knee joint (plastic) | 250 |
| Turn for the box (plastic) | 250 |
| Adapter (plastic) | 250 |
| Flange for air vent | 250 |
| Tightening clamp 150-200 mm | 150 |
| Drank in the closet and shelves (depending on the complexity) | 400 |
| Dismantling of an old hood | 400 |
| New cabinet installation service | 800 |
| I drank a hose rope for broaching | 350 |
| The price of dismantling the old hood | 400 |
The exhaust device has long been an indispensable attribute of cleanliness and comfort in the kitchen. After acquiring this household appliance, the question arises of its quality installation. So, can there be a cooker hood for the kitchen with our own hands or better delegate the work to specialists?
Electrotechnical details
Before installing a household appliance, it is necessary to perform a number of preparatory activities. The task of primary importance is to ground the device.
In the inner part of the body, a large amount of moisture, grease spray, is tightened, which automatically increases the danger of short-circuiting, electric shock, especially if the unit is not assembled correctly and then plugged into the mains.
Specialists focus attention: the installation of the hood in the kitchen with their own hands begins with the connection of 3 wires (it is a phase, a zero and a ground). Traditionally, grounding is indicated by a yellow-green color. To use the device was really safe for health, it is connected to the "ground".

Electrical connection
note!! To fix the hood in a private house will not be difficult, especially if the object has a ground loop. It is enough to connect the wire to the appropriate terminal (GND). The grounding can be an ordinary metal wire connected to the body of a kitchen appliance.

Many owners of houses have a natural question: how to connect the hood in the kitchen, with the missing ground loop? From the advice of folk craftsmen to throw a wire on a battery or a pipe, it is better to refuse. You'll have to do everything with your own hand and through the only correct option - a dumb neutral.
Tip!! It is enough to look into the shield box, and find in it the wires attached to the metal bus (pin). This will be the desired blank neutral. A wire is connected to it, with a section of the order of 2.5-3 mm.kv. Then it is connected to the automatic distributor by 6.3A.
Ventilation in apartment and kitchen
In accordance with statistics in 90% of cases, the installation of kitchen hoods with their own hands implies an unintended disruption of the functioning of the ventilation available in the apartment or house. Some experts recommend that a small hole be made, into which the soot, combustion products, grains of fat will be removed. Independently this problem can not be solved, since the cross section ventilation duct remains the same, there is no improvement in the air exchange.

However, it is enough to equip a small box, supplemented by a "clapper valve" and the situation is normalized. The corresponding device is shown in the photo below. The principle of operation of this mechanism is simple:
- in the made housing there are 2 holes;
- red indicates the valve system;
- in the closed state air circulates through the window, due to which the natural ventilation above the gas stove.
In the active mode, the fan generates pressure, the valve position is corrected and the first of the windows is closed, natural ventilation is connected to the circuit. This scheme inclusion is noteworthy in that the kitchen hood in a private house in the off state will work thanks to natural air exchange.

Adjustment of the valve is carried out by means of the built-in spring, which is a sufficiently reliable fastening. Experts advise making a valve from light material, plastic, aluminum.

Aluminum ductwork
There are several variants of air ducts with which you can organize household ventilation.
- Aluminum Corrugated Pipe. Available and reliable material for the implementation of kitchen hoods. Mount it simply, because you can bend to any size. During operation, the corrugation does not emit any vibrations, a buzz, which can not be said for rigid boxes. Before you hang the hood with this pipe, you need to provide a variant of its additional decor, because it looks visually ugly.

- . Light, reliable and at the same time noiseless plastic solutions. Smooth surface of this material prevents the formation of air resistance. To fix the hood in the kitchen in the apartment is recommended when using elastic pipes.
Step-by-step installation instructions
It is obvious that the installation of the kitchen hood with their own hands is carried out taking into account the individual characteristics of the household appliance, its type, the location of the canal. Let us dwell on the most common variant. So, how to install the hood in the kitchen with your hands in the closet? To begin we will prepare the necessary tool.

Preparation of anti-rotation mechanism
Are you planning to do everything extremely high quality? In this case, we recommend starting work with the preparation of the box under the air cracker. If there are financial means, the anti-return valve can be purchased in ready-made form, in the absence of these - manufactured by hand. It is made mainly of rigid, galvanized sheets or aluminum.

More information about the check valve can be found in the video below.
note!! Metal "butterfly" is installed in front of the ventilation duct.
- To connect the kitchen hood does not take unnecessary forces, the body is better placed on a wall cabinet, above the surface of the plate. In the future, it can be fixed more tightly, using a mounting foam and an additional fastening at the cabinet.
- The next step is to compare the shell of the cracker with the cabinet. In accordance with its size make a markup for future holes. The correct installation of the hood in the kitchen is carried out with the obligatory removal from the wall of the cabinet in which the household appliance is planned to be placed. The desired shape in accordance with the marking is formed with a jigsaw, first of all in the area of the lower frame.
- If the connection of the hood in the kitchen is planned to be carried out on a corrugated pipe, holes are also made in the shelves, the diameter of which corresponds to the dimensions of the duct. In the upper wall, we recommend preparing a square-shaped hole with an additional 3-5 mm on each side. If you focus on the rules of installing the hood in the kitchen, then this slot is used to place the cracker.
Advice! To cut a round hole under the aluminum corrugation in the shelves of the cabinet, you need to use the beginning of the screwdriver with a large drill. Then, insert a saw blade into the drilled hole and then cut the circle.

Watch video how to install the hood in the cabinet
Look at the video below how to conduct the corrugation through the cabinet
The whole complexity of mounting the hood for the kitchen in a private house by one's own hands is reduced to the necessity of preliminary work with furniture. For a dome installation, the situation is simplified at times, since all that is required is to securely attach the device to the air duct and ventilation duct.
Duct connection
Next, you need to connect the air duct of the hood to the hole in the kitchen wall (central hood at home). If you use corrugated paper, then, after you remove it from the cabinet, it is attached to the central exhaust shaft using a plastic cover with a hole and a clamp.
Advice! To ensure that natural ventilation is present in the kitchen, it is necessary to use a plastic cover with holes (provided that there is no additional source of air in the room).

Many owners wonder how the cooker hood is installed in the kitchen, if only plastic pipes, elements? In this case, it is necessary to connect all the pipes, angular parts, adapters and bring them to ventilation.

Use of plastic ducts
note!! Before you draw the hood in the kitchen with your hands, calculate the system in such a way as to minimize the number of jumps and bends in order to provide the device with sufficient traction.

Connecting the extractor to the ventilation duct using plastic channels
Now you know how to properly install the kitchen hood, and in what order to carry out the necessary work.
In most cases, the hood to the kitchen with their own hands is mounted without any problems. If the home appliance is purchased with furniture, then all that is required of the owner is to put the unit inside the cabinet, fix it and connect it to the ventilation. And how to make a hood in the kitchen in case the home furnishing thing does not involve placing inside any equipment?
Obviously, not every owner is ready to sacrifice a kitchen cupboard for the sake of a beautiful appearance. Considering the fact that high humidity will constantly affect this piece of furniture, its damage is only a matter of time. And the question of how to install a kitchen hood gets additional urgency. To cope with the task will help the simplest scheme and sequence of actions.
- We prepare the U-shaped metal structure from dowels and corners.
- Fix the structural elements near the wall, where it is planned to install the hood above the stove.
- The body of the kitchen appliance is mounted on a U-shaped frame (the unit in the "pyramid" case is fixed in a similar way).
Many of our compatriots have difficulties with fixing the installation with dowels (when the pipe located next to it interferes with the proper placement). How can I install the hood in the kitchen? For such situations, plumbing screws are provided. They are long enough to screw the hood in the bathroom, in the kitchen or any other place.

Now you know how to properly draw the hood by yourself, in what order to perform the installation work, what to do in case of problems with the fastening. In fact, there is nothing difficult in this kind of work, especially if you have the necessary tools and all the details at hand.
note!! For generalization of the theoretical base for the installation of kitchen hoods, we recommend that you view the thematic video materials for this article.
After completing all work, the appliance must be connected to the electrical network. Installed Hood We advise you to connect it with a safety device, and not directly plug it into a power outlet. In the event of a voltage drop, this will help keep the device operational. Do not forget about the grounding of the case.
Having made sure of the functionality of the device, it can be covered with a protective decorative cap and enjoy clean air, the aroma of the prepared dishes.
Summing up
Kitchen hood by one's own hands can be installed in just 1-2 hours without the slightest experience in installation works. Regardless of your experience, we strongly recommend that you follow the safety precautions and precautions when working with electrical appliances, wiring.
- Air duct (corrugated or plastic)
- Extractor hood
- Building Level and Roulette
- Rotary hammer and screwdriver
- Dowels, screws and nails
- Electric socket
- Pencil for marking
- Hacksaw
The main points of preparation for installation
- The device must be checked for suitability for installation, as it is almost impossible to repair the malfunction after installation. Furniture and walls are drilled according to specific dimensions and can be damaged during dismantling.
- Place under the device must be measured and note its height. It should be understood that the built-in hoods are placed during the installation of the kitchen, and the standard flat and hinged - after completing the kitchen set.
- The distance from the hood to the cooker is usually regulated and prescribed in the instructions to the product. However, there are some general rules and the distance should be: over the gas stove - more than 80 cm, and above the electric - more than 70 cm. Naturally, with a large distance between the plate and the hood, the efficiency of the device is several times less, but it is also not necessary to mount it below due to possible disruption of operation.
- Be sure to have a rosette near the location of the cooker hood. It is best if it is grounded and applies only to one device, because the network may overload and short-circuit the device to break down. It is desirable to use a protective blocker on the power outlet, which will disconnect the device when the permissible loads are exceeded.
Installation of built-in hood in the cabinet. Step 1: Prepare an anti-return box
The box is manufactured from aluminum and galvanized metal according to the scheme below.
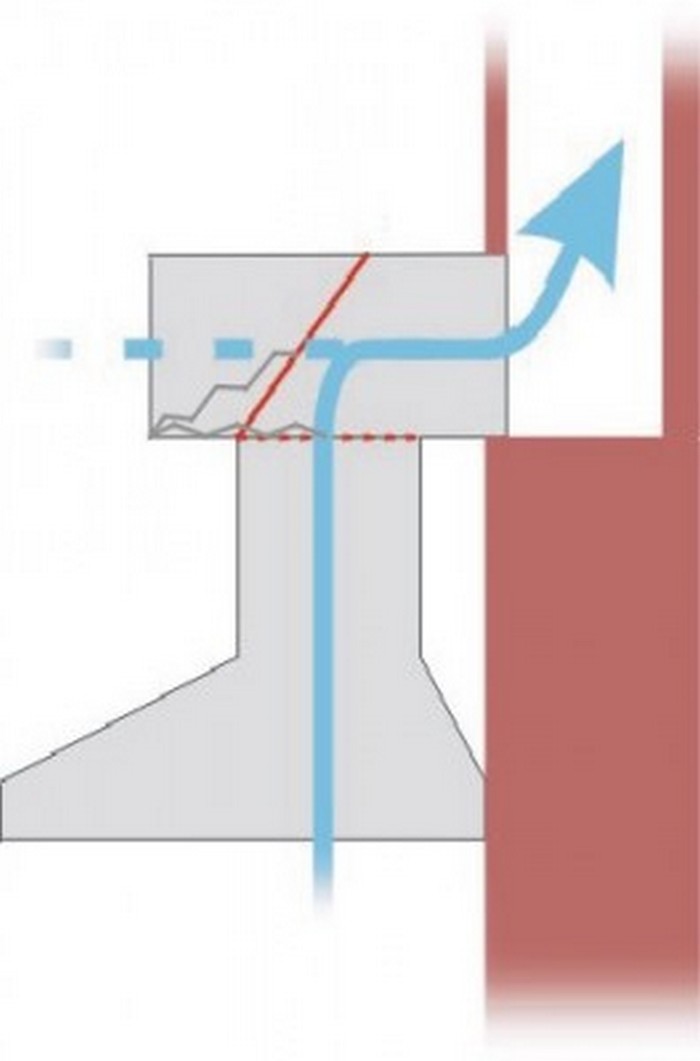
In the image you see a box on which there are two holes. When the valve is open (it is marked in red), all smells can be eroded through the window, that is, naturally ventilated. And if the valve closes the window, ventilation is already done through the hood. Reverse air flow is impossible, and the valve can be adjusted by a small thin spring made of plastic or aluminum.
Such a valve can also be bought in the store. It is installed to the opening of the ventilation shaft.
Step 2: Install the wall cabinet
The case of the box is better to be installed in the cabinet, which later is carefully fixed with mounting foam. However, the installation of the direct hood in the cabinet must be done as follows:
- Perform the layout of the cabinet and the holes in it.
- Dismantling the cabinet and cutting holes in the wall with a jigsaw. First you need to make holes inside the markings, and then - cut the right hole in the cabinet.

- Making holes for the duct in the shelves of the cabinet. At the top of the wall make a hole for the cracker with a size of 5 mm.
Step 3: Installation of air duct
In the previously made holes, place the corrugation in order to give it a square shape. Next, cut off the part of the pipe that has remained from the bend, and adjust the corners. Then you need to hang the cabinet with the corrugation on the wall and apply the sealant to the joints of the duct to make it more stable.

Step 4: fixing the box, hood and corrugation
It is important to secure the box to the cabinet so that it connects the ventilation paths with the corrugation. To do this, use silicone, and for large gaps, you can and mounting foam.
To fix the device in the cabinet, you need to use self-tapping screws, and to secure the cabinet itself on the wall you will need not only screws, but also dowels.
The hood and the corrugation can be fixed by means of a clamp and a sealant, by which the parts are glued.


Important! It is necessary to reduce the number of bends of the corrugation, since each of them also reduces the drawing power of the hood by 10 percent.
Mounting standard hood without cabinet
To avoid damage to the furniture plate from heat, steam and humidity often simply refuse the cabinet and install the hood on the frame and dowels. The frame is executed in the form of the letter "P" and stands as a support for the device.
When installing the hood above the gas stove, stronger fixing elements (long screws) are used, which have a thread and a nut. Their screwing is the same as in the case of dowels, however, it is important to mount the device with a slight indentation from the wall.

Step 1: Marking the wall for drawing
The horizontal leveling of the wall surface above the slab will be helped by the building level and roulette, marker or pencil. Take into account the characteristics of each type of plate and mark the permissible distance on which the device can be located. Provide a point for future attachment of the device.

Step 2: Drilling holes
Take a drill with different options drilled in order to make a hole. The drill is selected in accordance with the thickness of the walls and the material from which they are made. Place the dowels in the holes obtained.
Step 3: fixing canopies and hoods
Screw the sheds with a screwdriver, then hang them on the hood. Then you can connect the device to the mains. It is extremely important to attach the fuse to the outlet and make the reset to avoid network drops. To fix the result, put on the decorative box.

Installation of domed hood
Dome hood type of attachment can be screwed to both the wall and the ceiling. Installation is carried out in several steps.
Step 1: marking the walls
During markup it is worth to be much more careful than in the installation flat hoods. The first thing to do is to draw a horizontal line above the stove, using a building level and a pencil. Also, note the height of the entire device, along with the pipe size. When installing the extractor should not cross the lowest permissible mark.
Then it is necessary to apply a vertical line for the symmetrical fixing of the hood. Measure the distance from the bottom of the device to the two following attachment points and, taking into account the center line, draw the horizontal line up.
Step 3: Connect the ventilation
The ventilation pipe can be plastic or corrugated. From the number of bends on it depends the quality of the intake air intake. Take care of the check valve, which also will resist the ingress of air from the street and carbon monoxide from the ventilation ducts.
How to fix devices of different types, look at the video.
Successes to you in repair!
How to install the hood correctly? Only a professional can cope with this task, or will there be enough of our own knowledge and strength? This question is faced by a large number of people, and each decides for himself how to act in this situation. Of course, the best option is to install the device by a specialist. And this is understandable: so you are guaranteed to get rid of errors during installation and you can be sure that the technique will work after installation properly. However, if you still decided to try to mount the hood yourself, it would be superfluous to read our instructions.
The fact that modern cuisine can not do without this miracle of technology, everyone knows. But often the buyers are faced with the question of how to hang the kitchen hood correctly, so that it will most effectively clean the air rising from the stove, or remove it from the room. To do this, follow the simple guidelines.
The main rule, which is important to observe, concerns the selection of the hood. Even if you are well aware of how to hang a structure, but it does not match the dimensions of an electric or gas stove, all diligence will be in vain. The rule says: the breadth of the kitchen worker must match the width of the plate (Figure 1).

The next main question: at what installation height is the hood installed? When the exhaust design is too low in relation to the plate, cooking becomes inconvenient. Therefore, when choosing the installation height, consider the growth of users. They should be comfortable to operate and operate the device. And an excessively high location will not allow the efficient capture of fumes. Experts advise to observe the height of the installation in 65-75 cm from the electric plate to the hood. For gas stoves, the optimum height will be 75-85 cm (Figure 2).
Varieties
Classification of extracts is carried out by type and place of installation:
dome (mounted to the wall like, under the suspended kitchen cabinet, and independently of it);
fireplace (according to the installation actions it does not differ from the dome type);
island (installation of this type of hood means fixing to the ceiling, provides more space in the room);
angular (installation is carried out in the corner of the kitchen);
built in with a sliding panel (mounted in a suspended kitchen cupboard);
flat (fastened with the back side to the wall, and the top directly to the cabinet itself).
Features
Kitchen hood, depending on its installation, can work in the following modes:
- assumes that all air is diverted outside the kitchen. This mode is most effective, since the technique removes all cooking fumes in the ventilation shaft and creates a low noise level. To connect the hood to this mode of operation, it is necessary to purchase a plastic duct (or its analogs) and additional adapters (Figure 3).

The mode of "filtration" (recirculation) - means that the hood is not connected to the ventilation system, it is based on the principle of air recirculation. In this case, all the air, passing through the carbon filters, is cleaned and goes back to the kitchen. To operate the device in this mode, special carbon acrylic filters are installed on the engine. Usually, in four months they require replacement, that is, two or three times a year. After this time, the carbon filters should be replaced with new ones to improve the efficiency of the device. It must be said that it is easier to mount the unit operating in recirculation mode, since it is not necessary to take into account the connection to the ventilation system. But it is necessary to recognize that the productivity in this case is reduced in comparison with the regime based on the removal of air into the ventilation shaft (Fig. 4).

Performance
The productivity is measured in cubic meters per hour (m 3 / hour). In order to understand what your hood should have, you need to determine how much air it can take out of the room in one hour of operation.
Therefore, in order to choose exactly the device that will fit the dimensions of your kitchen, you must first determine the air exchange in the room. To calculate the volume of the room-rectangle, multiply the parameters of width, height and length.
Length x width x height = room volume m 3
A x B x H = V (m 3)
For example, if you take a room with a length of 4 m, a width of 3 m, a height of 2.5 m, then its total volume will be 30 m 3. According to SES ( health standards), the air must be in time to be updated in the room where food is prepared, for one hour at least 10 - 12 times. Therefore, the resulting volume of the room is multiplied by at least 10. As a result, a properly selected hood for a kitchen with a volume of 30 m 3 should have technical characteristics for a capacity of 300 cu. m / hour.
And considering that the technique should not constantly work at full strength, we recommend to focus on a slightly higher value, i.e. taking into account the power reserve. Usually the obtained performance value is advised to multiply by a factor of 1.3.
Total, 300 x 1.3 = 390 cubic meters. m / hour.
For efficient operation of the hood in the table below are presented specifications on productivity (m 3 / hour) taking into account the minimum reserve factor depending on the kitchen area and ceiling height.
| Productivity, m 3 / hour | Ceiling height, m | ||||||
|---|---|---|---|---|---|---|---|
| 2,5 | 2,7 | 3,0 | 3,2 | 3,5 | 4,0 | ||
| Kitchen area, m 2 | 6 | 234 | 253 | 281 | 300 | 328 | 374 |
| 7 | 273 | 295 | 328 | 349 | 382 | 437 | |
| 8 | 312 | 337 | 374 | 399 | 437 | 499 | |
| 9 | 351 | 379 | 421 | 449 | 491 | 562 | |
| 10 | 390 | 421 | 468 | 499 | 546 | 624 | |
| 11 | 429 | 463 | 515 | 549 | 601 | 686 | |
| 12 | 468 | 505 | 562 | 599 | 655 | 749 | |
| 13 | 507 | 548 | 608 | 649 | 710 | 811 | |
| 14 | 546 | 590 | 655 | 699 | 764 | 874 | |
| 15 | 585 | 632 | 702 | 749 | 819 | 936 | |
Table. Calculation of hood productivity
It should also be taken into account that the more performance characteristics, the higher the fan speed, which in turn begin to make noise.
For effective operation of the device it is necessary to take into account not only the area of the room, but also the number of family members, and how often you prepare (Figure 5).

This is the optimal performance of the hood, which will allow it to successfully cope with the tasks assigned to it and to work long in your kitchen.
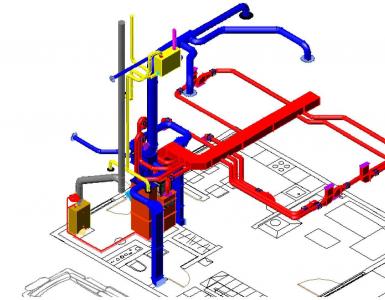
Ducts
Another important point when installing the hood in the kitchen is the installation of the air duct. He, by the way, can be made of plastic or semi-rigid aluminum. The first option is better, but more expensive, the second option is cheaper.


 Fig. 8. Connection plastic ducts with ventilation grille
The installation of a plastic duct (Figures 6, 7, 8) is more complicated, as it requires adapters, a ventilation grille (wall cuff), all possible connectors, horizontal and vertical bends (Figure 7) in the form of the letter "G". Also, special adapters (Figure 10) (reducers) will be needed, allowing the transition from round to rectangular. In addition, you can use an adapter and another version, which will simplify the transition from a larger diameter to a smaller one (Figure 11). It is designed to connect the air duct to the exhaust outlet of the hood. A large number of additional parts (Figure 9) of various types allow you to mount any type of complexity. Such installation is not easy (especially for a beginner), but such air ducts have almost no shelf life and prevent excessive noise generation during operation of the device. We recommend that you choose this option - a rectangular or circular PVC product.


For corrugated air ducts (made of semi-rigid aluminum), only a grid with a fitting is required, a plastic adapter (included in the hood) and two clamps (Fig. 12a, 12b). During installation, it is stretched along the entire length to remove the folds. Because of them, noise may occur during operation.


It should be noted that corrugation is much inferior in terms of its aesthetic and performance characteristics of the duct system of plastic. Firstly, it is unattractive, difficult to mask, and always striking. Plastic is more attractive in appearance and such a system can be laid on top of cabinets in such a way that it will be virtually invisible. Secondly, corrugated is more inclined to increase noise, rather than air duct from PVC, which has better sound insulation properties.
To achieve maximum duct productivity, it is best to choose as short a length as possible. This will reduce the noise level during the operation of the hood, and also improve the quality of the removal of bad air from the room. Bends at an acute angle and pipe turns of 90 degrees are not desirable.
If you are only interested in correct installation hoods in the kitchen, then it is necessary to select the air duct system so that the air duct has the largest possible diameter. This will significantly reduce power losses, which will go to "pushing" air mass. Consequently, the efficiency of the exhaust design will be higher.
Reducing the diameter of the duct is not recommended, but if you need to use a smaller channel cross-section, you need to use a special adapter (Figure 11). In this case, the cross-section must be reduced by only one step. Timeliness of the constriction allows avoiding unnecessary power losses, for this purpose the adapter is usually mounted on the site of the outlet flange of the hood. The standards for the inner diameter of the exhaust channel of the exhaust structures are 100, 120 and 150 mm.

It is convenient when the ventilation is on the same side as the extractor. Then the duct system is held at the top of the kitchen cabinets (Figure 13). If the ventilation duct is located on the opposite wall, then the duct will have to be laid on the ceiling. In this case, it can be hidden in special boxes, painted in the color of the ceiling or walls.
If the ventilation system is routed through the attic and other cold rooms, premature cooling of the air occurs in it, and condensation may form inside the individual sections. This phenomenon will lead to the fact that with the passage of time, the thrust force becomes insufficient and mold will start to form. In this case, it is necessary to insulate the ventilation inside the house with heat-insulating materials.
Conclusion
Compliance with these rules will ensure high quality of the hood. All these measures will prevent the emergence of additional loads on the motor of the device, which can affect its performance, caused by aerodynamic drag in the duct. If you do not follow these instructions, this could cause an incorrect air discharge and motor overload.
In order to install the hood correctly, read our installation instructions for aggregate data of various varieties. We will describe in detail how to mount
Many species repair work you can do it yourself. One such case is the connection of the hood to the ventilation system. Even an inexperienced home master is able to cope with this crucial stage. Especially when the aluminum duct for drawing is used as an air duct. This type of construction material during installation does not require many years of experience and special knowledge.
Corrugated pipe is represented on the market of building materials in a variety of options - these are color models of small diameter made of plastic and a serious culvert from stainless steel. Material, size, color, price - all this for any buyer.
For beginners home master It is difficult to choose exactly what is ideal for solving the problems that arise.
Due to inexperience, it is possible to choose the type of pipe for ventilation, choosing the color or material that harmoniously fits into the interior
What can be corrugation
One of the convenient and simple solutions for the kitchen is the use of a corrugated pipe to connect the hood to the ventilation system. To buy exactly what is required, not to get lost among a large number of proposals and not to overpay for an air duct, you need to sort out a little with the main types and purpose of the corrugation.

Corrugated pipes with a large diameter of 3.0-3.6 m can often be seen under the roads and railways. They are installed to perform culverts
Gofra is actively used by builders and domestic craftsmen as an important element in the arrangement of communications. Its popularity is due to high strength, a variety of sizes and materials, and a long service life.
In appearance, the corrugation is rectangular and round. For kitchen hoods, buy a round air duct.

Rectangular variants of corrugation are more often used in industrial premises
You can often find corrugated pipes made of such materials:
- cink Steel;
- stainless steel;
- aluminum;
- textile;
- high and low pressure polyethylene;
- polyvinyl chloride.
The scope of application depends on the type of material and the diameter of the finished product. To arrange household ventilation, they often buy corrugated aluminum and stainless steel.

The plastic corrugation that connects the hood with the ventilation duct creates more noise than the aluminum analog
According to the manufacturing method, the corrugated pipes are:
- wireframe;
- spiral-winding.
The first type of product is a metal frame, covered with aluminum foil or polymer film. it flexible air ducts. They have the ability to return the original appearance without deformations after stretching the whole length of the corrugation.

Spiral-wound corrugation is made of stainless and galvanized steel, made of aluminum. It is much more expensive than frame analogues
The second type of air duct is made of metal bands. The finished product is half flexible - it can stretch 2-3 times, but it can not return to its original state. It will be necessary to make an effort to give the tube the desired shape, and the deformation traces will be clearly traced.
Many manufacturers offer flexible corrugations with thermal insulation and without. The first option allows you to expand the scope of use of products. So, with the help of four-layer flexible pipes it is possible to lay ventilation ducts both inside and outside the premises. And the distance will not be of fundamental importance.

In the manufacture of thermally insulated products, mineral wool or glass wool
Scope of construction materials
A wide variety of corrugated pipes, which differ substantially in their size and type of material, eloquently testifies to various areas of use of this building material.
Half-length flexible pipes of small diameter, made of plastic and polymers, are actively used for paving electrical cable. This can be a channel for telephone, computer, power and other wires. Most often, electricians use corrugation with a diameter of 1.6 to 4 cm.
Half-flexible corrugation made of galvanized or stainless steel has become one of the actual options for the arrangement of the heating system. In practice, this type of pipe is easier to assemble. The ability, if necessary, to bend any section without breaking the inside diameter of the product helps to easily bend corners and other complex areas during installation.

Gofra of galvanized and stainless steel is much more expensive than aluminum analogues. But the tubes of solid material looks aesthetically pleasing
Flexible corrugated pipe types are used for ventilation systems. The diameter, most commonly used for household ventilation, is from 10 to 15 cm. There are cases when a pipe with a diameter of 20, 30 or more cm is required. Although this is not the running dimensions, it is also not difficult to find the required option.
As for the material of the products, the corrugation, bought by the masters for arrangement of ventilation in the kitchen, is flexible and made of aluminum foil. Variants with plastic material and stainless steel are used less frequently in everyday life.

Such popularity of flexible design is due to the convenience of its installation. The price is quite reasonable and meets the requirements put forward to this product by buyers
Ventilation ducts of textiles are used for arranging communications in production facilities. They do not interfere with the very rapid transfer of air in the room. It is this feature that facilitates their use in meat processing plants, in public catering and other types of premises.

Tissue ventilation ducts can be quickly and easily dismantled. They are not difficult to clean and disinfect
Plastic and polyethylene corrugation is used to connect plumbing, water supply to washing machines, dishwashers and other equipment. With the arrangement of sewerage without corrugated pipe also can not do. Especially in complex areas where the use of a rigid structure can be difficult.
Gofra: how to choose correctly
The wide choice of corrugated pipes offered by the sellers can create certain difficulties in choosing the appropriate option for the ventilation arrangement. Therefore, in order to buy the right product, you should follow these parameters:
- diameter and length;
- material of the product;
- quality;
- price.
The diameter should be in accordance with the recommendations given in the instructions for the purchased exhaust model. If you stay on a larger or smaller version, expensive equipment can at best not cope with its functions to remove smells from the kitchen, and at worst - burn out from overexertion.

Gathered in the store to buy corrugated, you need to carefully study the technical characteristics of the hood, and before buying, do not hesitate to measure the product
Therefore, do not ignore the recommendations given by the manufacturer. Sometimes, together with the hood, an air duct is supplied. It's great if it works in a particular case - the length will be sufficient and the material will suit. Otherwise, you will have to visit the building materials market yourself and purchase a more suitable option.
Another situation when, together with the hood, they offer to buy corrugation immediately. Here you need to be extremely careful, because not always the seller cares about the comfort of the client. He can offer stale or too expensive goods. The length in this case should be measured in advance, so as not to buy extra meters, trusting the seller's experience.

The flexible pipe for ventilation in its original form has a length of 60-70 cm. But it stretches for 3 meters. It is worth considering when buying
The length of the corrugation needed to connect the hood to the ventilation duct is measured by a tape measure. Measure the need to do from the entrance to the hood and to the entrance to the wall. The path should be chosen exactly the one that is to be repeated to the pipe. It should be borne in mind that the corrugation may bend, depending on the technical parameters specified by the manufacturer. For example, by 180 degrees.
The ability to bend under the desired angle allows you to pave the most optimal path. The pipe will be mounted in a stretched state. This point should be taken into account.
The second parameter that influences the choice is the material of the product. Sometimes the color is suitable plastic version. In this case it is necessary to remember the greater noise created by the air duct. If this question is not fundamental, then the range of models can be expanded.

Polyethylene corrugation is not used for ventilation. These products, depending on the diameter, are suitable for transporting and pumping bulk and liquid substances
To buy did not disappoint, do not forget about the documents confirming the quality of the purchased goods. Do not hesitate to ask the seller for a certificate of quality and manufacturer's warranty.
In addition to the document, you should carefully inspect the corrugation - there should be no dents and suspicious scratches. Do not be afraid to stretch the full length of the flexible pipe and check it for gaps or holes - they should not be. If the corrugation is of questionable quality, then it is better to refuse from its purchase.

The flexible pipe will be installed in the ventilation system in a stretched form. Therefore, it is necessary to examine it properly in this condition before acquiring
The price also matters. It's good to buy similar offers from other manufacturers before buying to avoid overpaying. Also, it will greatly help to save knowledge of the required length of the duct.
When choosing, you should consider where exactly the corrugation will be used. If you plan to install it on the street or in systems air supply ventilation, where there will be heating / cooling, then you should pay attention to models with thermal insulation. It is more convenient to buy a finished product, than then by own means to warm a flexible pipe.
Fineness of corrugated pipe installation
Connecting the corrugated to the hood and the ventilation system will be within the power of the domestic master. To do this work, it is necessary to take:
- flexible tube;
- clamps;
- aluminum tape;
- grating with check valve;
- silicone sealant;
- adapters from round to square.
The last point is useful in case when the extractor has a square or rectangular branch pipe, and the corrugation is purchased round.

There are on sale adapters for a smaller and larger diameter. They should be used only if necessary, so as not to reduce the productivity of the exhaust equipment
All the necessary parts are good to buy with the corrugated pipe. This will not make a mistake with the number of necessary spare parts.

All components for the future installation of the air duct should be selected, after removing the measurements on the site of the upcoming installation (+)
If you need to connect 2 or more flexible pipes between each other, you can use aluminum tape. It well connects the material of the metal ducts, provided they are accurately glued to the surface.

Aluminum tape can not only connect two corrugations between each other, but also seal a randomly broken hole
The corrugated pipe must be stretched to its full length. In this condition, one end must be attached to the exhaust outlet of the hood. For fastening it is necessary to use a metal branch pipe and a sealant.

The sealant should be applied only on a dry and clean surface. Otherwise, it can not reliably close the joints
Then, after every 1.0 meter vertically or 1.5 meters horizontally, the corrugation must be pinned with additional clamps. These devices will ensure the correct fixing of the duct. If the ventilation opening is only 0.5-0.8 meters, then no additional clamps will be necessary.

If the ventilation duct is long, do not make sharp angles - each of them will reduce the exhaust capacity by 10%
If before entering the ventilation more than 3 meters, you need to choose a more powerful model of the hood or stretch the corrugated pipe in a straight line under the ceiling to shorten the path. After all, the longer the channel, the more powerful the equipment should be.
By installing additional clamps, it remains to connect the corrugation with the vent by inserting its second end into the corresponding hole in the wall grill.

Wall grilles for ventilation come with integrated check valve or without it
The joints of the grate with the pipe should also be properly treated using a sealant. Now we have to check the quality of the installation. To do this, turn on the hood and attach a sheet of paper - if it is attracted, then everything is perfectly mounted. So you can start decorating.
As a decor, a decorative hood of the hood can be used. Sometimes this is clearly not enough. Then the owners connect fantasy, selecting the most the best option, for example, to hide the pipe in the hinged lockers.

Sometimes the ventilation duct is hidden in a plastic box. If you put in it also the lighting, then no one will guess about the metallic corrugation.
Depending on the style of the kitchen interior, the corrugated pipe can be hidden under the suspended ceiling. If the furniture in the room is in the style of hi-tech, then the metal corrugation will organically fit into the overall picture.

It happens that the air duct fits perfectly into the interior of the kitchen, being a logical continuation and not getting out of the overall composition
When to replace the pipe
Gofra is an inexpensive and very worthy solution to the problem of home ventilation. If it is installed correctly, then there will be no problems with the use. The main thing is to follow the recommendations given by the manufacturer of the product.
Care for the corrugated duct is not particularly necessary. One is unpleasant - it's very inconvenient to get the dust from the walls. Over time, in 8-10 years, a rather thick coating of fat, dust and dust particles is formed inside the pipe. You will not be able to clean it. The only way out is to put a new corrugation.
If we compare the service life of 10 years with the cost of a new ventilation duct, the replacement does not at all look like a problem.

When replacing, it is necessary first to dismantle the old pipe, and then to install a new one
When dismantling it is necessary to perform all the actions, that during installation, only in the reverse order. After removing the pipe, it is necessary to thoroughly clean the joints, to clean the ventilation grill or even replace it at all. Then perform all the steps to mount a new corrugation.
Video about the selection and installation of corrugations
Video clip on how to connect the air duct in the kitchen - the features of using a corrugated pipe:
Metallized corrugation used as an air duct in cooker hood, can be hidden behind a decorative casing. This video instruction will help to correctly connect it to the hood:
A visual video about additional details used when connecting the pipe from the corrugation to the hood:
Video review of flexible corrugated aluminum pipe:
An interesting video about how to produce air ducts from aluminum foil:
Having dealt with the features of choosing and installing corrugations, you can save by doing everything yourself. These works do not require special skills and professional tools, which makes it possible to do without calling specialists. A quality corrugated pipe, correctly attached to the hood, is able to provide ventilation for the kitchen not less than for the next 10 years.