Than to glue a plastic corner in a bathroom. Important nuances of installation. Which adhesive sealant to use
When installing the bathtub against the wall, a small gap is inevitably formed. Quickly and reliably close it can be plastic or ceramic corner (curb). This will help to prevent water from entering the floor, high humidity in the room and the formation of mold fungus. This is a relatively inexpensive way to solve the problem, since it is not difficult to install a corner on a bath without the help of specialists. A well-chosen decorative border will serve as a stylish addition to the interior.
The assortment of corners for baths in the modern construction market is impressive. When choosing it is necessary to take into account the features of the walls and the style of the interior. According to the material, the following types of curbs are distinguished:
- plastic;
- acrylic;
- polyethylene;
- ceramic.
Borders protect from leaking
Corners made of plastic and acrylic
Products made from rigid and foamed polyvinyl chloride (PVC) are easy to install and practical. Thanks to a flexible rubberized edge, the plastic curbs for the bath tightly adhere to the surfaces and reliably seal the gaps. The plastic has water-repellent properties and is resistant to acid and alkaline cleaning agents.
Corners made of PVC are suitable for both cast iron and steel bathrooms. With plumbing made of acrylic, curbs of the same material are the most successful. Acrylic skirting boards can also be installed on baths of other types. When choosing a color, you should give preference to the curb in the tone of the bath or the decoration of the walls.
The disadvantages of plastic products include the fact that over time their surface loses its original appearance - it is covered with scratches and can turn yellow. However, these corners are inexpensive. If necessary, they can be easily dismantled and replaced with new ones. With proper care, plastic and acrylic skirting boards can last up to 5 years.
By the method of attachment you can choose:
- corners for installation on a sealant and glue;
- self-adhesive plinth ribbons.

Plastic self-adhesive curb for bathroom
According to the configuration, several types of plastic skirting boards are distinguished:
- cast moldings;
- the "swallow" design;
- compound corners.

Corner-molding from PVC
Plastic skirting board "swallow"

Bathroom fittings
All listed types of corners are suitable for fixing on a tile or other wall decoration. For installation under the tile, it is advisable to choose a plastic curb for a PVC bath with a perforated interior. This will ensure reliable adhesion of materials during subsequent wall lining.
Ceramic skirting boards for bathtubs
The main advantages of corners from glossy and matte ceramics are durability, as well as an attractive and diverse design. Thanks to the protective coating, they are resistant to damp environments and do not absorb pollution. However, the material is rather fragile, so when installing and operating ceramic skirting boards, protect them from blows.
Curbs from ceramics are harmoniously combined with facing tiles. They are universally suitable for all types of bathtubs. If desired, you can choose ordinary or decorative ceramic corners. Depending on the configuration of the bathtub, you can purchase kits with left-hand and right-hand slices or a rounded insert for corner jointing.

Ceramic plinth with corner insert

Border of ceramics with angular cut
In shape, the following types of curbs are distinguished from ceramics:
- angular;
- "pencil";
- frieze.
The corner plinth has a flat outer side. "Pencil" - round. Frieze is a narrow curb tile - flat, convex, concave, with a smooth or relief surface.

Decorative tiled plinth
Installation of plastic and ceramic curbs
Before installing the skirting board on the bath so that water does not flow, careful measurements and materials should be prepared. Also it is necessary to choose suitable sealing and adhesive compositions.
Necessary tools and materials
For installation of plastic and acrylic skirting boards for a bathroom you will need:
- tape measure or centimeter tape;
- stitch for oblique sections;
- rubber or plastic spatula;
- painting tape;
- construction knife;
- acetone or solvent;
- sanitary or aquarium sealant;
- waterproof glue or "liquid nails";
- building gun.

Angle cutter

Building gun for silicone
When installing ceramic corners instead of waterproof glue tile is used. To perform the cuts, use a grinder with a diamond disc. The best choice for white skirting boards will become glue and sealant of the same color. For fixing colored ceramic and plastic corners for the bathroom, transparent compounds are suitable for the tile.
Sequence of work with corners from PVC + video
The installation of plastic curbs is performed in several stages:
- Measure the length and width of the bath. On the skirting profile make a marking and with a construction knife cut it into details of the right size. In the corner joint areas, curbs at an angle of 45 ° are cut by a stool. You can also use special corner inserts.
- The side of the bath and the tile adjacent to the gap are cleaned of dirt and degreased with acetone or a solvent. The surface is dried with a conventional hair dryer.
- Before you glue the plastic corner in the bathroom, the edges of the slit are covered with paint tape. This will help apply silicone sealant and glue as neatly as possible and prevent them from hitting the surface.

Preparing the surface for work
- The clearance along the length and width of the bath with the help of a construction gun is filled with silicone. Do this carefully, not allowing the formation of sags and voids. Composition is leveled with a spatula and left to harden. Continue to work after 24 hours.

Application of silicone sealant
- After solidification of silicone, remove the excess with a construction knife. On the gap area and the surface of the corner, a layer of water-resistant glue is applied. Lay the curb and tightly press it. The sides are covered with plugs.
- Before installing the corners of the "swallow" and molding, you need to check the accuracy of their docking at the corners. Start gluing better from these areas. The installation of the composite skirting boards begins with the fixing of the lower part. The top is attached only after drying.
- At the end of the work, the paint tape is removed. If necessary, excess glue and silicone are carefully removed using a construction knife.

Bath with a corner of PVC
With small gaps (up to 1.5 cm), you can do without glue and attach the skirting directly to the silicone. They will help to understand how to correctly apply the sealant, and how to properly glue the corner to the bath, video with the advice of specialists.
Video: Sealing technique
Video: how to paste a curb on the bath
Features of fastening self-adhesive tape
One side of the polyethylene curb tape is covered with a butyl adhesive, so for its fixation, "liquid nails" will not be needed.
- After cleaning, degreasing and drying of the bath and wall surfaces, the gap between them is filled with silicone. After waiting a day to harden the sealant, you can start attaching the corner.
- The sides of the bath adjoining the wall are measured along the length. From the roll of self-adhesive tape cut the elements of the right size with a margin of 1-2 cm. You will need a scissors or a construction knife. In the corner joints make slanting slices (45 °).
- The curb fixing starts from the corner of the bath. With the prepared parts of the tape gradually remove the protective film, put them in the gap and tightly press against the edge of the bath and the wall for 15-20 seconds.
This phase of work is better done together. To smooth the irregularities, it is convenient to use a soft cloth. In places of insufficient adherence, it is possible to additionally fix the corner with a sealant.

Fastening of self-adhesive border
Stages of installation of a ceramic plinth
Working with curbs of ceramics is quite complicated, so it is better to entrust it to professionals. However, having the experience of laying tiles, installation of a corner on a bath can be done independently.
Mounting ceramic plinth perform in the following order:
- The cleaned and defatted borders of the gap between the bathroom and the wall are carefully dried with a hair dryer and pasted with a paint tape.
- The cylinder with the silicone sealant is placed in a construction gun and gently filled with a mixture of a gap along the entire perimeter.
- The sealant layer is leveled with a spatula and left for a day. At this time, you can start preparing the curb to install. If the corner elements do not have oblique cuts of 45 °, they are made with a Bulgarian with a diamond disc. Spots are carefully sanded with sandpaper.
- Once the sealant has hardened, it is neatly leveled with a construction knife. On the prepared surface consistently lay parts of the plinth. On the inner and lateral parts of the corners, a spatula is applied by a spatula with a smooth layer of tile adhesive and pressed firmly against the edges of the bath and the wall. Excess glue is removed.
- Begin the fixing of the plinth from the corners. If there are rounded corner inserts, they are installed first. Then join with these elements on two parts of a border with right-hand and left-sided cuts. You need to do this with the maximum tight junction. In the same way, the other parts of the corner are attached.

Installation skirting from ceramic butt
- After the glue dries (after about a day), the protective tape is removed and the plinth is moistened abundantly for a more firm grasp.
- The next day they perform the final finishing - the seams between the elements of the plinth are filled with a trowel and ground.

Bath with ceramic corner
The border for the bath for a long time will retain an attractive appearance, if it is properly and regularly taken care of. Remove dirt and soap deposits with non-abrasive cleaning agents with a soft brush or sponge.
Sometimes doing repairs, we forget about some details, the completion of which then takes a lot of time and effort. And speaking of the repair in the bathroom, we should mention the timely closing of the joints between the wall and the bathroom. If the gap is not eliminated immediately, then when using a bath or shower, it will cause water to enter the joint, therefore, it will seep water on the floor in the room and destroy the finish. Therefore, so that you do not have to repair a room for a new one, experts advise you to use a corner on the bath and curbs that allow you to quickly and reliably seal the gap between the wall and the bathroom, as well as complete the interior of the room.
There are two types of corners for the bathroom:
- plastic;
- ceramic.
Both of them have their own specific features, which must be taken into account when choosing the way to close the gap. Let's look at each of them, their advantages and disadvantages, and also the ways of installation.
Corner bath
Plastic
The plastic corner on the bath is a profile strip with a length of 2.5 meters. Manufacture plastic corners from PVC (polyvinylchloride). This material is considered the most practical for sealing the joints near the bathroom, taking into account the features of the room:
- is not afraid of moisture and sudden changes in temperature;
- does not allow the fungus and mold to spread around the room;
- has an acceptable cost, which makes it popular with the general public.
As for the assortment, the manufacturers of plastic corners for the bathroom took care to satisfy customers as much as possible. Most often there are plastic corners 25 * 25 and 50 * 50 millimeters in size. This is very convenient, because it will allow you to install both a thinner bar that will not be practically visible, and use a thicker option if you have a big gap between the wall and the bathroom and the corner will become a kind of complement to the interior. There are corners both external and internal that simplifies a choice of the necessary model and without special efforts to make its installation.
In addition to the range, it is worth noting the good flexibility of plastic, which gives the master the ability to easily and accurately establish a corner on the bath. This is especially important if you close a gap near the bathtub with a wrong or round shape. You can also pay attention to models with rubberized edges that will more effectively prevent water from penetrating into the gap. They cost a little more expensive, but they give an excellent result.

Plastic Bathroom Corner
Installation
To date, there are two main options for installing a plastic corner and curb in the bathroom:

As for the design, the plastic corners on the bath and the curbs provide good tightness, preventing water from penetrating any finishing materials. And also guarantee the external appeal of the bathroom.
You can use a self-adhesive corner and curbs for the bathroom. But it is better to additionally treat them with waterproof sealant.
Ceramics
On the second place on popularity allocate ceramic corner for the bathroom, which refers to more durable and reliable materials when closing the slots next to the bathroom, compared to plastic. In addition, if your walls are tiled, they will be more beautifully combined with ceramic corners and borders.
Speaking about the advantages of ceramic corners for the bathroom, it is worth highlighting their hardness, which does not allow them to deform with time. In addition, ceramics are environmentally friendly and absolutely unaffected by water.
Regarding design, the ceramic corners for the bathroom are a beautiful component of the decor, breaking the surface into zones and adding accents to the color solutions, as if emphasizing or diluting this or that style. They do not lose color throughout the service and have a large assortment of ceramic corners and curbs for the bath. 
But among the disadvantages of ceramic corners can be identified that they do not tolerate mechanical damage, that is, they can split from a strong impact. In addition, ceramic corners and curbs are less plastic, which complicates their installation somewhat, especially with non-standard bathrooms.
Installation
Like the plastic corner for baths, the ceramic corner has two types of installation:
- under the tile;
- on the tile.
The ceramic curb is mounted on the surface of the bath, which is already exposed and fixed. As in the case with the plastic corner, the surface is well cleaned and degreased. Joint is sealed with waterproof sealant or cement mortar. After drying, the ceramic corner and curb are glued to a special glue for ceramics.

Installation of a corner for a bath
The work is done slowly and systematically to remove excess glue or sealant from time to time, arrange crosses for further laying out the tiles. It is desirable to tighten the corner tightly to the joint and level with the level so that the tile will later lie properly and evenly. So that later you do not have any distortions, and therefore, an ugly look, properly produce the styling and ceramic curb.
Then after 24 hours, when the ceramic curb is glued, you can gently remove the dirt and glue residue if they are left on the surface of the bath. In general, try not to initially use a lot of glue or cement mortar, so you do not have to tear off the dried up mass.

bath angle white
If there are any gaps between the ceramic curb and the bathroom (the wall), treat them with a sealant, so as not to break the integrity of the structure. And, of course, do not forget to treat the joints with grout or other special means.
Mounting the ceramic corner on the tile, occurs according to the same scheme as the plastic one. And you can do it yourself.
In any bathroom there is a rather complicated microclimate, that's why you need to choose the finest materials for repairing this room as carefully as possible, demanding. The lack of the ability to constantly ventilate the bathroom, a high level of humidity, frequent changes in temperature adversely affect the finish of all surfaces, which leads to their rapid wear. Therefore, during the repair it is important to take care of isolating all possible joints, gaps, where moisture can penetrate. And the most vulnerable place where dampness constantly occurs, mold is formed, an unpleasant smell, you can name the gap between the wall and the bathroom. To solve this problem, the masters attach a corner to the plastic bath. The installation of this useful element does not take a lot of time, but it is considered quite useful. Actually, how and where to use such corners, we'll talk in this article.
Types of corners for the bathroom
Before you learn how to properly install the plastic corner on the bath, you need to figure out what kind of things they are in order to pick up the best option for his home. In the people they are also called curbs, which are an inexpensive, practical tool that allows you to remove gaps between walls and fonts.
Important! More often such gaps arise due to the unevenness of the walls, the violation of the technology of bath installation or the discrepancy of its dimensions with the parameters of the room. They are made, as a rule, from polyvinylchloride, and they represent a usual bar in the form of a corner in width from 3 to 6 cm and length from 1,8 to 3 meters. Such curbs can easily be fixed independently with the help of liquid nails or silicone sealant.
There are such varieties of corners:
- Internal borders. This - the corners, which are installed in the process of facing the walls with tiled materials, and then on top of them the sides of the bath are mounted. Thanks to this design, it is possible to reliably isolate the joints between the wall and the bowl from moisture ingress.
- External borders. These are plastic corners, which are mounted on top of the bowl. In other words, these are the bars curved in the form of an angle of 45 degrees. Such self-adhesive edges do not allow water to penetrate between the wall and the bathroom, as all the liquid flows down them inside the container.
- Dismountable corners for the bathroom. They consist of two parts - an internal and decorative outer edge. Their installation is more complicated, but they perfectly protect against the formation of mold, moisture penetration.
Important! To choose specifically, what kind of waterproofing border is right for you, you need to rely on the peculiarities of the situation:
- If you need to seal a hole between the wall and the old bathroom, then get a better self-adhesive corner.
- For new plumbing are more suitable long-term collapsible sidebars, because how to fix the bath on the bath is necessary in this case in the process of performing repair work.
Advantages of the corners for the bath
Before the advent of specialized devices on the market to isolate the joints between the wall and the master's cup, we used tools, such as thickened oil paint or moisture-resistant cement. But, unfortunately, such measures were of a temporary nature, since we had to regularly re-cover the cracks.
Plastic corners have become a real salvation. They completely solved the problem of water leakage into the formed gaps. Their advantages include:
- Ease of installation. Even a person who does not know anything about repair work, understands how to install a corner in the bathroom. Indeed, fix it is simple, you just need to use liquid nails or sealant.
- Resistance to a changeable microclimate in the bathroom. Since plastic is a very practical material, it is not afraid of dampness, direct contact with detergents, water and mold. That's why these curbs are very long.
- Easy to clean. Such materials are absolutely undemanding in this respect - it is enough to wash the corners occasionally with a soap solution or a regular sponge.
- Reliability. Curbs do not allow water to flow into the gap between the bath and the wall due to its smooth construction, and thanks to this, the liquid does not stagnate in them.
Important! It is on the right choice of angle depends on how much you qualitatively seal the seams between the bathroom and the wall surface. To accurately avoid mistakes and avoid water ingress or splashing during the use of the shower, choose the sides 2-4 cm wider than the gaps themselves.
How to set a corner on a new bath?
So, you have purchased a new plumbing and bathing corners. How to install them we will consider further. Once a brand new bath is installed, you need to take care of sealing the joint between it and the wall before you start using it.
Materials for work
For installation of the sides you will need, except for themselves:
- sealant;
- painting tape;
- antiseptic;
- hacksaw or jigsaw.
We perform the installation as follows:
- The sides of the bowl that adjoin the wall must be carefully cleaned of dust and dirt with a sponge and soap solution.
- Now measure the distance from the side of the bath, corresponding to the height of the curb, then at this level we fix the paint tape, in order to protect the new finish of the walls from dirt.
- The boards of sanitary ware and the adjacent wall are treated with an antiseptic and degreasing agent, so that the corner is better adhered.
- Fill the sealant gap between the wall and the bathroom, let it dry properly for several days.
- Plastic corners using a jigsaw or a hacksaw are cut at an angle of 45 degrees of the right size, we apply liquid nails or sealant on them, we press them against the surface.
- The edges of the sides are closed with special plugs, we let the structures dry for a few days.
Important! Note that corner corners of 90 degrees serve no more than two years due to the fact that due to unsuccessful design they constantly accumulate water and develop a fungus. Over time, they darken, start to smell unpleasantly and raise unsanitary conditions. Of course, you can get rid of mold, but only for a while and the corner still have to be replaced.
How to install a curb on an old bath?
When the bath is operated for a long time, the joints between it and the wall, naturally, wear out, so they have to be re-sealed. Excellent for this plastic border, because its installation does not require dismantling the finish of the walls and does not spoil the appearance of the room.
In this case, you need to understand carefully how to fix the tape. The corner is mounted on the bath in this order:
- We dismantle the old corners with a knife or spatula.
- We remove from the joint old sealant. If you do this it will be difficult to use tools, then you can use some kind of chemical composition.
- Antiseptic means remove from the walls and sides of the bath mold.
- We clean the surface of dust and dirt detergent, and then - with alcohol, degreasing acetone or detergent containing acid.
- The joint is filled with a new sealant on a silicone base.
- To sealant does not hit the wall and the edges of the bath, you need to protect them with paint tape, and this is important not to spoil the decorative design of these surfaces.
- Use a jig saw or a knife to cut the corners and make sure that the joints are even, at an angle of 45 degrees.
- We put the sealant on the sides and tightly press them against the wall and the edge of the bath.
- Remove excess sealant can be a normal rag.
- It is necessary to put the caps on the edges of the sides.
Now you know all about how the installation of plastic corners on the bath, why to do it and how much it is profitable. We hope you have succeeded, you have seen that it is simply and inexpensively, and now your bathroom is in an ideal condition, in which there should be a main hygiene room in any house.
Why do I need a ceramic or plastic bathtub corner? What are these corners in shape and method of installation? Finally, how correctly to cut and fasten these products? In my article I will try to answer in detail the questions asked.
Why this is necessary
The main function of the corner (it can also be found under the name "plinth for a bath", "curb" or "ebb for a bath") - sealing its contiguity to the wall. The waterproofing of the bathrooms is not always ideal, and the puddle on the floor that flows down the wall during the shower, may well mean a local flood from the neighbors from the bottom.

In the case of acrylic and steel baths, the skirting board has one more function.
Here you need a little lyrical digression.
Still some two and a half decades ago in apartments the cast-iron baths were massively installed. Steel plumbing fixtures were produced, but not widely used.
Since the beginning of the 90s, the victorious procession of acrylic bathtubs began in the country: they attracted with the grace of form, considerable volume and the availability of additional functionality (on-board, hydro-massage, lighting, transparent inserts, etc.). Steel baths also became popular: they attracted a decent appearance and a very democratic price, which was very useful against the backdrop of problems in the country's economy.
Quite soon it turned out an unpleasant feature of both devices: due to their low weight (20-40 kg versus 96 -140 for cast iron baths) they have exceptionally bad stability. Sitting or leaning on the side, it is possible to overturn the bath or at least to displace it against the wall.

The problem is completely solved by installing the bath on the frame, propping its sides along the perimeter. However, this frame is unpopular among producers because of the relative high material consumption and, consequently, the cost of production: in this sector, the market primarily requires cheap plumbing.

A tiled or PVC skirting board glued between the wall and the shelf of the bath reliably fixes the device. It does not allow it to tip over with a vertical load to the far side of the wall or to move away from the wall under a horizontal load.
What are the plinths?
Ceramics
Ceramic (tile) plinth has a section in the form of a sector of a circle or a rectangular triangle with a slightly concave hypotenuse. Usually it is completed with inserts for the corners between the walls.
Clinker reflux differs from it only in the temperature of burning ceramics: it reaches 1400 degrees. This ensures a high density of sintering of the clay particles and, as a result, a high fracture toughness and resistance to mechanical wear.

However: ordinary ceramics, too, serves in the bathroom environment indefinitely.
Plastic skirting board
Another type of plinth - plastic on the tile. It is often hollow inside, made of polyvinyl chloride (cheap and chemically resistant plastic) and can be attached to both glue and mounting tape. In the latter case, the tape is preliminarily attracted to the wall by screws; the skirting board body is fixed on it with simple latches.

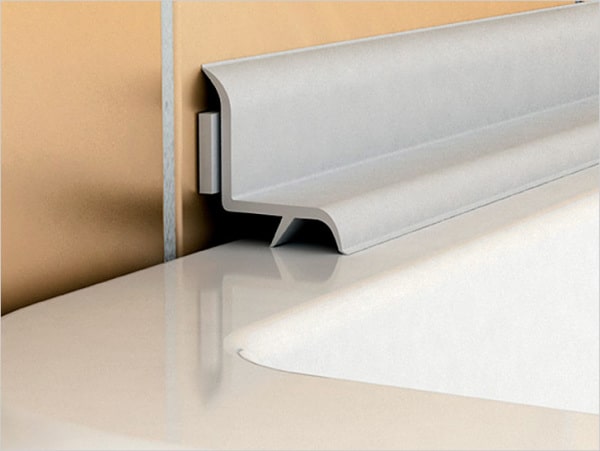
Plastic corner
To seal the abutment, the corner itself can also be used - as intended especially for baths and shells (it is easy to recognize by flexible curved edges, ensuring maximum tightness of the junction to the tile and bathtub shelf), and ordinary decorative - internal or universal.

Plastic curbs are often sold with an adhesive layer applied. Plastic self-adhesive corner for the bathroom, glued to the tile, does not provide a complete tightness of the connection: water will inevitably flow into the vertical seams between the tiles.
Installation
Ceramics
How to glue and how to install a ceramic corner for the bathtub against leaks?
Here is the instruction:
- For installation is used silicone sealant. It is worth choosing a quality silicone from a famous manufacturer (Ceresit, Moment): inexpensive sealants do not have good adhesion to smooth surfaces;

Use a transparent sanitary sealant. Unlike the universal, it includes in its composition antiseptic additives that prevent the appearance of mold. It is the transparent silicone that I advise because it, unlike the white, does not darken with time.
- The surface of the shelf of the bath and tile is cleaned of plaque, spray and rusty stains. I use for this purpose "Belize" or any other means based on sodium hypochlorite: it is effective and safe for bath enamel;
- Then, adjacent surfaces are washed with water and dried;
- The sealant is applied to the flat surfaces of each plinth, after which it is pasted between the bathroom and the tile. Extruded excess silicone is removed immediately, before it freezes;

- Seams between adjacent elements of the tide are filled with the same sealant. In order not to spoil the surface of the ceramic, do not be too lazy to paste a couple of strips of paint tape along the edges of the seam;
- For cutting ceramics, I advise you to use a grinder with a diamond disc. It cuts much faster than the abrasive, does not burn when cutting and gives much less dust.
Plastic skirting board
How to cut off the plastic plinth, leaving the edges smooth and without burrs?
And in this case you will need a Bulgarian, but now with an abrasive disc (on stone or on steel - it does not matter). It gives a perfectly flat cutting line and allows you to adjust the dimensions of the segment to within a fraction of a millimeter.

Cut plastic with open windows or in a gauze bandage on your face. Plastic dust for a long time hanging in the air and not so useful for the lungs.
How to install a plastic tide with a mounting tape?
- The tape is separated from the plinth;
- Its position is marked in such a way that the bottom of the skirting board is tightly pressed to the side of the bath;
- In the tile and wall holes are drilled in steps of no more than 25 - 30 centimeters. Tile should be a special feather drill on the glass and tiles; it is drilled at low speed and with constant wetting of the drill bit. Holes in the wall under the dowels are made by a perforator with a drill a diameter of a millimeter smaller than that of the hole in the tile;

- In the holes, plastic dowels are driven, after which the tape is screwed to the wall with stainless steel screws (galvanized or brass). Black (phosphated) screws can not be used: they will quickly decorate the sides of the bath with rusty streaks;
- The plinth is snapped on the mounting tape;
- Clearances in vertical seams between the tiles are filled with silicone.
How to properly glued plinth without a mounting tape? Than to glue it to the tile and bath?
And in this case, we will save the silicone. Quality sealant has excellent adhesion to PVC. It is applied by two strips on the wall and the shelf of the bath, after which the plastic reflow, cut to size, is pressed against the joint and fixed by any loads for 15 to 30 minutes before setting the sealant.
If you apply the sealant to the skirting itself, with its label you will necessarily stain the walls.

Plastic corner
How to glue to the joint of the bath with a wall universal or inner corner of PVC?
Just like the plinth. There are only a couple of nuances:
- For cutting a universal angle, it is more convenient to use a conventional scissor than a Bulgarian;
- It is better to fix the corner before grasping the sealant, not by several loads, but by one pressing it along the entire length - for example, a bar, a bar, a board or a steel corner.
Without skirting board
How to make an abutment to the wall sealed without a skirting board?
If the wall is not too curvilinear, simply lay a tiled apron above the bathroom already after its installation. The gap between the bottom edge of the first row of tiles and the side of the bath should be minimal. After the tiles are stitched, the seam between the bathroom and the wall is completely filled with sealant.

Sealant can also be used for tile gluing. I used a transparent sealant for labeling the apron over the bathroom, as well as for filling the joints between the tiles. Finishing retains a completely decent appearance almost three years.

The final question is whether the light bath with this method of sealing?
From the displacement of the nearer to the side wall, it is held up by the lower edge of the tiled apron.

How to prevent the bead shift down? Elementary, Watson: enough to build and fix to the wall any supports.
I used for this purpose dragged to the wall racks of thick (15 mm) plywood; with the same success it is possible to fix under the side of the bath a steel corner with a width of 30 - 50 mm.

Care
After some time in the area of the adjoining of the bath to the wall, lime scale, rusty streaks, dried soap of soap and shampoo inevitably appear.

How to remove them, without violating the tightness of the connection and without damaging the skirting board?
I advise you to use for the care of the bathroom, tile and tile all the same "Belize". At a price of 20 - 30 rubles per liter, it effectively removes any contamination, without damaging the plastic and enamel.
How to use this tool? Very simple:
- "Whiteness" is applied to the contaminated surface with a soft sponge;
- After 5-10 minutes it is washed off with the same sponge and water from the shower. If necessary, the treatment is repeated.

Cleaning and bleaching agent "Whiteness".
Can I use abrasive cleaners to clean the curb?
The fact is that the abrasive will inevitably leave small scratches on the plastic corner. After becoming rough, its surface will begin to collect any dirt much faster.
Ceramics are much more resistant to mechanical wear; by itself, it is not afraid of cleaning with a fine abrasive. However, the abrasive will inevitably damage the sealing of the joints with silicone, which may well lead to the appearance of leaks.
Conclusion
I hope that I managed to answer all the questions that have accumulated in the distinguished reader. As always, you can learn more about the video by reviewing the video in this article. I will appreciate your additions and comments. Successes, comrades!
September 2, 2016If you want to express gratitude, add clarification or objection, something to ask the author - add a comment or say thank you!
If you decided to make a cosmetic repair in a sanitary unit and replaced the outdated plumbing fixtures with a new one, then it's time to think about how to perform a frame in the bath.
Of course, you can do without it, but you need to remember that water is the main enemy of many finishing and building materials.
Without the use of specialized materials and devices it is not easy to make the joint between the wall and the bathroom entirely impermeable.
It will always get water, in consequence of which, under the bathroom there will always be dampness, mold may appear, a nasty scent will appear.
Types of curbs for bath
There are 3 main types of boarders for the bath:
- Plastic
- Ceramic
- Tape
Consider in detail the shortcomings and superiorities of any of these types.
Belt variations

If you need to remove the gaps between the bathroom and the wall or the sink instantly and at a low cost and give the room a wonderful view, then the curb tape is great for this.
But do not forget that this curb will serve you no more than 2 years, and therefore this option can only be analyzed as a short-term one.
These tapes have a thickness of about 2 mm, are available in different widths. High-quality curb tape has excellent properties of operation.
It is made of polyethylene or an elstomer. One side is covered with butyl glue. In the composition many curbs tapes have fungicides, which protect the bathroom from the formation of fungi and mold. This curb completely water does not pass, it does not crack, it is easy to use, and thanks to the plasticity it can be bent at any angle.
Features of installation work
Of course, in the first place, it is necessary to purchase a curbstrap with the required width. To avoid miscalculation, measure the widest gap between the wall and the bathroom. And so, the tape is purchased, where to start, how to paste a border on the bath?
Consider all the steps of the work and their distinctive characteristics.

If you do everything right, you will get a beautiful view of your bath.
Curbs from plastic

This is the most common and economical option. In each building shop a wide range of different plastic borders is offered. To strengthen such details it is possible and under a tile, and from above it.
Picking up a similar option, you need to think about what to put a plastic corner in the bath.
It is much better to use "liquid nails". Also, a specialized silicone adhesive is excellent.
To install curbs of plastic, you do not need to have any specialized skills in construction. In addition, they are inexpensive, but there are quite a few ways of different colors and sizes.
This all performs plastic corners with enough material popular to cover the slots in the bathrooms. Acquiring this curb, it is necessary to think about how to stick a corner on the bath, and more specifically to the wall: under the tile or on top of the tile.

Consider what kinds of plastic curbs there are.
They are made in the form of corners and plinths. Two options are excellent for securing the connection between the wall and the plumbing. Borders in the form of a corner profile can be installed both on top of the tile and under it.
If, for example, you pick up a skirting board made of plastic, then it is placed only on top of the material for the cladding.
Now the manufacturers began to release curbs with rubberized edges. This makes it possible to make the sealing more reliable. Together with the profiles themselves, you need to purchase all the necessary components (stubs, corner components)
Features of installation work
If the walls in the sanitary unit are tiled, then there are two options for fixing the curb:
- Under the tile
- Above the tiles.
Which option to choose and how to paste a plastic corner on the bath?

Of course, the first option should be used if, together with the installation of plumbing, curbs, it is assumed and wall decoration with tiles.
The tile will lie on top of that half of the corner, which is fixed to the wall.
This is enough work requiring great work, requiring great abilities.
And so if you picked up such an option, it's better to ask professionals. Priority of such fasteners is considered sufficient great hydroprotection : water in this version definitely does not leak.
But if you have to change the border a couple of years later, you can only do this by dismantling the tile over the bathroom.
The second option is much easier. If the walls are already lined with ceramic tiles, then everyone will manage with the task of gluing a border to the bath. In this version, you need to start by cutting a plastic corner or a baseboard into parts along the length of the bath.

It is best first of all to "measure" these pieces to the opening and to circle them with chalk or a pencil. Then glue the tape on those parts of the wall and bath, where the glue should not get.
This will greatly simplify your further work. Of course, the surface must be ready in advance (as in the version with curb tape). Than to paste a plastic corner in a bath and a wall?
Much better suited "nails liquid": this is one of the most reliable option. If the gap is large enough, pre-seal it with sealant or foam for installation.
When it is dry, apply glue on the back surface of the corner and press it against the wall and the edge of the bath for 20-30 seconds. When the part is glued, it will be necessary to install the component parts and remove the repair tape.

In the apartments of our time, PVC panels often are used instead of tiles in the form of a material for finishing.
Consider how to paste a border of plastic on the bath, if you have this case. In this version, it is better to pick up rubberized border.
Panels are also usually placed both on top of the corner, and under it. If the distance is large, then you can "zoom in" the wall with the help of a repair profile, to which the panels will be installed.
And then the corner can be put on top of the panels. Here, in place of a corner, you can also use a plinth made of plastic, just do not forget to seal the seal with a special sealant. After all the work is done you need to leave your bathroom for a day. Only then you can safely apply it to the destination.
Now the question of how to paste a corner on the bath will not cause you any difficulties.
Ceramic bordurchers

More recently, ceramic tiles were an important finishing material for plumbing units. And if there was a gap between the wall and the bathroom, you had to invent how to make a curb in a bath of tiles.
It was quite difficult and hard work: I had to cut small squares from the tiles, from which the slope from the wall to the bath was formed.
If the work was done on the conscience, then the effect was absolutely decent. Now there is no such need.
In many shops for construction when you buy a tile for the toilet you can immediately recommend and favorable ceramic curbs. But often they can be purchased separately. When selecting such a frame, you need to work hard so that the border is combined with the color of the tile itself.
In an exceptional case, you should choose a curb white color, then merging with plumbing fixtures, it will not break out of a single design.

In fact, all products made of ceramics are considered strong enough and hard.
And therefore, of all the options that are considered, ceramic bordurks will especially serve for a long time, they are virtually not subject to deformation and are used without replacement for many years.
But you need to remember about the disadvantages of this option: it has little resistance to mechanical damage, i.e. with a strong impact such an object can be pricked.
In most cases, this kind of trouble happens when installing ceramics, and already delivered curbs to their own hardness add mechanical strength to walls and baths and are not actually vulnerable.
Working with ceramic components requires specific skills, and therefore the best option is to entrust this process to specialists. If for example you personally agreed to take this case, then it will be useful for you to read how to execute a border in bathroom from ceramic profiles (or skirting boards).
Features of installation work
For work you need to purchase the required number of pieces. Buy borders with a margin (in case of damage), and even calculate how many elements of the angular type you need. You will also need a specialized glue for tiles (it must be necessarily waterproof), sealant and grout.
All work consists of several stages:

Any of these types of bordurists have both their own superiority and bad qualities. Choosing the option for yourself, consider the entire interior of your bath. On any, having issued a bath with the help of a border, you give it a complete and beautiful view.