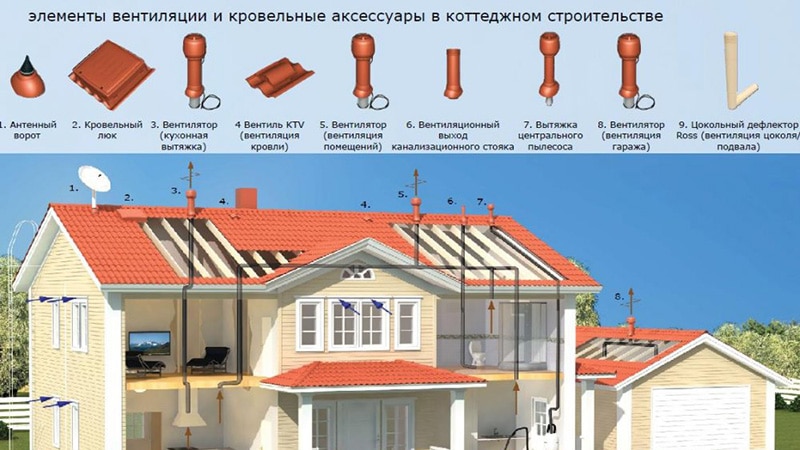
Sewer riser: design, subtlety of the device and operation. Why do you need a pipe for sewage?
Please note: if at the end of the sentence the number in parentheses is indicated is the number of the corresponding paragraph of PO 30.1330.2012 "Internal water supply and sewerage". This document is an updated version of the relevant SNiP. If a certain standard is established SP 31-106-2002 "Design and construction engineering systems single-family houses ", this will be clearly stated.
Stoyak is the main element of the internal sewerage network. The main task of the riser is the collection of sewage from the floor tap and their removal to the horizontal collector.
Selecting the location for the riser
In urban apartments the riser is installed during the construction of the house - usually in the corner or at the back of the bathroom. It can not be carried.When building a private house, the site for the riser is selected as part of the creation of projects internal sewerage. When choosing a location, remember that:
- the laterals shall be as straight as possible (8.2.2);
- the riser should also be as straight as possible, but it is also possible to create indentations (horizontal displacement of the riser) under certain conditions;
- a riser made of polymer materials (pipes PP, PVC, HDPE, PVD) must be hidden inside the shaft or the box, the walls of which are made of non-combustible materials (except for the door that provides access to the riser.) The door is made of material of the combustibility class not lower than G2) 8.28);
- in the cellars, where there are no production or storage facilities, in the attics and in the bathrooms the risers from the polymer pipes can be located openly;
- not allowed open installation risers in living quarters.
Spacing of the riser
It should be remembered that:
- the horizontal offset of the indentation should not be more than 1 m;
- to create an indent, taps with an angle of no more than 45 ° should be used;
- the diameter of the indentation bends should be no less than the diameter of the vertical pipe.
If the horizontal offset of the indentation should be greater than 1 m, or the angle of retraction should be greater than 45 (this is hardly possible with the creation of sewerage in a private house, but who knows), the speed of water movement in the site of indentation should be not less than 0.6 m / and the riser below the indentation should have a diameter comparable to the diameter of the horizontal manifold.
The installation of indents above the taps is undesirable, but is allowed if:
- the downstream portion of the riser can operate as a non-ventilated part;
- located below the indentation, the riser section is equipped with a ventilation duct or venting valve (8.2.3).
Sometimes indenting is created to reduce the flow rate and noise level. In this case, the indentation should look like this:
Choice of riser pipe
Information on pipes of different types can be found in the corresponding section. Most often, polypropylene pipes are used.
It is also important to correctly determine the diameter of the riser. The capacity should be sufficient to simultaneously drain the drains from all connected floor tap. To calculate the risers of multi-storey buildings with a large number of connected devices, a complex formula is used. For a private house, you can use a simplified calculation algorithm that takes into account only the total consumption of effluents from different appliances. .
Ventilated and non-vented riser
Sewer gases are constantly accumulating in sewer systems. They can be toxic or explosive, and even foul-smelling - for sure. To ensure that these gases do not enter the premises through receivers, sanitary and technical devices are equipped with hydraulic closures. The shutter is the bend of a pipe inside which water is located. Water does not allow gases to enter the room.
With intensive passage of sewage into the riser, a vacuum is formed in it. If the rarefaction exceeds the threshold, the water from the water seals will be drawn into the riser - a so-called stall will occur. Sewage gases, without encountering water, will freely enter the room.
Avoiding rarefaction at the same time to ensure the diversion of sewage into the atmosphere allows the installation of a ventilation or fan tube. The pipe is a continuation of the riser - it is removed to the roof. The stand with the fan pipe is called ventilated, without fan tube - unventilated. An unvented riser is also considered a riser equipped with a vent valve or a group of 4 or more risers that are connected together from above by a common pipeline without an exhaust part. The term "fan riser" is generally used as horrible.
The exhaust part of the riser is discharged through the roof or through the ventilation shaft. Height exhaust pipe above the roof should be:
- on flat and pitched unexploited roofs - not less than 20 cm;
- above the edge of the ventilation shaft - not less than 10 cm;
- on exploited roofs - not less than 3 m.
In addition, the distance between the opening windows or balconies and exit vent pipe should not be less than 4 m.
The diameter of the riser vent pipe should be equal to the diameter of the main pipe (8.2.16). If the exhaust pipe unites several risers, its diameter should be equal to the diameter of the largest riser from the combined group (8.2.17).
When laying in unheated attics, the exhaust pipe must be insulated.
Important: it is forbidden to install deflectors deflecting the draft in the mouth of the exhaust pipe of the riser - it will freeze in the first frost.
If you can not install a ventilated riser, you can make it unventilated. Installation of non-vented risers is allowed if:
- the ventilation mode of the external sewerage network is maintained;
- the second drain rate does not exceed the capacity of the unventilated riser of the corresponding height (see data on the capacity of unventilated risers in the reference materials).
The storey of the building does not play a role, although the old version of SNiP had slightly different requirements (SNiP 2.04.01-85). However, I strongly recommend to establish a normal ventilation riser.
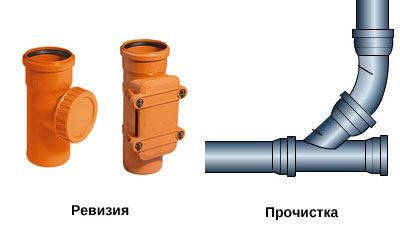
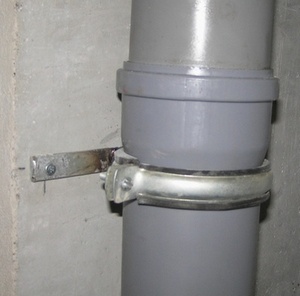
The unvented riser should end with a revision or a cleaning hatch.
Installing Revisions
Stands should be equipped with revisions. Audits should be installed in the upper and lower floors (8.2.2), and at a height of more than 5 floors - every three floors (8.2.3). If the riser is indented, there must necessarily be a revision on the floor, which is located above the indentation of the riser. In a one-story private house, one revision will suffice, in a two-story house too (on the second floor).
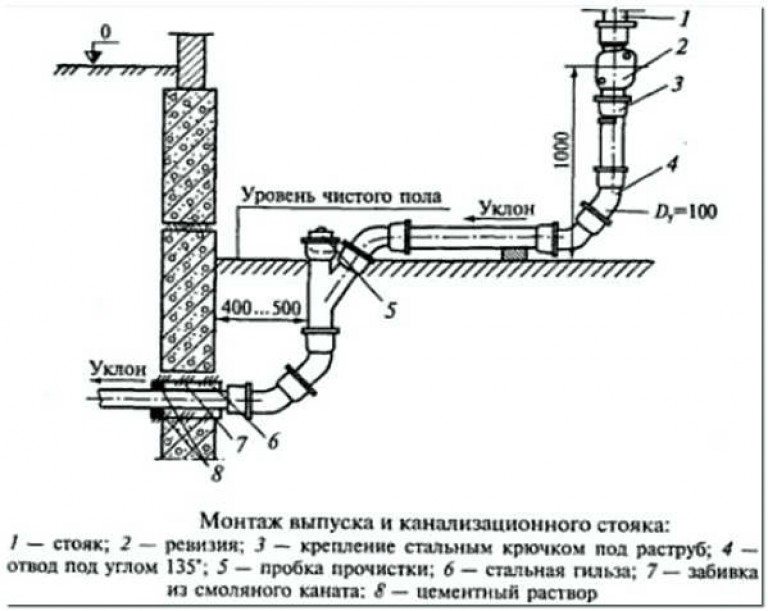
The audit is located at a height of 1 meter above the floor. The floor outlet should be under revision. The distance between the connection point and the revision is not less than 150 mm.
How to properly install a riser in a private house:
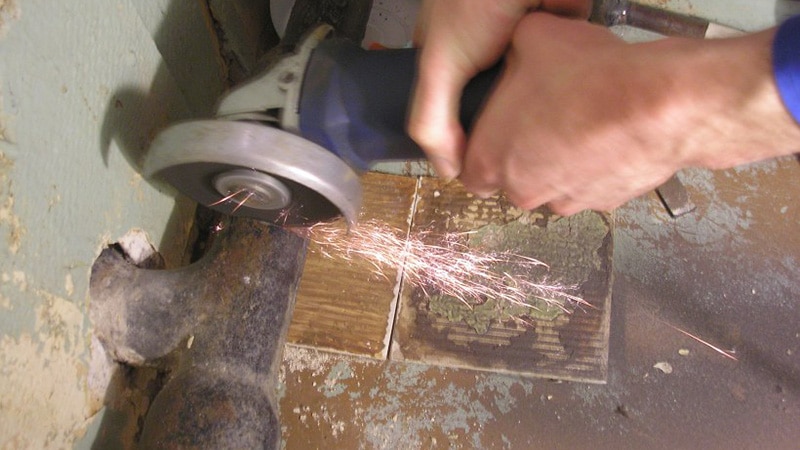
- We prepare the site: create openings in the floors and roof. If the polypropylene riser is to be embedded inside the wall, it is also necessary to do the necessary shtroby.
- We prepare the necessary components. You will need pipes with oblique tees and crossings, as well as inspection elements. It is better if the crosses and tees will have an angle of 45º - this will increase the throughput of the riser. If necessary, it is allowed to use straight frogs, but only in a vertical plane.
- Trial installation of the riser. The riser is going from bottom to top, and is assembled according to the current of the water - the socket of each piece of pipe must be on top. In this case, the joint will not interfere with the movement of waste water. Remember, that:
- the riser should be located strictly vertically with a deviation of no more than 2 mm per 2 meters of the riser length;
- it is inadmissible to place the joint of pipes in the passageway through the roof;
- the distance between the funnels and the wall must be at least 20 mm.
- After assembling the riser we mark the places of the funnels on the wall and determine the fixing points of the yokes. Stands are attached to the wall under the sockets. The distance between the yokes is no more than 4 meters: thus, at least one yoke must be located on each floor.
- If everything went well, you can start drilling holes for fixing the clamps. It is recommended that you first disassemble the riser.
- The final installation of the sewer riser. We collect the riser, connect the floor lateral bends, check the verticality of the structure. If everything is good, fix the pipes with clamps, constantly controlling the verticality.
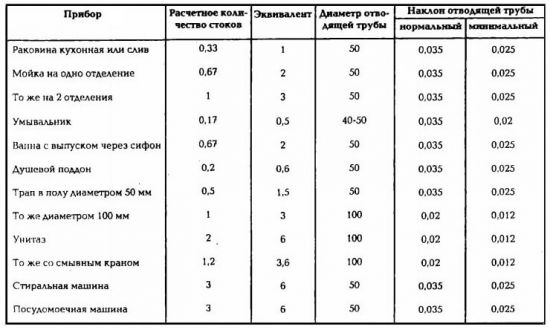
On the clamps for riser and noise insulation
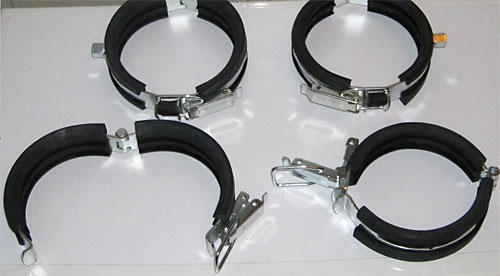
A significant part of the noise from the operating sewer pipe is associated with the transmission of vibration to the walls through the pipe-retaining clamps. To solve this problem it is possible, using a damping collar with a rubber insert.
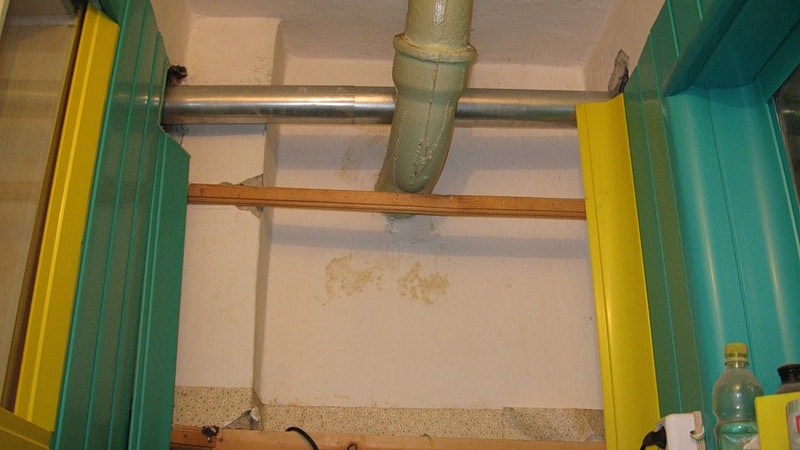
Passage of the riser through the floor
As already noted above, there should not be joints at the site of the riser through the floors. For obvious reason - the leak in the riser often occurs through the joint, and if it is inside the ceiling - this is a problem.
After installing the riser, the passage through the overlap is cemented with cement over the entire thickness of the overlap (8.2.8). In addition, it is necessary to protect the lower part of the riser by concrete to a height of 8. 10 cm. The thickness of the concrete layer is 2 ... 3 cm.
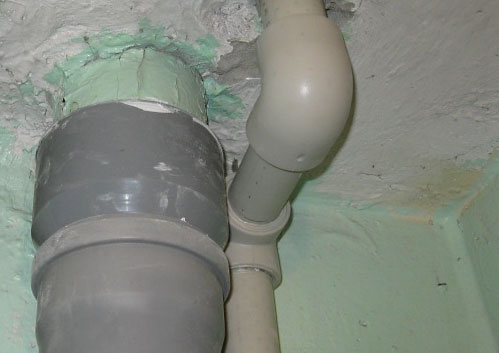
Before embedding the riser with concrete, it is necessary to wrap the pipe with a roll-on waterproofing material. In the waterproofing protection there should be no gaps.
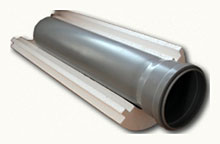 Noise isolation of the sewer pipe
If you are concerned about the noise of the riser, you can use a polyurethane foam or a foam plastic shell. Polyurethane foam is more expensive, but its flexibility makes it possible to effectively isolate curvilinear pipe sections. The foam plastic shell is suitable only for straight sections, but it is noticeably cheaper. In addition, it is very easy to work with a foam soundproofing device for pipes - it is applied, snapped, fixed with adhesive tape.
Sewer riser passage through the roof
The ventilation part of the riser must be taken out to the roof. For passage through the roof, standard roofing can be used. The choice of passages for pipes with a diameter of 100, 110 and 150 mm is great - there will be no problems with the purchase.
The work itself is carried out in the following sequence:
- we remove thermal insulation in the place of the supposed passage through the roof;
- we are looking for a section between the elements of the crate and mark the middle of this section;
- drill a through hole of small diameter in the place of the supposed output center;
- we move to the roof and cut out a hole in the roof of the desired shape (use the stencil);
- we impose sealing element of penetration on the roof and adapt it to the relief. The element easily bends, so that it can be pressed tightly even to the roof with a complex relief;
- we fix the sealant with the help of non-zero sealant and self-tapping screws. The distance between the screws is 3 ... 4 cm;
- if the axes of the sewer outlet and the main element of the ventilation pipe slightly do not coincide, we attach a special corrugated tube to the sewage outlet. If the discrepancy is significant, it will be necessary to mount an inclined element;
- we attach roofing to the sealing element. The method of attachment depends on the design of the penetration.
Pay attention: the external elements of the ventilation pipe must be inclined. The minimum inclination is 2 cm by 2 m in length. This is necessary to ensure that the condensate freely slides down and enters the drain.
- insert the sewage outlet into the tunnel and fix it. The output must be strictly vertical;
- return to the attic and attach to the hydrolysis sealant seal (supplied with roofing penetration);
- we connect the corrugated tube or the outlet of the sewer pipe with the fan pipe by means of a clamp.
And very good video about the riser through the roof
In the previous publication, we considered sewage pipes , which are used in modern construction for the installation of sewerage networks. As you now know, pipes differ in material and diameter, and can also be used for external and internal laying.
In a brick bath with a large enough area, a washbasin can be installed in the relaxation room, where you can rinse the cups after tea, wash the dishes or hands. Also in the bath can be allocated a premise for a toilet.
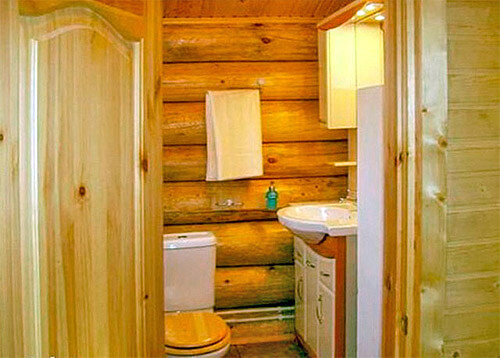
In this case, you need to think about how best to compose all the rooms that have plumbing equipment, which you want to connect to the release.
Pipes for the sewerage of the bath do not differ from the sewer pipes in the private house. However, in the case of the installation of monolithic floors with sealing in them of the discharge pipes, it is better to stop the choice of cast-iron pipesah, differing in durability and very high mechanical strength. With the correct mating of the funnels, cast-iron pipes will last for more than a decade.
Polymeric pipes that are laid with a buried floor can be deformed under the influence of a high temperature of waste water or, over time, the sealing rubber rings in the socketed areas can dry out, leading to leaks, wetting and gradual destruction of the floor structure.
Piping - schemes
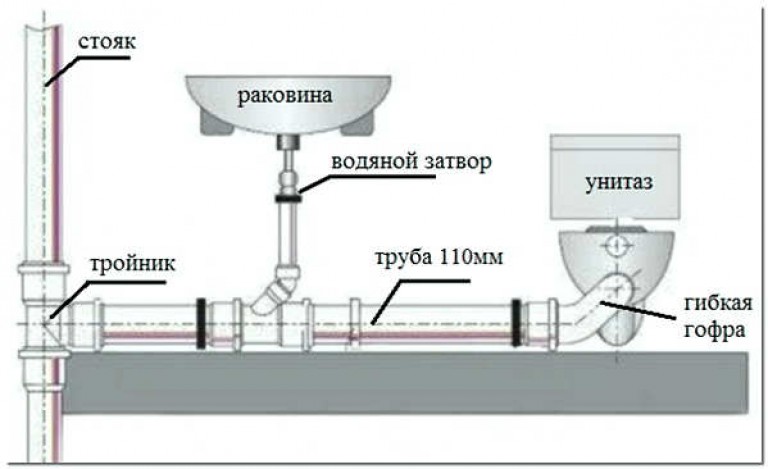
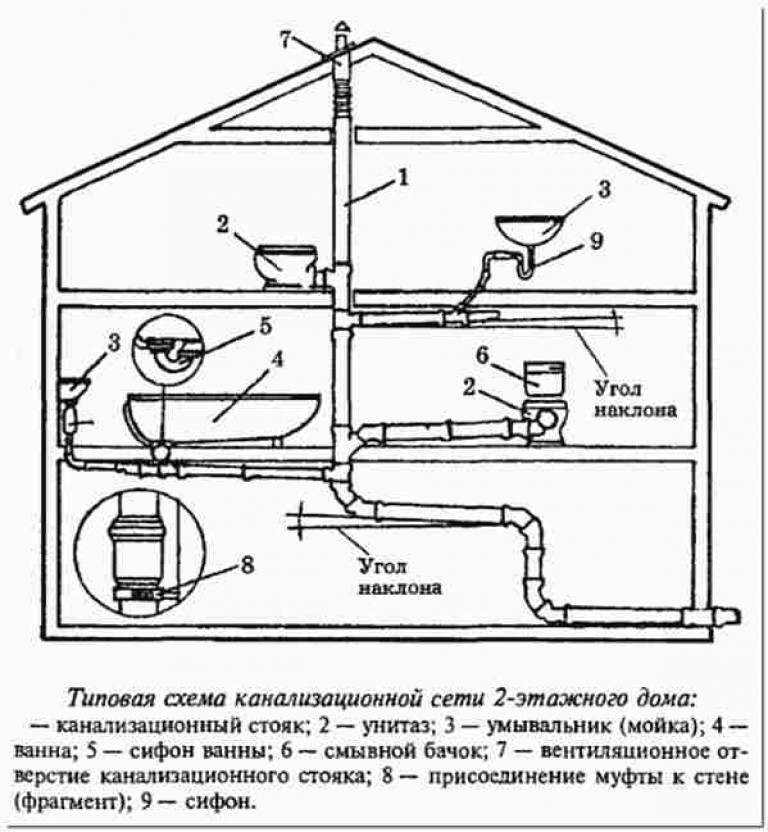
Internal distribution of pipes in a bathroom in an apartment, in a private house or in a bathhouse is made in such a way that the location of the sinks, washbasins, toilet bowl, bathtub and other appliances is as compact as possible and the length of the horizontal sections of the sewage system is minimal.
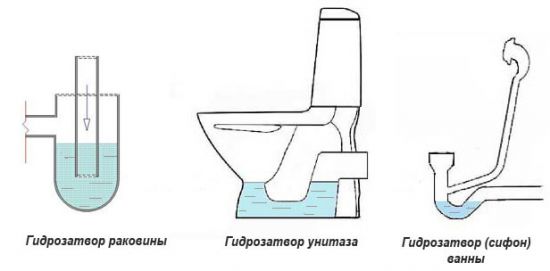
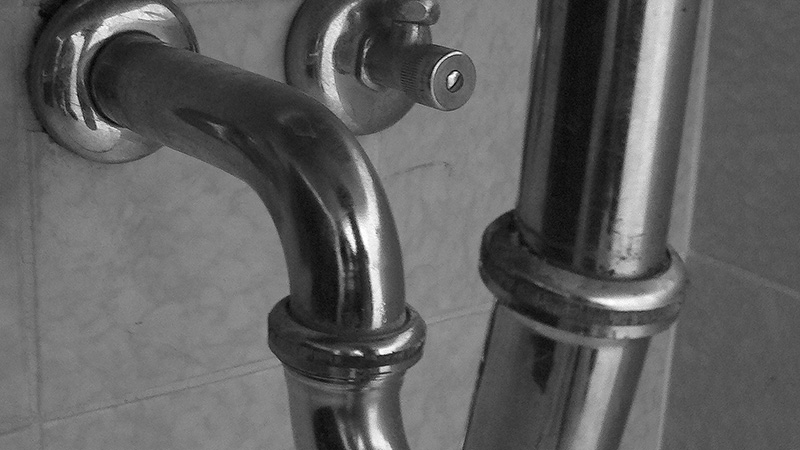
All plumbing equipment is connected to the sewage system through a hydraulic lock (water lock) - a curved part of the pipe in which, after the descent of water, there is some liquid that prevents penetration into the interior of the stench from the sewerage. In another way, the hydraulic seal is sometimes called a siphon.
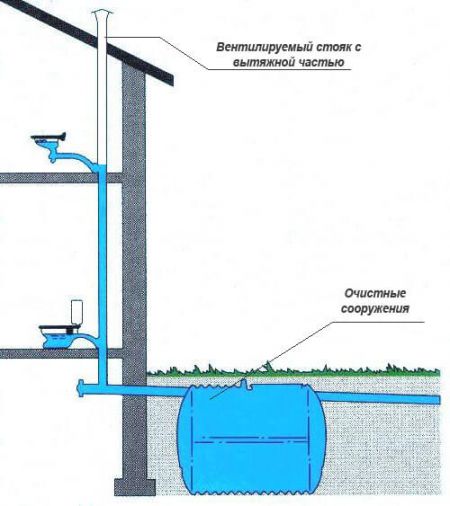
Sewage is sent by the discharge pipes to the collection manifold and subsequently to the sewer riser.
The sewerage stand is a vertical pipeline, into which waste water is collected from different floors and transported down to the outlet to the external network.
The riser can not have a diameter less than the diameter of the discharge pipes of sanitary devices attached to it.
The exhaust part of the ventilated riser is lifted above the roof to a height of at least 30 cm from the unexploited flat roof or 50 cm from the unexploited pitched roof.
Stretching the riser should be located at a distance of at least 4 meters from the opening windows, balconies or windows.
The exhaust part of the riser serves for ventilation of gases accumulating in the sewerage system, and also facilitates the free passage of waste water in the pipes without disrupting the hydraulic locks connected to the sewage disposal system of sanitary devices.
If the communication with the atmosphere is not ensured by the pipe, the discharge created by the motion of the liquid along it will lead to a "sucking" of the liquid from the hydraulic locks (the so-called "breakage of the hydraulic locks"). After that, all harmful gases from the sewerage system through the broken water locks, in which there is no water, begin to flow unhindered into the internal premises.
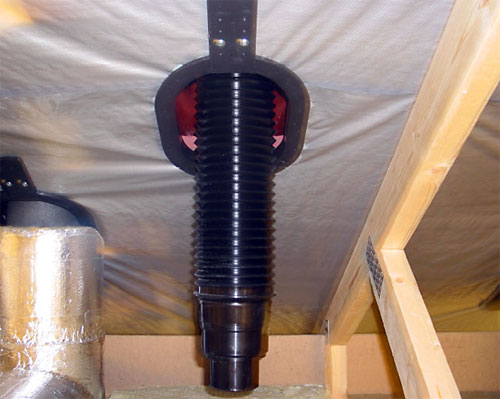
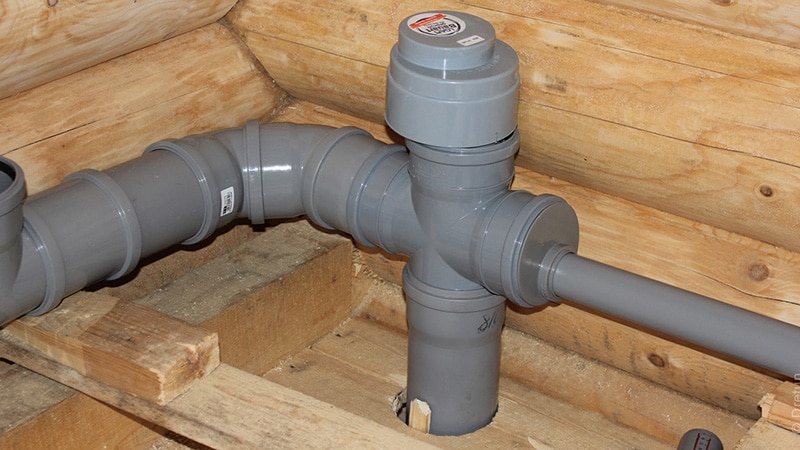
If it is not possible to remove the riser above the roof, a special vacuum valve is allowed to connect to the atmosphere at the upper end of the riser.
![]()
Such a valve operates according to the principle check valve - When draining the sewage system, the atmospheric air enters the riser, and at the same time it prevents the gases from entering the room from entering the room.
What are vacuum sewerage valves you can see in the video below:
The furthest from the riser are the sinks and washbasins, and in the immediate vicinity of the riser the instruments having the largest diameter of the outlet are mounted. As a rule, toilet bowls are installed next to the riser.
Because of the need to observe the minimum required slope, horizontal sections within the interior try to make as short as possible.
That is why when designing the layout of the premises is chosen so that the bathrooms and bathrooms are at a minimum distance from each other. You probably noticed that usually the layout is done so that the bathroom is located across the wall from the kitchen, and all plumbing equipment joins one riser.
Only in rare cases, when it is impossible to do this because of the need to comply with other norms of architectural design, the apartment may have two sewer risers.
If the house has more than one floor, then the bathrooms are designed one above the other, as well as kitchens or bathrooms.
Installation of audits and cleaning of sewers
In accordance with the requirements of SNiP 2.04.01-85 * "Internal water supply and sewerage of buildings" for the convenience of maintenance of the drainage network on it should be provided for the installation of audits and cleanings.
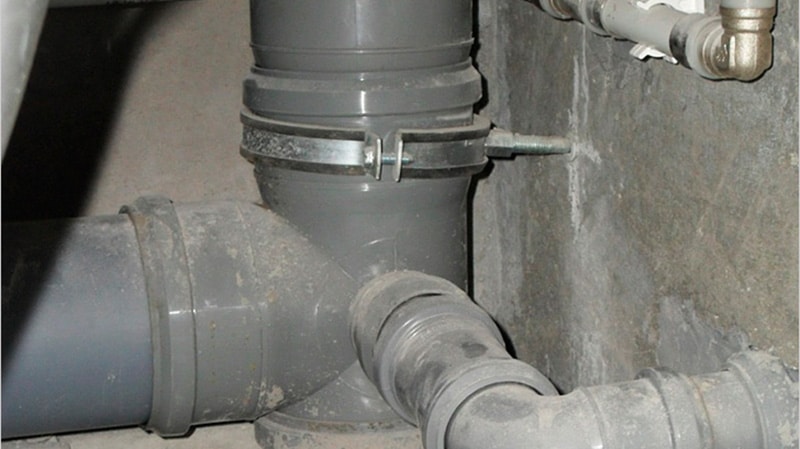
The inspection is a shaped element of the pipeline installed on the sewer riser and having a hatch fastened to the body by bolts with nuts or threaded cover:
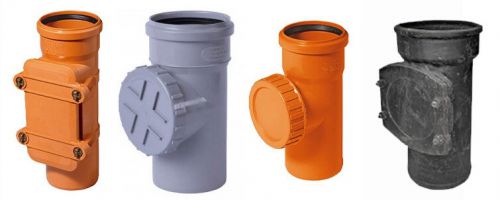
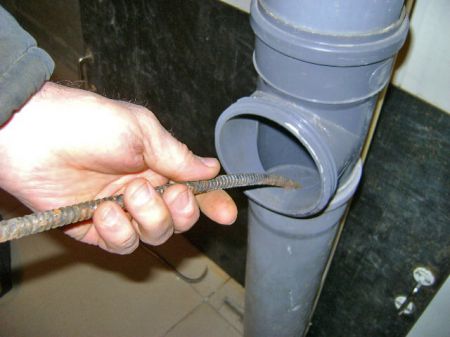
In the case of blockage, the revision cover is unscrewed and the sewage system is cleaned through a formed hole with a plumbing cable.
Audits on sewer risers are installed on the first and last floors of buildings (but not less than 3 floors) at a height of 1 m from the level of the clean floor.
Also, audits must be installed over any indentations of the riser.
If the riser is supposed to be closed with a box, care should be taken to install a special hatch in the box opposite the revision to ensure easy access to it if necessary.
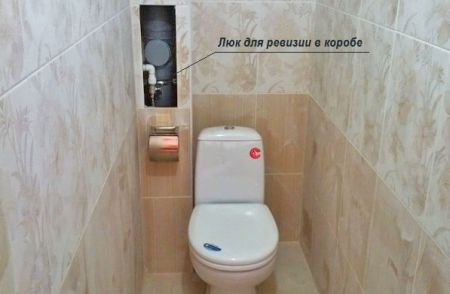
In accordance with the requirements of SNiP 2.04.01-85 * "Internal water supply and sewerage of buildings" the size of such a hatch is recommended to be 30x40 cm. But this size can be different if unrestricted access to the audit is provided.
Cleaners are placed on the horizontal sections at the beginning of the sections (in the direction of movement of the wastewater), and also when the direction of the pipeline is changed, if it is difficult to clean it without installing a cleaning device.
The cleaning can be installed in the form of a special fitting, but any tee or branch with a plug at the end can be used in its quality.
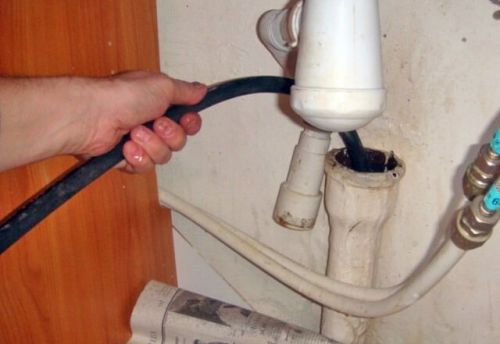
As a cleaning, tees are frequently used in the places of joining shells, washbasins or other plumbing fixtures. In this case, to remove the blockage from the sewage pipe take out the corrugation coming from the shell, which is connected upstream along the flow path, and a plumbing cable is inserted into the released hole.
In table 6 of SNiP 2.04.01-85 * "Internal water supply and sewerage of buildings" the following regulatory distances between revisions and cleanings are indicated, depending on the nature of the drains and the diameter of the pipelines:
|
Diameter of the pipeline, mm |
Distance, m, between revisions and cleansing |
Type of cleaning device |
||
|
industrial uncontaminated |
household and industrial, close to them |
industrial, containing a large number of suspended substances |
||
|
Cleaning |
||||
|
Cleaning |
||||
|
200 and more |
||||
|
Notes: 1. Instead of revision on the suspended lines of sewerage networks laid under the ceiling, it is necessary to provide for the installation of cleaners that are removed to the upper floor with a hatch in the floor or open depending on the purpose of the room. 2. Revisions and cleaning should be installed in places convenient for their maintenance. 3. On underground sewage pipelines, the audit should be installed in wells with a diameter of at least 0.7 m. The bottom of the wells should have a slope of at least 0.05 to the revision flange. |
||||
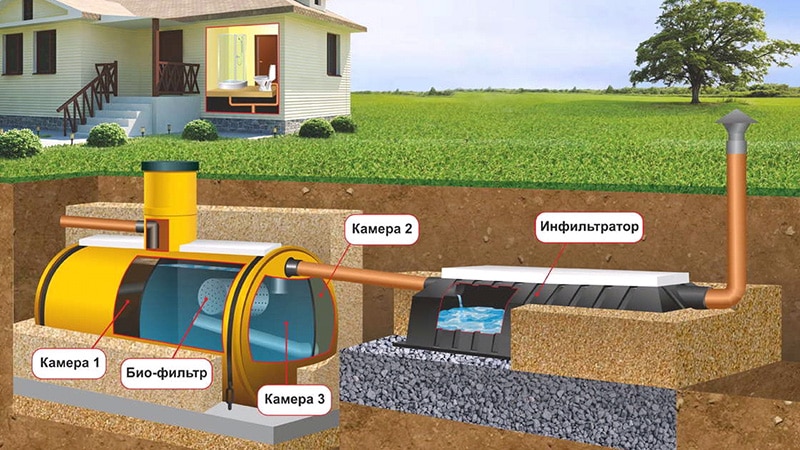
Internal sewerage diameter
The slope of the sewer pipes and their diameter depends on the amount of waste flow. For domestic sewerage apartment buildings expenses are considered according to empirical formulas that take into account the likelihood of their simultaneous use by different numbers of people depending on the degree of improvement of the living quarters (with or without bathrooms, with centralized hot water supply or with a gas column, etc.).
To simplify the selection of the diameters of sewer pipes, the following table can be used (click to enlarge):
As you can see, the biggest second wastewater costs are provided by the flushing of the toilet bowls, so the toilet outlet is connected to the pipes with an internal pass-through diameter of at least 100 mm.
Sewer pipes from the sink and sink have a diameter of 50 mm, and the drain pipe of the washbasin can have an internal passage of 40 mm.
Drainage slopes
Sewage pipes must meet the two necessary conditions - to freely pass the likely flow of sewage and not silt due to accumulation on the inner walls of sediments.
To skip the flow, the appropriate diameters are selected, but in order to comply with the second condition, minimum slopes are calculated that ensure the movement of the wastewater with the so-called non-cutting speed. In other words, at this flow velocity, the smoothness of the pipe walls and the slope, all the contaminants slip into the pipe, not depositing on the walls.
The values of slopes are given in the table above.
In the case where it is not possible to observe the normal gradient, it is allowed to lay pipes with a minimum slope.
It is possible to determine approximately the minimum slope for any diameter in the following way: divide the unit by the pipe diameter in millimeters. That is, for a pipe with a diameter of 100 mm, the minimum slope that ensures the non-inviolability of the pipe at design costs with sufficient filling of the working section of the pipeline will be:
For a pipe with a diameter of 200 mm, the minimum slope will be 1: 200 = 0.005.
In this way, it is convenient to use the slope to quickly estimate the design marks that the pipeline will pass through when building an external network. After all, this will determine the depth of the wells and the possibility to observe the distance to the standard depth of freezing in the area of sewerage.
But do not forget that this is the way to determine the smallest possible deviation. Normal slopes should be taken according to the standard values that make up the following values for different diameters:
D100 - 0.02
D150 - 0.01
D200 - 0.008
Sewerage outlet
Before installing the sewer, you may have questions - "How to sewage under the foundation?", "How to lay the sewage in the foundation?" And other similar. To understand how the sewerage production is done, let's look at its device.
As a rule, the discharge is made from sewer pipes with a nominal internal passage diameter of 100 mm, laid with a slope of 0.02 (min = 0.012) towards the well or septic tank.
Under the foundation, sewer pipes should not be laid, as any movement or draft may cause a displacement of the soil, which will lead to a fracture of the sewer pipe and its destruction.
To prevent this from happening, the sewage release is passed through the foundation.
For this purpose, when designing, the outlets for sewage outlets are planned in advance and when the foundation blocks are laid out, the mounting holes of the correct size (depending on the outlet diameter) are left in these places.
In the case of the implementation of monolithic foundations, a sleeve of the required diameter is installed at the point of passage of the sewer, into which the channel outlet is subsequently passed.
The diameter of the sleeve for the passage of sewage through the foundation should be 200 mm larger than the diameter of the sewage outlet. The free space between the sleeve and the sewer outlet is caked with sealing material and on either side the ends of the sleeve are sealed with cement mortar.
Sewage system needs to communicate with the atmosphere for airflow in the event of a rarefaction and the removal of gases. For these purposes, a pipe for sewage in a private house is installed. Its absence can lead to the fact that the system will work incorrectly - the discharge of water will be accompanied by irritating sounds, and an unpleasant smell will appear in the room.
With intensive drainage of water, the flow velocity in the sewage system sharply increases, resulting in the formation of a zone of rarefied pressure. Since under the law of physics pressure in the closed system tends to equalize, water from bends and siphons rushes into the zone of rarefaction, which causes unpleasant and quite loud clattering and squelching sounds in the kitchen and bathroom. The pipes for the sewerage provide instantaneous airflow into the sparsity zone, thanks to which eliminates the possibility of "suction" of water from hydraulic locks.
As the main reason for the formation of sparseness, toilet bowls are often called, however it should be remembered that the flow rate can be significantly increased even when the washing machine that drains water under pressure is operating. If we answer the question why a fan sewer pipe is needed, in a single phrase, one can say that such designs prevent the overlap of the total lumen of the sewer pipe by the drained flow.
Another function of the fan tube - removal of gases formed in the sewage system. Otherwise, they can enter the room, causing a lot of trouble.
Materials and diameters of pipes
Since a fan pipe in a private house is part of the system, it will be optimal to perform it from the same material that is selected for the remaining pipelines. In some cases, a combination of materials is possible, but experts believe that the effectiveness of heterogeneous systems is significantly lower.
For the installation of the internal part of the sewage system in a private house, cast iron or plastic pipes.
- Cast-iron pipes They possess the required durability, however, they become susceptible to corrosion in the presence of defects in processing or in obtaining mechanical damages. In addition, the large weight of products significantly complicates the installation not only in terms of increasing labor costs, but also in terms of fixing vertical sections of the pipeline.
- Increasingly, for the installation of internal sewerage systems plastic pipes, which, apart from their low weight, also have a number of other advantages, including strength, durability, absolute corrosion resistance and the presence of a smooth inner surface that reduces the likelihood of deposits and blockages. Another advantage of plastic is a wide choice not only of pipes of different diameters, but also necessary for the implementation of the developed scheme of fittings.
The choice of the diameter of the fan pipe is made taking into account the design features of the system. Basic condition: the diameter of the pipe should not be less than the largest pipe (including branch pipes and bends) of the system.
Since in the overwhelming majority of cases the largest sewer pipes are used to connect the toilet bowl and have a diameter of 110 mm, then the pipes are installed in the same diameter.
Installation of riser and outlet to the roof
The current construction norms (SNiP 2.04.01-85 * "Internal water supply and sewerage of buildings") recognize the mandatory installation of a fan riser for houses with 2 or more floors, however, experts are sure that in a single-story private house such a structure is capable of significantly increasing the degree comfort and save unnecessary trouble. Given the designation of the pipe pipes, it becomes clear that their need directly depends on the degree of risk of overlapping flow sewage collector, and hence the number of drains entering the system. Thus, when using the house as a summer holiday destination with a short stay and having a minimum of plumbing and drainage points, you can completely do without a fan pipe.
For a full-fledged apartment house with a toilet, a bathroom or a shower room, several faucets, a washing machine and a dishwasher, the fan pipe is, if not mandatory, in any case a very desirable addition to the sewage system.
The device of the sewer pipe is not difficult. In fact, the fan part of the system consists of individual taps for drain points and a fan riser. With a large area of the house and several bathrooms or toilet rooms that are located at a considerable distance from each other, several fan risers can be installed in order to exclude the laying of long horizontal pipelines in which the traction force decreases. When connecting several branches with a single fan pipe, the supply pipelines should be located with a slight inclination.
Intensive movement of gases through the pipe and their effective removal from the system is facilitated by a temperature drop - the initial section of communications is located in a heated room, and the final one is outside the house.
Since the main part of the fan pipe is a vertically located pipeline, it is important to take care of its reliable fixation. The chimneys are fixed to the walls with metal clamps. In some cases, it is recommended that sound insulation of the fan risers using specially designed materials for this purpose (for example, mineral wool roll or slabs).
Particular attention requires the withdrawal of the pipe pipe to the roof. It can be carried out through a riser located inside the house or with the help of a pipe fixed on the outer wall of the house. Optimal is the output of the fan riser to the roof, since the conclusion to the attic is not allowed by existing norms and rules, and the installation of the structure under the overhang increases the risk of destruction of the pipe when leaving the roof of ice or snow mass.
In order for the system to work effectively, it is important to follow certain rules.
- The height of the fan pipe above the surface of the sloping roof should be at least 0.5 m above the unexploited flat roof - 0,3 m. And if the roof is used, then the height of the pipe must be at least 3 m.
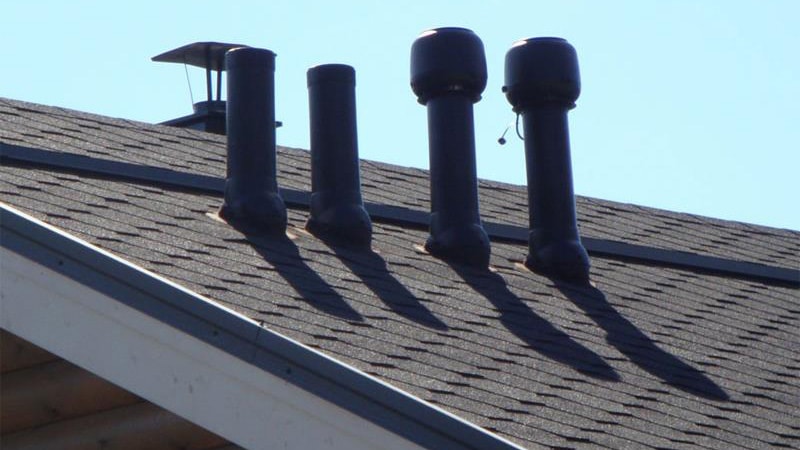
- If there are several pipes on the roof (general ventilation, chimney from the fireplace or stove, etc.), the pipe must necessarily be above all others. Otherwise, unpleasant smells can get into the room. For the same reason, it is strictly forbidden to combine a fan riser with a common ventilation system or a chimney.
- The distance from the windows to the fan pipe should not be less than 4 m.
- It is preferable to carry out the withdrawal of the fan tube at the location where the maximum number of discharge points is located, without transferring the pipe from aesthetic considerations.
- It is not recommended to install decorations or other additional elements on the fan tube. Their presence can promote the formation of condensate and, accordingly, icing and reducing the diameter of the passage. Gas removal in this case will be made less efficiently.
To expand the topic in as much detail as possible, is described in yet another of our articles.
If you decide to make yourself a shower cabin, then you will be useful for installing a shower ladder under the tile.
Check Valve
The installation of a non-return valve on the fan pipe can increase the efficiency of the system, in particular, prevent the reverse flow of gases. In addition, check valves reduce the risk of clogging the fan pipe.
Sewerage without a fan tube equipped will perform its functions, however, the convenience of its use and the degree of reliability can be lower, so it is still recommended to share these elements. In particular, when the water in the siphon is dried, only the valve can not get rid of the smell.
The installation of the fan pipe is carried out during the construction of the inner part of the sewage system, it can be done by oneself with minimal skills. It is important only to strictly follow the recommendations of specialists and the requirements imposed by building codes and regulations. The use of modern materials significantly reduces the complexity of work.
For owners of country houses, doing a lot for the improvement of the home with their own hands, it is useful to know some features of the arrangement of water and sewage systems. These are the most basic engineering Communication, without which the construction of any house can not do.
When installing the sewer, it is important to remember about such a device, as a fan riser. What is this device and what are the nuances of its installation? These and several other questions can be found in our article.
A fan riser in a private house is a part of the pipeline that connects the riser to the open air.
Fan tube on the roof of a private house
In the absence of this element, during dilution of effluents in the system, dilution occurs, the hydraulic seal is broken, and an unpleasant smell is felt in the room. For each sanitary device, there must be a discharge pipe with a knee. In this bend, water is normally found. It also serves as a water seal, preventing the penetration of unpleasant fumes into the house. With a sudden discharge of sewage in the sewer pipes, there is a depletion. Through the fan device, air flows from the street into the system, and the pressure is normalized. This ensures the absence of odors.
Sometimes you can do without a fan riser. For example, in a small building consisting of one or two floors. However, the mandatory requirement in this case is the equipment of only one bathroom.
If the house has two or more bathrooms or several toilets, then installation of the fan riser is mandatory. Its presence is determined by the following factors:
Development stage
Even at the design stage, in order to establish a regular sewer pipe riser correctly, two basic requirements must be considered:
- The sewage pipe must be taken out in the direction from which the evaporation is diverted by the flow of air.
- Simplified installation of the fan system can be understood as the supply of pipes to ventilation duct. If this is difficult, the tap is carried out through the wall.
The ventilation structure for eliminating unpleasant odors consists of different parts:
- of the pipe pipes;
- ventilation ducts;
- connecting elements;
- fittings.
Features of the work
Having understood what a fan riser is, you need to carefully study the principles of its installation. It is advisable to plan the installation of this device as soon as the development of the internal sewerage system project begins. For ventilation to work better, you should try not to allow bends and corners in the construction.

The scheme of a conclusion of a fan riser
The ideal position of the air riser is exclusively vertical. This pipe is output through the floors between the floors on the roof. However, it is not always possible to implement this in practice. Often in country houses you have to use additional elements for connection.
Sometimes the method of connecting several risers into one duct is used. It can be connecting an auxiliary riser to the main one or removing the fan pipe with its connection at the same distance from the two risers.
This method of installation is better, since it allows evenly to distribute the air pressure throughout the system.
Fan pipes on the roof of the building
One of the main rules of installation is the correct diameter of the air tube. It should not be larger than the sewer diameter. At the same time, the index of this element ideally corresponds to the size of not only the central riser, but also the branch pipe, which serves to connect the external and internal sewerage.
It should also be remembered that it is unacceptable to combine sewage ventilation with any climate design or the removal of carbon monoxide during the operation of the boiler.
How to change the fan riser
If the air riser breaks down, it often requires changing it. Replacement of the structure is carried out on the same principle as repairing individual parts of the sewerage system. This process differs mainly in the material from which the pipes are made, and the method by which they are combined.
Repair of the pipe
To replace the fan riser requires compliance with a number of conditions:
- During the dismantling operations organize a good ventilation in the living area.
- Replacement of structural elements must be carried out in respirator and rubber gloves.
- At the end, you need to make sure that all the pipeline kept tight.
By itself, installing a fan riser is not particularly difficult. Nevertheless, the masters recommend following certain important requirements.
It is better that the diameters of the pipe and the riser coincide.
Cast Iron Pipe
If a combination of several materials is used in the work, for example, a plastic pipe made of plastic, and the riser is cast iron, a rubber adapter is recommended.
For articulation of several fans, angles of 45 or 135 degrees are used. The sections of the fan system, located horizontally, must be laid with a slope of 0.02% in the direction of the exit of the gases.
If you want to change the angle of the pipe, use a special tap with a degree of rotation 135.
Requirements to which the risers should correspond
Certain criteria have been developed for air risers. During the installation of the system, it is advisable to check with them:
- When the pipe is taken to the roof, it must rise over the roof by at least 30 cm.
- If an attic or loft is built the minimum length of the pipe should be three meters.
- The gap between the pipe and a nearby light opening or loggia is made in length at least 4 meters.
- The fan system in accordance with existing standards it is carried out through premises with heating or should have an individual heater.
- Do not let the air pipe out through the chimney.
- The upper part of the fan riser is equipped with a protective grid, which prevents penetration into the construction of insects and birds.
Common errors when installing the riser
Despite the fact that the installation of the fan system can be performed independently, there are a number of nuances, knowledge of which will help to avoid serious shortcomings in the installation of the riser.
Installing the fan tube
Sometimes incorrectly carried out work on the equipment of a fan design have rather unpleasant consequences.
For example, not always the owners of country houses properly conduct the installation of the fan tube, cutting the system immediately in the attic. This leads to the fact that unpleasant smells are leaking into the attic, which can also penetrate into the housing.
Another serious drawback is the installation of a fan on the outer wall. In this case, there is a risk of condensation.
Some owners prefer to mount an additional device - a roof aerator.
Aerators for pitched roofs
Its function is to improve traction. However, this is not always advisable. In most cases, the following occurs: the outflow of sewage gases is weaker and an unpleasant odor from the bathroom can be felt in the house.
The installation of an air riser becomes an indispensable condition for proper equipment of the drainage system. The absence of this device leads to rather negative consequences.
Sometimes the installation of the pipe is best entrusted to qualified specialists. If you do not have the necessary number of tools or materials, do not perform the installation yourself. Buy the right equipment, which in the future is unlikely to be useful to you, does not make sense. In addition, the arrangement of sewage systems has its own specifics. An experienced master plumber will do the job qualitatively, taking into account all requirements.
In order to correctly perform the installation, it is necessary to strictly follow the pre-prepared project and perform all necessary calculations.
How can I replace the fan tube
It is common to consider vacuum valves as an alternative variant of ventilation sewer systems. They are installed on the end of the riser in the house.
Installing the vacuum valve on the sewer stand
Inside the vacuum valve there is a special spring with a weak resistance and a rubber sealing element for sealing. The principle of operation of such a device is as follows:
- Sewage drains, passing along the riser, provide a vacuum in the system.
- A shutter or valve is opened.
- The air from the siphon is sucked in and goes to the sewerage network. This extinguishes the rarefaction.
- After the pressure in the sewer system is normalized, the spring mechanism is activated. The valve closes the gap and prevents the unpleasant smell from entering the room.
In situations where there is no possibility of installing a return sewer valve on the riser, this device can be mounted on any other piece of horizontal pipe that is fed to the riser.
It is necessary to pay attention to such an important point as the availability of each sanitary point of the hydraulic shutter.
Using a hydraulic shutter
Otherwise, an unpleasant smell in the house can not be avoided, despite the correct installation of the sewage system and ventilation equipment. In most modern sewer systems there are mounted hydraulic shutters.
There is a special document - a set of Building Norms and Rules (SNiP). It is necessary to take into account these requirements. In the documentation the conditions of the obligatory equipment of the fan risers are given:
- houses with two floors and higher, in which there is a sewage system and the installation of plumbing devices;
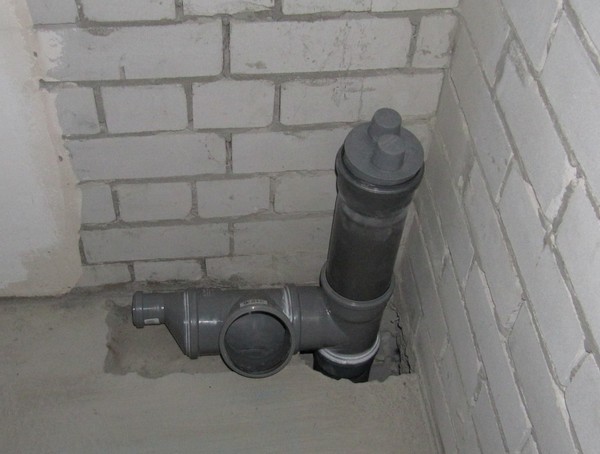
- in houses with autonomous sewerage, with the presence of a store, a septic tank or a cesspool;
- if the room constantly there is an unpleasant smell.
In any case, equip an air riser in a country house is necessary. Only in this way is it possible to consider correctly the work on laying the system of sewage pipes. Nobody will want to accept the presence of smells from the sewerage in the living quarters. You can invite professionals to install fan tubes, or you can try to solve this task yourself.
Fan pipe on the roof of a private house Sewer system with a septic tank in a private house Scheme of a fan riser outlet Fan pipes on the roof of the building Use of a hydraulic shutter Installation of a vacuum valve on a sewer riser Repair of a pipe pipe Aerators for pitched roofs Cast iron pipe Exterior view of a pipe in a suburban house Picture of a pipe on the scheme Ventilation outlet to the roof Diagram of installation of the fan tubes in the house Ventilation hole of the riser Installation of the pipe
What is a riser pipe in its essence? This is one of the most important elements of the whole system. It is with him that the design of the internal house drainage system . The sequence of actions is as follows:
- Take a ready plan at home or draw it (the main thing is the accuracy in the size of the rooms and the thickness of the walls / ceilings). If the plan is done on a graph paper, it will be more convenient to carry out further calculations.
- Mark all the "wet" rooms.
- Identify with the room, which will be toilet bowl.
- Choose a place to install a riser next to the toilet. The location of the main sewer pipe of the house must take into account the need to arrange an inlet into the external sewer pipe.
The sewerage project in a private home must take into account two important points. For the riser device, pipes with a diameter of 110 mm are absolutely required. This will ensure a qualitative outflow of waste water and fecal matter.
Savings in this case almost always result in problems in the operation of the entire system. The pipe material for the internal and external sewage system is different.
The owners of private houses often ask the question: why do I need to install a sewer riser next to the toilet? It's simple: the length of the horizontal pipe between the riser and the drain of the toilet bowl should not exceed one meter.
At a greater distance, the guarantee of a complete outflow of fecal matter is lost and it will be necessary to install fecal toilet pump.
Material
What can the sewer riser be made of? The most popular are three options:
- polyvinyl chloride (PVC),
- polypropylene (PP),
- cast iron.
The last material is well known to those who lived / live in apartments relative to the old building. One of the main advantages of cast iron is good sound insulation. This is rarely thought of, but the wastewater can be quite noticeable noise. Large disadvantages of cast-iron pipes are high cost, high weight of any element and gradual overgrowth of internal surfaces of pipes.
Pipes for sewage in a private house PVC and PP - easy to transport, install, they are reliable and durable. And their price is much lower than that of cast-iron ones. When proper installation minuses of quality polypropylene pipes usually not detected. PVC pipes can damage the high temperature of the waste water, and then the material may appear cracks. All connecting and fittings must conform to the main material of the pipes.
When calculating the length of the riser, one should not forget about the outside of the sewage system.
Here everything depends on the depth at which the street water supply will be laid. If the depth of the pipes - below the freezing point of the soil, the inner riser will be quite long. At a shallow depth of laying underground sewers vertical pipe in the house will be shorter, but will have to take care of heat insulation of the sewer pipe in the ground.
Ease of use and aesthetics
When installing the sewer system, not every landlord thinks about the beauty of the internal pipeline. If such a task is still worthwhile, it is completely solved. The pipe of the sewer pipe can be hidden by a box or laid in a special niche.