Exhaust valves for ventilation. Types of check valves. Application of flexible membrane
The causes of external overpressure in the apartment ventilation system.
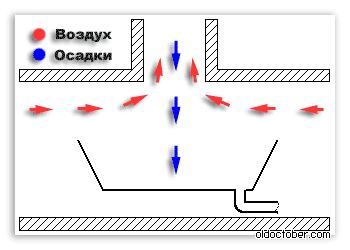
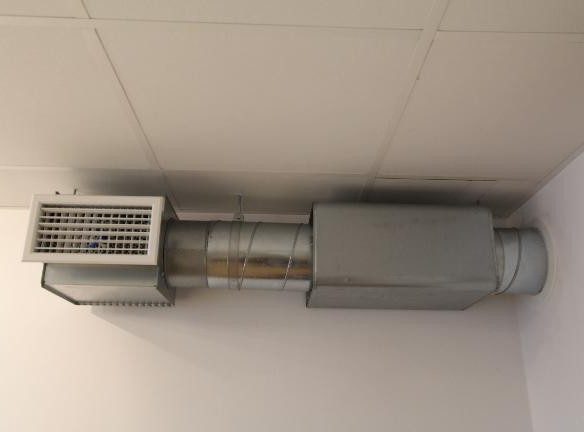
When the ducts of the ventilation shafts do not extend directly to the roof of the building, but to the technical floor, under certain weather conditions, airflow from the technical floor may enter the ventilation openings of apartments located on the last floors of the building.
Usually, on such technical floors, equip one huge pipe, designed for the entire entrance. A large pallet is installed under the pipe, connected to the sewage system. If, at the same time, close all other openings connecting the technical floor with the external environment, then the ventilation system may become fully operational.
But, as a result of various re-planning, related to the construction of those. floor sheds or even living rooms, work ventilation system is violated. This is facilitated by the broken down original or, alternatively, additionally installed doors.
In addition, in high-rise buildings on those. floor there is another parallel ventilation system, this is a smoke exhaust system. If the doors leading into the service rooms of the smoke removal system are not hermetically sealed, this too may cause a disturbance in the operation of the apartment ventilation.
Well, and the last. For the correct operation of the passive ventilation system, it is required that the air in the apartments is warmer than on those. floor, but this hot condition can not be met in the hot summer.
The reason for the penetration of foreign smells into the apartment is the excessive air pressure in the premises of the technical floor. This pressure arises with strong gusts that can pump air through the openings on the technical floor, such as technological windows, openings with missing doors, etc. The value of this pressure also depends on the wind rose, so the appearance of unpleasant odors can be seasonal in nature.
It was this phenomenon that I discovered immediately after I moved into a new apartment on the top floor of a sixteen-story building. By the way, at that time, the original scheme of our house ventilation was not broken yet, but still it failed in a strong wind of a certain direction.
It was 26 years ago, and then, I did not even try to find a ready solution to eliminate this disgrace. But, in the following years, during my few trips to local construction stores, I never saw anything like that that I managed to produce in just one day.
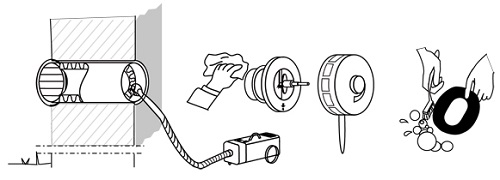
The air diaphragm valve.
The device is a diaphragm valve (valve) with the function of forced opening.
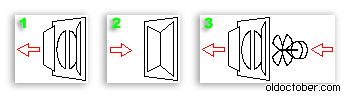
1. When air spontaneously moves from the apartment to the ventilation shaft, the valve flaps open under the pressure of air.
2. When air from the ventilation shaft starts to move into the apartment, the valve flaps are closed and the valve is hermetically locked.
3. In order to ensure ventilation of the room with excess pressure in the ventilation shaft, an exhaust fan is used.
On this uncomplicated scheme, I postponed the first air valve. As the engine for a self-made fan, a "EDG-2K" motor was used with a power of only 5 watts from an old tape recorder.
The first model of the fan revealed a number of shortcomings. When high pressure air in the shaft, a 5-watt motor could not provide normal ventilation. And the seals of this engine were not very successful design, because of which the bearings had to be lubricated too often. Unfortunately, this home-made fan is not preserved, so I can not show it.
As soon as I could, I replaced the home-made fan with a factory-built 20-watts VN-2 fan. In those times, they just had to be repaired, and something that fell into the "dry residue".
By a lucky chance, the diameter of the self-made fan almost coincided with the diameter of VN-2, and the valve did not have to be altered. I just drilled four new fixing holes, and the old one was sealed with adhesive tape.
Everything would work like that, but once the wife went to neighbors living on the floor below just when the fan was working. Returning, she reported that the noise from our propeller at the neighbors was heard several times louder than ours, although their apartment was not even under us, and the total vent pipe we did not have any. Here is such an acoustic paradox.
I suppose that this was partly due to the fact that the shaft of the BH-2 fan rotated in ball bearings, and the fan itself was not isolated by the shock absorbers, and partly, perhaps, with some unknown resonant phenomena in the ventilation system.
Anyway, it was decided to seriously improve this design.
That's what happened as a result.
Design and details.
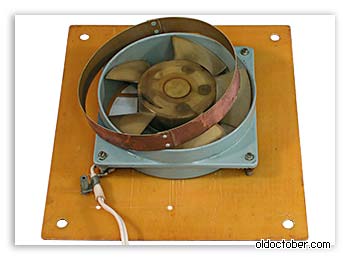
On the local radio market, I bought an imported second-hand fan, but this time, of course, on sliding bearings. Backlash bearings did not have and I made a new valve under this device.
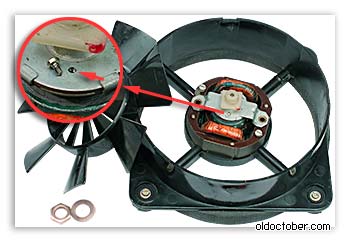
The fan was conditionally nonseparable (on rivets), therefore, to get to the stuffing boxes, I had to drill two holes for lubrication. At the same time I already cut M1,6 threads into them.
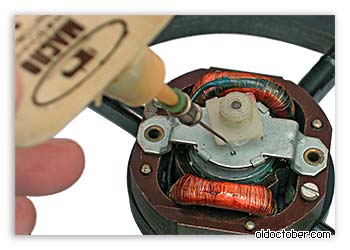
Through these holes, oil was poured into the oil seals with a medical needle.
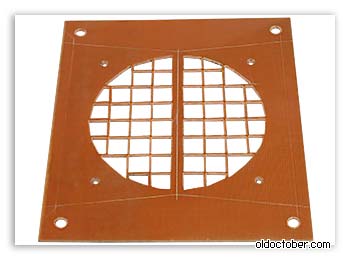
The valve base was made of 4 mm thick fiberglass. First I marked the grill on the fan side, then drilled what I could, and at the very end I processed the holes with a file. All operations were done so as not to damage the smooth surface of the fiberglass on the side of the future valve flaps.
To seal the joint between the fan and the valve body, I used a gasket of porous rubber that was folded into a ring and glued directly to the fan casing.
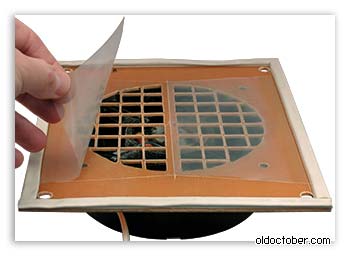
Another ring I made from fiberglass in thickness of 0.5 mm. It has allowed to fix on the case of the fan the kapron filter made of ladies' pantyhose.
A sealant made of porous rubber and a kapron filter should protect the apartment from penetration of small insects, if any, in a mine.
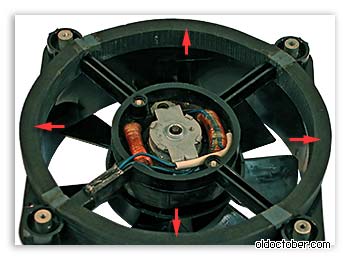
To ensure that the vibration from the engine is not transmitted through the valve body to the wall, I installed the engine on rubber shock absorbers.
Manufacturing of valve flaps.
Special attention should be given to the polyethylene film from which the valve flaps are made. I used 0.1mm thick polyethylene. The larger the cell in the valve body, the thicker the film should be.
For the film on the market, it is better to go with your scissors. You also need to choose the largest roll with a smooth film. Wavy film is not good. Directly from the roll you need to cut several pieces of film and immediately put them in a hard folder for papers so that the film does not accidentally get crushed.
For fixing the leaflets to the valve body, I used Scotch tape on a lavsan base. Previously, this kind of adhesive tape was used to glue tape.
The video shows the process of manufacturing valve flaps. Expand the player to full screen to see the video in HD quality.
The leaves are made in the following order.
First, a piece of film of the required size is glued to the base, using adhesive tape (Scotch tape).
Then, with a sharp knife along the ruler, the contour of valve flaps is cut. And only at the very end of the valve leaves are separated from each other.
If the film is accidentally wrinkled during gluing or assembly, you can safely change it. With a small excess pressure in the ventilation shaft, the wrinkled film will "siphonize" and let the miasma into the apartment.

To seal the joint between the valve and the wall of the room, it is convenient to use a self-adhesive sealing tube. I bought a tube meter in the construction market, which is usually used to seal windows and doors.
To install the valve, I drilled four holes in the wall with a diameter of 8mm and hammered into it the factory nylon plugs (dowels). The valve body was fastened with four screws and washers, having pre-laid rubber washers under the washers.
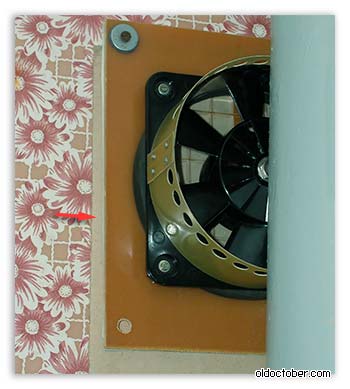
In order not to damage the valve flaps during installation, I pressed them with a piece of cardboard and removed the cardboard only when the valve was fixed to the wall with two upper screws.
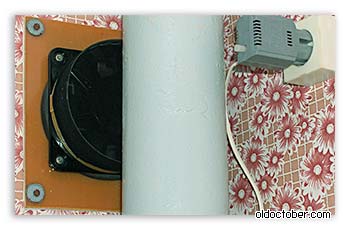
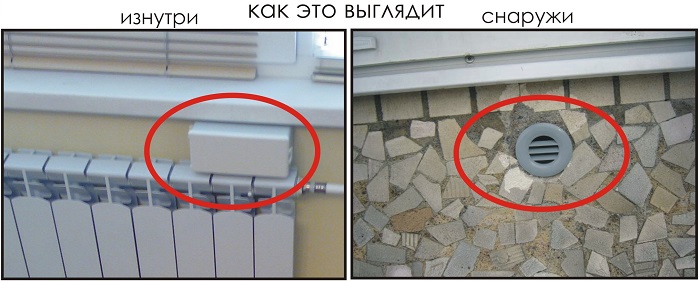
The right part of the valve is not visible in the photo, since the vent hole is just behind the cast-iron sewer pipe.
Since the fan was purchased with some power margin, I connected it to the network through the simplest triac controller. The regulator allows to reduce the engine speed and accordingly reduce the noise. The design of this self-made power controller is described in detail.
Operation of the valve.
Operation is reduced to periodic cleaning kapron filter. Approximately once a month or two filters must be stripped in water with soap.
The valve of the last modification, since the last revision, has been working for more than 11 years and has been dismantled for registration of this article with photographs. I hope that I will live to the next revision.
There may be a question, how to know in which position the valve leaves are located, because they can not be seen from the room.
If you sharply open the door of the room where the valve is installed and the valve releases cotton, then its doors are open, if the valve slams when the door is closed, the doors are closed. But, this is if the door opens outside the room. If the door opens inward, everything will be exactly the opposite.
Known issues.
For all 26 years of operation, there was only one failure of this valve, when local non-union youth gathered at those. floor, threw the mine with burning paper. Then the valve flaps were melted and had to be replaced.
Can provide for different designs. For the maintenance of small rooms it is recommended to use valve mechanisms that ensure the inflow and exhaust of air flows. As a rule, these are compact devices, due to which the user relieves the kitchen or technical room from unwanted elements in the air environment. On the market, air valves for ventilation are available in various versions, including automated control systems.
Supply Valves
This is the simplest solution for organizing a fresh air supply system. The valve of this type is usually used in rooms where there is an exhaust or At the same time a classic membrane valve for airflow is not practical to use in places where there is forced system aeration. In this case, double injection air masses, which can be superfluous.
By design, such models are most often cylindrical devices with filters that can be integrated into a wall niche or a window system. In addition, the supply valve can be supplemented with automatic airflow control systems, which independently of the user adjust the operating parameters to the optimum mode taking into account the weather conditions.
Types of inlet valves
All models can be divided into several categories, depending on the addition of functional devices, control systems and approaches to installation. First of all, it is necessary to divide the ventilators into conventional and noise-insulating ones. Most of the valves are air for ventilation inflow type provide and protection from extraneous noise. For this, the filter layer is supplemented with a special insulating material. Also, the valves are divided according to the possibility of regulating the inflow. Traditional devices are not managed in any way - as a rule, they are cylinders with cleaning filling, which work in the same free air supply format. In turn, adjustable modifications can provide not only automatic control of throughput, but also manual. For this outside part the valve is equipped with a special closure, which can be changed position.
In addition, the supply valve can assume different installation possibilities. Thus, manufacturers of window systems increasingly form in their designs special openings, in which it is easy to integrate valves. The classical design can only be built into walls and partitions.
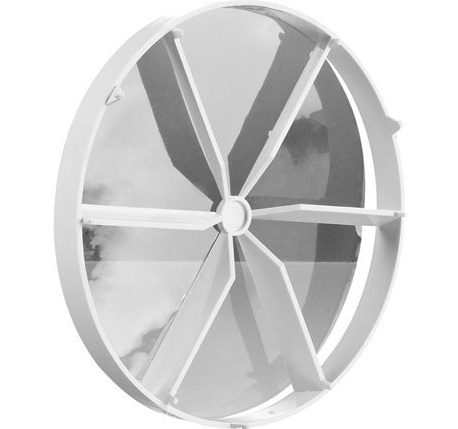
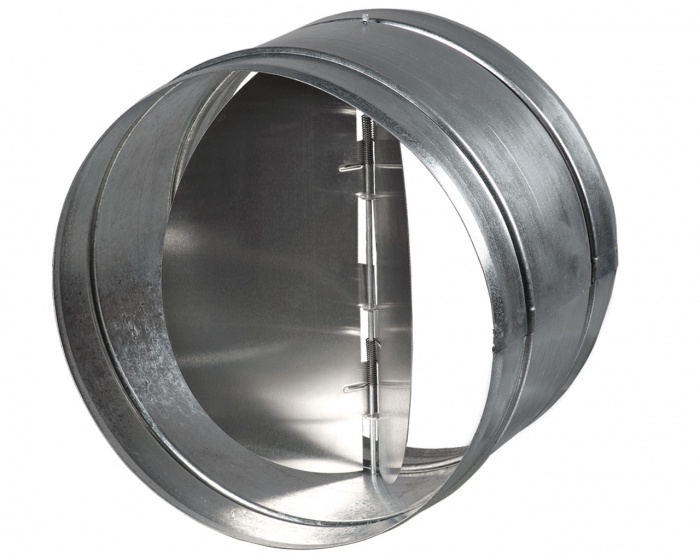
Check Valves
If you need a system to remove the exhaust air, it is better to refer to the models of the reverse action. The basis of these devices are two blades, which in the course of work regulate the characteristics of the drawing of air currents. The body can be represented by a cylinder or a channel of a rectangular shape - this nuance should be calculated initially, so that the design optimally approaches the parameters of a particular installation site. Unlike the inlet models, which are a membrane valve with filtration, in this case, the emphasis is on the function of the fan, which literally delivers the waste mass to the working blades. That is, in the non-return valves, filtration membranes are not needed, since the system is not designed for supply function with the injection of fresh air. In addition, such constructions can be equipped with protective gratings and noise suppressors.
Types of reverse action valves
The principal difference of such systems is the method of location. If the optimal configuration of the installation for inlet valves assumes a horizontal arrangement, the non-return valve systems can also be installed vertically. But it is important to take into account the supply channel and the possibility of its connection, since the check valves are air for ventilation vertical type are mounted in the ceiling openings. Also devices are distinguished by material and section. From the point of view of comfort it is desirable to use plastic models, and to prolong the service life, metal systems are preferable.
Valve control systems
There are three main approaches to the implementation of the control system for air valves. The most effective is an air valve with an electric drive, in the design of which a fan is provided. The operation of such a system can be controlled remotely by a remote control, and by installing a special program with certain bandwidth parameters.
The second option is represented by hygro-controlled mechanisms, working on the principle of changing the position of the damper. Such models are supplied with polyamide tape sensors that monitor the humidity values of the air and, in accordance with these values, adjust the position of the leaf. This principle of regulation can be guided by the indices of the microclimate in the room. The third category of control systems is represented by manual mechanisms. If the air valve with electric drive changes the position of the leaf by means of an automated mechanism, then in this case it is supposed to participate in the correction process of the user himself.
Installation work
Installation is carried out by two technologies. As noted above, in most cases the valve is integrated into a wall or bulkhead, but the installation scheme in the window structure can also be used. The first option involves the creation of a hole in a concrete or brick niche by means of shtrobleniya. As a rule, this operation is performed by specialists. The valve is installed in the formed opening, and the space around it is filled with mounting foam. In the window constructions, the air valves for ventilation are desirable to be integrated, provided that the standard sizes are compatible. The best option there will be a complete purchase of a complete set of window systems and a vent valve. In a conventional double-glazed window such a device can not be installed. Especially for mounting at the stage of the process of manufacturing profiles, small openings are formed, into which the valves are mounted using metal fasteners.
For the organization of fresh air inflow into the building (both residential and non-residential), nowadays, the inlet ventilation valves (ventilators) are often chosen.
On the location of the most common are wall models - mounted in the outer wall.
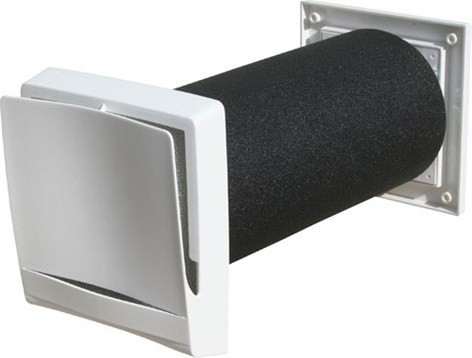
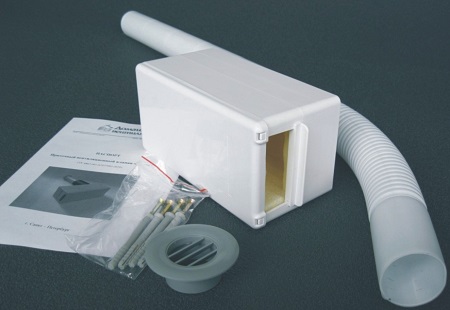
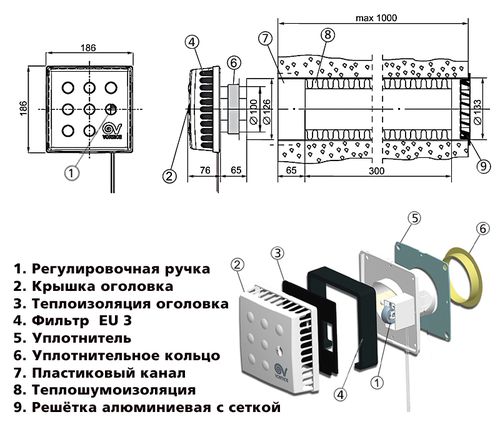
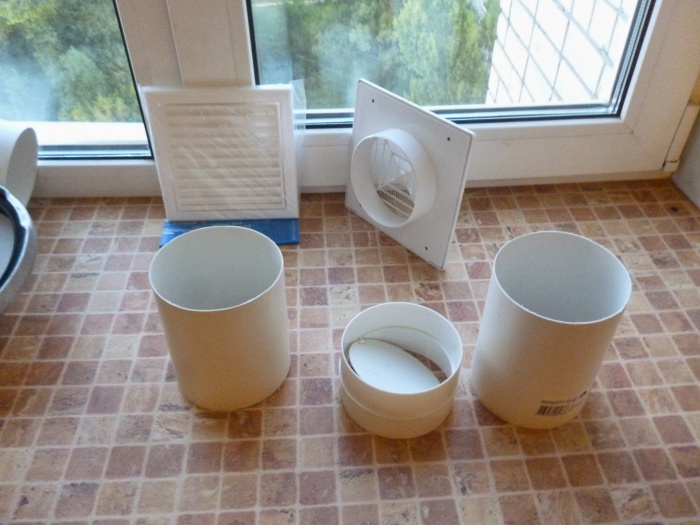
Description of construction
Air duct. A pipe through which air flows from the street into the room. The vast majority of models have a plastic duct.
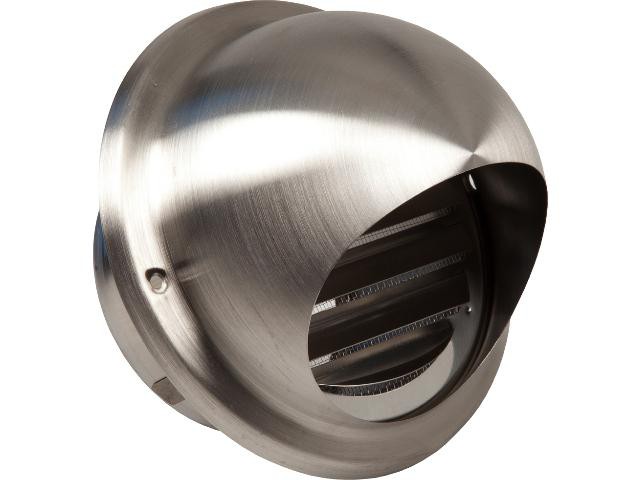
External ventilation grille. Prevents the ingress of rain ducts into the duct. Made of plastic or metal.
Internal housing - head (plastic, usually shipped in disassembled form). Contains a filter, directs airflow into the room. It is made of plastic.
Inside the duct may be insulation or noise insulation. It is necessary to ensure that the wall around the pipe does not freeze, and also to reduce street noise.
As a heater is usually a polyphobe. The parts described above can be purchased separately, and make a self-made airing machine with your own hands, which will cost a little less than buying a finished product.
If the ventilation wall valve is adjustable, the regulator is located in the inner casing (head). Some models (Aereco EHT) are additionally equipped with a hygro-regulation system. It reacts to the humidity inside the room, and opens the valve when a certain value is exceeded.
More complex air-handling units (for example - a line of models Eco Freshness) can additionally be equipped with the following elements:
Fan.
Recuperator (air heater).
Humidity and / or air temperature sensors - to automate the operation of the device.
Remote electronic control panel (by means of which the fan and / or heater are switched on and off).
Purpose of the product
The task of the supply ventilation valve is to provide a person (as well as animals and plants) with enough air for breathing, and to prevent the appearance of mold in the room.
If there is no constant inflow of fresh air into the room (and for one person it takes about 30 cubic meters per hour) - the body does not receive the proper amount of oxygen. In addition, the stuffiness leads to condensation of moisture on the window slopes, frame and window sill, which in time can lead to the development of mold.
The wall air valve is capable of supplying a sufficient amount of fresh air: under normal conditions (if the pressure difference is 10 Pa), most models receive about 25-30 m³ / h. Just as much as required health standards for 1 person. If the pressure drop is greater, the amount of incoming air will also increase.
Principle of operation and testing of ventilation ducts
Air from the street comes through the ventilator, because the pressure in the room is lower than on the street. Such conditions (pressure drop) are created by the operation of exhaust ventilation in the room: a hood or a simple ventilation duct.
An important point to consider: if exhaust ventilation it works badly - then the ventilator will also give less air (since the drop will be less than the norm, or it will not be at all). Therefore, before planning the installation of a fresh air vent valve, make sure that the exhaust ventilation function normally.
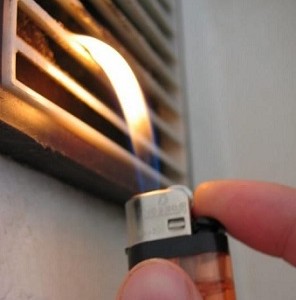
To check the operation of the ventilation duct, it is necessary:
Open the window (or window, or balcony, the main thing - that was the influx of fresh air).
Bring a lighted match or a lighter to the grille.
When the exhaust ventilation is working normally, the flame must be "tightened" into the channel. If this does not happen, or if the flame on the contrary deviates from the grille - then there is no traction, and the ventilation in the apartment is broken.
Instead of an open fire, you can check the operation of the ventilation duct and a regular piece of paper (best of all - toilet, because it is thin and light). A small cut must be applied to the ventilation grille. Ideally - the paper should attract: in this case, the exhaust ventilation works perfectly.
The methods of verification mentioned above may prove useless in the summer, in hot weather. The air in the heat is heavier than in the cool weather, and therefore the pressure in the ventilation duct drops. Therefore, even normally operating ventilation may not attract fire (or paper).
On the pros and cons of the application
The use of a wall ventilator is a useful solution for several reasons:
- inside the room the product is invisible (with any method of installation it is easy to cover with curtains), and if it is noticeable, it does not spoil the interior and does not strike the eye;
there is no need to often open and close the window (which means that the hardware does not wear out, calculated on an average of 10,000 movements);
the valve receives less noise than through the open window (thanks to the filter and insulation in the duct);
it is possible to adjust the amount of incoming air (there are no regulators basically only on the cheapest models);
installation near the battery or at the top of the wall avoids sudden temperature fluctuations in winter;
relative cheapness (1 set of the valve and its installation by specialists in the amount will cost about 3-5 thousand rubles).
With regard to the last point: when installing the vent valve near the battery - the air will heat up from it. In the second case (if the valve is mounted at the top of the wall) air will flow into the room from above, and mix with the room (warmer).
More expensive models of inflows can be equipped with recuperators (heaters) and fans. Fans can be either exhaust or supply air. Such installations are more effective, however, they cost at least 8-10 times more than conventional ventilating valves (for example, the quotations for Eko-Freshness, having a fan and heating, start from 15,000 rubles).
There are also disadvantages:
the need to make a hole in the wall (if the inflow after some time will want to be removed - there will be a through hole in the street);
the errors made during installation can lead to the fact that the wall (the section between the hole and the slope) will freeze, or some part of the duct will freeze in winter;
in too cold regions (where the temperature falls for a long time below -10 °) in the winter the inflow can not be used, since the room will be very cold;
models without a fan can average about 30 m ³ / h air (which is normal for 1 person in the room).
Types and Distinctions
All wall inflows differ in several parameters:
How does the ventilator look outside (from the street) and from the inside (from the room)
With manual adjustment of the amount of passing air or without adjustment.
By the presence or absence of an automatic adjustment system.
By the presence or absence of noise insulation duct.
If possible or impossible to install additional accessories.
If possible or impossible to completely shut off the valve.
By the diameter of the duct.
By the amount of air passing through.
Otherwise, the differences are only in the device internal (located in the apartment) housing and the appearance of the elements.
As a special case - there are differences in the form and material of the duct. For all models it is a plastic pipe. Only SVK V-75 M is different - this wall valve The air duct is made of expanded polystyrene and has a rectangular shape. It is located immediately under the windowsill.
The most successful are the following sites:
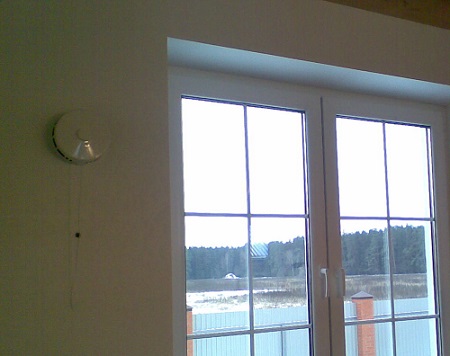
Under the windowsill, next to the battery.
At a level of 2/3 of the height of the window opening (for an ordinary apartment - at an altitude of about 1.8-2 meters from the floor).
In the first case, the incoming air immediately heats up from the battery. In the second - enters top premises where it mixes with warm air. Both options are good in that this arrangement allows you to hide the wall valve behind the curtains.
The only requirement that should be considered in the second case: from the location of the supply valve in the wall to the window slope should be a minimum of 30 centimeters. Otherwise this site in winter can freeze.
On the device and installation of the valve using the example of KPV 125 (video)
Stages of installation
To install the supply valve in the wall (we will consider the installation process for valves with a circular duct, for the installation of the SVK V-75 M - it is possible to read separately):
Marking tools.
Installation of diamond drilling.
Hacksaw (for cutting the air duct as needed).
Glue (if the outer grille is adhered to the duct) or a screwdriver (if bolted).
Unnecessary rags or polyethylene film - to lay the floor at work.
Means of protection of eyes and respiratory organs (from flying dust during drilling).

Installation is performed in the following sequence:
The installation location of the ventilator is chosen, taking into account the rules mentioned above.
A through hole is drilled in the wall. It should have a slight slope (3-4 degrees) in the direction of the street - to prevent moisture from accumulating in the duct.
Drill holes for self-tapping screws (for attaching the inner case).
The air duct is used: the pipe is inserted into the hole and the required length is noted.
Surplus pipe - cut off the mark.
Inside the duct, a noise isolator is installed (if it is included, if not, it is recommended to buy a pipe warmer-the "shell" of the desired diameter) and use it as noise insulation.
The pipe is inserted into the hole.
On the outside, the ventilation grill is fixed to the pipe (for glue or bolts). The blinds should be directed down towards the street, and be horizontal.
The inner case is attached to the wall by self-tapping screws.
The inner case is assembled.
Steps of installation on the example of the valve Domvent (video)
Care and maintenance
For cleaning, it is necessary to dismantle the inner case and remove the filter and noise isolator. This is recommended in the warm season, so that the cold wind does not blow out in the room (or the hole must be sealed).
If the filter and insulator are made of synthetics (and in most models just so) - they can be washed in soapy water. After that, they must dry up without fail.
Pay attention to the purity of the duct inside: you can look inside, while the filter and the heater dry. If there is dust or small debris inside a large layer, you can vacuum it. As an option - you can remove the outer grate and blow the pipe with a vacuum cleaner.
If the temperature in the room in winter starts to drop noticeably (usually at temperatures below -10º and / or in strong winds) - it is recommended to reduce airflow through the valve (if possible adjustment).
The last 7 years in residential buildings are particularly popular sealed windows of PVC, wood or aluminum. They led to very specific complications in the field of creating an ideal microclimate of the room. The use of windows in 2-3 seals completely excludes the influx of fresh air in the premises, which was previously present due to the presence of slits.
Correct and normalize the internal microclimate is possible only if a wall supply air valve is used for manual or automatic control.
Types of ventilation devices
Installation of a forced ventilation system involves the use of 2 different designs of air-supply devices. It should be noted that each design is used in accordance with the requirements of the tenant and provides room with fresh air.
For this reason, almost every modern valve is additionally equipped with a special filter that facilitates the retention of small and large contaminants, as well as the penetration of moisture inside the room.
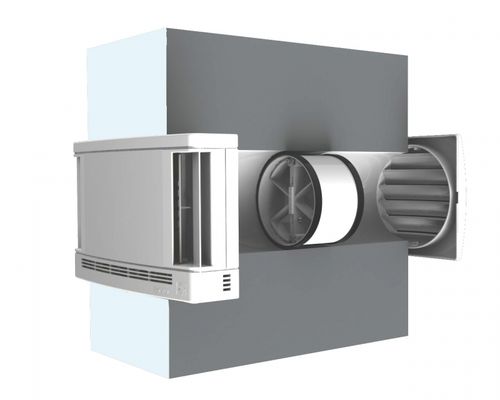
To date, there are 2 types of devices:
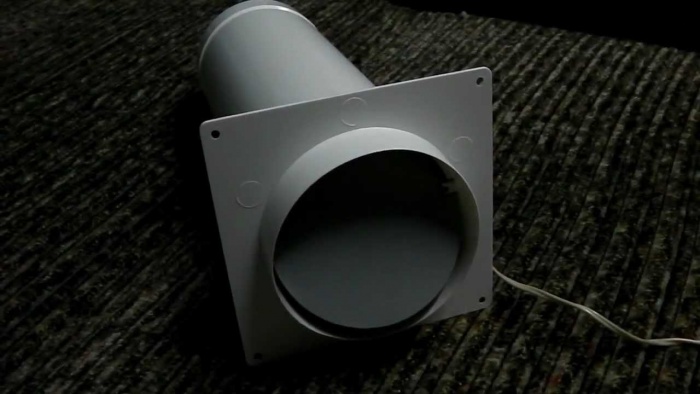
- The structure is located on the wall. This model is the most common and easy to implement. Visually, such a device is a through pipe in the wall, which is only closed from the outside by the ventilation grille. Behind this grate, in the wall itself, there are often installed systems of additional filtration and noise insulation. It should be noted that, on the inside, the hole has a larger diameter, which ensures the supply of fresh air of the required volume.
- Ventilation valve, built into the window structure of the modern window. Such ventilation systems are referred to as simpler devices, which in no way affects their performance. The only difference and disadvantage from the wall is the lack of the ability to install filters.
Regulation of airflow of such systems is carried out with the help of a special handle, which allows, if necessary, to block the flow of air.
Advantages of forced ventilation
Forced ventilation system has a lot of advantages, among which:
- increased circulation of air flow;
- the possibility of regulating the speed of air movement;
- removal of air pollution.
Rationality of use
If modern double-glazed windows are installed in the room, the air regulation is absolutely disturbed and leads to accumulation carbon dioxide, water evaporation as a result of human activity.
Disadvantages of this method are: sharp changes in internal temperature, penetration of dirt and dust from the outside, the disappearance of noise insulation properties during airing; sharp temperature drop for plants, lack of process control and saving of thermal resources.
The same drawbacks are also present in the case of crevice aeration mode , despite a more loyal way of depressurizing the window.
Criterias of choice
To ensure the access of fresh air without worsening the noise-protective properties of windows, vent valves are installed today, which must be selected in accordance with certain criteria:
- The cost. Valve cost, as a rather complex engineering device can reach one-third of the price of the window itself. However, it is worth considering that for normal and long-term functioning, you should buy an expensive and tested valve.
- Installation area. Modern models of inlet valves can be installed directly on the window or through an adjacent wall. It should be noted that installing the valve through the wall will cost more in installation and can damage the aesthetic facade of the building.
If you consider the installation of the valve directly on the bag, then there are 2 different options for possible mounting:
- Replacement of the old double-glazed window with a new window of smaller dimensions and install a valve into the formed slot.
- Installing the valve in an existing modern double-glazed window.
- Method of valve control. Modern models vent valves There are 2 types: manual or automatic control. Units with manual control require constant monitoring of various parameters that affect the air quality in the room.
- With automatic control, everything is much simpler, since all processes occur independently of external influences and desires. The process of regulation and normalization of the climate in the room is carried out through indicators of humidity and temperature in space.
- Level of noise protection. To date, all models of ventilation valves have their own level of noise protection, which must be selected in accordance with the installed windows and the needs of the residents.
- Compliance with the established norms of air exchange. Each installed valve must give out a stream of air in accordance with established norms.
- Operability in harsh conditions. In view of the fact that the device is manufactured in fear with a less severe climate, the design of the valves can carry some shortcomings in a particularly cold season. A striking example of this drawback is the presence of condensate and its further freezing at extremely low temperatures.
The appearance of condensate or ice on the valve, first of all, depends on the temperature and humidity from the inside and outside of the window, the implementation of air flows and operating modes.
Installation of forced ventilation
Before starting work, you need to determine the location of the device. The most common location option is the location in the immediate vicinity of the heating system.
Installation of the wall valve can be carried out with your own hands, and with the help of qualified specialists. The first stage of work involves drilling holes in the supporting wall. After installing the wall, all gaps are filled with special construction foam.
To perform the installation yourself you will need: an external grid white with special apertures providing access to the room, a pipe, a quality noise isolator and a set of special filters, a ventilation grille with a mosquito net.
Installation forced ventilation - this is the only correct solution for people who are sober and caring about themselves. Such a small and inconspicuous design can significantly improve the quality of living standards for people.
Often, being in your own apartment, you have to smell cigarette smoke or other products of life. It happens, first of all, because of the reverse thrust of the ventilation. The smell, along with the flow of air, penetrates into your apartment from neighboring. To protect the home from unwanted odors establish a check valve for ventilation. It not only protects the apartment from reverse flows, but also improves the overall air circulation.
Choosing and installing such a structure, it is worth to learn about its features and device. Also it is necessary to understand the types of products. In order not to spend on ready-made models, it is possible to design a check valve by oneself. This will not only save, but also install an auxiliary part according to the dimensions of the duct.
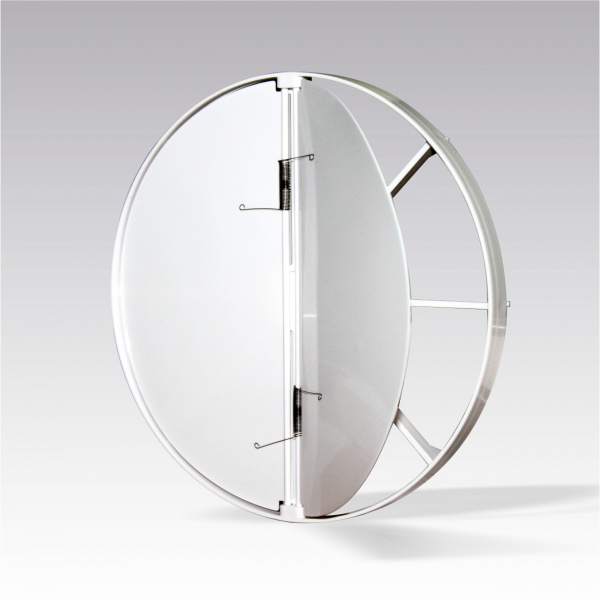
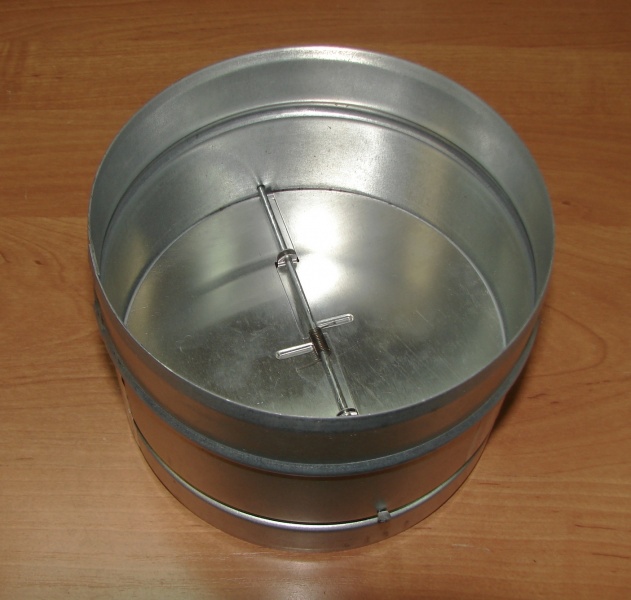
Device and classification
The device consists of blades and a rod. The rotating part does not allow air masses to move in the opposite direction, and the flow moves only in one direction. When changing the direction of the air masses, the moving part of the device is blocked.
The device has an additional function that allows you to regulate the flow of incoming air. This is due to the adjustment of the section.
The product structures are classified according to the following parameters:
Note! Before purchasing a device, consult a specialist. You should tell him the diameter of the mine in your apartment, the area of the room and the humidity level.
Using
In any ventilation system, reverse thrust may occur. Therefore, valves are used in all types of structures.
In buildings that are equipped with ventilation of a natural type, channels from pipes are arranged. For them, valves that are sensitive to minimal changes in air flow are optimal. Installation of the device is carried out simultaneously with the entire ventilation system.
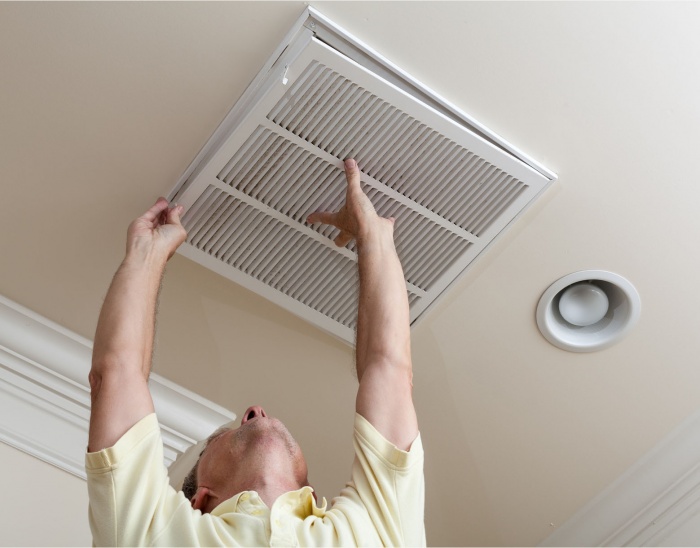
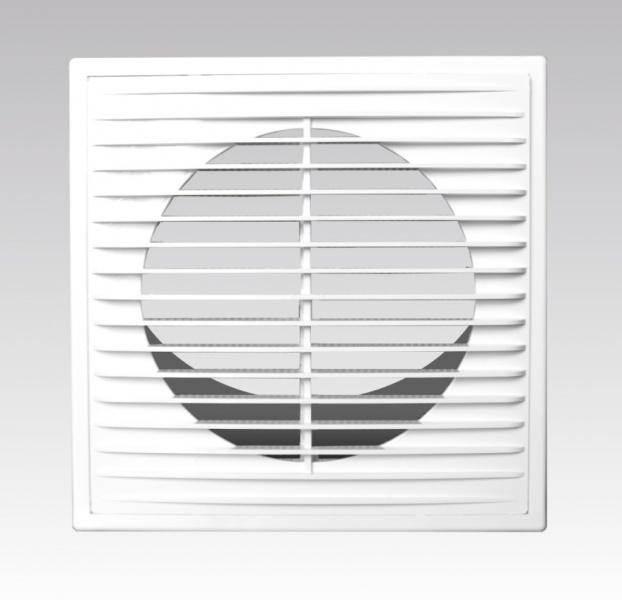
The standard place of the device for reverse air exchange in premises with natural ventilation - this is the interior walls. The devices are mounted in places near or above the door.
Devices air supply ventilation represent a moving part and a lattice - through it in a room the street air arrives. Street air is cleaned by a filter, after which it, heated, enters the room. In rooms with such ventilation, there is no need for third-party ventilation through the windows. It is very convenient for owners of apartments with plastic windows.
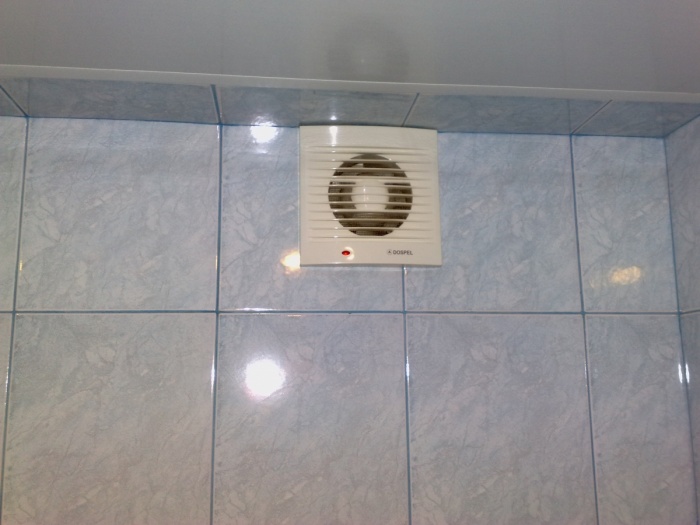
Bathroom fittings
A non-return valve for ventilation installed in the bathroom blocks the penetration of odors from the kitchen. But this does not prevent the withdrawal of the polluted air of their kitchen.
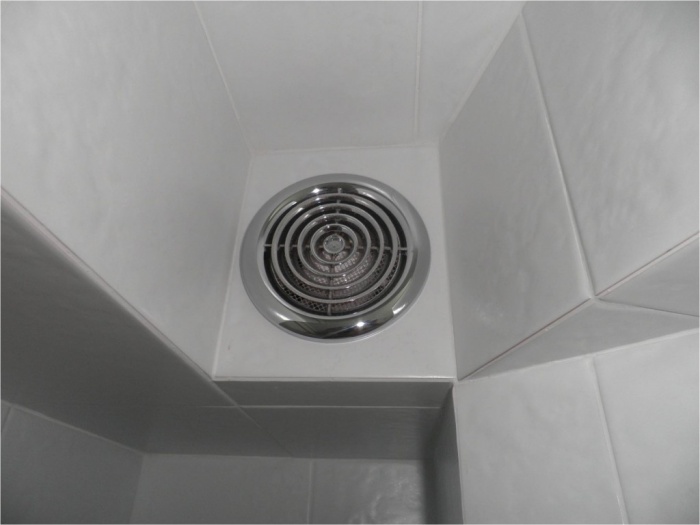
For normal air exchange, a check valve with holes is installed on the grilles. They allow you to remove the airflow of their kitchen without drawing. There are models that take out the exhausted air immediately to the street. On the reverse side of the channel put a check valve - to protect against penetration of cold from the street.
Often, because of smoking neighbors in the toilet or bathroom is the smell of tobacco smoke. Constant contact with moisture in the bathroom promotes reproduction of mold and fungi. Often in such premises there is a musty smell. These phenomena are the result of improper ventilation. A quality air supply valve will save you from such problems.
How to choose
Before buying and installing a valve, you need to know about the following characteristics of this device:

Note! If you do not know the model of which firm to purchase - choose the proven vendors that exist on the market for more than a year.
Valve installation by own hands
For correct installation device is to determine in which place it should be placed. The grid is installed in the inlet or outlet of the ventilation duct. With it, a non-return valve is installed. Installation is quite simple. To do this, just use a liquid nail or self-tapping screws. The grate is installed to the wall as tightly as possible.
When installing the valve behind the fan, first remove the fan. After this, the following algorithm of actions is performed:
- First, the valve is placed in the shaft and marks are made on it for the holes for fastening.
- After that, holes are made in the device.
- The product is placed in the ventilation shaft and marks are already made on the walls - through the holes made in the valve.
- In the walls make holes for dowels.
- Installation of the non-return valve is carried out.
Advice! If there are gaps between the valve and the walls, they must be filled with a sealant.
Once the non-return valve is installed, you can install the fan back. If all procedures are performed correctly, the exhaust air will not enter the room again.
A non-return valve for ventilation is a practical and simple device that contributes to the proper operation of the ventilation system. This allows you to create a healthy indoor climate.
How to design a check valve
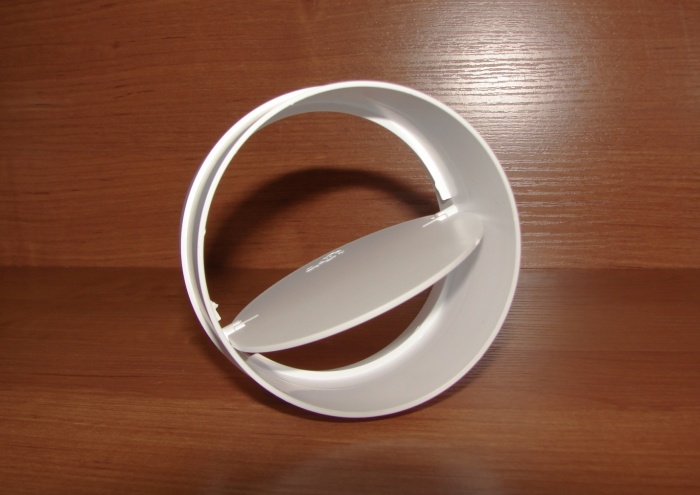
For the construction of a non-return valve you will need to buy a grate, a polymer film and fasteners. Also, to create a device, it is better to purchase a sealant. The simplest version of the design is a valve membrane action. It is easy to construct with your own hands.
The manufacturing of the check valve is carried out in the following sequence:
- Measure the dimensions of the ventilation hole, and then cut out the grate. It should be larger than the vent 2 cm in size.
- In the presence of plastic under the workpiece grate can be done with a file.
- Its surface should be smooth. This ensures a tight fit of the membranes.
- To fix the 2 squares of the film from the two sides of the grid, this procedure is carried out using a sealant.
- Drill holes in the grate - they will later be placed fasteners.
- Place the grate in the vent and screw it on.
Such a device will work effectively both in the case of ventilation of natural and forced type. It will be particularly useful to install a check valve if there are some problems with ventilation. This will keep the room fresh air, eliminating the appearance of unpleasant odors.
![]()
How much are the finished structures
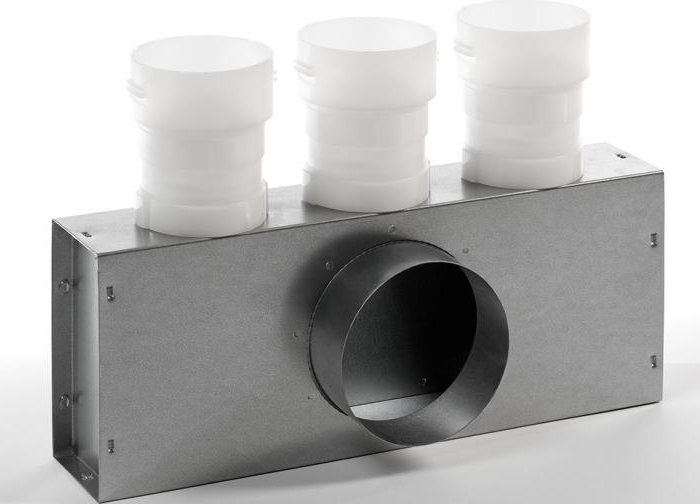
Among the most accessible it is possible to allocate the zinced models. Such products are intended for round ducts. They cost from 200 to 900 rubles. The price of different models depends on the chosen size. The minimum cross section of such structures is 10 cm.
Rarely you can find valves of rectangular shape. The price for it is much higher than for round products. For example, if you choose frames of 30x15 cm among the petal blinds, you can meet models worth 2 - 3,5 thousand rubles.
conclusions
The check valve can not be called the most important element of the ventilation system. Often it works so well that there are no problems at all. However, if such situations arise as wind blowing, the appearance of foreign smells from the street, etc. - the check valve can solve all the problems.
If you do not want to spend on expensive designs, you can build a simple device yourself. It is important to take into account the shape of the ducts and the installation features.