Flows the toilet bowl how to fix it. The toilet tank flushes after flushing: repair of the drain tank with the button by hand. The valve does not work.
The toilet in each house is an element of everyday life, without which it is simply impossible to manage. It is operated much more often than all other devices of sanitary engineering. That is why it is more often than other devices is out of order. And the most vulnerable part of it is the tank, which consists of several internal components. Their mechanical damage, as well as careless handling of the reservoir are the reasons for the loss of this device's performance. In the article, we will consider how to repair the toilet bowl with a button independently, without causing a team of plumbers.
Fill and close the tank
Once the valve is cleaned and again operates, it is again installed in the tank. After inserting the drain valve, the safety lever returns to the position behind the back cover so that the valve is locked. After successful repair of the washing, the individual stages of disassembly are reversed. First, the water turns on, controlling the angle valve. This step is often overlooked. But, unfortunately, no rinsing, flowing or not, without water.
Subsequently, the splash shield with the actuating system, and then with the drive bracket, are inserted and secured with fixing bolts or fastening screws. Make sure they are sitting properly! If this is done, only the drive card is missing. If this also occurs, the initially leaking tank is again invisible. However, the problem with running water is solved. Sometimes it can be so easy!
All the drain tanks have a similar design. The difference is only in the mechanism of water start-up.
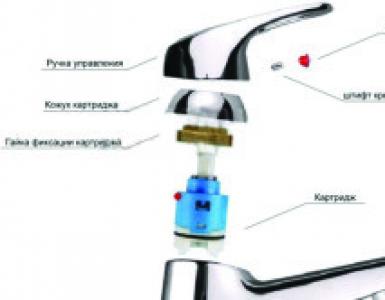
Constructively the toilet bowl with a button or two buttons, as well as with a drainage lever, can be represented as a set of interacting units:
- Filling valve. It is responsible for maintaining the water level at a certain level. The hollow float controls the operation of the valve. When the water rises to the desired level, the float blocks the water supply channel to the tank;
- Plastic float fixed to the filling valve. Works on the principle of the rocker, rising when the tank is full;
- Drain Valve, which has an overflow system. Modern versions of the tanks assume the control of this valve by pressing a button. When manually managing the drain of the old sample, it is sufficient to pull the lever or chain to start the water in the toilet;
- Overflow is a mandatory component of the tank. It is adjustable in height, thus setting the limit water level. If this level is exceeded, the water flows over the overflow pipe into the sewage system, without pouring out through its walls.
The tank with mechanical water drain works very simply. Water enters it through the filling valve when the float is lowered. After reaching a strictly defined level, the float blocks the water supply. Managing the discharge is by hand. If the tank is equipped with buttons, then the water is drained after pressing them. In this case, the drain valve partially or completely opens, letting water into the toilet. The float is lowered, opening the filling valve.
Another conclusion to the conclusion: if the tank should not be dismantled at the same time, decent decalcification can often help. The problem with almost anyone: a permanent trough in the toilet signals that the tank is leaking. It needs to be done quickly. Otherwise, there will be unnecessary water losses and a high level of billing. This step-by-step guide shows what usually causes leakage of the tank, and how easy it is to repair the flushing rinse.
Depending on the degree of defect in the drain, 10 to 100 liters of water are lost daily. Therefore, one who does not want to fall out of the clouds during the next calculation of water should provide rapid relief. But the installer is expensive. Small damage can often be fixed manually. For them, there are simple solutions.
The structure of the toilet bowl with two buttons is a little more complicated, but you can use it more economically. If you press one of the buttons, a partial discharge of water occurs. Full drainage occurs when the second button is pressed.
Increasingly, new types of lower waterway connection. It is advisable to install them if the use of a lateral connection is impossible due to lack of space. The main difference of this tank is the presence of a membrane valve. Under the influence of water pressure in the pipeline, the valve opens slightly and lets the water inside. When lifting water, the float presses on the piston rod, which gradually closes the diaphragm valve. When the set level is reached, the valve closes completely.
Do not ignore the constantly working or dripping toilet cistern. "Every day, ten or more liters are lost through a broken toilet flush," says Michael Pommer, coach at the German Academy of Heimwerker in Cologne. Depending on the damage in the channel, up to a hundred liters may disappear. This pushes the cost of water up. Anyone who does not correct this situation will receive a receipt no later than the next annual financial report in the form of a juicy additional payment.
Immediate action: unscrew the entrance to the toilet
So what to do when the water continuously runs to the toilet? Tenants should immediately contact their landlord to ensure that the damage has been quickly repaired, says Ulrich Roperz from the German Miterbund in Berlin. The order of an artisan is usually the task of the owner of the house.
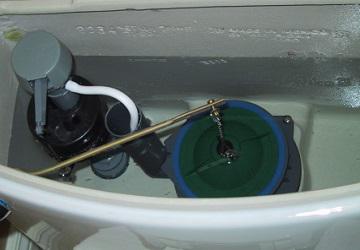
 Fittings with bottom water supply and with control by means of a button
 Common Malfunctions
Malfunctions plum may well lead to loss of toilet capacity. For many, such a sudden breakdown can be a real disaster. In addition, no one will like increased water flow.
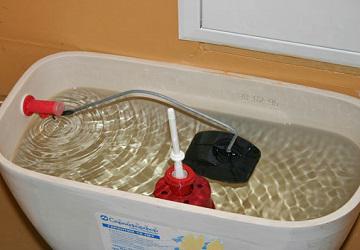
Elimination of noise when filling the tank
The easiest way is to drain the water from the inlet into the tank. This is often found as a corner valve in the intake line of the box and can be rotated by hand. "In other cases, the check valve is located in a water box," Pommer explains. Then the cover of the box must be removed. The valve, which is hidden under the cover, can be closed with a screwdriver.
The owner does not always pay the cost of repairing the toilet, explains Roperz. Some leases contain provisions that stipulate that minor repairs and repairs must be made by lessees of less than a certain amount. If the contract has such regulation, it can offer itself to tenants, even to act. "Repair of a faulty water supply box is not by itself difficult with the help of models with surface mounting and concealed installation," says Pommer. Both washing systems look different, but they work the same way.
About what it is and what kinds it happens, read in a separate article.
And how to choose and in what situations it is necessary, we told in another article on the site.
What are the breakdowns typical for the drain tanks? We list them in the order of their occurrence frequency:
1. The leakage of water from the toilet bowl to the floor. Most often, water flows through the sealing ring, located between the bottom of the tank and the toilet shelf. If the ring is cracked or jarred, the water will penetrate through it. Also, the place of leakage may be the gasket of fixing bolts, with which the tank is fixed to the shelf. They will have to be replaced, if the tightening of the bolts does not work. And it does not matter if the old toilet tank is being repaired, or the modern system is being repaired. After all, the bindings are the same for all of them.
Damaged toilet repair
In the mounted model, the tank is fixed to a wall or wall before installation. If the boxes are located above the toilet, the tank cover can be raised. "The causes of defects are mostly dirty or worn seals, a jammed float or a broken valve," explains Heimwerker Pommer. In the event of a faulty seal, the shut-off valve must first be closed and the tank must be emptied. "Then rotate the cylinder in the box to the left or right to release it from the fastener and unfasten it."
Tip: When replacing gaskets and seals, it is recommended to lubricate them with liquid silicone to extend their service life and prevent cracking.
2. In the toilet is observed a constant current of water. Most often this is due to the overflow of the tank, in which water flows through the overflow tube. This can happen because of a change in the overflow level, a loose fitting of the float to the closing valve, loss of its tightness by the float. A rubber seal on the drain valve may also be worn out. Most often, the fault can be eliminated by adjustment. When the seal is worn, it is desirable to replace the entire drain mechanism.
The gasket on the cylinder head is then cleaned or replaced with a detergent. Before restoration, you must also clean the hole for the flushing pipe with a gel cleaner, advises Pommer. According to Pommer, the rejection of water purging can also be caused by a violation of the intake valve. Then both valves must be replaced.
Also a defective swimmer may be due to excess water in the box. The task of the float is to regulate the level of the liquid in the tank. In old boxes often there is a swimmer, made of solid foam, which gives way to time. When this happens, it does not rise high enough to close the valve. Sometimes the float also clamps and causes a constant flow of water. In such cases, the float can be restored by moving or adjusting the boom to the valve.
3. Malfunctions of the trigger mechanism. If you use the button water feeder, then when the button is pressed, water may not flow into the drain. You will be able to repair the valves of the drain tank with your own hands, as, more often than not, there is a break in the lever mechanism that connects the button to the drain. This applies to tanks with a handle or chain.
Modern tank helps save water
However, in the case of very old devices, most of these repairs are no longer expected. According to Pommer, the new models are already available at a price of 25 euros, and replacing the old rinse with a modern model can reduce water consumption. Nevertheless, care should be taken to ensure that the toilet and drawer correspond technically, says Franz-Josef Heinrichs of the Central Association "Heating", "Sanitary Engineering", "Conditioning."
Ten-year-olds usually require a nine-liter tank for cleaning. If they were combined with four or six-liter strips, clogging would be possible. However, many commercially available washing tanks can also be installed in nine liters.
4. Noisy filling of the tank. This is due to the disconnection of the tube through which water is poured into the tank. This is typical for tanks in which water is supplied from the side. With a splashed pipe, the noise of the incoming water will be clearly heard. To solve the problem, remove the top cover and install the tube on the union.
In the case of weekly house cleaning, toilet cleaning is probably one of the most unpleasant duties. You can simplify the unloved task. What to look for and how to use urinals and scale. Anyone who repairs or remodels a bathroom, weighs the colors of the tile and discusses the shape of the bathtub. It can take revenge on itself: the construction and materials of the sanitary installation are also crucial for the hygiene of a quiet village.
In the cracks, grooves and on the pipe the transitions to the wall, villi and hair like to stick. This is somewhat more expensive, because of its ground clearance, it facilitates wiping. For very small or very large people, this is equally unfavorable, "says Henrichs. In places free from barikas, bowls are often attached at a height of 45 or 50 centimeters, which facilitates the ascent, to which the connections and feeding shafts are suitable.
5. The water does not pass through the tank. Repair of the toilet bowl with a button or with other release mechanisms in the event of such a malfunction is reduced to checking the inlet to the tank. It is necessary to remove the valve from the tank and clean the inlet with a thin steel wire and rinse it with water.
The correct material is important
Shells are almost all made of porcelain, small, but subtle differences are evident during harvesting: high-quality sanitary ware is provided with a special coating. On this water is better shelled. This prevents the appearance of spots or edges of lime. Differences are usually not visible to laypeople. Therefore, Jens Wiesmann, managing director of the German Association of the Sanitary Union in Bonn, advises you to find out about the materials used. In trade there is also a look or a handle under the rim of the rinse: Cheap products are only partially or not glazed, not to mention the coating.
Repair tank with one button
Many people, accustomed to the old cans, do not know how to fix the toilet bowl with a button. In fact, the differences between these systems are very small. For many, the main problem is the disassembly of such a tank. Indeed, the button located on the cover of the tank requires careful handling during disassembly. But the device is very easy to understand.
Regularly clean the toilet, clean
Deposits are then deposited more easily. There is a universal cleaner and, if necessary, liquid cleansing milk, a brush, a flap for smooth surfaces and a cleaning sponge with a rough layer for the bottom of the seat. "If, for example, limestone edges were formed during the holiday, they could be perfectly removed with citric acid," says Steiger. Therefore, he recommends using them only with rubber gloves. Protects from splashes of the eye. Chemicals should be applied for a sufficient time, the brush then releases the deposits.
The procedure is as follows:
- shut off the water;
- empty the tank;
- carefully unscrew the plastic nut around the button;
- remove the cover.
Further actions depend on the nature of the failure. Damage to the tank with the button can be as follows:
Home remedies against lime and urine
Ugly deposits in the toilet can also be easily removed using household appliances. Many housewives swear, for example, on a cola, which, with some aging time and a little clears the ugly edges of the ice edges. Degreasers are used for hard-to-reach deposits - for example, in the fracture of the drainpipe. Also baking soda and vinegar dissolve stubborn urine.
Even with a brush that has a special side part, it is difficult to clean it under the rinse edge. Water is fed into the pool through several nozzles or similar distribution systems. If the drain tank is drained into the toilet, the cause is usually a broken seal. Guide in six steps. A broken toilet cistern leaves a lot of unused water. Often this is a creeping process that occurs only after a few weeks or months.
- A little water is pumped into the tank. Check the position of the float and adjust it.
- The button of water start fuses. This can happen due to clogging of the mine button. It is necessary to clean it and press the button to its previous position.
- Water does not go into the toilet when the button is pressed. Most likely, there was a break in the mechanism between the button and the drain valve. You can restore it yourself. If this element of the armature has broken, then to replace it you can use a copper wire or replace the valve completely.
- Overflow over the water. It is necessary to adjust the height of the overflow or the float. The overflow is regulated very simply. To do this, unscrew the union nut and set the desired overflow level.
- The water flows into the toilet bowl from under the valve. The drain valve may have worn out. It is best to replace the entire valve. To do this, unscrew the plastic nut in the bottom of the reservoir and remove the valve from its place. Install the new valve.
To the note: It happens that the valve is loose in place because of the skew. Re-opening it and closing it helps to eliminate the problem of leakage.
Broken sealing causes water droplets
Step: Remove the lid from the tank
Step: Empty the tank and remove the lifting platform. The small angle valve, which is usually located on the side of the tank, is closed and thus blocks the water supply. Now empty the tank, causing rinsing. "If there is no more water, the lifting bell is as far as possible from one side, and the bayonet mount rotates with a small left turn and raises it up," explains Birkholz.Step: Find a suitable print
The ring seal is now free. "After several years of use, it will show cracks or show a scale of lime," says Birkholtz. "In such cases it is advisable to exchange them." There are replacements in the construction market, but, unfortunately, not in all cases. "It is best to take an old seal, more precisely a whole line, as a model." But before the new purchase the toilet should be rinsed with a bucket.
Two-button tank repair
Economical water consumption adds popularity to such a plumbing fixture. And how to repair the toilet bowl with two buttons? The principle of dismantling such a tank remains the same, as in the one-button version.
Characteristic breakdowns of the two-button tank:
Repair of a tank having a lower water connection
In the tank with a lower water connection, a membrane-type filling valve is used. This can cause problem with filling the tank at low pressure in the water supply system. The water pressure may not be sufficient to press the valve and fill the tank. If your system constantly maintains low pressure, then it is better to replace the diaphragm valve with a rod analog.
Step: Install a new seal
After replacing the seal, the installation is carried out in the reverse order.
Step: Check the water level in the tank
"Once the tank is open, the water level should be checked at the same time," advises the home improvement specialist. To do this, open the side corner valve so that the water can flow again. "If the water level remains below the marking line inside the container, then everything becomes clear." If it rises above it, you can adjust the float on the vertical adjusting screw. "It's better to stay a few centimeters below the mark so that the water can be preserved in the long run."Another common problem is the leakage of water at the entrance to the reservoir of the supply valve. Its location is such that the valve is constantly under water. With insufficient tightness of connections, the presence of leaks is practically guaranteed.
Repair of the toilet tank with the bottom supply of water is performed after shutting off the water supply and removing the lid of the tank. After that, the problem is eliminated by the same algorithms that are described for repairing models with buttons.
We dismantled how to repair the drain tank with a button, with two buttons or with a mechanical control. They differ slightly, mainly by the design of the control mechanism. The general principle of functioning and repair of all the devices considered is the same.
The video shows the repair of the toilet bowl with its own hands, more precisely, the process of replacing its fittings.
The correct work of plumbing - it's saving the budget and a good mood. However, it is not always possible to avoid the leakage of the toilet after flushing. The water draining from the tank drains excess water.
You can deal with the failure yourself, without resorting to plumbing, knowing the algorithm for determining the problem and how to fix it.
Leakage of water from the toilet bowl indicates that the tank of the plumbing fixture is defective. This is evidenced by the following facts:
- A constant noise of water is heard, falling into the bowl of the toilet bowl between the rinses.
- Appears rusty plaque.
- There is condensation on the pipes of cold water.
- The figures on the cold water meter exceed the normal values.
Initially, to avoid such inconvenience will help the correct installation of plumbing equipment.
Breakdowns that occur in the future are completely correctable on their own, having got acquainted with the materials of the causes and methods of repair.
How does the toilet work?
Before you determine the cause of the breakdown, you should remember the principles of the toilet draining device.
From the water pipe, water enters the tank. The reservoir fills up, lifting the float. Having reached a certain volume, the water closes the drain valve, further filling stops. When flushed, pressing the button (lever, pulling at the chain), the valve opens, the water tends to the bowl of the toilet bowl. Further, the filling process should be repeated, however, the toilet bowl leaks, preventing water from reaching the shut-off valve or vice versa, it is poured through the float.
Causes of breakage
Before fixing a breakdown, you should find out the possible causes of it. So, we can identify the main.
Wrong installation
Usually new plumbing products installed not according to norms lead to leakage within the first 6 months after installation.
To find out and eliminate the cause of the malfunction yourself, you can disassemble and inspect the tank for the fact of visible cracks, flaws and check of the check valve.
Drainage device malfunction
After a long time of use, the accessories wear out, reminding themselves of breakdowns. Also, problems can occur much earlier, if the sanitary engineering used low-quality materials of the tank's accessories.
To identify the problem you need to close the water supply connected to the tank, and observe the leakage. If the water leaks when the water supply is turned off, the drain valve has broken. This can be due to blockages, build-up of salt deposits from water or normal wear and tear. To get rid of breakage it is possible having arranged a tank "general" cleaning with disposal of a touch and casual garbage.
If the water remains in the tank and does not flow into the bowl, then the cause is the incorrectly adjusted float, or in a clog automatic water supply system. In this case, you should try to adjust the water supply head.
Identify and repair a breakdown
Leak tank leakage can occur in different ways, so you first need to determine how the water flows:
- Leaks through the overflow.
- The leak occurs before the overflow begins.
- Flows between the bowl and the tank.
- Together with the sink.
- Water flows through the overflow.
The toilet bowl is full, and excess water is spilled through the overflow. This problem occurs for several reasons.
Mechanical damage to the valve body. Breakage happens only with plastic accessories. Deformation or weak, not tight pressing of the gasket.
Wear of the pin holding the lever of the automatic drainage device. Displacement of the float lever.
Before starting repair, prepare the necessary tool: gloves, nippers, pliers and new parts in return for the old ones. Do not forget to cut the water supply.
Lever shift
Lever shift - the most common cause of leaks. To get rid of the problem, it is enough to return the lever to its original position: below the pipe connection, strictly horizontally.
To get rid of other leaks through the overflow, you should:
- Remove the reservoir cap.
- Try to adjust the float by raising it by several millimeters.
- If the leakage has stopped, then you need to replace the axis of the float, or unbend it (the metal axis).
- It is not necessary to turn the lever of the float for the earlier closing of the water.
- The leakage continues after lifting the float - you should pay attention to the valve.
- The hairpin in its composition can be worn, then it should be replaced with a new one or, alternatively, used copper wire. In the place where the pin is attached, there must be a tight connection and no holes.
The solution is to replace the mechanism. Continuous leakage with hermetically seated valve gasket leads to costs for the new device.
Water flows down to overflow
Water constantly flows, reaching or not overflow level. Most likely, rusted or cracked bolt, pulling off the shelf and toilet.
Once again, make sure that the leakage occurs to the level of overflow. Carry out a thorough inspection of the fittings, if necessary, replace a few bolts or the entire set of fittings.
Give preference to brass fittings. Give up the steel, because hebut less durable.
The solution involves a complete parsing of the tank. So, you need:
- Close the water supply.
- Empty the reservoir tank.
- Close the water supply.
- Remove the bolts that pull the toilet bowl off the shelf.
- Rusty bolts should be cut off.
- To reject a tank back, to take a shelf and to place it on an equal surface.
In addition to the valve and float, all parts must be disassembled with keys and pliers. Bolts are replaced with new ones in the process of reverse assembly. Rubber gaskets should also be replaced or resuscitated with sealant.
The tank with a shelf is fixed with bolts from plastic. The cuff should be rolled in the direction of the toilet and carefully put on the shelf. If necessary, then pull off the shelf with a thick copper wire or clamp, as it can also leak, eventually losing elasticity.
Inconspicuously attached pear
Excluded the previous options, and the water continues to flow, not reaching the level of overflow? Rubber pear plays the role of a membrane, closing and opening the drain of water. but rubber products with constant contact with water lose elasticity and do not densely adjoin, as a result of which water flows.
How to fix it?
The best option is to replace the pear. To do this, detach it from the stem with a thread in a counter-clockwise direction. Choosing a new one, you should pay attention to the softer of the proposed options, since such a pear will last longer.
For a while, you can solve the problem with an additional load tied to the lifting rod. The body kit will help to tighten the pear more tightly to the saddle, rather than relieve the leak. In the role of the cargo can act any heavy nut.
Other features of toilet repair you can learn by reading the video:
Prevention
In order to exclude breakage and prolong the life of the toilet bowl, one should direct "spring cleaning" in the tank and bowl at least once a week.
From the tank to clean up possible debris, get rid of the raid. Timely change the valve, monitor the condition of the hardware.
Do not subject the toilet to mechanical influences and sudden changes in temperature. Then the plumbing product will last for many years.
To understand the cause-effect relationship and eliminate leakage in the toilet can be hand-made even by a professional. Initially, it is necessary to exclude simple breakdowns and only then proceed to analyze the plumbing to eliminate more complex problems.