How to install a check valve in the plastic duct. Installation of forced ventilation. Advantages of forced ventilation
For the organization of fresh air inflow into the building (both residential and non-residential), nowadays, the inlet ventilation valves (ventilators) are often chosen.
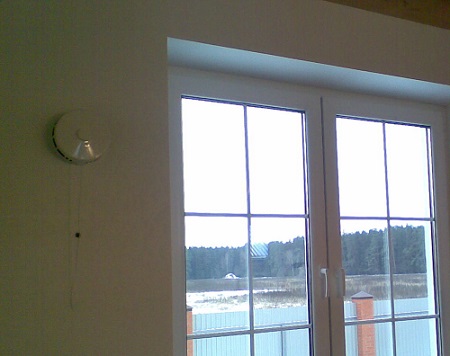
On the location of the most common are wall models - mounted in the outer wall.
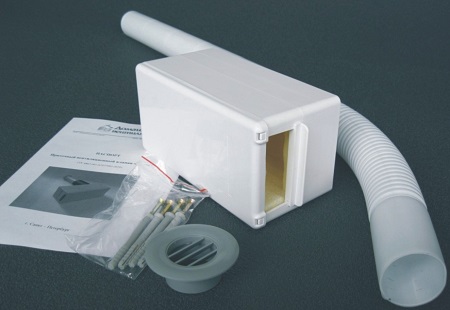
Description of construction
Air duct. A pipe through which air flows from the street into the room. The vast majority of models have a plastic duct.
External ventilation grille. Prevents the ingress of rain ducts into the duct. Made of plastic or metal.
Internal housing - head (plastic, usually shipped in disassembled form). Contains a filter, directs airflow into the room. It is made of plastic.
Inside the duct may be insulation or noise insulation. It is necessary to ensure that the wall around the pipe does not freeze, and also to reduce street noise.
As a heater is usually a polyphobe. The parts described above can be purchased separately, and make a self-made airing machine with your own hands, which will cost a little less than buying a finished product.
If the ventilation wall valve is adjustable, the regulator is located in the inner casing (head). Some models (Aereco EHT) are additionally equipped with a hygro-regulation system. It reacts to the humidity inside the room, and opens the valve when a certain value is exceeded.
More complex air-handling units (for example - a line of models Eco Freshness) can additionally be equipped with the following elements:
Fan.
Recuperator (air heater).
Humidity and / or air temperature sensors - to automate the operation of the device.
Remote electronic control panel (by means of which the fan and / or heater are switched on and off).
Purpose of the product
The task of the supply ventilation valve is to provide a person (as well as animals and plants) with enough air for breathing, and to prevent the appearance of mold in the room.
If there is no constant inflow of fresh air into the room (and for one person it takes about 30 cubic meters per hour) - the body does not receive the proper amount of oxygen. In addition, the stuffiness leads to condensation of moisture on the window slopes, frame and window sill, which in time can lead to the development of mold.
Wall air valve it is capable of supplying a sufficient amount of fresh air: under normal conditions (if the pressure difference is 10 Pa) through most models, about 25-30 m³ / h is supplied. Just as much as required health standards for 1 person. If the pressure drop is greater, the amount of incoming air will also increase.
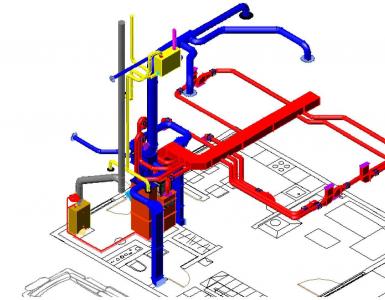
Principle of operation and testing of ventilation ducts
Air from the street comes through the ventilator, because the pressure in the room is lower than on the street. Such conditions (pressure drop) are created by the operation of exhaust ventilation in the room: a hood or a simple ventilation duct.
An important point to consider: if exhaust ventilation it works badly - then the ventilator will also give less air (since the drop will be less than the norm, or it will not be at all). Therefore, before planning the installation of an air supply vent valve, make sure that the exhaust ventilation function normally.
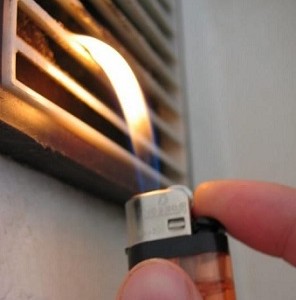
To check the operation of the ventilation duct, it is necessary:
Open the window (or window, or balcony, the main thing - that was the influx of fresh air).
Bring a lighted match or a lighter to the grille.
When the exhaust ventilation is working normally, the flame must be "tightened" into the channel. If this does not happen, or if the flame on the contrary deviates from the grille - then there is no traction, and the ventilation in the apartment is broken.
Instead of an open fire, you can check the operation of the ventilation duct and a regular piece of paper (best of all - toilet, because it is thin and light). A small cut must be applied to the ventilation grille. Ideally - the paper should attract: in this case, the exhaust ventilation works perfectly.
The methods of verification mentioned above may prove useless in the summer, in hot weather. The air in the heat is heavier than in the cool weather, and therefore the pressure in the ventilation duct drops. Therefore, even normally operating ventilation may not attract fire (or paper).
On the pros and cons of the application
The use of a wall ventilator is a useful solution for several reasons:
- inside the room the product is invisible (with any method of installation it is easy to cover with curtains), and if it is noticeable, it does not spoil the interior and does not strike the eye;
there is no need to often open and close the window (which means that the hardware does not wear out, calculated on an average of 10,000 movements);
the valve receives less noise than through the open window (thanks to the filter and insulation in the duct);
it is possible to adjust the amount of incoming air (there are no regulators basically only on the cheapest models);
installation near the battery or at the top of the wall avoids sudden temperature fluctuations in winter;
relative cheapness (1 set of the valve and its installation by specialists in the amount will cost about 3-5 thousand rubles).
With regard to the last point: when installing the vent valve near the battery - the air will heat up from it. In the second case (if the valve is mounted at the top of the wall) air will flow into the room from above, and mix with the room (warmer).
More expensive models of inflows can be equipped with recuperators (heaters) and fans. Fans can be either exhaust or supply air. Such installations are more effective, however, they cost at least 8-10 times more than conventional ventilating valves (for example, the quotations for Eko-Freshness, having a fan and heating, start from 15,000 rubles).
There are also disadvantages:
the need to make a hole in the wall (if the inflow after some time will want to be removed - there will be a through hole in the street);
the errors made during installation can lead to the fact that the wall (the section between the hole and the slope) will freeze, or some part of the duct will freeze in winter;
in too cold regions (where the temperature falls for a long time below -10 °) in the winter the inflow can not be used, since the room will be very cold;
models without a fan can average about 30 m ³ / h air (which is normal for 1 person in the room).
Types and Distinctions
All wall inflows differ in several parameters:
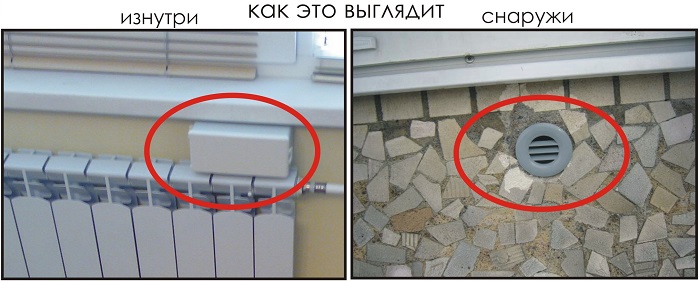
How does the ventilator look outside (from the street) and from the inside (from the room)
With manual adjustment of the amount of passing air or without adjustment.
By the presence or absence of an automatic adjustment system.
By the presence or absence of noise insulation duct.
If possible or impossible to install additional accessories.
If possible or impossible to completely shut off the valve.
By the diameter of the duct.
By the amount of air passing through.
Otherwise, the differences are only in the device internal (located in the apartment) housing and the appearance of the elements.
As a special case - there are differences in the form and material of the duct. For all models it is a plastic pipe. Only SVK V-75 M is different - this wall valve The air duct is made of expanded polystyrene and has a rectangular shape. It is located immediately under the windowsill.
The most successful are the following sites:
Under the windowsill, next to the battery.
At a level of 2/3 of the height of the window opening (for an ordinary apartment - at an altitude of about 1.8-2 meters from the floor).
In the first case, the incoming air immediately heats up from the battery. In the second - enters top premises where it mixes with warm air. Both options are good in that this arrangement allows you to hide the wall valve behind the curtains.
The only requirement that should be considered in the second case: from the location of the supply valve in the wall to the window slope should be a minimum of 30 centimeters. Otherwise this site in winter can freeze.
On the device and installation of the valve using the example of KPV 125 (video)
Stages of installation
To install the supply valve in the wall (we will consider the installation process for valves with a circular duct, for the installation of the SVK V-75 M - it is possible to read separately):
Marking tools.
Installation of diamond drilling.
Hacksaw (for cutting the air duct as needed).
Glue (if the outer grille is adhered to the duct) or a screwdriver (if bolted).
Unnecessary rags or polyethylene film - to lay the floor at work.
Means of protection of eyes and respiratory organs (from flying dust during drilling).

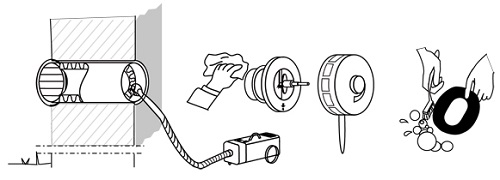
Installation is performed in the following sequence:
The installation location of the ventilator is chosen, taking into account the rules mentioned above.
A through hole is drilled in the wall. It should have a slight slope (3-4 degrees) in the direction of the street - to prevent moisture from accumulating in the duct.
Drill holes for self-tapping screws (for attaching the inner case).
The air duct is used: the pipe is inserted into the hole and the required length is noted.
Surplus pipe - cut off the mark.
Inside the duct, a noise isolator is installed (if it is included, if not, it is recommended to buy a pipe warmer-the "shell" of the desired diameter) and use it as noise insulation.
The pipe is inserted into the hole.
On the outside, the ventilation grill is fixed to the pipe (for glue or bolts). The blinds should be directed down towards the street, and be horizontal.
The inner case is attached to the wall by self-tapping screws.
The inner case is assembled.
Steps of installation on the example of the valve Domvent (video)
Care and maintenance
For cleaning, it is necessary to dismantle the inner case and remove the filter and noise isolator. This is recommended in the warm season, so that the cold wind does not blow out in the room (or the hole must be sealed).
If the filter and insulator are made of synthetics (and in most models just so) - they can be washed in soapy water. After that, they must dry up without fail.
Pay attention to the purity of the duct inside: you can look inside, while the filter and the heater dry. If there is dust or small debris inside a large layer, you can vacuum it. As an option - you can remove the outer grate and blow the pipe with a vacuum cleaner.
If the temperature in the room in winter starts to drop noticeably (usually at temperatures below -10º and / or in strong winds) - it is recommended to reduce airflow through the valve (if possible adjustment).
A check valve for ventilation is necessary for the effective operation of the ventilation system. It excludes the possibility of turning the air flow in the hood, thus ensuring the influx of exceptionally fresh air into the dwelling.
1
Quite often the apartment building starts to function inefficiently. It is easy to notice this by the appearance of unpleasant odors in the home. There are similar situations due to the fact that in the ventilation system there is a reverse thrust. This is understood as the phenomenon of the return of a part of the air from the vent to the living quarters.
Reverse traction can be formed for the following reasons:
- Incorrect installation on the roof of the exhaust pipe.
- A small amount of fresh air entering the system natural ventilation.
- In one of the flats of the high-rise buildings, a powerful forced draft was mounted, which led to disturbances in the operation of the general house ventilation system.
Powerful forced draft
More often than not, problems with natural ventilation occur when the check valve fails. Arranged this device is very simple. Its main constructive element is the shutter. It can be opened by air flow only one way. And when the movement of air changes its direction, the shutter is slammed. Due to this, the reverse thrust stops. The shutter for devices operating in natural ventilation systems is made in the form of a flap or disk. Such devices can have different sizes and configurations (rectangular, circular) cross sections.
The check valve, in addition, can be heated and operated without heating. The first type of devices is installed on ventilation systems equipped with an electric drive. Heated valves eliminate the risk of condensation in the ventilation and the formation of ice on its internal parts during severe colds. The key parameter of the described devices is their throughput. To ensure the effective ventilation of the standard housing area, the latter should be at a level of 4-6 m / sec.
Devices to prevent the formation of reverse traction are made of plastic and metal. Metal structures are considered more durable. But at work they produce loud enough sounds (claps), on such valves condensate often settles. Among other things, they are prone to rust. For these reasons, many now decide to purchase a plastic check valve. It functions almost silently and is inexpensive. True, his service life compared with products made of metal is much lower. We add that the devices of interest to us not only prevent back draft, but also do not allow to get into the ventilation of dust and small insects.
2
The devices described in the article are of four types in their structure: membrane, single-leaf, shutter-type and butterfly. Valves of membrane type are supplied with a flexible damper. It reacts to the smallest movements of the air, so such devices are considered the most sensitive. Single-leaf check valve is made in the form of a shutter. It is fixed on the horizontal axis. The air flow rotates the flap, thereby closing and opening the passage of natural ventilation.
The mechanisms of the shutter type have 2-4 horizontal axes, on which a number of blades are mounted. Such devices are often called gravitational and petal valves. Mechanisms such as a butterfly are also quite common. They are usually made of metal and installed on ventilation systems equipped with an electric fan. Butterflies have two flaps located on either side of one axis. The disadvantage of such valves is high noise during operation. It can be reduced by mounting on the butterfly blade sealing elements.

Butterfly check valve
When choosing a check valve for ventilation, it is necessary to pay attention to the material from which it is made, its device, shape and diameter of the section. It is important to remember that in a residential building such a mechanism is obliged to react to insignificant streams of air. In this regard, experts advise that when installing natural ventilation, the valve should be supplemented with a hood (that is, a special fan). On the wall, these structures do not look very nice. But it does not matter. It is always possible to cover the mounting location of the hood and valve with an elegant ventilation grille.
Note! Butterfly mechanisms in temperate latitudes are covered with icing much more often and faster than conventional single-leafed products.
One more nuance. If you purchase ready-made kits for natural ventilation of the home (valve plus fan), special attention should be paid to the amount of exhaust power. Here everything is simple. For bathrooms you should buy kits with a power factor of 7, and for kitchens - with a score of 10.
3
Careful owners can save the family budget. If there is a desire, the valve for ventilation can be really done by yourself. True, the exhaust fan still have to buy. But all the same, the costs will be less.
With your own hands the described valve is done like this:
- Take 3-5 mm thick piece of textolite or strong plastic. Cut out a plate from it. It must have geometric dimensions corresponding to the parameters of the ventilation hole. The plate will serve as the basis for a homemade device.
- Drill a few holes in the manufactured product (around the edges). Some of them are needed for fixing the base to the wall surface, part is for fixing the fan. You also need to make holes in the center of the plate. Through them, a stream of air will penetrate into the room. The size of the holes and their total number are selected at your discretion. The main thing to remember is that the ventilation capacity will be the higher, the more "holes" you drill in the plate.
- Attach the hood to a plastic or textolite base, made by own hands. Preferably in the area of its joint with the plate put a gasket of rubber. Then the integrity of the structure will increase significantly. You can also put rubber pieces under the fasteners to reduce the level of vibration and noise emitted by the fan during operation.
- Take a sheet of thin plastic or dense (thickness above 0.1 mm) film of polyethylene. They are needed to create the wings. Glue the film (plastic) to the plate. Important! Self-made valves are required to cover the ventilator completely. Initially, glue plastic or polyethylene whole. And then divide them into two parts (they should be the same in size).
![]()
Manufacturing check valve own hands
Now you need to put a self-made valve in vent channel and securely fasten it with dowel-nails or to the wall. The gaps formed between the wall surface and the installed mechanism must always be sealed with a good sealant. The next step is to cut the leaves in half. How to do it right, we said above. Add only that the cut must be perfectly flawless. This is easy if you use a sharp knife to separate it.
That's all. You have made an excellent membrane valve for natural ventilation, which, by its performance, is in no way inferior to factory devices. It is guaranteed to last you 2-3 years. The principle of the self-made device is simple. The valves open under the influence of the flow, letting air into the ventilation duct from the living room. If there is a reverse thrust, the film slams (and absolutely hermetically). So, inside your home from the house ventilation system does not get air. If it is necessary to force the ventilation of the room, you only need to start the exhaust fan.
Modern technologies make our home increasingly airtight. Windows made of metal-plastic, laminated surfaces and stretch ceilings prevent natural ventilation, which causes dampness and mold in the houses. Domestic people suddenly begin to suffer from allergies and frequent respiratory diseases - this is also a side effect of the complete sealing of the house. Stagnant air is replete with allergens, microorganisms are actively multiplying into pathogenic bacteria. That's why it's important to mount into the wall check valve, which will provide access to outdoor air in the room and at the same time will not allow the appearance of drafts.
The supply valve is a simple device for ventilation
The main purpose of the supply unit is to provide fresh air into the room.Under the condition of normal operation, the supply unit passes an average of up to thirty cubic meters of air per hour to the room, which corresponds to the physiological needs of one person.

The device consists of several elements:
- Tube-duct. Usually this part of the device is made of plastic.
- Lattice (metal or plastic) to protect the outside of the duct.
- Internal insert with head and filter for air purification.
Some devices are additionally equipped with a noise isolator and. These additional elements do not allow the valve air supply ventilation in the wall to freeze in severe frosts and block street noise.

The hygro-regulation system automatically opens the valve if an excess of the standard humidity reading is observed in the room.
Complementary exhaust valve can also be additionally equipped with:
- fan;
- temperature sensors;
- air recuperation system;
- remote control.

Advantages and disadvantages of the walled inlet valve
Like any device, the ventilator has its undoubted advantages and disadvantages, which can not be ignored. First about the good:
- With the use of the device, the need for constant opening and closing of windows is greatly reduced. This saves time and keeps the window mechanisms.
- The device acts as a noise isolator and filters the air from toxic urban impurities.
- The device has the function of regulation, it can be customized to the needs of a particular home.
- Mounting of a ventilator in the working area heating devices greatly saves heat loss.
- The device has small dimensions, almost invisible on the wall and does not interfere with the placement of furniture.
- The device has a relatively low price, it is easy to install and can be manufactured and installed independently.

Helpful information! Installing the air conditioner in the battery area will cause the cool air of the street to be heated by the heat of the radiator when entering the room. The second option for installing the device is at the top of the wall, where the incoming air masses will be mixed with the warm air of the room.
Cons in using the device:
- To install a vent valve in the wall, it is necessary to make a hole, that is, in some way, violate its integrity.
- Incorrect installation of the device may cause the wall to freeze.
- In the northern regions in winter, the ventilator can contribute to a drop in temperature in the room to uncomfortable values for humans.

Types of ventilators
Supply units differ in the following parameters:
- presence of airflow adjustment (mechanical or automatic);
- presence of a noise isolator and a heater;
- the presence of additional elements;
- the possibility of complete insulation of the duct;
- in size and appearance.

Air exchanger selection
Before you buy a supply valve in the wall, you need to check it for compliance with some important criteria:
- The device does not should cost too cheaply, a quality device equipped with the required number of functions costs at least a third of the average cost of a plastic window.
- The valve should be installed directly into the window frame or into the wall next to the window. It is important to check the possibility of such an installation.
- It is necessary to determine the type of ventilator control - mechanical or automatic. The machine will greatly simplify the need to control the optimum temperature and humidity in the house.
- Pay attention to the level of noise protection device.
- Ability of the valve to carry temperature regime region.

Prices and popular models
Ventilation devices with a minimum set of functions are relatively inexpensive. The simplest model can be purchased for five hundred to eight hundred rubles. But the most effective models are in the price category two - four thousand rubles.
Table 1. The average cost of supply air valves in the wall
| Picture | Model | Average price, rub | The volume of incoming air, cubic meter per hour | Diameter, mm | additional characteristics |
|---|---|---|---|---|---|
 | Kiv 125 | 1600 | 36-60 | 133 | Mosquito net |
 | AERECO | 4200 | 5-40 | 100-125 | Noise suppression |
 | KPV-125 | 2450 | 54 | 125 | Thermal insulation |
 | SVK B-75 | 2500 | 1,5-31 | 142 | Thermal insulation |
Duct installation features
Before installing the valve, you need to determine the location of the valve. The best place for this is the place near the radiator on the load-bearing wall.

- Step 1. Drilling a hole for installing the air exchanger. The diameter of the hole should be slightly larger than the valve tube. This will allow you to correctly set the device and securely fix it in the wall.
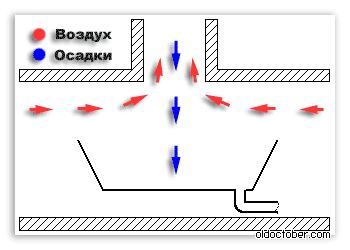
- Step 2. On the outside of the wall in the area where the device is placed, it is necessary to provide protection against rain. If it is not possible to do this (the valve outlet will be located in an inaccessible place), the hole should be made with a slight inclination towards the street. So rain drops will not get into the device.
- Step 3. Install the supply valve to the wall and fix it with a construction foam.

How to make a supply valve in the wall with your own hands
For the manufacture of a simple device you will need:
- a lattice from a bathroom or a bowl;
- filter (piece of foam rubber);
- heater;
- plastic pipe;
- valve.
The plastic pipe will be the air duct, the piece must match the thickness of the wall (you can provide a small margin). The optimal diameter of the tube is 10 to 12 centimeters.

- On one side of the tube, a grid is fixed, it will be outside part device.
- Inside the tube is inserted rolled up roll insulation (minvata, polystyrene). For this purpose, you can use a pipe heater. The thickness of the layer should be about two centimeters, this is enough to prevent frost.
- A foam filter is then inserted into the tube.
- The last stage will be the installation of the valve. You can make it yourself or purchase a finished product in any store of ventilation equipment.

Article
Quite often there are situations when the existing ventilation system in houses can not cope with its function and air saturated with the smells of the prepared dishes is not discharged to the ventilation ducts, or worse, odors from neighboring rooms and apartments are received.
Such effect can suffer not only kitchen facilities, but also those where there are ventilation openings - bathrooms, bathrooms. To save from inhaling contaminated and badly smelling air will help a check valve for ventilation, which, despite its simple design, will completely change the functioning ventilation system, bringing it into a normal working state.
Types of check valves
The purpose of the non-return valve is to reduce or increase the value of the section of the ventilation duct. Depending on the task put before the check valve, there is a greater or lesser flow of fresh air or outflow of contaminated air masses. But the main task, nevertheless, is the inadmissibility of the inflow of foreign smells into the living quarters, which can penetrate for various reasons - clogging of the ventilation ducts, their poor tightness.
Today the consumer has the opportunity to choose among a variety of similar devices a non-return valve for natural ventilation:
- by material of manufacture;
- in form;
- by the way of functioning;
- in the place of installation;
- by the ability to pass a certain amount of air.
According to the material of manufacture are made of metal and plastic, the shape of the check valve can be round or rectangular and depends on constructive features the ventilation system itself, the shape of its section.
Plastic and metal are different in quality materials, so valves made from them are used in various ventilation systems, depending on the conditions and design features of the latter.
By the method of controlling the ventilation device - automatic and manual. Automatic devices can be controlled, practically, without human intervention, by means of microcircuits. Manual control is used in simple ventilation systems, where the regulation of the amount of air flow and time is carried out by simply opening or closing the dampers.

The non-return valve can be installed in a vertical position or horizontally, depending on the design of the ventilation system. If the airway ducts are positioned vertically, this implies that the air masses move vertically, so installing a check valve for ventilation is horizontal so that the blades of the device can with great effect flow air flow. When the ventilation ducts are horizontally positioned, the check valve is mounted vertically.
Bandwidth is a parameter that determines the amount of air that can pass through the ventilation device in a certain time. Different kinds of check valves have different parameters of throughput.
Constructive differences
The device of the check valve does not represent a complex engineering mechanism and looks like a freely fixed on the axis of the blade or horizontal blinds. Also in the construction there is a counterweight, the task of which is to stop the operation of the non-return valve at the time when the supply fan does not function.
Such devices are used in ventilation systems using air ducts of various large section, in shape - square, rectangular or round. Mounted on specially made for this purpose holes. If used in industrial systems where there is an increased explosion hazard, the check valve may have dimensions from 125 mm to 1000 mm.

Check valve butterfly for ventilation is made of steel with zinc coating, has two blades, fixed on the axis, which is installed in the center of the vent hole. The valve operates only when the valve is on inlet fan, when it is turned off, the blades are closed. This principle of operation is relevant for almost all such devices.
There are models of check valve of this type, which are equipped with rubber seals, which makes it possible to reduce the noise level produced by the motion of the blades. Products with cross-section sizes from 100 mm to 315 mm are produced.
Also there is a check valve of the petal type, called still "blinds". It is a grating with horizontally narrow blades that let air masses pass in only one direction. They are often used in everyday life, when it is necessary to improve the operation of the exhaust ventilation system.
Instead of several blades, the return air valve for ventilation may have a design consisting of square or circular plates that perform a complete or partial overlapping of the ventilation duct.

Such devices can not always be used, because at negative outside temperatures, the plate, when in contact with the walls of the ventilation shaft, can be covered with ice, which must be removed with the help of a building or household hair dryer. For this, it is necessary to make easy and convenient access to the non-return valve.
Can I do without a check valve?
According to some people, it is possible, and the work of the ventilation system will not stop, but it will be worse. The non-return valve prevents:
- The formation of return thrust, when the room gets air from neighboring rooms or outside.
- Access in winter time to cold air masses.
- Entry into the ventilation ducts and inside the premises of insects from the street, shallow dirt and dust, which can disrupt the operation of the entire system, until it goes out of order.
- Increase the humidity of the air inside the house, by penetrating it from the outside.
On the basis of all that has been said, it can be said with certainty that a check valve is needed, since it protects the ventilation system and promotes its normal functioning.
How to choose a check valve?
Naturally, the consumer chooses a check valve for ventilation, the price of which corresponds to the quality of the product. Some models have exhaust fans, in which case the cost of the device will undoubtedly be higher. In addition, the price is affected by the size of the check valve, the material of which it is made, the type of section, the purpose, the manufacturer. On average, the cost of a non-return valve varies from 300 rubles to 3500.

The effective operation of the non-return valve depends largely on the speed of airflow through the ventilation duct. It is necessary that the blades come into motion even from the slightest air movement, since insufficient thrust is the first reason for the ineffective operation of the entire ventilation system arranged according to a natural principle. To strengthen the thrust, exhaust fans are installed in the ventilation ducts, complete with check valves.
Without these devices, the check valve will only serve as a damper that blocks the air intake. Fans should also be selected based on the required power, which is calculated based on the volume of the room.
Considerable participation in the correct operation of the non-return valve is taken by factors such as climatic features of the region - temperature, prevailing wind direction and its speed. A low temperature leads to icing of the valve, and the wind contributes to faster clogging of ventilation ducts.
Today, the manufacturers claim that the plastic check valve for ventilation, whose throughput capacity is 4-6 m / sec, is very popular. In addition, it does not create noise, and can be used when working exhaust fans, and as an independent device.
The choice can be affected even by the appearance of the decorative grating, which also, to some extent, performs the function of a check valve, albeit minimal.
Equip your apartment or house with a non-return valve, by purchasing it and inviting a specialist to install it, but you can do it yourself. The choice is yours.
The causes of external overpressure in the apartment ventilation system.
When the ducts of the ventilation shafts do not extend directly to the roof of the building, but to the technical floor, under certain weather conditions, airflow from the technical floor may enter the ventilation openings of apartments located on the last floors of the building.
Usually, on such technical floors, equip one huge pipe, designed for the entire entrance. A large pallet is installed under the pipe, connected to the sewage system. If, at the same time, close all other openings connecting the technical floor with the external environment, then the ventilation system may become fully operational.
But, as a result of various re-planning, related to the construction of those. floor sheds or even living rooms, the operation of the ventilation system is disrupted. This is facilitated by the broken down original or, alternatively, additionally installed doors.
In addition, in high-rise buildings on those. floor there is another parallel ventilation system, this is a smoke exhaust system. If the doors leading into the service rooms of the smoke removal system are not hermetically sealed, this too may cause a disturbance in the operation of the apartment ventilation.
Well, and the last. For the correct operation of the passive ventilation system, it is required that the air in the apartments is warmer than on those. floor, but this hot condition can not be met in the hot summer.
The reason for the penetration of foreign smells into the apartment is the excessive air pressure in the premises of the technical floor. This pressure arises with strong gusts that can pump air through the openings on the technical floor, such as technological windows, openings with missing doors, etc. The value of this pressure also depends on the wind rose, so the appearance of unpleasant odors can be seasonal in nature.
It was this phenomenon that I discovered immediately after I moved into a new apartment on the top floor of a sixteen-story building. By the way, at that time, the original scheme of our house ventilation was not broken yet, but still it failed in a strong wind of a certain direction.
It was 26 years ago, and then, I did not even try to find a ready solution to eliminate this disgrace. But, in the following years, during my few trips to local construction stores, I never saw anything like that that I managed to produce in just one day.
The air diaphragm valve.
The device is a diaphragm valve (valve) with the function of forced opening.
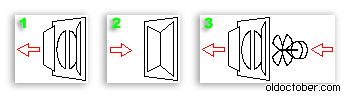
1. When air spontaneously moves from the apartment to the ventilation shaft, the valve flaps open under the pressure of air.
2. When air from the ventilation shaft starts to move into the apartment, the valve flaps are closed and the valve is hermetically locked.
3. In order to ensure ventilation of the room with excess pressure in the ventilation shaft, an exhaust fan is used.
By this simple scheme, I rested the first air valve. As the engine for a self-made fan, a "EDG-2K" motor was used with a power of only 5 watts from an old tape recorder.
The first model of the fan revealed a number of shortcomings. When high pressure air in the shaft, a 5-watt motor could not provide normal ventilation. And the seals of this engine were not very successful design, because of which the bearings had to be lubricated too often. Unfortunately, this home-made fan is not preserved, so I can not show it.
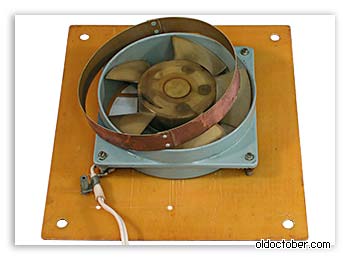
As soon as I could, I replaced the home-made fan with a factory-built 20-watts VN-2 fan. In those times, they just had to be repaired, and something that fell into the "dry residue".
By a lucky chance, the diameter of the self-made fan almost coincided with the diameter of VN-2, and the valve did not have to be altered. I just drilled four new fixing holes, and the old one was sealed with adhesive tape.
Everything would work like that, but once the wife went to neighbors living on the floor below just when the fan was working. Returning, she reported that the noise from our propeller at the neighbors was heard several times louder than ours, although their apartment was not even under us, and the total vent pipe we did not have any. Here is such an acoustic paradox.
I suppose that this was partly due to the fact that the shaft of the BH-2 fan rotated in ball bearings, and the fan itself was not isolated by the shock absorbers, and partly, perhaps, with some unknown resonant phenomena in the ventilation system.
Anyway, it was decided to seriously improve this design.
That's what happened as a result.
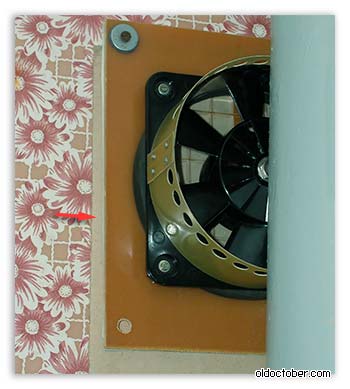
Design and details.
On the local radio market, I bought an imported second-hand fan, but this time, of course, on sliding bearings. Backlash bearings did not have and I made a new valve under this device.
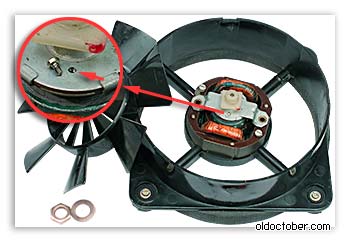
The fan was conditionally nonseparable (on rivets), therefore, to get to the stuffing boxes, I had to drill two holes for lubrication. At the same time I already cut M1,6 threads into them.
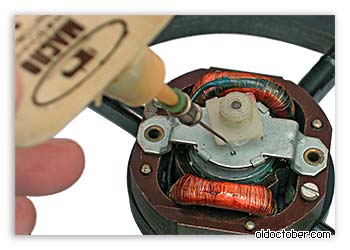
Through these holes, oil was poured into the oil seals with a medical needle.
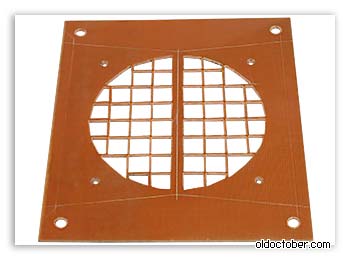
The valve base was made of 4 mm thick fiberglass. First I marked the grill on the fan side, then drilled what I could, and at the very end I processed the holes with a file. All operations were done so as not to damage the smooth surface of the fiberglass on the side of the future valve flaps.
To seal the joint between the fan and the valve body, I used a gasket of porous rubber that was folded into a ring and glued directly to the fan casing.
Another ring I made from fiberglass in thickness of 0.5 mm. It has allowed to fix on the case of the fan the kapron filter made of ladies' pantyhose.
A sealant made of porous rubber and a kapron filter should protect the apartment from penetration of small insects, if any, in a mine.
To ensure that the vibration from the engine is not transmitted through the valve body to the wall, I installed the engine on rubber shock absorbers.
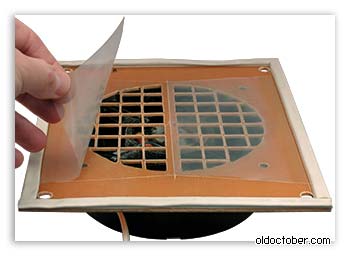
Manufacturing of valve flaps.
Special attention should be given to the polyethylene film from which the valve flaps are made. I used 0.1mm thick polyethylene. The larger the cell in the valve body, the thicker the film should be.
For the film on the market, it is better to go with your scissors. You also need to choose the largest roll with a smooth film. Wavy film is not good. Directly from the roll you need to cut several pieces of film and immediately put them in a hard folder for papers so that the film does not accidentally get crushed.
For fixing the leaflets to the valve body, I used Scotch tape on a lavsan base. Previously, this kind of adhesive tape was used to glue tape.
The video shows the process of manufacturing valve flaps. Expand the player to full screen to see the video in HD quality.
The leaves are made in the following order.
First, a piece of film of the required size is glued to the base, using adhesive tape (Scotch tape).
Then, with a sharp knife along the ruler, the contour of valve flaps is cut. And only at the very end of the valve leaves are separated from each other.
If the film is accidentally wrinkled during gluing or assembly, you can safely change it. With a small excess pressure in the ventilation shaft, the wrinkled film will "siphonize" and let the miasma into the apartment.

To seal the joint between the valve and the wall of the room, it is convenient to use a self-adhesive sealing tube. I bought a tube meter in the construction market, which is usually used to seal windows and doors.
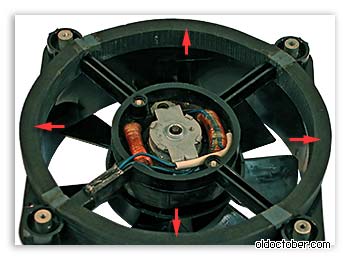
To install the valve, I drilled four holes in the wall with a diameter of 8mm and hammered into it the factory nylon plugs (dowels). The valve body was fastened with four screws and washers, having pre-laid rubber washers under the washers.
In order not to damage the valve flaps during installation, I pressed them with a piece of cardboard and removed the cardboard only when the valve was fixed to the wall with two upper screws.
The right part of the valve is not visible in the photo, since the vent hole is just behind the cast-iron sewer pipe.
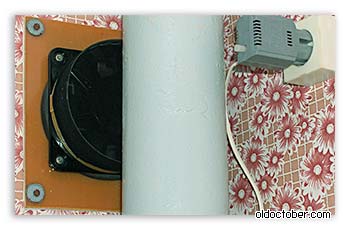
Since the fan was purchased with some power margin, I connected it to the network through the simplest triac controller. The regulator allows to reduce the engine speed and accordingly reduce the noise. The design of this self-made power controller is described in detail.
Operation of the valve.
Operation is reduced to periodic cleaning kapron filter. Approximately once a month or two filters must be stripped in water with soap.
The valve of the last modification, since the last revision, has been working for more than 11 years and has been dismantled for registration of this article with photographs. I hope that I will live to the next revision.
There may be a question, how to know in which position the valve leaves are located, because they can not be seen from the room.
If you sharply open the door of the room where the valve is installed and the valve releases cotton, then its doors are open, if the valve slams when the door is closed, the doors are closed. But, this is if the door opens outside the room. If the door opens inward, everything will be exactly the opposite.
Known issues.
For all 26 years of operation, there was only one failure of this valve, when local non-union youth gathered at those. floor, threw the mine with burning paper. Then the valve flaps were melted and had to be replaced.