Than to glue the pvc corner to the ceramic tile. Belt plinth and its installation. Tips: how to set a corner on the bath against leaking
Between the bathroom and the wall you need to close the space, no matter how small it was. Even if the seam is only a couple of millimeters in width, then water will get through it for the sanitary equipment, and because of the lack of ventilation, mold and fungus will develop. To install this seam, you can use different ways, but the most common is plastic corner for Bath. It is installed on top of the seam, thereby sealing.
Advantages and disadvantages of a corner for a bath
Before installing a plinth, it is worth paying attention to its advantages and disadvantages in order to make the right decision and give preference to it.

Characteristics:
- Optimum cost. This product is considered to be one of the cheapest at cost and provides an opportunity to completely seal the gap between the bathroom and the wall.
- To paste a border to the bath so that water does not become damp, it will take only a couple of movements and a building material with a tool.
- The plastic corner is resistant to an environment with high humidity, as well as to sudden temperature changes.
- The plastic is flexible and soft in structure, so that the edges can be fastened even to an uneven surface.
- Plastic border is not terrible impact chemicals, used in the care of the bathroom and tiles.
- Corners made of plastic on the tile do not require special care. To clean them is a pleasure, as it is enough to simply wipe with a special cloth.
The plastic corners that are installed around the bathroom have their drawbacks, however, they are not too significant.
Despite the fact that the material is resistant to humidity, it can become a place of formation of such problems as fungus and mold.
To eliminate this problem, it is worth every day after using the bath to wipe the surface of the corner dry.
Types of plastic curb for a bath
In what form can I buy tiled corners for a shower or a bath? In the range there are a variety of variations of these products, and the most popular are those that do not require fitting and with a self-adhesive surface.

The peculiarity of such models is that:
- No need to purchase glue;
- Do not take too much effort to install;
- If you need to remove the plinth, then this can be done with one jerk, without using a tool.
The installation of a corner in the bathroom can be done using a more modern and modified model. In appearance, it does not differ from the standard angle, and it is just as flexible, but rubbery.
Thanks to the rubberized edges, sealing of the seam becomes more qualitative, and no additional use of putty is required, which will reduce the cost of finishing work.
The size of the decorative corner, as a rule, is standard. In length, it is 250 cm. To finish the side of the bathtub, one product is not enough and at least two are required, so that the slots are sealed as tightly as possible from each of the three sides of the bath adjacent to the walls of the room. The plastic can easily be cut to the right elements, for example, to make an inner corner, and this requires a sharp writing knife. The width of the plastic corner is from 25-50 mm. Which option to choose depends only on personal preferences.
How to install a skirting board on a bath so that water does not get wet
Specialists in finishing work believe that the installation of a plastic corner is best for tiles.
So it will be easier, and suitable even for beginners.

Installation:
- Before you start, you will need to clean the surface of the tile and dry it. The same is done with the edge of the bathroom, where the plastic profile will fit.
- If you previously installed a corner, then it is required not only to remove it, but also to clean the surface of the bath with tiles from the remnants of the glue.
- The gap between the bathroom and the wall must be filled with sanitary sealant. It is acceptable to use a mounting foam.
- In order not to stain the edge of the bath, before applying the sealant, you need to paste the paint tape.
- Further, the corner is cut to the desired parts.
- Apply the glue on the product from the inside, and not only the central part but also the edges are spread. Thus, more tight fit is ensured.
- To install the plinth, you need to lean it to the right place and squeeze it well. This will increase the adhesion of the material and the coating of the bathtub with the tile.
- After the glue has dried completely, joints are treated with a special transparent sealant.
Due to the fact that the PVC corner was produced for the decorative purpose, that is, for accurate masking of the gap between the bathroom and the wall, that is why it is not sealed to the surface, which means that it will be necessary to additionally use sanitary sealant.
It is best to choose silicone putty, they are more moisture resistant and transparent.
The service life of the product is not too big. It will serve several times less than a ceramic product, and replacement will be required every 1.5-2 years.
We put a plastic corner for the bathroom on the tile
There is an option of installing a plastic skirting board on the tile bath. However, with such work can only master the master-finisher. The essence of the finish is that the installation of the corner is carried out at the same moment as the tile is laid.
In this case, the fixing of the plastic corner is done tightly and the tile adhesive is used for installation.

Mounting the corner under the tile is a more reliable method, but it has a huge drawback. It consists that replacement of a corner will be spent only together with deformation of the bottom number of a tile, that not only too long and difficultly, but also is expensive.
As it was said earlier, the plastic corner is not durable for the service life. Experts believe that, ideally, the replacement should be done once a year. In fact, the product can serve several years, and sometimes even up to 5-6, but with the passage of time, it will begin to become yellow.
To lay the plastic profile on the bath was really qualitative, you should pay attention to a number of recommendations:
- If a plastic corner made of metal and covered with plastic is used, it should be perfectly even, just like the surface to be treated. Otherwise, the end result will not be the most effective.
- Calculation of the dimensions of each element when installing the skirting should be as accurate as possible up to 1 mm.
- Work begins with internal corners, and only then additional elements are installed. To be more precise, it is desirable first to cut the parts, and try them on without applying glue. Otherwise, you can, not only dirty hands, but also the surface of the bath, but to remove the sealant from it will not be so easy.
- It is not at all necessary to choose a plastic corner in accordance with the color of the walls. It is quite possible to choose the optimal white version. It is classic and perfectly suited to any design decision.
How to fix a plastic corner (video)
The process is not complex and not too long. Carrying it, you can not worry about the fact that soon on the walls will penetrate harmful to human health mold and fungus. They are very dangerous and can cause serious harm, and get rid of them very simply will not work, even with the use of potent chemicals.
In any bathroom there is a rather complicated microclimate, that's why you need to choose the finest materials for repairing this room as carefully as possible, demanding. The lack of the ability to constantly ventilate the bathroom, a high level of humidity, frequent changes in temperature adversely affect the finish of all surfaces, which leads to their rapid wear. Therefore, during the repair it is important to take care of isolating all possible joints, gaps, where moisture can penetrate. And the most vulnerable place where dampness constantly occurs, mold is formed, an unpleasant smell, you can name the gap between the wall and the bathroom. To solve this problem, the masters attach a corner to the plastic bath. The installation of this useful element does not take a lot of time, but it is considered quite useful. Actually, how and where to use such corners, we'll talk in this article.
Types of corners for the bathroom
Before you learn how to properly install the plastic corner on the bath, you need to figure out what kind of things they are in order to pick up the best option for his home. In the people they are also called curbs, which are an inexpensive, practical tool that allows you to remove gaps between walls and fonts.
Important! More often such gaps arise due to the unevenness of the walls, the violation of the technology of bath installation or the discrepancy of its dimensions with the parameters of the room. They are made, as a rule, from polyvinylchloride, and they represent a usual bar in the form of a corner in width from 3 to 6 cm and length from 1,8 to 3 meters. Such curbs can easily be fixed independently with the help of liquid nails or silicone sealant.
There are such varieties of corners:
- Internal borders. This - the corners, which are installed in the process of facing the walls with tiled materials, and then on top of them the sides of the bath are mounted. Thanks to this design, it is possible to reliably isolate the joints between the wall and the bowl from moisture ingress.
- External borders. These are plastic corners, which are mounted on top of the bowl. In other words, these are the bars curved in the form of an angle of 45 degrees. Such self-adhesive edges do not allow water to penetrate between the wall and the bathroom, as all the liquid flows down them inside the container.
- Dismountable corners for the bathroom. They consist of two parts - an internal and decorative outer edge. Their installation is more complicated, but they perfectly protect against the formation of mold, moisture penetration.
Important! To choose specifically, what kind of waterproofing border is right for you, you need to rely on the peculiarities of the situation:
- If you need to seal a hole between the wall and the old bathroom, then get a better self-adhesive corner.
- For new plumbing are more suitable long-term collapsible sidebars, because how to fix the bath on the bath is necessary in this case in the process of performing repair work.
Advantages of the corners for the bath
Before the advent of specialized devices on the market to isolate the joints between the wall and the master's cup, we used tools, such as thickened oil paint or moisture-resistant cement. But, unfortunately, such measures were of a temporary nature, since we had to regularly re-cover the cracks.
Plastic corners have become a real salvation. They completely solved the problem of water leakage into the formed gaps. Their advantages include:
- Ease of installation. Even a person who does not know anything about repair work, understands how to install a corner in the bathroom. Indeed, fix it is simple, you just need to use liquid nails or sealant.
- Resistance to a changeable microclimate in the bathroom. Since plastic is a very practical material, it is not afraid of dampness, direct contact with detergents, water and mold. That's why these curbs are very long.
- Easy to clean. Such materials are absolutely undemanding in this respect - it is enough to wash the corners occasionally with a soap solution or a regular sponge.
- Reliability. Curbs do not allow water to flow into the gap between the bath and the wall due to its smooth construction, and thanks to this, the liquid does not stagnate in them.
Important! It is on the right choice of angle depends on how much you qualitatively seal the seams between the bathroom and the wall surface. To accurately avoid mistakes and avoid water ingress or splashing during the use of the shower, choose the sides 2-4 cm wider than the gaps themselves.
How to set a corner on a new bath?
So, you have purchased a new plumbing and bathing corners. How to install them we will consider further. Once a brand new bath is installed, you need to take care of sealing the joint between it and the wall before you start using it.
Materials for work
For installation of the sides you will need, except for themselves:
- sealant;
- painting tape;
- antiseptic;
- hacksaw or jigsaw.
We perform the installation as follows:
- The sides of the bowl that adjoin the wall must be carefully cleaned of dust and dirt with a sponge and soap solution.
- Now measure the distance from the side of the bath, corresponding to the height of the curb, then at this level we fix the paint tape, in order to protect the new finish of the walls from dirt.
- The boards of sanitary ware and the adjacent wall are treated with an antiseptic and degreasing agent, so that the corner is better adhered.
- Fill the sealant gap between the wall and the bathroom, let it dry properly for several days.
- Plastic corners using a jigsaw or a hacksaw are cut at an angle of 45 degrees of the right size, we apply liquid nails or sealant on them, we press them against the surface.
- The edges of the sides are closed with special plugs, we let the structures dry for a few days.
Important! Note that corner corners of 90 degrees serve no more than two years due to the fact that due to unsuccessful design they constantly accumulate water and develop a fungus. Over time, they darken, start to smell unpleasantly and raise unsanitary conditions. Of course, you can get rid of mold, but only for a while and the corner still have to be replaced.
How to install a curb on an old bath?
When the bath is operated for a long time, the joints between it and the wall, naturally, wear out, so they have to be re-sealed. Excellent for this plastic border, because its installation does not require dismantling the finish of the walls and does not spoil the appearance of the room.
In this case, you need to understand carefully how to fix the tape. The corner is mounted on the bath in this order:
- We dismantle the old corners with a knife or spatula.
- We remove from the joint old sealant. If you do this it will be difficult to use tools, then you can use some kind of chemical composition.
- Antiseptic means remove from the walls and sides of the bath mold.
- We clean the surface of dust and dirt detergent, and then - with alcohol, degreasing acetone or detergent containing acid.
- The joint is filled with a new sealant on a silicone base.
- To sealant does not hit the wall and the edges of the bath, you need to protect them with paint tape, and this is important not to spoil the decorative design of these surfaces.
- Use a jig saw or a knife to cut the corners and make sure that the joints are even, at an angle of 45 degrees.
- We put the sealant on the sides and tightly press them against the wall and the edge of the bath.
- Remove excess sealant can be a normal rag.
- It is necessary to put the caps on the edges of the sides.
Now you know all about how the installation of plastic corners on the bath, why to do it and how much it is profitable. We hope you have succeeded, you have seen that it is simply and inexpensively, and now your bathroom is in an ideal condition, in which there should be a main hygiene room in any house.
Water - one of the main enemies of building materials. As beautiful as the interior decor of the bathroom, with poor quality waterproofing, it will quickly lose its attractiveness. Therefore, many want to know how to paste a curb on the bath. Without special materials, the joint between the wall and the equipment is difficult to make sealed, which threatens the appearance of mold, fungus and other troubles.
What kinds of curbs exist?
Before you begin to work, you need to determine the type of curb that will be installed in the bathroom.
Depending on the interior decor of the room and personal preferences, you can choose:
- Tape self-adhesive element. It is a polyethylene tape with a sticky composition applied to one side, which ensures a tight connection to the surface. This is a very practical and inexpensive option, available in different widths and different colors. Using this material, the problem of how to make a curb in the bathroom is very simple. On the reverse side of the tape, a protective layer is removed, and the element is firmly pressed against one side by one side and the other to the bath. The service life of such decor is very limited.
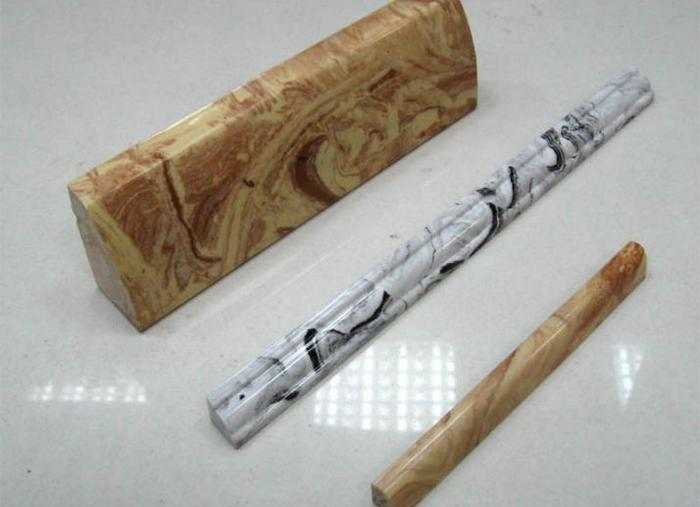
- Ceramic elements. Are the corners of different textures, widths and colors, made of ceramics. They are very durable, provide reliable waterproofing and are characterized by a long service life. However, there are drawbacks. Often, paving the curb in the bathroom will require the work of professionals, since it is difficult to perform it yourself. In addition, ceramics - a fragile material, which, with careless handling can be broken both before the beginning of laying, and after it.

The installation of the ceramic corner should preferably be carried out during the laying of the basic tile
Stages of mounting the plastic element
Before installing a PVC curb, you need to purchase all necessary materials. In this case, you need to prepare the necessary number of decorative bands, the number of which can be easily calculated by measuring the length and width of the bath. In addition, they need silicone, better aquarium, liquid nails, paint tape and a construction gun.
- Competent preparation of the foundation. It consists in thoroughly cleaning the edges of the bath and the wall adjacent to it from dirt and fine dust. At the end of the work, you can wipe the surface with a cloth soaked in a chlorine solution and dry the substrate well.
- Using a construction gun, the gap between the wall surface and the edge of the equipment is sealed with a sealant, and then carefully dried.
- To prevent damage to the enamel, the edge of the bathtub is covered with a paint tape.
- Liquid nails with the help of a construction gun are applied to the base on which the curb is laid and as much as possible pressed against the wall by one edge, the other to the bath. At this stage, it is best to take advantage of someone's help, because the reliability of gluing and the life of the curb depend on how tightly the tape is pressed.
- The glue, which can appear from under the plate, is neatly removed. The joints of the curbs are additionally insulated with a sealant.
Technology of laying ceramic corner
Some do not dare to choose ceramics, because they do not know how to put a curb in the bathroom so it's right and beautiful. The work can be entrusted to professionals, but if desired, it is quite possible to manage independently. Before starting work, you need to prepare the necessary number of ceramic blanks. Their number is calculated on the basis of their length and width of the bath with a margin in case of possible damage or trimming. In addition to direct elements, you will also need corner, sealant, waterproof tile adhesive and grout.
The actual installation of the curb on the bath includes the following stages:
- Substrate preparation. Dirt and dust must be removed, and the base itself is well dried.
- Closing the gap between the bathroom and the wall. If it is not large, it will be enough to handle the joint with silicone. Wider gaps are pre-foamed, after which the seam is processed and dried.
- Tile glue is bred in accordance with the instructions attached to it, then with a spatula it is applied to the back side of the curb, it is placed on the desired place and is glued. Nearby lying details fit as tightly as possible to avoid gaps between them.
- Angles are made with the help of special corner elements. To fit them, two straight pieces cut the edge at an angle of 45 °. Perform this operation with the help of "Bulgarians" with a diamond disc, but you can use pliers. The details are drawn on the cutting line and gently "bite" the pieces to the desired configuration, after which the cut is ground.
- The next day, the curbs are poured with water to better fix the adhesive.
Silicone sealant or special moisture-resistant grout eliminates small transitions and gaps between the tiles and corners.
After installing the bathroom, shower tray, a sink or washbasin between the edge of the sterntechnic appliances and the wall there is a gap. Sometimes it is only a few millimeters, but the water still gets there, it flows to the floor on the wall and, with an insufficient degree of sealing, can "please" the neighbors from below with a dark stain on the ceiling. Even if you live on the ground floor or in a private house the dampness under the bathroom will not bring anything good - mold and fungus, a musty smell. Because these gaps try to close. There are numerous and various curbs for the bath that close this gap. They put them not only on baths, but also on pallets in the shower room or near the sinks. Choose just a different profile and its size. And the installation principles remain the same.
The gap between the wall and the bathroom and the choice of curb
If the bath was installed after the walls were finished, there would inevitably be a gap between its side and the wall. Big or not - depends on how level the walls are and whether the bath itself is exposed. In any case, this gap is better to fix. Firstly, there will be no dampness under the bathroom, and secondly, the appearance is better.
To choose a curb for a bath, one must proceed from the width of the slit. Depending on the distance to the wall, the installation sequence changes:

Determined with the technology of sealing the gap, you can choose a curb for the bath. It's not as easy as it sounds - a lot different options, so you can get lost.
Types of curbs for baths and their installation
All curbs for the bathroom can be divided into two large categories, each of which has several subspecies:

More affordable products from the first group are more affordable, they are easier to install. More expensive and difficult to install ceramic, marble or granite curbs, but they also look much more colorful. True, too, must be appropriate.
Installation of plastic curbs and corners
If we talk about plastic curbs for the bath, they can be installed under the tile and on the tile (or any other wall decoration). Border on the bath floor tiles are installed in the process of finishing the walls - its upper edge is put under the tile. This option is good, but you can not move / replace the bath without destroying the finish.

The second type of curbs is mounted after finishing the finishing works. In this case, the bath is simply attached to the wall, and the existing gap is closed with one of the plastic or polymer corners.
Plastic borders, installed on the tile, there are different profiles, with different sizes of shelves. The very edges of these products are elastic and they fit snugly against the wall and sanitary ware. The usual finishing plastic corner is more rigid. Hermetically install it can only be on a smooth wall - not on the tile and, especially, not on the relief tile. For such cases, there is a plinth on the bathroom PVC with rubber beads. The rubber edges of this border fit tightly even in the seams between the tile and in the relief. Where the fit is not tight enough, the glue or sealant "works".
Which adhesive sealant to use
In most cases, install a curb for the bath with a silicone sealant. But afterwards problems arise: after a while the seam becomes dark - mold develops. We have to take everything off, disinfect, degrease and put it in its place. The gap between the normal state and the appearance of mold is different for everyone - from one year to several months. It depends on the intensity of operation, but more on the availability of sufficient ventilation in the bathroom. If ventilation is bad, blossom may be after a few months.

There is an exit. And not even one:
- Use can be hermetic for aquariums. It does not bloom under any circumstances (it is possible that the composition contains antibacterial components). Like the usual plumbing, the aquarium sealant is white, there is a transparent one. Only the packaging is usually small and the price is higher. But it's worth it.
- Waterproof glue. Anyone, but good and reliable. If you need an example - Moment Crystal. Inexpensive, reliable. But one thing: use strictly according to the instructions. Then he holds for a long time, and fungi and mold on it are not planted.
- Good (read dear, branded) sealant based on MS-polymers. It is really hydrophobic and continues to repel water even after years, while ordinary acrylic begins to flow after 4-6 months. There are among the MC polymeric sealants compositions with antibacterial components that prevent the development of fungi and mold. After drying, they remain elastic, so they move slight changes in cast iron or metal baths without problems.
How to glue so that it does not fall off
Many have already used the curb for the bath more than once, but each time there are problems - after a while the corner or plinth falls off the wall. This happens, because when using a bath, a shower - they are a bit, but they move. You step into the tank, it moves a little, go out - again minimal, but move, leaned against the edge of the bath - again moved. And so every time. Naturally, if you attach the border to the bath rigidly, sooner or later it will fall off. The large amplitude of movement in acrylic bathtubs and shower trays, the smaller - for steel and cast iron. Accordingly, from acrylic containers skirting falls off more quickly, on the others it lasts longer.

One of the good options - provides a secure attachment to the wall
In order not to have this problem, the PVC border for the bath or shower tray should only be glued to the wall. This is especially true for acrylic containers. With this method of installation, the adhesive layer from above does not allow water to flow into the gap between the bathroom and the wall. The lower part of the corner tightly presses against the rim (when installing it should be well pressed), excluding water from the side. In this case, all movements are quietly compensated by the elasticity of the material and the plinth is held on the wall.

Such a curb will work well with an acrylic bath - you do not need to glue it down
If you do not like this option, look for a sealant that remains sealed after drying, in particular, these are the same sealants based on MS polymers. For cast iron and steel baths, it will fit, the curb for the bath will hold. For acrylic it is, unfortunately, not an option - too great a shift.
Why from under the plinth stinks
There is another unpleasant moment that often appears after installing a PVC curb for the bath - an unpleasant smell from under the plastic. Make the connection 100% sealed can not, even microscopic cracks, but remain. Water seeps into them, where it remains. After a while, the water rots, begins to exude that same smell. This is due to the adopted technology of installation of the rails for the bathroom - it is recommended first to fill the gap between the bathroom and the wall sealant, and then install the plinth. The idea is clear - that the water that got under the plinth did not leak under the bath. So it happens - the water remains in the remaining space, where it "smells".

To avoid such trouble, it is better to install the curb for the bath immediately on the wall, without first filling the gap. Yes, with this installation, a few drops of water can seep under the tub. But this amount will not do any harm, with sufficient ventilation after a while, the moisture will dry out.
The order of mounting plastic borders for the bathroom
With all the differences in the method of mounting profiles of different types, there is a certain sequence of actions that is observed and leads to a good result. In general, you need to act like this:

That's all. Border for the bathtub is installed. Now you have to wait a while until the composition is frozen and grabbed. The exact time depends on the type of glue / sealant used and can take from several hours to several days.
By this technique, a self-adhesive (border) tape is installed to finish the joint of the bathroom and the wall. It is an inexpensive and quick way to seal a small gap. Such a finish can only serve a little less than plastic, but fuss with it less, although all the stages preparatory work remain in force.

There is one point that must be remembered if a curb is placed on an acrylic bath. Before gluing the bath more than half of it is filled with water and in this form is left until the sealant polymerizes.
Ways of gluing a border with adhesive tape and flexible (rubber) edge
It just seems like to install a strip of plastic with an adhesive layer simply. Absolutely not: we must immediately install it in place, since it is not realistic to move the skirting board. Unstick if the attempt is unsuccessful, too, is not the best way out - some of the glue remains on the tile and side of the bathroom / shower tray. In general, you need to practice without removing the protective tape first.
Even if you immediately succeeded in planting a curb in place, not everything is so rosy with skirting boards of this type. The fact is that the tape on which they are fastened, quite thick and even tightly pressed to the wall and edges of the edges are not so tight. It is possible leakage in some places, especially at the seams.

If you like this plinth for a bath very much, you can glue it to the glue / sealant. To do this, remove the adhesive tape, put on the wrong side adhesive composition, put it in place, very well pressed. The layer of the adhesive composition is thin, the plinth is very tightly pressed, the leakage is almost eliminated.
And another moment - so as not to break the curb, on the side that is attached to the bath to apply glue is not necessary (described above).
The technology of mounting a ceramic curb for a bath
Ceramic curbs consist of straight, angular and end elements. The number of straight elements is considered based on the size of the bath / shower tray, corners and ends with a standard placement for a bath, two are required, for a shower tray, the angle can be one. The number of straight elements you take with a small margin - for trimming.
Before laying all the elements are desirable to inspect. If there is a need (they are mixed inaccurately, there are differences in thickness, etc.), the back side can be slightly added to the file. It is better not to use a Bulgarian - the chance to do more harm than to correct is too great.

Ways of installation
The method of installing the ceramic curb depends on the finish of the wall and the size of the slit. If it's a tile, you can use waterproof glue. If the tile is embossed or the wall is simply plastered, the installation on the adhesive does not give the required level of tightness. In this case, mount the ceramic curb for the bath on a special tile adhesive for wet rooms. It is sold in bags in dry form, before use, some of its amount is mixed with water until it is uniform.

Colors can be different, but more often they use whites - under the color of the bath
Sequencing
The whole process consists of a sequence of steps:
The process of installing a ceramic curb for the bathroom is not much different from the laying of tiles. Actions are the same. Align the elements in two planes - so that the edges and the plane go smoothly and without changes.
In the case of a small cosmetic repair in the bathroom, it is very often required to close the joint between the fountain and the wall adjacent to it. The most common option for such a quick repair is a special corner for the bath, which is very quickly installed and does not require the presence of a special tool. Today we will talk about the main types of corners, the methods of their installation and attach photos to the full coverage of the process.
Sealing options
Before making a side in the bathroom, it is necessary to choose a suitable material that will not only fulfill the functions of sealing, but also correspond to the general interior of the room. Today for decorative seam sealing are used:
- adhesive tape from polyethylene;
- plastic corners;
- ceramic corners.
Each of these options is not only different in value, but also technological process installation, as well as the service life.
Polyethylene tape

When choosing a polyethylene tape, it is necessary to remember that such a side for the bathroom, although it is the simplest option of sealing the joint, but its service life usually does not exceed 2 years with active operation. Such tapes can have different colors and strip width, as well as embossed decorative patterns. Among the advantages are flexibility, counteracting the reproduction of fungal bacteria and ease of installation. The installation process is as simple as possible:
- before installing such self-adhesive corner for the bathroom, it is necessary to thoroughly clean the joint from dust and grease stains, then dry the place of installation with a hair dryer;
- if the size of the gap exceeds 3 millimeters, it is necessary to preliminarily seal it with a neutral sealant.
Important. When using tape, do not use silicones on an acid basis, since such a sealant will corrode polyethylene, which will lead to a breach of sealing and damage to the product.
- after the sealant has dried, we measure the sides of the bath, which must be sealed and cut off the pieces of tape we need with a margin of 2-3 centimeters;
- we begin to stick on the long side, remove a few centimeters of the protective tape from the adhesive layer and glue to the place of the joint, not allowing the tension of the tape.

Important. Before you paste a curb on the bath, do not remove the protective tape from the entire length. When installing, do not use a hairdryer, as the tape stretches under the influence of temperature. The places of the corner joints should be overlapped overlapping, for this purpose we left the stock a few centimeters when cutting.
- after installation, we cut the corner joints with a clerical knife to remove excess lapping and additionally we seal the angle with the sealant.
This completes the installation of the tape and it is necessary to wait 4-5 hours to completely shrink the product, after which the bathroom can be used.
Plastic curb

Plastic side edges for the bathroom are the most common option for sealing the joint, because from the service life with high quality laying is 3-4 years. They are of low cost, easy to install and are distinguished by a wide variety of species. To date, there are two types of curbs for external and internal laying. Corners for outdoor installation are mounted over the joint with the already installed tiles. Internal models are installed before the cladding works, after which the installation of tiles is in progress.
For your information. Before you buy a curb for a tile bath, note that the life of this product is not long and if you need to replace it, you will also need to dismantle a row of tiles laid on the corner.
If you chose the inner corner between the bathroom and the tile, then this procedure is quite complicated and time consuming, and for its implementation it is better to invite qualified workers. If you have an overhead corner, then the installation process is as simple as possible:
- first of all it is necessary to cut a corner in size and attach it to future installation sites for precise fitting;
- then, without removing the corner, paste on the tile mounting tape on the upper edge of the curb, so as not to stain it with sealant or foam;
- before sticking a corner on the bath, cut off the corner joints at an angle of 45 degrees.

For your information. If you doubt that you can make beautiful corner joints, it is better to buy in advance ready-made corner modules that will significantly simplify the work.
- prepare the surface, remove dust and grease. For cleaning, you can use alcohol or white spirit. Dry the joint with a hairdryer.
- if the gap is too large, then before fixing the curb on the bath, fix it with a mounting foam.
- for reliable bonding it is better to use liquid nails and after all elements are put in their places, to conduct additional sealing of joints with the help of silicone.
Ceramic curb

Ceramic curb for the bathroom is considered the most beautiful form of decoration and durable, although it takes much longer to install it. Previously, for the decoration of the joint and its sealing, it was necessary to cut curbs from the remaining tiles, but today this is no longer necessary, as the production of ceramic corners is established at an industrial level.
This corner between the bathroom and the wall is now sold in almost every store building materials. The product has a wide range of color solutions and design variations, which allows you to choose a model for almost every style of the interior. The material is characterized by high strength and durability, although its mounting process is slightly more complicated than the previous ones.
Important! Before choosing the corners under the tile for the bathroom, it must be remembered that such a method of sealing the joint is not capable of withstanding the stresses of bending and deformation, since it is laid on the tile adhesive. This option is better not to use for acrylic or steel baths, but only for cast iron.
- Before you start, purchase the required number of curbs with corner joints;
- clean and dry the joint;
- then seal the gap with a mounting foam or silicone, depending on the thickness;

For your information. At this stage, you need to decide what to put a corner in the bathroom. If you have a bath of acrylic, then it is prone to expansion when heated, which means that it is better to use a sealant for the corner, which, when dried, will provide elasticity. If the bath is cast-iron, then this material practically does not expand and in order to securely fix it bathroom corner, you can use conventional tile adhesive.
- knead the tile glue and use a putty knife put it on the joint, then tightly install the curb modules, leaving room for grouting;
- after the installation of the curb on the bath is finished, it is necessary to wait a day until the tile adhesive has dried completely and then apply a moisture-resistant grout for the joints.
Having studied the above information, you already know how to glue a corner on a bath of plastic or ceramics yourself, which will allow you to significantly save money on repairs. And to fix the material, we suggest watching a video that answers many questions.