Installation of a deep shower tray. How to install a shower tray - options from different materials
Were you planning to purchase an expensive shower cabin for your dacha? Take your time - there can always be a cheaper option! The low cost price of the product does not mean its poor quality, we can say more - almost always it's just a simplified and minimized design. In this article, together with the website of the site, we will study a steel shower tray, which will help to build a primitive, but pretty cute shower.
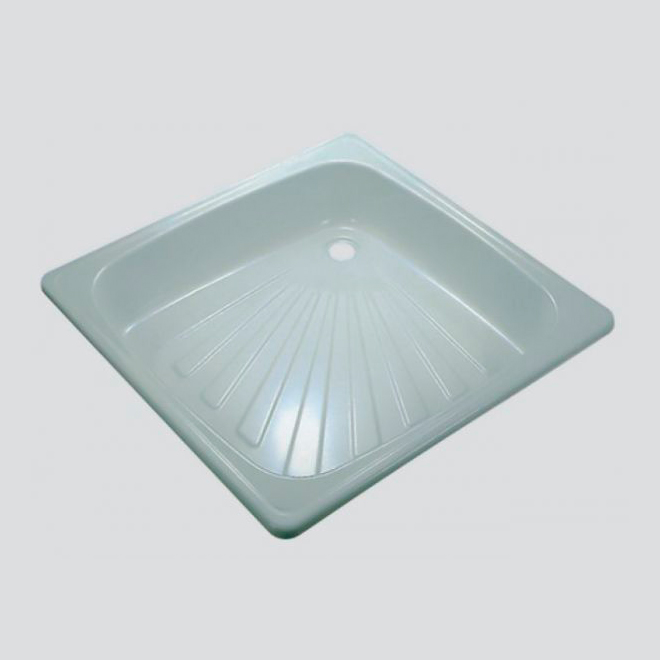
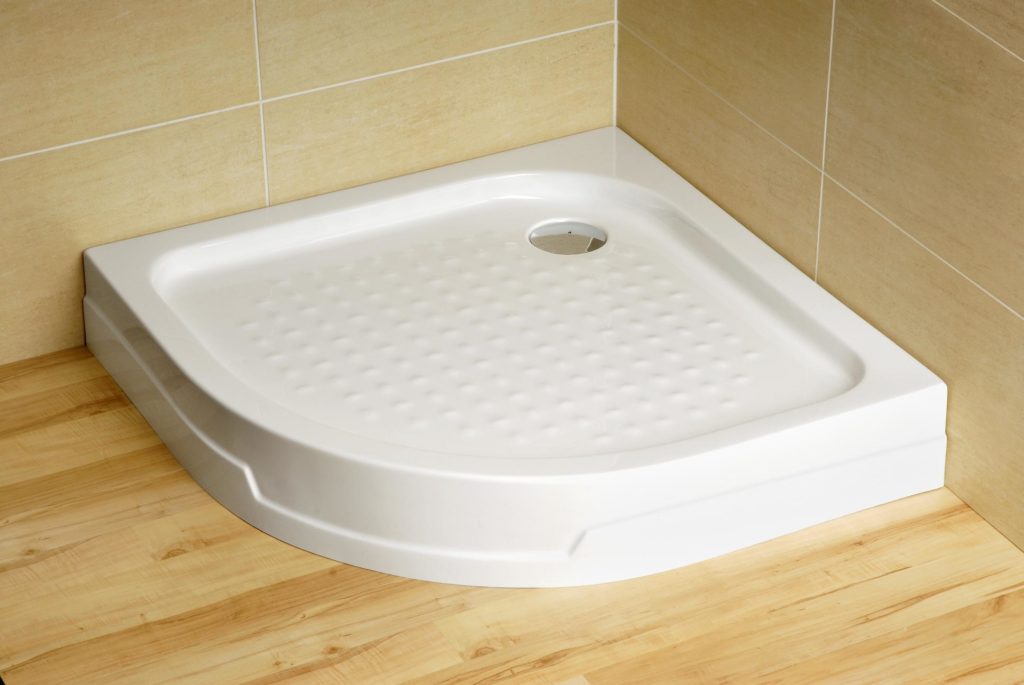
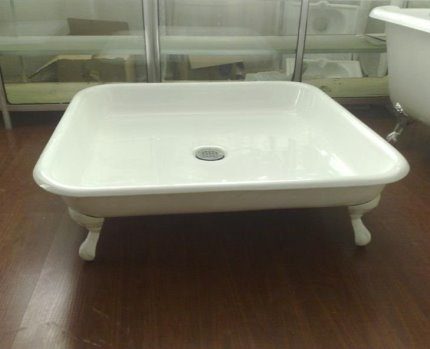
Rectangular shower tray
Steel shower tray: advantages and disadvantages
It is generally accepted that steel enamelled shower trays do not have any advantages and that the most attractive in them is the price. But this is not so, except low cost, this type of plumbing fixtures have other positive qualities, which for some reason everyone tries to forget. Yes, they have less attractive appearance than similar products made of acrylic, the enamel on them from inaccurate treatment can be irradiated, they are slightly colder than all the other brethren, but, you see, it will not be very correct to focus on faults alone. Especially when you consider that they are fixable.
In addition to low cost, metal shower trays have the following positive aspects.
- The strength with which no acrylic can compare. If you are a massive person, it is the steel pallet that can carry your weight without additional supports.
- A very simple installation, which if desired, will master any man - there are no subtleties and nuances that are able to affect the life of this product.
- Versatility. Such a pallet can be used as a separate plumbing fixture, and complete with. And what is most interesting, to choose a factory sliding for such a pallet will not be difficult.
And the shortcomings mentioned above, by and large, are not at all disadvantages - the appearance can not be corrected. But here, if you think carefully, you can think of something - products of this type, as a rule, are built in either the floor or the pedestal specially made for it. In general, the appearance of such a shower tray fully depends on the quality of its surroundings.
Metal pallet: varieties and their differences
Another point that repels most people from the enameled shower tray is a small variety of shapes and design solutions. The product is simple, not superfluous and designed to fulfill the sole purpose - to collect water and drain it into the system. In general, talk about the types of metal pallets will be short - you can classify metal pallets by two signs.
A visual aid for installing a shower tray can be found in the next video.
Rectangular shower tray in steel: installation technology
As mentioned above, one of the advantages of steel shower trays is its simple installation, which will be discussed later. For simplicity of perception of the information we will outline it in details and on points.
In principle, that's all. After the mounting foam or sealant has solidified, it remains only to put the parapet itself in order (if, of course, it is available). Usually, the supporting brick is tiled with a tile, which is chosen to fit the walls or walls of the room. When the finish is finished, it remains only to take care of the curtain, and the simple will be ready.
As you can see, the steel shower tray is not difficult to install with the device - everything is simple and straightforward. And the lack of appearance, which is usually attributed to him, rather depends on the inept hands of the master, who paves the pedestal and tiles it with tiles.
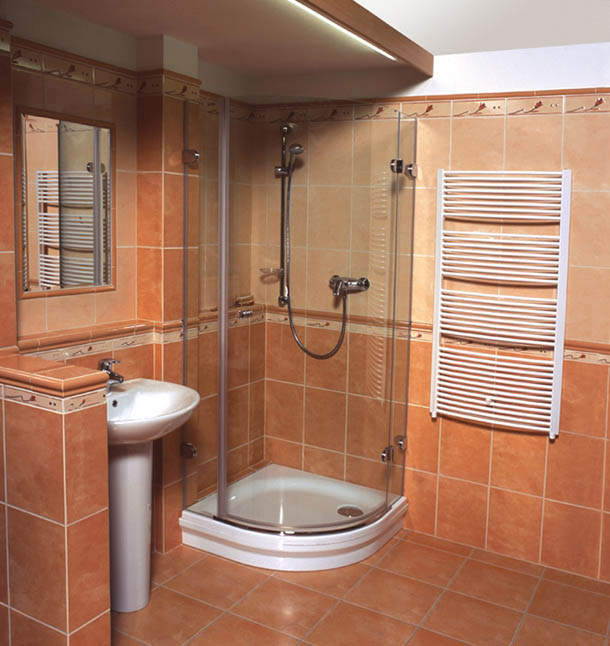
There are several varieties of bottoms for shower cabins. However, the acrylic pallet prevails in use. This device is characterized by its positive properties, and also has strong qualities.
By equipping yourself with the conditions for bathing, it is worth paying attention to the design on which we will stand taking water procedures. This should be the most secure and comfortable surface. It is better to buy a unit with a pallet made of acrylic. However, one should not overlook other options. They are useful for comparison. On sale there are:
Note! All works connected with the installation acrylic pallet should be carried out in gloves, to avoid injuries to the hands and itching after mounting the structure.
Bottom choice according to the form
Basically, the consumer is trying to acquire practical in form the basis for the shower. For example, for small bathrooms, the choice of symmetrical, semi-circular corner products is rational. Such pallets for the bathroom fit well into the overall interior and are not difficult to install. Rectangular equilateral structures are installed directly on the surface of the floor, not requiring the imposition of a sealed adhesive, often in a set they come with rubber feet.
Semi-circular or hexagonal structures necessarily have one right angle, with which the installation is located strictly in the corner. This way you can save space in the bathroom.
How to choose a pallet according to the required parameter?
Here it is necessary to take into account some peculiarities of the room, where the cabin with the pallet will be installed. If you plan to arrange a box of milking in the middle of the room - it should be big, and the best option Placement - in the corner, the size of which should be known.
Note! Before you take measurements from the angle where you will mount the shower, all surfaces must be prepared and checked for level.
The most common are the dimensions of 80x80, 90x90, 100x100 mm. You can install bottoms not equal on the sides 100x80, 90x120, however they do not always look good against the background of the general design of the room. Take into account the height of the sides. The most popular are deep or medium-sized variants with altitude from 18 to 45 cm.
In order not to be mistaken with the choice of the acrylic pallet model, you must first make a drawing indicating all the dimensions.
Advantages and disadvantages of acrylic bottoms
Positive sides acrylic bases for the shower are in the following qualities:
- light weight and elementary installation;
- practical and attractive appearance;
- high noise insulation and affordable cost.
Nevertheless, one should not forget about some disadvantages that lie in deformation, susceptibility to mechanical damage. It is noted that when the objects fall there are cracks and dents, sometimes they are difficult to eliminate even with a repair kit.
Equipment for acrylic bottoms
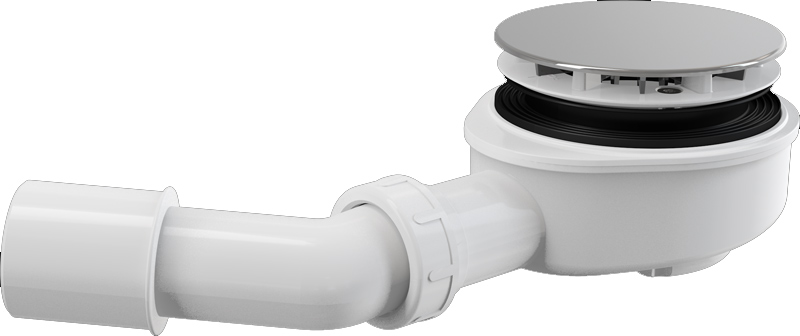
In addition to the base (in our case a shower tray made of acrylic), some structural components, for example a drain tube or a siphon, which also differ in appearance, will be required to successfully install the bathing area. You can purchase a knee-type type of water seal, corrugated tube or an option similar to a small bottle that is easy to open and clean. Using the ceramic bottom, pick up the details, it is individual.
The owner of the note! If the shower enclosure is installed in a corner opposite to where the drainage system is located, then the pallet must be mounted on the frame or a special podium should be constructed.
Recommendations for installing an acrylic shower tray
It is clear that all elements of the hydraulic boxes are mounted separately. As for the pallet, it is better to start assembling it from the integrity check and the availability of all components. Then you need to review the instructions from the manufacturer, and start to act step by step:
- We prepare the inventory: the components for the pallet (legs, guide beams, fixing bolts) and the bottom itself.
- We turn the pallet, fix the beams in the marked places, fix the legs on the fencings. If you have chosen a semicircular installation, an additional leg must necessarily be mounted in the middle.
- We connect the siphon or corrugated tube to the drainage site, and lower it into sewage pipe, not forgetting about the sealing of seams. Then set the corner in the right place.
- The screen is fixed last when the shower is assembled. We check its efficiency. Ideally, a properly designed bottom does not have a slope, and when it's visited there is no noise and crackling.
All work is done on a perfectly flat surface.
What are the criteria for the value of the pallet

The price of an acrylic shower tray reflects several factors.
- Quality. The material must be without flaws, i.e., there should be no manufacturing defects, as well as mechanical damage due to its transportation. For example, the shower tray is cast iron, it remains durable, but it is heated for a very long time.
- Manufacturer. As a rule, the more well-known the manufacturer's brand, the more expensive the device is.
- Model. The cost of the bottom options for the cabin varies depending on the design, attractiveness of the device. Ceramic version will cost more than acrylic.
- Material. During the manufacture of the bottoms, additional raw materials are used. This can include reinforcement, sealants, seals of various kinds. Not to mention that absolutely different materials are used to achieve the desired result. For example, ceramic shower trays will be heavier in weight, therefore, it will be difficult to cope with the installation yourself.
In this case, the consumer needs attention when buying. Only the right choice of the bottom will save from forgery.
Shower cabins, in which pallets made of acrylic, are gaining increasing popularity among buyers. And this is not surprising. The acrylic pallets are not susceptible to rust and mechanical damage. It happens that in the shower from the hands often slip bottles and jars with detergents, but acrylic pallets fall these items are not terrible.
In addition to strength, acrylic is also a warm material, which means that your legs will not freeze in the shower. Well, to all other advantages can be attributed relatively low cost of acrylic pallets. All these characteristics and make them in demand among buyers.
To make installation of a pallet from acryle, it is not necessary to spend money on a plumbing call. Installation can be easily done by yourself, it is enough to know a few nuances.
Let's start with the sewer drain. The closer he gets to the cockpit, the better. Ideal option - the location of the sewerage directly below the cabin itself. In this case, all pipes can be hidden under the pallet. If such an option is not possible, then you can hold and hide the sewage pipes in the wall. In the latter case, it is necessary to create a slope and try to arrange the drain as close to the floor as possible.
To connect the drain pan to the drain, you will need a transition corner and corrugation.
To seal and fix all the parts, you will need a special sealant. It is very important to use a sealant based on silicone, and not acrylic. Otherwise, you can not avoid leakage and other problems, since acrylic is unstable to water.
Apply the sealant you need abundantly. It is applied to the corrugation, and only then an adapter is applied to it. When nasazhivanii corner silicone squeezed out, but it should be. After the sealant has dried, it forms an elastic and strong interlayer at the junction of the parts.
Fixing the sink
Now you can start fixing the sink on the pallet. Only do it carefully. The plastic nut that comes in the kit can easily crack from too much pressure on it. Between the nut and the pallet itself, do not forget to install the rubber gasket that comes with the kit. It is recommended to apply a small amount of the same silicone sealant to the inner part of the gasket.
Installing the acrylic pallet
After fixing the drain, it is possible to install a shower tray tray for the intended place. Do not rush to connect it directly to the sewer. The first thing to do is adjust the height of the pallet legs. This process can take a lot of time. The thing is that the legs are hidden on the bottom of the pallet in a special casing, and after each manipulation the pallet will need to be turned over.
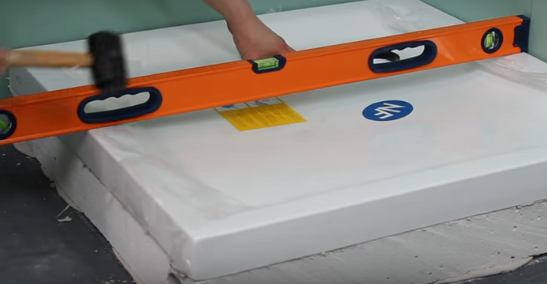
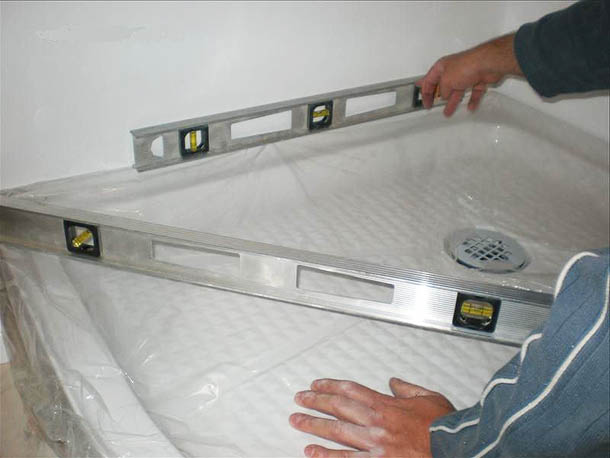
After properly adjusting the legs, the pallet should stand flat and not stagger. It is recommended to level the feet using the mounting level. When the alignment is completed, you can connect the pallet to the sewer. This stage is considered to be the final step when installing a shower tray.
I would like to note a couple of features that are mandatory for the installation of any pallets, including acrylic:
1. The pallet should be installed in a strict horizontal position. If this is not done, then in one of the corners the water will constantly stagnate. That's why do not ignore the building level. Installing the tray "by eye" will lead to undesirable consequences.
2. Smooth floor - a pledge of a successful installation of the shower tray and the entire shower cabin as a whole. Before you put the cabin, it is necessary to take care of the leveling of the floor surface. You can, of course, perform the installation on the old floor, but this process will require more time and effort.
The installation of the cabin itself is carried out according to the attached instructions. Features of the installation will depend on the model of the cabin, which is now a lot. The only thing general rule - installation of the mixer and shower should be performed at the stage of finishing works.
Instead of concluding
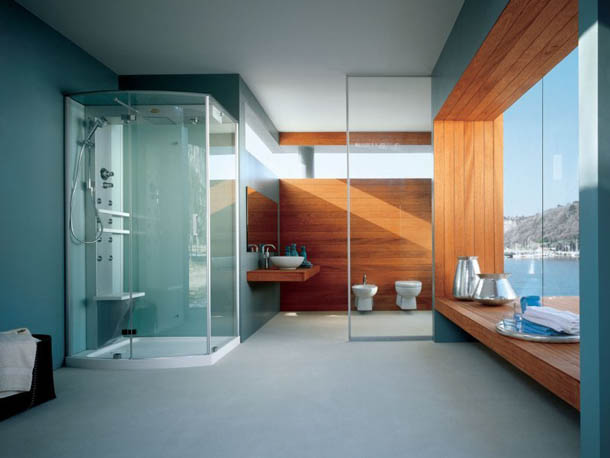
The shower cabin is the perfect solution for any bathroom. Spacious premises it is able to supplement, and in small and completely replace the cast-iron bath. A variety of booths, presented in stores, allows you to choose the option that is right for you.
As this article showed, it is not necessary to resort to the help of expensive specialists, and it is possible to overcome the installation of the shower cabin and the pallet to it with your own hands. To do this, it is enough to strictly follow the sequence of work and remember the features of the installation.
The bathroom is a place of relaxation, where a man puts himself in order. It should be practical and have a pleasant aesthetic appearance. A shower is the ideal way to save space in the bathroom. A very important point in the installation is the installation of a shower tray. Consider detailed instructions on how to properly install different models.
Manufacturers are ready to surprise the most sophisticated master, offering a variety of shapes, sizes and designs. One of the first classifications is the separation of models in form. It can be square, oval, round, triangular, rectangular products. It is necessary to select the shape and size of the pallet, which will maximally ergonomically distribute the space in the bathroom at the appropriate level of convenience.
Another classification is related to the material of execution. Today you can buy a pallet from:
- cast iron;
- acrylic;
- marble;
- ceramics;
- become.
In this case, the pallet can be installed in several ways, using a metal frame, a pedestal or a flat surface (for ceramic models). It is worth noting that the marble products are very fragile and can be damaged by impact at the stage of installation, so all work should be done as accurately as possible. The ceramic pallet can also shatter from the impact.
Marble pallets have a beautiful exterior design and will fit into any style of the interior of the bathroom: from retro and classic to hi-tech
It is worth noting that cast iron and steel models can be unpleasantly cold in the morning, which can not be said about acrylic products. The latter are now being modified with the addition of quartz dust. As a result, the construction becomes stronger and more durable. Such models are called quarval.
Marble pallets are distinguished by their spectacular appearance and are quickly warmed up. Give a pleasant tactile sensation in contact with the skin. Ceramic models are slowly heated, but practical in everyday use and durable. Prices for these solutions are significantly higher compared to the rest.
Pallets also differ in depth. When choosing, you can use the following landmark: very flat (6-10 cm), flat (10-18 cm), deep (25-35 cm).
Facing with tiles or mosaics
In many cases, the lining of the side surfaces is required to hide the mounting bases. One of the most convenient options for solving the problem is the use of mosaic tiles on a plastic or glass base. On the base, a layer of glue is applied with a notched trowel. After pressing down the tiles, the excess glue must be removed immediately.
With the help of the mosaic, any uneven surfaces can be faced. It is easily cut with construction scissors or a knife thanks to a paper base. It does not matter whether you use a tile or a mosaic - all seams need to be sealed. This especially makes sense when you decide to build a pallet yourself.

The space between the pallet and the floor can be covered with mosaic tiles or tiles. Mosaic fragments are flexible and allow you to quickly and qualitatively peel sidewalls or the entire pallet if you build it yourself
When forming joints, use crosses. After facing, you need to wipe the seams with a waterproof grout and rubber spatula. Then the remaining grout is removed and everything is wiped off with a piece of cloth. After everything dries, you need to wash the tile.
Instructions for installing pallets
The installation rules often depend on the material from which the pallet is made, so consider four popular options. Acrylic and steel modifications are more common, and cast iron, marble and ceramic are less common.
Installation of acrylic models
Acrylic solutions have the lowest weight, affordable price and are sold in a variety of shapes and sizes. Such models are equipped with brackets, legs and other fittings that help to make the installation and fix the pallet on the base. The disadvantage of the design in many cheap models is the lack of reinforcing support under the bottom, so when choosing it is necessary to pay attention to the bottom was strengthened.
First you need to turn the tray upside down and screw the legs. Depending on the model in the kit can go from 3 to 5 poles. A number of products use a support frame based on plastic or metal. Holes for mounting the legs will be located in this frame.
When screwing the supports, make sure that the length of the legs is not less than the height of the siphon. Also, all supports should be screwed to the same height (then you can adjust the horizontal position of the pan using a level)
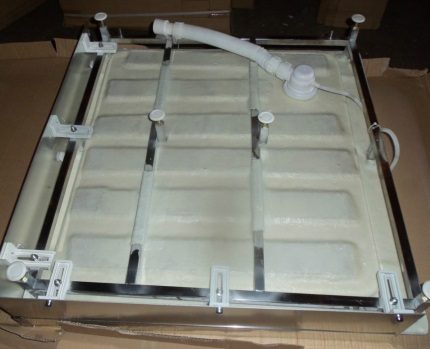
Make sure that all supports (studs, legs) are screwed in, and after installation, adjust the strictly horizontal position of the pallet
Next - installation of the drain system. It is necessary to connect the pallet to the sewage system by placing the product on the edge. Inside, a complete bushing is inserted, which is used for connection. On the protruding end of the bushing is put on the siphon pipe. To prevent leakage, joints are greased with glue.
You can use epoxy glue or epoxy clay. Connect the pipe and sleeve, and seal the joint with a sealant from above. In some models of shower enclosures a system of connections with paronit or polymeric gaskets can be used. In this case, you do not need to use glue.
Place the pallet on the legs, making sure that the edge of the siphon does not touch the floor. Now it's time to adjust the horizontal position of the pallet. To do this, rotate the legs, laying on the walls of the pallet (the grooves in which the shower enclosure will be mounted) level.
Horizontality should be checked on all sides of the pallet. If the product is installed against the wall or corner of the room, then it is necessary to grease the contacting surfaces with glue and press firmly. It is necessary to wait, when the glue dries, then tighten the sealing with the help of sealant, applying its layer to the place of contact between the sides of the pallet and the wall.
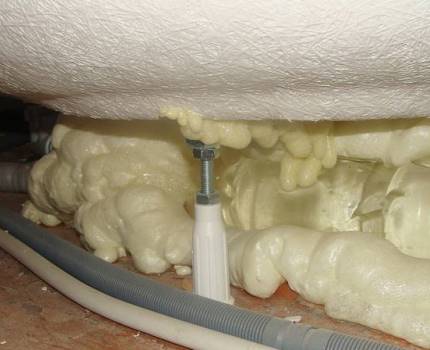
The space under the acrylic tray can be filled with a mounting foam that will act as a supporting cushion and soundproofing protection
Installation of a cast-iron pallet
Installation of a cast iron product is similar to the steps taken with the installation of an acrylic pallet. The principal difference is only in the design of cast iron models. Cast iron is very durable and resistant to metal. In its design there are no reinforcing elements, and the legs are component pallet and cast simultaneously with the body.
To align this model horizontally, you will have to put steel slats under the legs or other objects that will prevent the floor covering from being pushed, because The cast-iron pallet has considerable weight.
Board products made of cast iron do not stick to the wall of the room. But how to fix the pallet, so that it does not move from the plates installed under the support? This task can be solved by cementing the bosses, which will frame each leg, preventing the shifts. For the formwork will come an ordinary box of matches.
It should be noted that the shower cabins in the collection are not equipped with cast-iron pallets. Usually they are used with simpler fences, including curtains, screens and other lightweight materials that do not require precision, so as not to adjust them to the geometry of the pallet.
For cast-iron pallets, the full enclosure of the shower enclosure is rarely used, curtains are usually used. If the aesthetic integrity is preserved, enough blinds
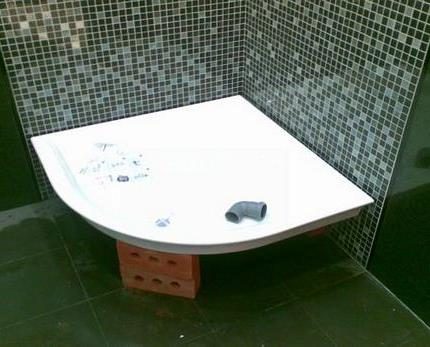
Sometimes the height of the legs of such a product is not sufficient to place a drain siphon below it. In this case, you have to prepare a special parapet. The procedure is not difficult to implement. It is enough to make a brick laying around the perimeter of the pallet or erect a concrete block - this will be the parapet. It should have space for the installation of a siphon and a sewer.
Then it is necessary to level the pallet by means of a level, having put under the legs of the plate, cementing them with the help of bosses made of cement. To hide the parapet and the space above it, you can use tiles or mosaic modules.
Features of mounting products made of steel
Steel models are produced by stamping, so it is quite difficult to make a solid construction from a pallet and legs. Steel products are completed with a stand. The plant, which produces steel pallets, produces and corresponding supports for them.
They have a rectangular or square shape and represent a welded welded structure of the profiles in which the threaded bushings are located. They screw in the threaded legs, with which you can do alignment (alignment) of the pallet.
Steel pallets often included in the factory shower enclosure. This is also a reliable option for replacing a worn acrylic pallet. If the pallet is installed as an independent product, then a cement substrate or pedestal is mounted on the bathroom floor. Their height should be sufficient for the location of the siphon and the piping.
The cement pedestal, which is an ordinary leveled screed, makes it possible to make the installation of a steel or stone pallet the maximum reliable
Places of contact of a pallet with a wall can also be glued and sealed, as when installing an acrylic product. The construction of the pedestal will be considered in the next section.
Installation of ceramic and marble models
Today, the trend is ceramic and marble plumbing. Pallets for the shower are no exception. Such products are strong and massive, so do not require the use of legs or reinforcing elements.
The installation method is selected depending on the design of the pallet. In many ceramic models a niche is provided in the cavity of the pallet for mounting the siphon and draining the sewage system. Such a tray is enough to connect to the sewer and install directly on the bathroom floor without any additional action. It remains only to attach the walls of the shower.
But there are many monolithic variants in which there is no corresponding niche. In this case, to connect the drain hole to the siphon, you will need to build a pedestal. Inside it there will be a space for connection to the sewer.
The construction of the pedestal is as follows. Nanosim layer of waterproofing on the area where the pedestal will be built. To do this, you can use liquid rubber, ruberoid, polyurea or other composition. It is necessary to wait for complete polymerization if you have used a liquid.
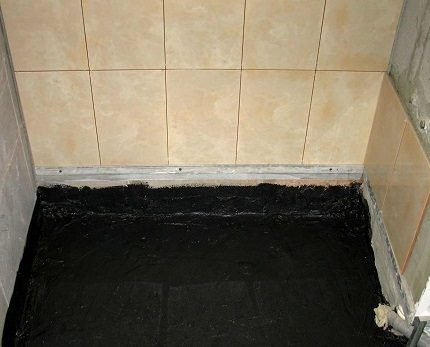
As a waterproofing can be used any modern version of liquid formulations, which, after application, polymerize and create a waterproof layer
Next, create a layer of cement screed with a horizontal surface (use the level). We wait for complete drying. Inside the contour of the pallet we make a brickwork with a height that would suffice for the normal arrangement of the siphon. It is necessary to provide a cavity for a drainage canalization.
We connect the drain hole of the pallet with the siphon, the reverse end of which is connected to the branch pipe. Apply a layer of cement mortar over the masonry. Next, install the pallet on a pedestal in such a way that the siphon and branch are in the places reserved for them. In the end, you need to make the pallet lining using tiles.
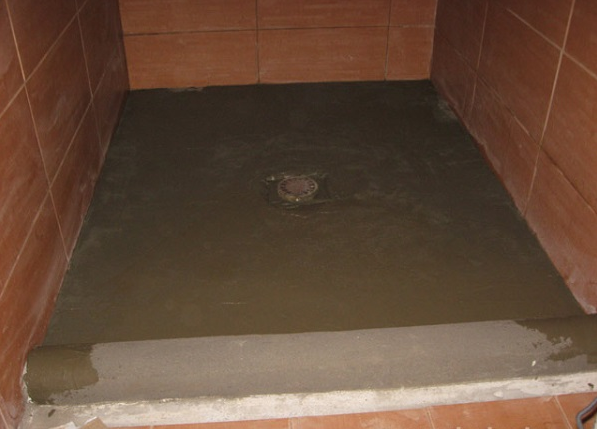
How to make a pallet yourself
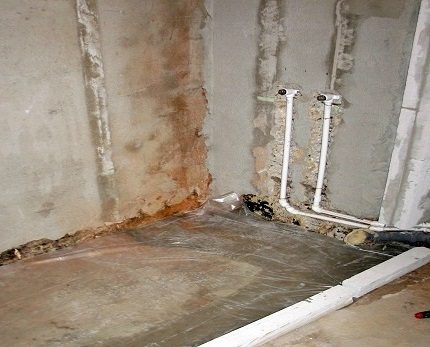
The process begins with the preparation of the future place under the shower. To begin with, the area of the installation is waterproofed, as in the previous paragraph. This will help protect the walls and floor from mold, fungus and dampness.
The second stage is the preparation of the sink. The finished drain assembly can be purchased at a construction or sanitary ware shop. It is also called a shower ladder. It should be of high quality. The drain hole is immediately connected to the sewage system. The installation must be very sealed, so you can use glue and sealants on all threaded connections.
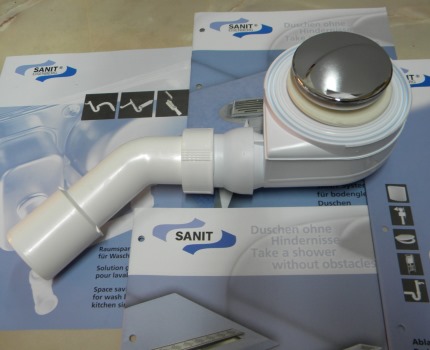
Buying a sink for a self-made pallet, you can not save. Choose a quality product that fits the size will serve as long as possible
Now you need to lay out the base (use brick masonry or a black screed) after the drying of the waterproofing compound. We make masonry walls using silicate or ordinary bricks. Before this, you need to put a metal mesh on the base for monolithic construction.
All the bottom of the pallet is treated with waterproofing material. After it dries, make a layer of screed over the entire surface of the pallet to hide behind it all the brickwork. It is important that the screed has a minimum slope towards the drain so that water does not accumulate after using the shower. After drying, apply the penultimate layer of waterproofing.
Next, make the surface of the pallet maximum flat. For this, a self-leveling mixture can be used. We apply the final layer of waterproofing and tile the pallet with tiles. It can be a mosaic or any other tile.
Strengthening of steel or acrylic products
These solutions, especially acrylic, have a weak structure. Measures to increase strength are reduced to the installation of support elements, which may be bricks.
It is important that the pallet press on all supports with equal force, otherwise one of them can just press the bottom
In this case, all supports in contact with the bottom should repeat its shape. To do this, you can also use gaskets made of paronite or rubber.
Some full models of shower cabins have a large height of the fence and a pallet, for installation of which the height of the ceiling may not suffice. In this case, it is necessary to make a floor excavation to make the installation of the pallet and connection to the drain.
How to install the shower:
The installation of the shower tray with the right approach does not take much effort and does not require special preparation. If you follow the instructions, you will get a first-class installation of a monolithic pallet with the highest possible reliability.
Repair in the house is always perceived positively only at the first stage, when everything conceived is implemented on paper. When the stage of the direct editing process comes up, there arises a lot of controversy, disagreements and pitfalls about which no one knew.
In this article, we describe in detail the process of repair in the bathroom, or rather - the installation of a shower cubicle on a "brick pillow."
Shower cabin from improvised materials
As you know, the price of the finished shower cabin sold in the store can vary greatly, this is due to various factors. For example, some devices are more modern, they have more electronics, others use cheap materials, and some are of a completely non-standard form.
The choice is great enough, to find something worthy of affordable price it is extremely difficult, therefore we suggest not to focus on finished products. Let's make the shower cabin better, save money, and work with our hands.
The very first thing you should pay attention to is the shape of the pallet:
- Rectangular.
- Semicircular.
- Pentahedral.
As for materials from which pallets are produced, the choice is quite diverse:
- Cast-iron - the most expensive, but at the same time, the most durable and durable. By weight are considered to be the heaviest, therefore the basis for them is reliable. On the other hand, the supports can be placed around the perimeter, leaving the central part in a suspended state.
- Steel pallets slightly inferior in strength and durability, but also at a cost more affordable. There is one drawback, steel noise when exposed to water, so it is necessary to use a special silencer for noise under the pallet.
- Acrylic - the most diverse in form, but the least durable. Under the weight of an adult, such a pallet can easily bend, and with increased load, it will even crack. Therefore, the pallets are installed with an additional support element made of metal parts.
Note! You can make a shower tray of bricks with your own hands, but it needs to be polished ceramic tiles. First, it is better from the aesthetic side, and secondly, tactile contact with the brick can not be called pleasant.
Now let's choose one of the above pallets, in order to describe the installation process by its example. Let's give preference to the most durable and reliable - cast-iron version.
Additional materials
To install the shower enclosure with your own hands, we will need:
- Plumbing elements: siphon, hoses, valve, rubber rings, fum-tape, shower head.
- Also useful silicone sealant.
- To prepare the mortar you need cement, sand and plasticizer.
- Building bricks (for example,).
- For finishing it is better to use tile.
As for the tools, you need to purchase:
- Building level (laser device).
- Roulette.
- Putty knife.
- Master OK.
- Kiyanka.
- Pistol for sealant.
Preparation of premises
Important! If the bathroom is a country house, then be sure to ensure that the pipeline was initially located correctly. For this, the drain is installed in the floor, in any part of the room. Pipes with cold and hot water it is better to install in the wall, so as not to be wasted on additional finishing during the repair.
- First of all, it is necessary to vacate the premises, dismantle the old floor covering and cut off all the old plumbing elements.
- Measure the working area and calculate the number of building materials.
- Prepare a cement-sand mortar using water and a plasticizer.
- Align walls and floor using a mortar or putty. This stage can be skipped, but you will agree, in a more even room and repair is easier to do, at least, finishing materials are easier to fix.
Setting the base
Below you will find an instruction from which you will learn in detail how the pallet is fixed to bricks:
- After the floor has been leveled, it is necessary to mark the boundaries of the cast-iron tray.
- Now you can knead cement mortar for brickwork.
- The next step - using a putty knife, apply a few cement smears to the floor surface.
- Put a brick on them, lightly drive it over the mortar. The final position of the material must coincide strictly with the line of the pallet.
- After that, hit the brick several times with a kyanite, to squeeze it as best as possible to the floor.
Note! The thickness of the seam for brickwork can vary, it all depends on where it is carried out. In this case, 5-7 mm is enough to maintain strength.
- Put the second brick, perpendicular to the first, to make the letter "G".
- Lay out as many bricks as necessary, so that the pallet does not touch the surface of the floor, and there was a place for the drain hose.
In the photo - under the pallet there passes not only a drain, but also a water pipe
- The same is done in all other corners, observing the drawn line of the pallet.
- While the solution dries, it is possible to mount sanitary elements.
- After waiting a certain amount of time (at least 2-3 days), you can proceed with the direct installation of the pallet.
- Before you put the cast iron product on the bricks, you must apply a cement slurry to them.
- Having put the pallet, it is necessary to squeeze it well and check by a building level, whether the horizontal plane is observed.
- In the event that everything is fine, you can connect the drain hose with the drain hole of the pallet.
The next stage is finishing. As for the basis we took a tile, then we need only two things: plastic crosses, for installing them between tiles, and grouting for seams. And in the right color. Here, in fact, the shower is ready, only the curtain to the ceiling is left to hang, so that splashes do not fly in all directions.
Acrylic tray
A cast-iron product is still expensive, not everyone can afford, so let's take a quick look at the process of installing a more flexible and elastic material - acrylic.
The main thing is a uniform distribution of the load in order to extend the service life of the base
- They should also be installed in the corners.
- The welded metal frame is fastened between the brickwork to the floor using dowel-nails.
- To metal is not ter acrylic surface, it is necessary to use insulating material. The most affordable that can be found in the materials at hand - the usual rubber, which is glued directly to the metal.
Important! Joints of pallets (though cast iron, at least acrylic) should be treated with silicone sealant. If you think this option is not too aesthetic, then you can use plastic decorative corners, which are fixed with the help of glue or sealant.
As you can see, the shower cubicle made of brick by your own hands is quite accessible, even for people who are not connected with construction and repair. The main thing is to do everything as professionals advise, then the result will please you longer.
Conclusion
Brick masonry is not afraid of high humidity, it is important to isolate the remaining elements from direct contact with water. For example, the main source of excess moisture may be a drain hose.
If it is installed without the appropriate materials (foamed tape and rubber rings), then there is a high likelihood of leakage, as a result of which - the water will be accumulated under the pallet. And this is an excellent environment for the propagation of harmful microorganisms.