Masonry shower tray made of bricks. Advantages of self-made pallets. Shower equipment with a ready pallet
Photo: on request Yandex and Google
Repairing the bathroom, we, in the first place, replace the finishing materials of walls, floor and ceiling, as well as we update the plumbing. If your room is not so spacious, to install a large bathroom in it, then you can save considerably by using a shower. This article will discuss how to make the pallet design yourself.
Types of shower trays based on materials
Pallet - this is the basis for our shower cabin, which means it must be made of really strong materials. They can be classified as follows:
- from cast iron. Such pallets are one of the most durable and durable. Among the minuses is a very large weight, a long warm-up and a high price.

- of steel. Very light, inexpensive and quite durable. However, such pallets have very fragile enamel and low noise insulation.

- from ceramics. These pallets are very attractive and easy to operate. But they usually do not have legs, and they are very fragile.

- from an artificial stone. You will definitely be attracted by the texture of the surface of such a pallet, however, low thermal conductivity, high price and heavy weight can push away from buying.

- from acrylic.Practical, light, beautiful, well absorb noise. The disadvantage of such pallets is only one: they are prone to damage and deformation.

- made of wood. Suitable for villa or a country house. Ecologically clean material, however, will last no more than three to four years.

- from plastic. Very budgetary and short-lived option, which we would not recommend for an apartment or a house: rather, for a summer shower.
How to make a shower tray by yourself: step by step instructions
For convenience, we propose to divide the entire process into several stages. The first, not least, is the procurement of all the materials necessary for work. So, you will need:
- Ladder, simply put the drain system.
- Several concrete blocks or bricks (at your discretion).
- A bit of sand and cement. It is also desirable to have plasticizers.
- Ruberoid or a pair of sheets of polyethylene film, a little water repellent mastic.
- Among the finishing materials - mosaic tiles or tiles (at your discretion).
- Grout for tile and good glue.


Now about tools:
- A small bucket in which we will mix the solution.
- Mixer.
- Kelma (building trowel).
- Laser or water level.
- Punch, drill, several screwdrivers of different sizes.
- Spatulas and roller.


Step 1. Run the screed under the shower tray. First, the surface should be thoroughly cleaned from the remains of old tiles, dust and dirt. Now primed in two layers. As for the primer, it is better that it is moisture resistant. After the soil has dried, a waterproofing of the shower tray is done. To do this, it needs to be smeared with a special mastic (especially carefully treat the corners). Then polyethylene film is laid on the floor (preferably a couple of layers). As soon as the mastic dries, you can fill the screed from the cement. As for the thickness of the screed, it should be about five to eight centimeters.
Advice! When you lay the film, try not to exclude air layers. If any, the effect of waterproofing will not be. 
Step 2. Install a shower ladder and drain pipes, make a neck for water drain. Before installing the drainage ladder, it is necessary to bring a sewage pipe to the drainage point (the ladder is connected to it). Pay attention to the height of the installation: the slope should be at least three degrees. Properly fix it with a cement-sand mortar. This stage is very important, because if you weakly fix the ladder and its construction will move in subsequent works, in the future the pallet will leak inside. As a result, the entire system will have to be dismantled. 


Step 3. Lay out the sides shower tray brick. After the waterproofing together with the gangway are installed, we can directly form the shower tray. Bortics along the perimeter of the pallet are made of bricks. First form the shape of the future pallet (about what kind of pallets are shown in the photo above). The markup is done on the floor using a simple marker. By marking out, lay out our brick edge, using a cement-sand mortar.
Advice! The proportion of the solution should be the same as for the screed: one to two. As for the height of the rim, it should be close to the level of the grate of our gangway - plus twelve to fifteen centimeters. So the water will not flow to the bathroom floor.
Step 4. Filling the base for shower cabins. Again, we use cement, in which it is worth adding a little special hydro-repellent, say, liquid glass. First you need to fill the layer up to the ladder (horizontal). As soon as it dries, install a few special beacons (plaster beacons). Thanks to this you will form a true inclined plane.
Advice! Before pouring the base, make sure that the overlap is strong. After all, the concrete base of the shower tray is quite thick and, correspondingly, it weighs a lot. 
Step 5. Waterproofing pallet. It is superfluous to make another layer of waterproofing. Now on the already made design of our pallet. We spread the mastic base, as well as external and internal edges. It is best to apply two layers. Now we can safely call the isolation reliable.
Step 6. Facing the shower tray, decorating. After the water repellent mastic dries, we cover the pallet with cement plaster. Special care is taken to process the seams of the shower tray. Please note that the selected plasters should be increased resistance to moisture. It is also mandatory to use a plaster grid with a small cell. So the layer of plaster will lie more firmly.
As soon as the surface dries, start priming it with a moisture-resistant primer (several times). Once the primer has dried, you can start working on the decor. Congratulations, shower tray, made by yourself, ready!

Do you know how to make a shower tray? Share with our users in the comments under the article!
If you do not have the time or desire to make a shower tray with your own hands, then welcome to our catalog: you will find dozens of stylish and quality options from verified sellers.
Also you might be interested:
For people who prefer quick water procedures for a long and languid stay in the bath, there is an excellent alternative - a practical shower cubicle. It takes up a minimum of space and can be located in any part of the room. The soul has another useful property - it saves water, which is important in our difficult times. Many are disappointed in the factory products, not very strong and of high quality, so they prefer other options. One of them is a shower from tiles - affordable, economical, comfortable and cozy.
-
- Stage # 7: Grouting and cleaning
Why dushkabina of tiles - the best option?
Why develop an original design of a self-made booth, if you can buy ready-made equipment in any sanitary ware shop - a full-fledged booth with many useful (at first glance) capabilities? However, practice shows that most of the modifications shower box just do not use if you just need to take a morning or evening shower.
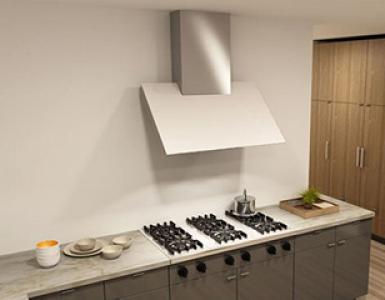
A simple and convenient version of the shower, which can only be conditionally called a cabin: a corner marked with a mosaic foundation, equipped with shower equipment and a drain for water drainage. Convenient for those who value time
For example, not everyone feels comfortable under a powerful "tropical" or cascade shower. Functions such as Charcot's douche, ozonation, a Finnish sauna or a steam generator are also not necessary for everyone. According to reviews, more often use a folding seat, sometimes turn on the radio, but such possibilities can be equipped and in a conventional cabin.
Dimensions and shape of factory cabins are not always suitable for bathrooms, especially if the area of the bathroom is minimal, for example, 1.5 mx 1.5 m.

A tiled cabin with plastic or glass doors fits perfectly into any size room. It can be arranged in a corner or simply to separate part of the room with a transparent partition
What are the advantages of a cockpit entirely or partially made of ceramic tiles? The material made on the basis of clay is safe, eco-friendly and durable. It does not conduct electricity and does not burn, which is also important, especially if the shower is used by children.
Caring for a tile or granite is very easy - fairly simple detergents, in contrast to special compounds designed for washing cabins from plastic.

One of the main advantages of ceramic tiles is the infinite variety of color solutions, while the factory cabins are produced in only a few variants, mainly in white-silver
With the help of tiles during the construction of the cabin, you can level the walls, disguise the errors of repair, hide some communications. Using ceramic elements of various types, you can create a mini-zone that stylistically will not differ from the rest of the room, whereas modern plastic and glass cubicles can hardly fit even in the classic interior.

A light transparent partition separating the shower does not violate the general style of the room, but is its continuation: the appropriate tone and texture of the ceramics
The disadvantages are few. One of them is insufficient sound insulation, but this problem easy - additional laying under the screed soundproof layer or insulation.
Ceramics are always cool to the touch, but in the shower room, it quickly heats up under the influence of warm water, and the rest of the bathroom can be equipped with the system " warm floor ". As you can see, disadvantages can be turned into advantages if desired.

Ceramic tiles are recognized as the best material for rooms with a high level of humidity, therefore, it is simply ideal for the construction of stationary shower cabins
How to make such a shower for yourself?
If you decide to make a shower zone with your own hands, first choose a location and determine the type of pallet, as there are several variants of cabs:
- with a self-made podium podium;
- without a pallet, with a ladder.
- from finished pallets (acrylic, steel, cast iron, ceramic);
From this decision depends the initial stage - the treatment of the floor in the room (laying heat and sound insulation, screed, waterproofing, laying pipes). If a ladder is required, additional work will be required to install it. Let's consider two variants of the device of a shower cabin from a tile: manufacturing of a shower of a tile with own hands and with use of the ready pallet.
Instead of a factory finished pallet, you can make a comfortable, stable and durable pallet on a foundation of concrete or bricks, lining it with ceramic tiles. It is assumed that the water will be drained to the drain by a drain, and a small ledge along the edge of the basement will prevent it from reaching the floor of the bathroom.

Before starting work, you should definitely familiarize yourself with the design of the ladder - a device for draining used water, mounted on the floor surface
All materials (tile adhesive, grout) must have water resistance, and the concrete base is covered with waterproofing.
Stage # 1: Substrate preparation
This stage depends on the project as a whole and the degree of readiness of the floor to install an additional structure. If a complete reorganization is necessary, we begin by dismantling the old coating. We re-make the concrete screed, not forgetting about noise insulation. Approximate scheme of the device of a floor (from below upwards):
- concrete slab;
- mineral wool, glass wool;
- waterproofing (polyethylene, ruberoid or pergamina);
- concrete screed.
For sound insulation of pipes, a special polymeric membrane can be used.

Before the commencement of construction it is necessary to take care of the installation of communications - the piping of water pipes and sewerage. A separate branch pipe is required to install a ladder - a device for collecting used water
Step # 2: Waterproofing the installation area
The surface of the site on which the structure will be located is carefully treated with a waterproofing material - in this case bituminous solution.
If there is an opportunity, it is better to focus on the choice of modern, more durable and elastic compounds - liquid glass or rubber, polymer-sand mixtures. They are not afraid of mold and fungus, which is important for work in a room with high humidity.

Liquid waterproofing is applied to all surfaces without exception: floor, wall (to the height of the basement), sewage pipes, and open only let out the outlets and valves
Stage # 3: Building a foundation with a gangway
On the prepared foundation lay out the foundation of bricks (they can be replaced with a metal workpiece). Under the foundation we install a ladder. Metal or plastic product can be purchased at the plumbing store. There are several variants of ladders - with a dry water seal or a conventional siphon - we choose the one suitable for the function and size.
Brick (preferably red, moisture-resistant) is laid on the floor, leaving a free release of the ladder. Along the perimeter lay a low, the size of the width of one brick, the edge, not forgetting the outer corner to make the beveled (for safety and space saving). Carefully we rub all the slits with a cement-sand mortar.

Cement mortar is prepared according to the classical scheme: on 3-4 parts of pure, without impurities of sand 1 part of cement. First mix the dry ingredients, then add water until a thick solution
Stage # 4: Waterproofing the structure of the pallet
This stage repeats the first. Liquid waterproofing covers the erected structure, not affecting only the release of the ladder.

Cement-polymer mastics for waterproofing structures in the bathroom have another advantage - they provide excellent adhesion to other materials after drying
Step # 5: Leveling the Surface
For laying the tiles you need a flat surface, so on the brick frame we apply the leveling mixture. Especially careful alignment will be needed for those who decided to use a mosaic instead of a standard tile. After the procedure is over, you need to pause - wait until the solution is completely dry.

Ideally a smooth surface can be achieved by troweling with the use of a special tool. For cement plasters use polyurethane grater, for gypsum mixture - a special sponge
Step # 6: Laying the ceramic tiles
Adhesive mortar is prepared immediately before application, since it has a limited shelf life. We choose the tiles to taste, but with the only condition - it should harmoniously blend with the bathroom interior and not slide.
It can be ceramics 30 cm x 40 cm, tile 10 cm x 10 cm, mosaic, however please note that large-sized parts will have to be cut because the pallet area is small (about 0.9 mx 0.9 m), besides To trim the edge, located along the perimeter, is lighter with small pieces or mosaics, which can easily be divided into small pieces. When laying the tile, remember the inclination towards the ladder.

We begin laying the tiles from the central (far) corner - the place where the eye falls first. The mosaic is easier to use, because it is easy to cut into convenient fragments, but do not forget that you need a perfectly flat surface
Stage # 7: Grouting and cleaning
Finishing stage - grouting joints. We apply special trowels for bathrooms. If you use a tile of light colors, you can use a white grout, but keep in mind that over time it will change its hue, since tap water contains a lot of impurities leaving traces.
The grout is applied with a sponge or rubber spatula, then carefully rubbed and remove the excess. Tiles are wiped with a good absorbent cloth.

For color tiles or mosaics, it is better to use a non-white grout, but a composition matched to one of the primary colors, in this case to blue. So on more long term the freshness of the cladding will be preserved
You can use the shower after a day, but it's better to wait 3-4 days, until the glue and grout are completely dry. It turned out the shower corner on the basement. To make it turn into a booth, you need to install a partition or door. Convenient option - double plastic curtains, sliding apart.
Blanks of glass and plastic are sold in supermarkets along with instructions for their installation. It is also possible to separate the cabin with a small partition (about 1 m in height), also tiled, or a curtain made of water-repellent fabric.
Shower equipment with a ready pallet
To all who do not want to spend time on independent arrangement of the basement, we recommend to buy a ready pallet and install it inside the tiled cabin. However, please note that the factory products have standard sizes, so they may not be suitable for your project. Most often, these are acrylic or steel tubs with low sides, having a hole for installing a drain.
Acrylic products are durable, light, preserve heat. You can buy a budget option - from 3,000 rubles to 5,000 rubles (China) or expensive, costing up to 35,000 rubles (Belgium, Germany, Italy, Poland, Czech Republic, Switzerland). Expensive wall and corner models are strong, and they are also equipped with a gangway, usually located in the corner.

Often, tile booths are called acrylic pallets, installed at the wall or in the corner, equipped with a shower and fenced off by a transparent partition
Many mistakenly believe that the cheapest are steel pallets. They are partly right, when it comes to Chinese or Portuguese products worth 2 -2.5 thousand rubles. However, German equipment is much more expensive - up to 50 thousand rubles. The most expensive are models from faience, their price reaches 200 thousand rubles.
The cabin under the factory pallet is prepared in the same way as for independent construction - first it is necessary to process the floor area, to make waterproofing, to bring the communications. If the tiles are not laid, it is necessary to wall the wall at this stage.

Ready pallets are good, if the booth itself is not needed, but enough shower corner. A pallet of acrylic or steel is installed in a free corner, leaving it open or fenced off with a curtain
Immediately before installation, a sewage drain is installed. Ideally, it should be with the pipes under the cabin, the second, undesirable option - in the wall, but at the very floor. When mounting pipes, adapters and connectors, do not forget about their reliability and use rubber gaskets and silicone sealant.

In some cases, the wall is already tiled, but additional partitioning is required. First completely finish the construction of the cabin, and only then install the pallet
The pallet is installed strictly according to the instructions, which necessarily goes in the kit. Usually start with the adjustment of the height of the legs (if any) and the alignment is strictly horizontal. The slope in the pallet is provided by the factory manufacturing technology.
The cheapest models, without taking into account the inclination, will have to be tilted to the side of the drain by 0.5-1 cm. Then connect it to the sewer pipe and put it in place, fixing the drain from the outside. The installation of glass doors or plastic blinds is the final stage.
Original cabins in the interior of the bathroom
We have already mentioned that the tile booth, unlike the purchased options, fits perfectly into any interior - traditional or ultramodern.

The combination of black glossy and matte panels, fashionable plumbing, comfortable cabin environment - minimalism like no other style is suitable for the design of modern bathrooms
Noble classics never go out of fashion. The design of the shower cabin completely corresponds to the rest of the interior - restrained brownish-beige shades, elegant furniture, expensive accessories.

In a fairly spacious room, the neighborhood of the bathtub itself is beautifully beaten on graceful legs and a shower cabin occupying a central place and fenced off by a heavy curtain
In the design of the cockpit from the tile is possible everything - even the ceramic ceiling in tone. The idea is interesting, but it requires caution: to install the mosaic choose the most durable glue!

Booths, fully laid out with ceramics, granite or artificial stone, resemble Turkish baths. You can develop the idea and, if the area allows, to make a small sunbed or at least sitting - also from the tile
The large footage of the bathroom gives the opportunity to realize the most amazing projects. Why not arrange the cockpit is not traditional, in the corner, but right in the middle of the room?

The cabin looks like a shower on a hot Mediterranean beach, but in the bathroom interior the semicircular partition, lined with a bright blue mosaic, looks appropriate and original
What if you do not like cumbersome designs and appreciate every inch of free space? The shower corner is a gentle ceramic mosaic in marine colors and a weightless curtain.
![]()
The equipment of this corner is based on two principles: a minimum of material and a maximum of skill. The main attention is to the device of the ladder, which collects water and does not allow it to spread throughout the room
Finally - tips on laying the mosaic from a professional:
- The main types of shower trays
- The bottom of the shower cabin with your own hands
- Screed tile
- How to trim the shower tray with tiles?
Repair in the bathroom, unlike many other rooms and rooms, often involves replacing plumbing. Installation of a washbasin or a shower booth by own hands is carried out when the family budget does not allow to fork out for hiring of experts. But it also happens that there is no money to buy a new shower box or any other equipment. In this case, it is permissible to make a shower tray of tiles yourself.
This option of designing a bathroom in addition to saving money, allows you to show yourself as an excellent master, express in your work individuality and innovation.
The main types of shower trays
To date, the market of sanitary goods has a very wide range. There is a rather large number of types of pallets, which differ, first of all, by the material used to create this technique. So, according to this principle, pallets can be:

To date, iron pallets have been of great use because of their practicality and reliability.
- iron;
- acrylic;
- cast iron, etc.
In those houses that were built long ago, the bathrooms are very small, so in order to cram all the plumbing that should be there, you only need to decorate the bottom of the shower compartment with brick, concrete or tiles of small volume and unusual shapes.
Back to contents
The bottom of the shower cabin with your own hands
In order to do everything correctly and reliably, it is necessary to first prepare the place reserved for showers.

Before you start installing the shower tray, it is necessary to completely isolate all surfaces that are present in the immediate vicinity of the system being built. So, as already mentioned, the pallet can be made from a variety of materials. The most optimal and affordable for self-implementation is the option in which first the pallet is laid out with a brick, then it is leveled with concrete, and the final stage is represented by tiling the pallet.
Pallets from these materials can be erected in any form and any sizes. The pallet, decorated with bricks, concrete and tiles is considered a great option, which can be used instead of an expensive washbasin. In order to cope with the task, it is necessary to stock up the following materials and devices:
- ceramic or clay tiles;
- brick;
- tile adhesive;
- cement;
- iron mesh;
- waterproofing;
- electric drill with nozzle "mixer";
- roulette;
- sand;
- building level;
- plums;
- putty knife.

After all the materials necessary for this event are prepared, it is necessary to make the base under the shower tray. Experts advise to begin to trim the shower tray in the bathroom at the stage of its rough finish, that is, even when the walls have no paint or tiles. The same goes for sex. In those areas where the pallet will be adjacent to the walls, it will be necessary to treat them with a waterproofing solution. This is bitumen or roll material, for example roofing material. This must be done to prevent the formation of mold and rot on the walls and other surfaces. Liquid waterproofing must be applied with a conventional paint brush in several thin layers. The first layer is applied to the walls before starting to make the screed, the second - after it is completed, and the last layer of waterproofing is applied before everything is prepared for the final, facing work with the tile.
If you want the shower tray in the shower room to be warm, it is permissible to start the galvanic system "Warm Flooring" under the screed.
As soon as the main layer of the waterproofing solution dries, you will need to move on to another stage - to decorate the pallet with a brick. Here you not only outline the limits of the shower cabin, but at the same time give the pallet the necessary form. For these purposes, you may need both conventional and armosilicate bricks. It is laid using a cement-sand composition, prepared by hand, or with the help of a concrete mix, which is available in any construction shop. If you adhere to the first advice, then you will need:

In the shower cubicle, you can make a warm floor due to a "warm floor".
- sand - 3 buckets;
- cement - 1 bucket;
- water - 1 bucket;
- plasticizer - 70 g.
All this must be thoroughly mixed, so that the mass is uniform. Since the pallet is made for the shower, it is reasonable to take some measures to strengthen the structure. That's why the plasticizer is used in the solution. It is needed in order to remove the unnecessary moisture from the mortar during the laying of the brick and to fix all the bricks together as firmly as possible. In addition, do not forget about the reinforcement of the erected structure. Seams between the rows can be inserted into the steel mesh or simply lay a metal wire between them. Due to this, the bottom of the pallet becomes very powerful.
Back to contents
Screed tile
After you have outlined the approximate boundaries of the pallet with masonry, you need to think about where the drainage sink will be located. This part of the pallet must be of high quality, since after the construction of the shower tray it will not be possible to change it in any way. If the sink is already available, then this step will need to be skipped. Then go to the process of forming the screed at the bottom of the pallet. To do this, first the beacons are exposed, and the tray is filled with screed. The latter, in turn, can be made from the same mortar as was prepared for brick laying, but some gravel or crushed stone can be added to it.

Since the shower area rarely exceeds 2 m², then the fill will take a little. And for its alignment, you do not need any special equipment. Here you can do with such a simple tool as a shovel or a trowel. In order to remove excess air from the solution, it is necessary to softly apply a trowel, a shovel or other similar tools by smooth soft movements. Do this by slightly deepening the flat part of the tool into the solution and gently moving it across the entire area of the pallet.
Once all of the above is implemented, it will be necessary for some time to leave the pallet alone for drying the screed. While this will happen, it will be necessary to treat the walls of the bathroom with a waterproofing consistency for the second time. This is required so that the dampness does not fall into the voids of the concrete or into the seams between the bricks.
High-quality insulation made with the use of high-tech materials will make it possible to exclude the appearance of a fungus or some other harmful microorganisms. In this case, not only in the bathroom itself, but in the rooms located next to it.
After that, the dried out surface of the shower tray must be applied self-leveling compound. At the same time, in the direction of draining, it is desirable to arrange something like a groove, so that all water or any other dampness goes quickly and easily into the drain hole. Once the applied layer of self-leveling consistency has completely dried, it will be necessary to repeat the manipulations concerning the application of the waterproofing. This layer must be carried out with extreme caution and thoroughness, especially in areas of contact between the pallet and the walls. Then it remains to apply a tile to the erected pallet.
If you have planned to make a shower tray with your own hands, then you should not flatter yourself that it will be much cheaper for you. This can be understood if you calculate how many materials you need to buy and how much work is worth doing.
For example, you need to organize a good sink. For this, the bottom of the pallet rises above the floor level. To this end, laid out a brick or poured concrete with a lot of plasticizer. It is also necessary to produce waterproofing works, to purchase a quality non-slip tile and to perform another finish.
In the aggregate, all this can not be cheap. However, building a shower tray with your own hands has the main advantage - you can give it the form you want, set where you want, choose arbitrary sizes and the like.
In this article, we suggest that you become more familiar with all technological processes for the production of a shower tray of tiles.
Advantages of self-made pallets
Although the construction of a pallet made of bricks takes time, but the result will fully justify all labor. First of all you can install a shower even in an apartment with a small bathroom. It is possible to give it any shape and size, taking into account the individual needs and preferences of your family. In the case of the factory pallet, it does not work.

You can give this structure a special and unusual appearance, by purchasing a beautiful tile. Shower tray from the tiles will serve you more than a dozen years. While bought can be out of order.
Selecting the appropriate material
Having weighed all the pros and cons, in favor of making a shower tray with our own hands, it is necessary to think over everything to the smallest detail and first of all make a list of materials that will be needed when working.

First of all, think about what the foundation will be made of. It is necessary in order to ensure sufficient slope in the drain pipe. It is made of brick or concrete on the basis of cement-sand screed.
Advice! If the choice fell on the brick, then give preference to ceramic or red. They have sufficient moisture resistance. However, if you make a good waterproofing, then you can also use silicate brick.
Also it is necessary to decide on the type of waterproofing. For this purpose, liquid bituminous compounds, ruberoid, PVC film are used. The main purpose of waterproofing is to prevent water from flowing through the concrete.

In addition, it is necessary to make a choice and the facing material for the shower cabin with your own hands. Usually purchased ceramic tile or a mosaic. In rare cases, the cladding is carried out by natural stone. It is also necessary to purchase a special moisture-resistant tile adhesive and a moisture-resistant grout for joints.
As you can see, you can make a shower tray with your hands literally any design and method. Thanks to this, you do not have to adhere to standards, and connect your imagination.
Select a location
It is equally important to decide on where the shower cubicle will be built with the help of tiles. The choice of the optimal location depends on several important factors:
- Availability and location of communications. For sewage management, it is necessary to carry out sewerage, and also water pipes. If the water supply is not a problem, then it is better to ensure the proper slope of the sewer pipe so that the riser is as close as possible.
- Size and shape of the structure. In this case, much will depend on the individual parameters of the selected room. First of all, you need to take care that you can safely take a shower in this place. It is equally important to decide what shape the shower tray will be for the tile. If there is a complex geometric shape, here it will be necessary to provide free access for its maintenance.

In general, a shower cubicle with its own hands with a pallet can be installed directly in the bathroom, bathhouse, workshop, garage and the like. Moreover, this apartment or house does not matter. When performing high-quality waterproofing works, all these restrictions are removed.
Necessary tools and materials
To make a shower tray of tiles with your own hands, you need to determine the manufacturing process and, before you start to work, see if there is a suitable tool and material:
Materials
- Grout for tile joints.
- Waterproofing.
- Tile glue.
- Alabaster / gypsum.
- Sewer pipes.
- Tile for the shower tray.
- Board for manufacturing formwork. The thickness of the board can be up to 20 mm.
- Plastic ladder.
- Sand and cement (if the foundation is not made of bricks).
- Lighthouses for pouring screed.
Tool

- Roller and brush for waterproofing.
- Building level.
- Putty knife.
- Marker.
- Nails and a hammer.
- Trowel.
- Bulgarian or tile cutting.
- Roulette.
- A container for mixing mortar and tile adhesive.
- Rubber spatula for grouting joints.
Instructions for making a self-made pallet
So, to make a shower tray with your own hands, you need to follow a certain sequence. All work consists of the following stages:

- Pour the screed.
- Installation of the ladder.
- The erection of the rim.
- Filling the inner pallet.
- Waterproofing.
- Facing.
All these stages, we will consider more in detail.
Pour the screed
First, the draft base is brought into the corresponding state. For this, the old tile coating is completely dismantled. Also make sure that the roughing screed is in good condition. It is not difficult to verify this. You can tap the floor, if you hear an empty sound, then it is better to dismantle it and fill a new screed.

Preliminarily the floor is primed in two layers. Further, waterproofing works are carried out. If a liquid mastic is used, then coat it completely with the floor and walls with a height of up to 400 mm. Special attention give the places of docking the floor with the wall and the corner between the two walls. If necessary, soak them twice.
The next step is to fill the rough screed. Please note that this stage of work is only carried out if you have removed the screed.
Advice! For more comfort you can lay floor heating - Underfloor heating system. Given that the tiles are distinguished by a high level of thermal conductivity, the warm floor would prevent freezing until it flows hot water or you do not adapt to this temperature.
Installation of the ladder
When the roughing screed is ready, it is necessary to install the ladder. Preliminarily, a sewage pipe is fed to the selected place. She should be given the proper bias, so that all the water from the tray does not accumulate, but quickly leaves. Be sure to check the pitch of the pipe with a level.

To fix the ladder, you can use gypsum or alabaster. Under the ladder, you can put a brick to achieve the required height. Fixing the ladder should be given special attention.

This is explained by the fact that in subsequent work, he must remain in place, in particular, when pouring the final screed. At the end of the installation, it is recommended that it be tested for leaks.
Master's advice, initial pallet height calculation and roughing
Pour a few liters of water into the ladder and make sure that it drains fairly quickly, as well as all connections to the sewer pipes dry. If a leak is detected, then do not risk, immediately remove the problem.
Fabrication of the bead
The rim is made of bricks. This way you can already shape the future pallet. The edge must repeat the bend you have planned, turn or just be even. That is, your shower cubicle of tiles can be square, rectangular, oval or other shape. And it should be formed precisely.

Preliminary it is possible to make a marking, putting marks with a marker directly on the floor. The next step is to prepare a cement-sand mortar and put the brick in the prescribed form. As for the height of the rim, it should be above the ladder and rise above it by a few centimeters.
There are also no strict rules, but remember, too high a rim can create problems for older people if they live in your home.
Fill the inner tie
Now it's time to fill the final screed inside the shower enclosure without the pallet. In the composition of cement, it is recommended to add hydro-repellent components, for example, liquid glass.

Directly before filling, be sure to set the beacons. Depending on where the ladder is located, the screed should have a slight slope in his direction. This bias is immediately formed by lighthouses.
note
Before you fill the screed, make sure that the overlap is relatively firm and reliable. After all, it should hold a considerable weight of all the concrete, filled with concrete.
Waterproofing
When the screed has dried, it remains to produce the final waterproofing. Using the same mastic, carefully apply a flooded screed and lined bricks. Due to this moisture does not penetrate into the device of the pallet.
Facing
So, everything is ready for the tiling. It can be put on dry and think about how best to put it. It is important to think in such a way that there are as few cuttings as possible, and also that the veneer looks visually beautiful.

First of all, the tiles are laid out on the floor, and only then the sides of the structure are faced. At the same time, the sides are first faced vertically (at the sides), and in the end, top part the side. It is important to monitor the level, so that everything turned out exactly.
Conclusion
So, we have considered with you the main features of how to make a shower tray. Apparently, the arrangement is quite easy. Strictly observing all the technology, making a pallet will not cause you any difficulties in the process of work.
Councils of the master, a shower from a tile with own hands
Also, there will be no problems during operation. We hope that this material helped you to understand all the technological processes. Additionally we suggest you to watch the prepared video.