How is the ball mixer. We proceed to repair work. If the water oozes out from under the base of the mixer.
Today in the apartments mixers of various designs are installed, including ball-type cranes. They are more reliable than simple faucets with gaskets, but they occasionally break down. It is quite possible to repair the ball valve with one's own hands, although the design of such a mixer differs markedly from the usual design of a crane with rubber gaskets. Consider the order in which the repair should be carried out.
Almost every home master who has a minimum experience of plumbing works can change the gaskets in the tap. In doing this work, there is nothing difficult, just unscrew a couple of nuts, remove the old gasket and install a new one in its place.
If on kitchen sink or in the bathroom installed ball valve, then during the repair by their own hands this device will have to sweat. But if the master is well prepared and understands in advance the design of the mechanism, then the performance of the work will not require significant effort.
Possible faults of ball valves and their causes
 If the tap is leaking, then, first of all, it is necessary to find out the cause of the malfunction.
- Damage to the case. This fault is typical for low-cost models, the body of which is not made of brass, but of silumin. This material is brittle enough, so it can crack during impact or other mechanical stress. Such cracks can be imperceptible at first glance, but eventually the body will burst at the site of damage and the tap will start to flow water.
Advice! If the body is damaged in the mixer, as an emergency repair measure it is possible to recommend the putty of the gap by "cold welding". But this will help for a while, so in the near future the mixer will need to be replaced.
Advice! When inexpensive mixers are used, clogs are often formed due to wear and destruction of the O-rings. Therefore, when performing repairs it is necessary not only to clean the hole, but also to change the seal.
- If the water comes from the tap with a bad pressure, under the condition of normal operation of the water pipe, then the reason for this is likely to be a blockage of the shutter.
Advice! To avoid the occurrence of blockages, it is recommended to install filters - in the input of water into the house or on the pipe that brings water to the sink (washbasin).
Performing repairs
To carry out repairs, you need to have a certain set of tools.
Preparation of the instrument
 A home master should have at hand:
- A hollow screwdriver;
- Pliers;
- Adjustable wrench;
- Hexagon socket wrench;
- A hammer.
- Means for instant rust removal (such as "Liquid key");
- Special silicone grease for sanitary ware (odorless and toxic).
Dismantling work
Any repair begins with the disassembly of the crane. The work goes like this:
Performing repairs
After the crane has been dismantled, it will be necessary to carefully inspect it, clean all cavities and replace the worn parts. As a rule, these are the already mentioned seals with springs. In addition, sometimes tightened bolts are damaged, in this case, they are also subject to replacement. When buying new bolts, you need to carefully monitor that they fit exactly the old size, otherwise the repair work will not give a positive result.
 If in the course of the work clogs are detected, it will be necessary to thoroughly clean all the cavities. The mixer has its own filter (a small mesh installed in front of the ball), but with insufficient quality of water coming through the pipes it will not save the situation.
Therefore it is recommended to install additional filters on the pipes. These preventative measures will significantly increase the service life of ball mixers. If the examination shows a strong wear and corrosion of the ball, then this part is better to replace the whole. After the repair, the crane is assembled and the final check of its operability is made.
Mixers of ball type can be completely repaired by yourself. Beginners should not only read, but also see how the ball valve is repaired - a video with a detailed description of the process can be found on the websites of the relevant subject.
In the kitchen, the mixer is much more active than in the bathroom, so it goes much more often out of order. In rare cases, the only solution to the problem that has arisen is the purchase of a new appliance and the invitation of a plumbing technician, the rest can be handled independently. Having decided to repair the mixer in the kitchen with your own hands, you will save on the services of a specialist and get important experience. It is only necessary to arm ourselves with theory and tools.
- Leak from under the nut in the place of a spout of water, from under the handle (lever) or valves of the mixer in working order.
- The correct movement of the lever or valves is broken (jam, scroll, not fixed in the desired position, etc.).
- At normal water pressure in the system, the jet is not powerful enough.
- Water drips from the closed faucet.
Please note: the detected problem must be solved as quickly as possible! This will extend the life of the mixer and protect yourself and neighbors from flooding, saving money, time and nerves.
The most problems are caused by the leakage of the crane. And here you need to know the "enemy" not only in person, but also from within. It is about the device mixers.
Features of the device of the main types of kitchen mixers
Such delights as thermostatic and non-contact faucets are good for bathrooms. In the kitchen, for a place under the sun, more practical models are fighting - traditional two-valve and single-lever models. Common elements for them are: body, spout (spout), aerator, gaskets. In the rest they are significantly different.
The device dvuhventilnyh cranes
The two-valve valves that are familiar to the eye are arranged quite simply. Under the flywheel, which you twist while operating the structure, the crane-box is hidden - its locking element. Below is a device of such a mixer for the kitchen in pictures.
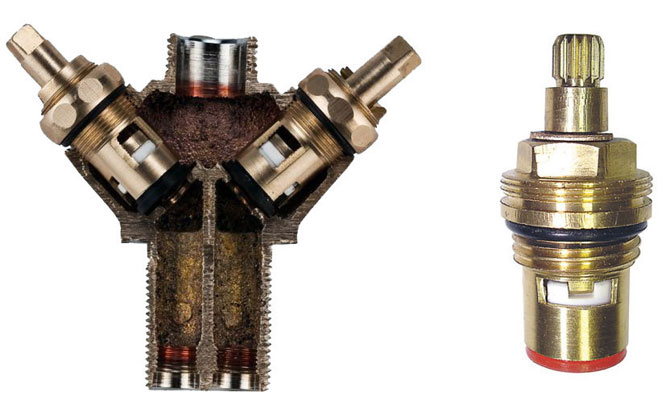
Buses in a two-ventilated mixer (in section)
In products where a few turns of the flywheel are required to feed or shut off water, worm gearboxes are installed. Their work is based on rotational and translational motion. The more you unscrew the valve, the more the lining of the axle will depart from the so-called "saddle". The consequence of this is the flow of water into the internal cavity of the mixer, and then into its spout (spout).
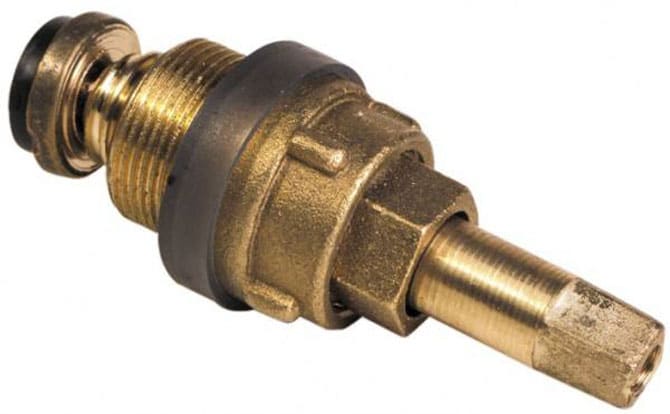
Worm-crawler crane for mixer
In models where for water supply it is enough to make only half of a turn, boxes with ceramic plates are installed. When opening the tap, the holes in them coincide, and water enters the spout.
Crane-axle boxes with ceramic plates
The cost of crane-boxes is not high, they are always available in sanitary ware shops, and their replacement is extremely simple.
The device and types of single-lever mixers
More modern and practical are models of cranes with a single control head and temperature handle (lever). Mixing of water in them is carried out in a hollow ball with three holes or in a special cartridge.
The mixing element in the spherical models has three openings, two of which are inlet - designed to enter this miniature tank of hot and cold water, and one output - to feed water into the sink of a specified temperature.
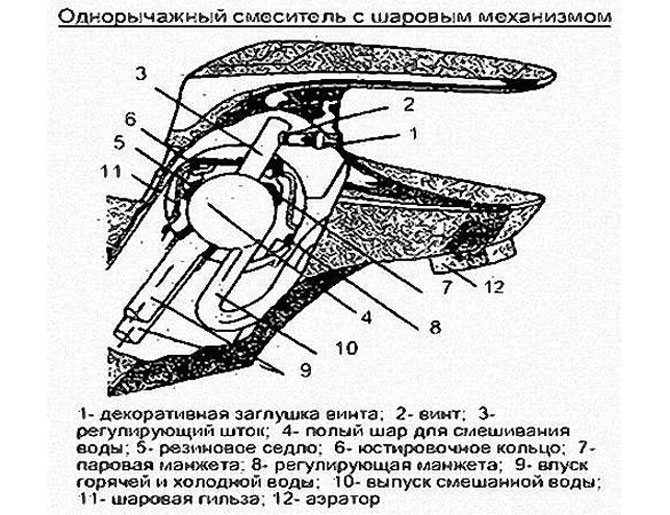
Device ball mixer
The ball itself is located on two "saddles" of rubber. Its displacement relative to them, carried out with the movement of the lever, and allows you to adjust the head, the temperature of the poured water. At the top, the ball is fixed with a sealing collar and a lock nut.
Schematic arrangement of the ball model of the kitchen faucet
The principle of the mixer with the cartridge, which replaces the ball, is similar. In this case, their internal structure is fundamentally different. In the presence of all the same three functional holes, but inside the cartridge is not a cavity, but special disks made of cermets. Due to their displacement relative to each other and the degree of overlapping of the delivery openings, when the lever is rotated, the water supply is adjusted.
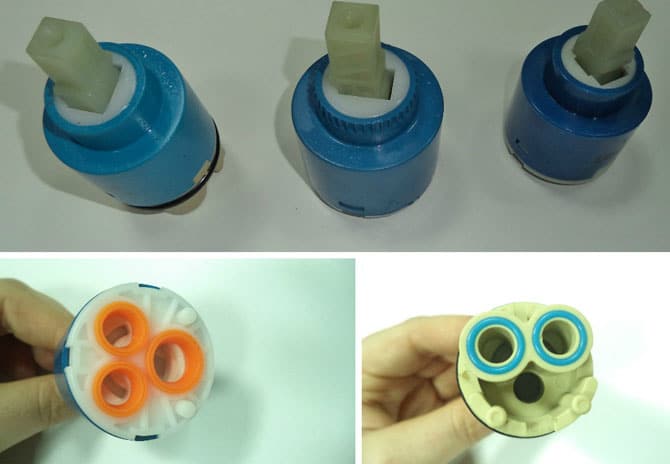
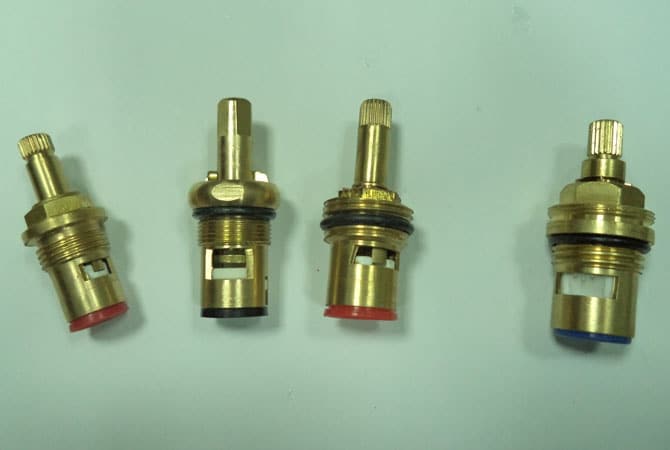
Replaceable ceramic cartridges
There is a tap in the kitchen - how to fix it yourself
To repair the kitchen faucet you will need:
- knife with a sharp end;
- hex and wrench;
- screwdrivers;
- new cartridge, crane-bux, rubber gasket, etc. - depends on which part you will be changing;
- WD40 is a technical aerosol that is useful if the parts are "attached" to each other. However, you can do with traditional tapping of a hammer on a screwdriver, but the risk of damage to the mixer is great.
Regardless of which mixer you have installed, shut off the water supply to the system before starting the repair and drain the remains into a sink or separate container. To do this, just open the tap. Then you can start repairing it with constructive features.
To repair the single-lever mixer you will need an allen key
Repair of single-lever kitchen mixer
The main principles of repair are the sequence of actions and accuracy.
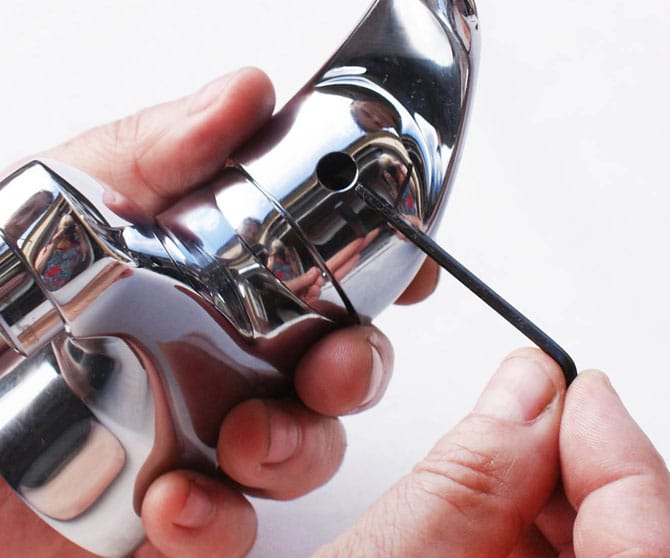
- Use a thin screwdriver or knife to pry and remove the decorative plug on the casing.
- In the resulting hole you will see a screw connecting the lever and the adjusting rod. Unscrew it with a hex wrench.
- Remove the lever from the body and unscrew the decorative cover. This can be done even with hands, if the details do not stick to each other.
Removing the decorative cover
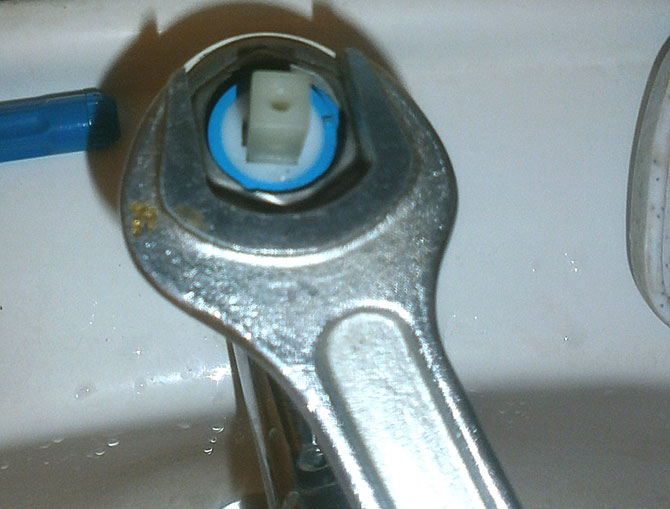
- Under it will be located a locking (clamping) nut. Carefully unscrew it with a wrench or by tapping with a hammer on the screwdriver.
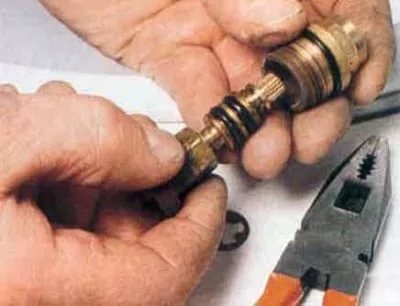
- If you disassemble the ball mixer, then under the nut you will see a sealing cuff. Inspect it for debris, deformations and tears. Pull the ball out. Examine its surface - it should be smooth and clean. It is necessary to remove the seals and the support springs - their poor condition can cause the tap to leak.
- If you disassemble a mixer with a cartridge, then remove it and subject it to a thorough inspection.
- Replace the failed part.
- Assemble the tap in the reverse order.
It is important! Do not tighten the nuts too tightly, as this can lead to deformation of the sealing gums and malfunction of the mixer.
Installing a new cartridge
To prolong the life of the product and ensure the smooth running of its rubbing parts, you can use a special silicone grease.

Removal of a mixer flywheel
Repair of a two-ventilated mixer
What if you have a two-valve crane in your kitchen? Almost all the same.
- On the flywheel of the valve, lift and remove the decorative plug.
- Using a screwdriver, unscrew the screw fixing the flywheel.
- Remove the flywheel. Before you will be a crane-beech.
- Counterclockwise, unscrew it and inspect it.
Extraction of the crane-axle box
- If it is a worm-type box and its gasket is damaged, replace it separately - buy it in a store (it costs a penny) or cut out a suitable thickness from rubber. Books with ceramic discs are changed entirely.
- Collect the tap in the reverse order.
General scheme of works on repair of the mixer
Everything is as simple and light as a designer. But a tap leak is not the only problem you may encounter while using it in the kitchen.
Other mixer failures and malfunction prevention
The quality of water in many cities leaves much to be desired, so over time, the aerator in the faucet may become dirty. On the inside, solid deposits build up on it. When they become too much, the pressure and quality of water deteriorate significantly. The solution to the problem is the replacement of the aerator. Ideally, it is easily unscrewed with a wrench, but for a stuck-on part you need a WD40 or a tapping with a hammer.
It is important! Do all the work carefully, otherwise the mixer will have to be changed completely.
The crane is flowing, and in the process of inspection you found a crack in it? Then it's time to go for a new product. For a short time silicone sealant can become an assistant.
To prolong the service life of the mixer it is possible, if you install a water filter and use the device carefully, without twisting the valves too tightly and without moving the lever sharply and until it stops.
Video: repair of single-lever mixer with ceramic cartridge
Now you know what to do if the tap is dripping in the kitchen. In most cases, the repair schemes considered are also suitable for eliminating the breakdown of faucets in bathrooms. This is a good saving of the family budget. But if you are not confident in your abilities or you simply do not have time, a competent plumber will perform all the work in a matter of minutes.
The situation when it is necessary to repair the ball valve at home is very common. By design, it differs from conventional similar devices. However, it is not difficult to repair it for any man who has minimal skills. For this you need to know:
- how the ball valve works,
- from what parts it consists,
- how the water is supplied.
Many people are used to replacing a rubber or silicone gasket in a conventional tap, and the device can be used. Similar problems can arise in a ball structure, but there are other reasons for its poor performance.
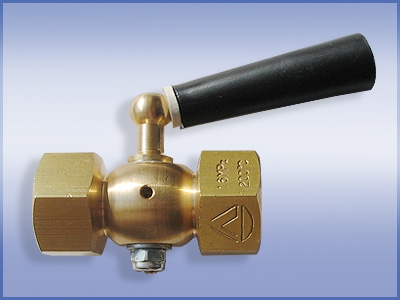
The ball valve consists of the following main parts: A locking device in the form of a metal ball with holes for the passage of water is mounted inside the mixer or tap. Rotating this ball causes an increase or decrease in the water pressure or complete closure of the device. In the mixer there are two openings for cold and hot water. And at the outlet one hole for the withdrawal of water the right temperature.
Therefore, if there are difficulties, then the repair of ball valves should be assigned to the plumber, who will do everything quickly and efficiently. But you can save money, and eliminate all problems with your own hands.
|
|
Problems in the operation of a ball valve crane
If it has obvious damage in the form of cracks on the body, the crane is no longer subject to repair, and it needs to be replaced. This defect is often found in cheap devices that are made of poor-quality materials. If the water pressure decreases, do not immediately disassemble the tap and look for problems inside. First, it is necessary to determine, perhaps, the pressure became less because of the decrease in water pressure in the system. To do this, you need to look at the pressure of the other cranes in the house. Another reason may be that the aerator (mesh) on the output channel is clogged and it is easy to clean it.
In the event that rusty water flows from the tap, the most common cause of the problem lies in the water supply system, and not in the tap.
The following faults are most often encountered in a ball mixer:
- water flows from the mixer;
- weakened the water pressure from the tap;
- improperly adjusted the water temperature.
Leakage of water is more often due to the fact that the space between the swivel element (ball) and rubber gaskets in the cartridge is clogged. Enough fine grains of sand, and the integrity of the structure will be broken, as a result, there will be a leak.
Therefore in this situation it is necessary to disassemble the mixer and clean the given place, otherwise the leakage will increase due to the fact that the grain of sand will deform the rubber gasket over time and it will have to be changed.
The reason for reducing the water pressure may be a partial clogging of the shutter. To avoid further occurrence of this situation, you must install a filter in front of the mixer or at the entrance to the house. Changing the temperature of the water can cause clogging of one of the holes with sand particles or pieces of rubber gasket.
 If you can not find the cause of the problem, you need to replace the tap on the riser with water. The reason for this lies in the fact that some people buy the cheapest mixers and taps. And such devices are made of cheap material - silumin
, which has low strength and often crumbles even with a slight mechanical impact.
If you can not find the cause of the problem, you need to replace the tap on the riser with water. The reason for this lies in the fact that some people buy the cheapest mixers and taps. And such devices are made of cheap material - silumin
, which has low strength and often crumbles even with a slight mechanical impact.
It is better to buy a normal device once than often to change or repair cheap mixers.
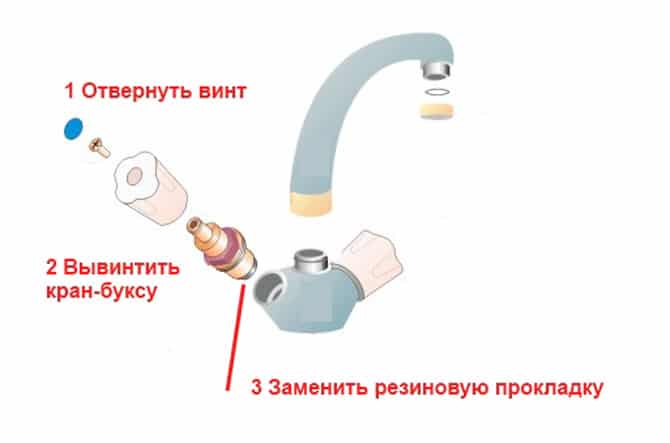
How to repair a ball valve
The sequence of disassembling the ball valve:
- first of all, close hot and cold water in front of the tap;
- the screw that holds the swing arm of the mixer must be unscrewed. Then it is necessary to remove the lever, with some effort and a little swaying it from side to side;
- after removing the lever, the threaded part of the device opens. The screwdriver needs to be unscrewed, slightly turning clockwise.
In this case, do not forget about the water hoses - when turning the tap they can be damaged.
- with the help of pliers it is necessary to remove the dome of the mixer and remove the plastic element;
- when leaking, carefully inspect the seal, which may be worn or clogged with sand particles or calcareous deposits. Cleaning work should be done very carefully, so as not to damage the seal;
- then you need to remove the ball from the mount, and if it has a damaged replace;
- the next step is the dismantling of the seals, which fix the rotary element. Seals and springs are easy to remove with a flat screwdriver with a thin sting.
- If the gaskets are damaged or deformed, they should be replaced with new products.
- It is necessary to inspect the springs carefully, if they become less elastic, they must also be replaced.
Approximately so you can repair the faucet in the kitchen or in the bathroom. Assemble in the reverse order. In this case, on all gaskets, old or new, you must apply a thin layer of lubricant, which is suitable for a particular type of mixer or faucet.
The composition of lubricant from different manufacturers can be different. Therefore, you need to carefully see what the mixer is lubricated. Otherwise it will lead to breakage of the crane.
Repair of the ball mixer must be done very carefully, carefully looking through all the elements and parts of the structure.
Particular attention should be paid to the presence of foreign particles in the pivoting element and on the seals.
After assembly, it is necessary to check the tightness of all joints and components and carry out tests with connected water. If the faucet or faucet is working normally, there are no leaks, the water pressure is normal and the temperature is regulated, then the repair is done correctly.

Bookmark this site
We take out the plastic part in the form of a shield, consisting of two parts of black and white colors.
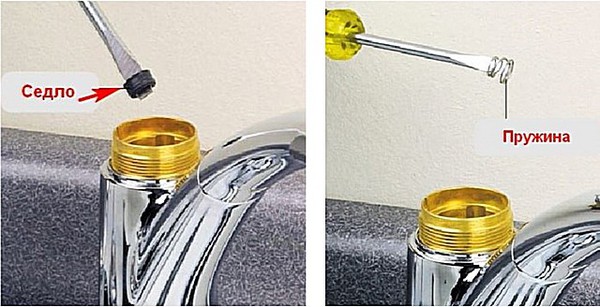
The black part is the seal. Usually, after long-term operation, its conical shape is violated or rusty coating is present, as a result of which the tap passes water. Most often for enough to remove all the dirt, but if the cause is not in the seal, then disassemble the faucet further.
We extract the ball from the crane in one movement upwards. The ball has a limiting hole specifying the range of rotation of the mechanism. Carefully inspect the ball stopper for dirt, surface cleanliness and cleavage. If the coating is damaged, then the ball most likely needs to be replaced.
When installing a new ball, make sure that the cutout on the right side of the part hits the ledge near the top of the valve. Then insert the shield, which is placed in the slot of the side of the valve with a plastic fuse.
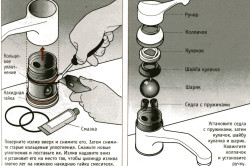
Under the black seal are springs, which at the time of disassembly should be operable. If they do not perform their function, then they need to be replaced. To do this, carefully remove them with a flat screwdriver. Since the new springs are much longer and stronger than the old ones, when installing them, it is best to use several platypuses and pull the shield down until the springs are compressed. Then you need to install the chrome-dome and the ring, then tighten them with pliers. The longer the ring is tightened, the heavier the mixer will turn on.
When replacing seals, it is necessary to use silicone grease, which will prolong their service life. It is not washed with water, and a small amount of lubricant will improve the running of the rubbing parts of the crane.
In order to assemble, the crane takes all the actions in the reverse order. Before assembling the valve, it is necessary to lubricate all the seals with silicone grease for sanitary parts. This completes the repair. Now it only remains to turn on the water supply and check for leaks.
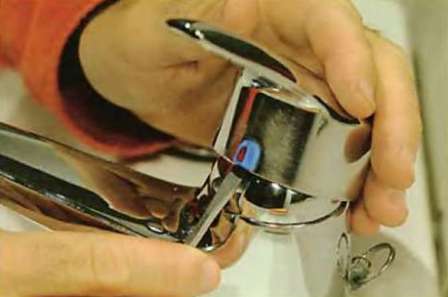
Very often a leak is detected near the base of the crane or in its upper part. In order to fix this, you need to lift the spout at the base after removing the ball and pull upwards.
Rotating spout of the ball mixer seal the two O-rings, it is these gaskets that tend to form leakage over time. These rings must be removed very carefully with a small flat screwdriver. After replacing the rings and before re-fitting the ball valve, it is necessary to apply a little silicone grease to these O-rings to reduce the wear of the seals.
It should be noted that in the plumbing market are ball valves of various modifications, so the ways of their disassembly may be slightly different. When installing a ball mixer and subsequent repairs, each threaded connection is sealed with a tape of fluoroplastic or a special thread in the cassette.
Most of the owners are used to solving the nuances of household repair themselves, without resorting to the help of various "masters for an hour." And it's not just about saving money, eliminating minor problems of modern plumbing - an interesting and quite feasible task, even for a beginner. But to achieve success, you need to know the principle of the device and its weaknesses. Let's try to disassemble in detail one of the problems - how to repair a ball mixer in the bathroom or in the kitchen.
The ball valve with a ball valve has a laconic and modern look, which allows him to organically supplement any interior kitchen or bathroom.
But its main advantage is comfortable use. After all, unlike the valve design, to adjust the head and temperature of the water flow, you do not need to turn the knobs in search of the "golden mean", but rather simply set the switch in the optimal position and put it into operation with one hand movement.
The ball mixer is very simple to operate: the water temperature is regulated by the movement of the lever to the right / left, and the pressure - down / up
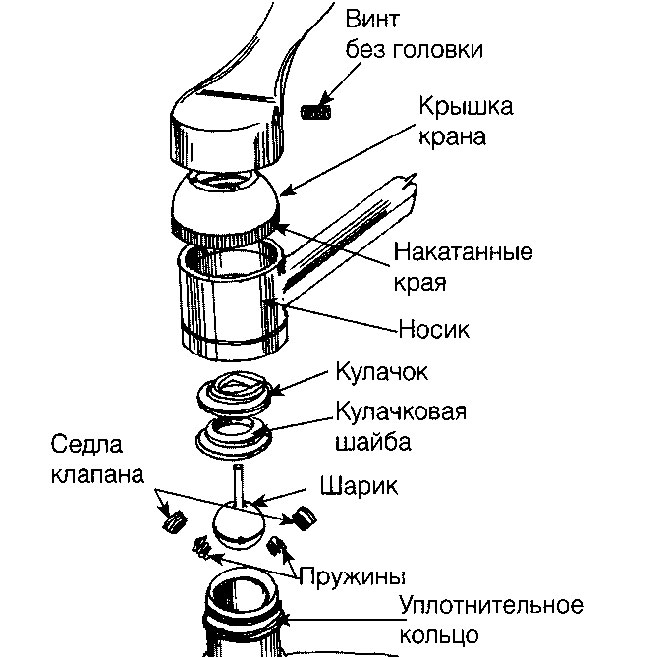
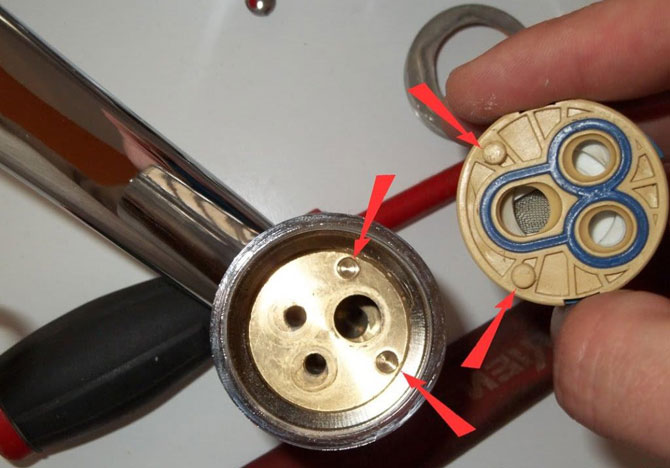
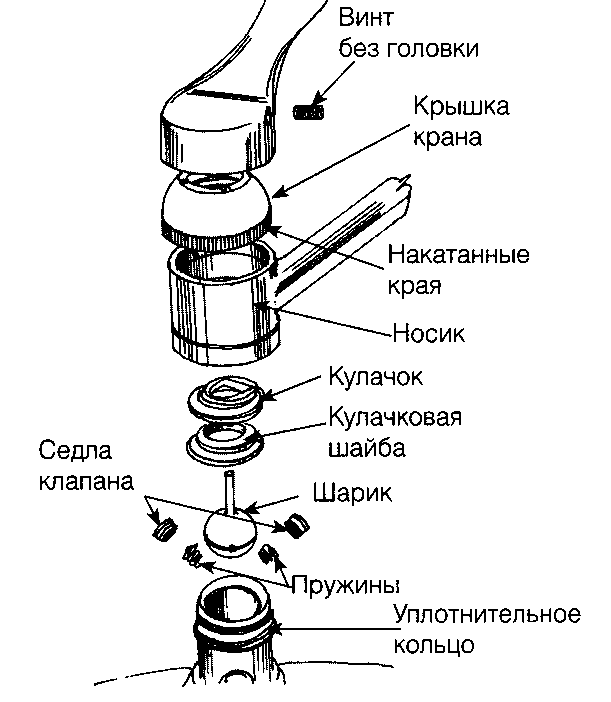
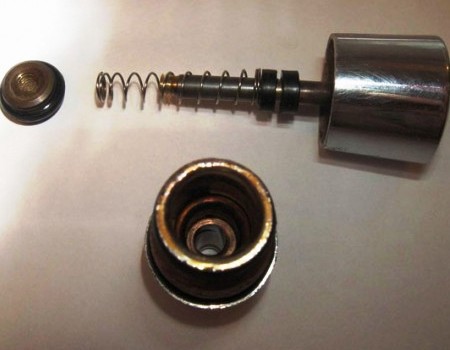
The design of a typical ball valve consists of the following mandatory elements:
- The control lever is a rotary knob that sets the flow strength and water temperature. It is fixed to the body with a screw closed with a decorative cap on which the symbols of cold and hot water are indicated by a color or letters.
- A metal cap fixing the valve mechanism on the body.
- "Cam" - a plastic part with a curved washer, which ensures the movement of the "ball" in a certain range. The washer itself has a domed shape and is equipped with rubber seals.
- The mixing chamber is a steel hollow "ball" fixed with a system of seat valves and springs. It has several holes: two for hot and cold water supply and one for the output of the mixed flow through the spout. In some designs, the "ball" is enclosed in a special protective capsule - a cartridge.
- Metal case with spout.
- Circular nut, fixing the body on the sink.
The system drives the lever. When it is lifted, the "ball" inside the crane starts to rotate, and when the holes are combined with similar grooves in the saddles, water flows into the spout. Depending on how complete this coincidence was, the head and flow temperature are regulated.

The ball mixer is easy to repair - all the consumables can be found on sale, but in order not to be mistaken with the size, do not throw out the failed part, but take it with you to the store.
In more detail - about the troubles that happen to plumbing fixture, and ways of their elimination.
Problems with ball mixer
Although ball valves are considered to be one of the simplest and most reliable designs, from time to time they fail because of natural wear of parts or under the influence of external factors. Consider the most common breakdowns that can occur when using such a mixer.
It is not possible to adjust the temperature of the jet
If the mixing of hot and cold flow takes place in a chaotic mode, the problem lies in the failure ball cartridge or rubber "saddles". The cause of breakdown is often a clog of space between the "saddles" and the holes of the "ball".
The crane will have to be dismantled to inspect the parts for damage. If such are found, gaskets or the whole "ball" will have to be replaced - no putty sealant and other tricks of long-term effect will not give.
Such breakdowns most often occur because of poor quality of water treatment in the water supply system of the house. And it's not just about mechanical inclusions - particles of rust and other small litter. The problem can be in increased water hardness.
If there is water in your region with excess of mineral impurities, before buying it is superfluous to study the mixer passport - many manufacturers specifically indicate acceptable rigidity for the smooth operation of their products.
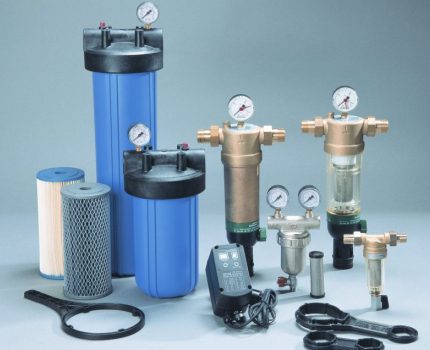
If you do not want to regularly repair and replace the plumbing, install a filtration system that will purify the water. Mechanical filters will extend the life of plumbing throughout the house
For a bathroom where water is used primarily for technical purposes, it is quite enough and the simplest mechanical filter, which simply protects the plumbing from foreign impurities. But for the kitchen, you can install a system that improves not only the quality, but also the composition of water, enriching it with micronutrients deficient. There are many options - from simple cartridge filters to reverse osmosis systems.
Weak water pressure even at maximum opening
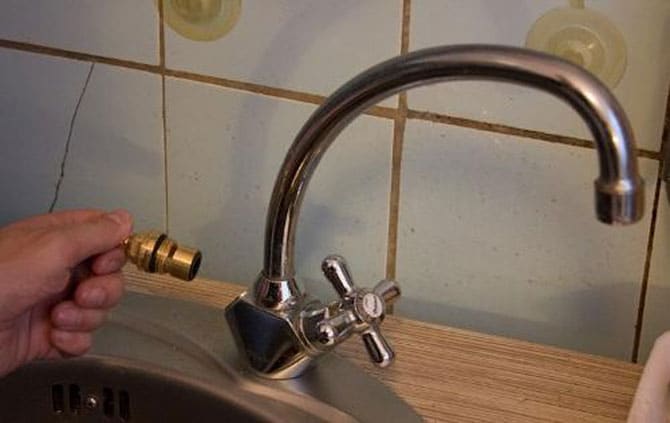
The reason may not be in the mixer itself, but in the low pressure in the water supply system of the house or apartment. Therefore, before dismantling the structure, make sure that from other cranes the water is coming with good pressure. If it is still confirmed that only one mixer is "to blame", check if the aerator on the spout has become clogged.
In the water, sometimes sand falls, particles of rust from worn out pipes or limescale, which accumulates on the mesh and interferes with the free flow. To make sure that the reason is in the aerator, remove it and turn on the water again. If the flow has increased to the required value, you just need to thoroughly rinse the mesh and install it in its original place. Of course, if the part has broken or rusted, it is better to replace it with a new one.
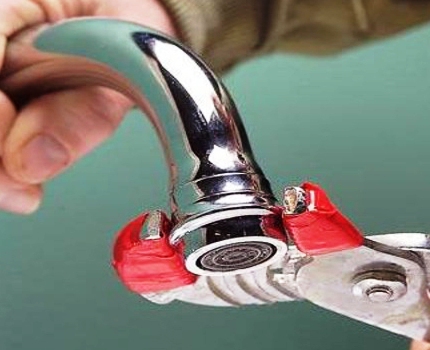
To check the condition of the aerator, it is enough to untwist the tip of the spout by hand or with the help of a sanitary wrench pre-wrapped with electrical tape
But if the cleaning of the aerator has not given anything, and the water pressure has not recovered, it is most likely that the reason lies in the internal blockage in the channels of the mixer, pipes, flexible hoses or tightly clamped gaskets. In a word, you can not do without dismantling the crane.
Noise while working
Another frequently encountered operational nuance of ball mixers is the annoying sound effects accompanying the flow of water. The reason for this phenomenon is the vibration of rubber gaskets due to the interaction of air and water flows. This problem has several solutions: install a special filter, reduce the pressure of water or pick up more tightly fitting gaskets.
Water leakage: repair options
Before starting repair, it is important to determine the source of the leak, and at the same time pay attention to the position in which the control knob is located.
If water leaks from under the lever when the crane is opened, the cause of the breakage may be the wear of the gasket. It can fail over time either because of poor quality knurled crane cover - sharp edges easily damage rubber. To eliminate the defect, you need to disassemble the mixer and install a new gasket.
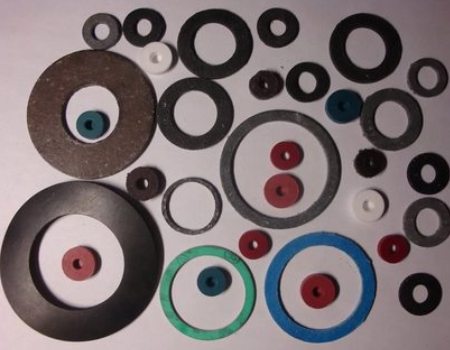
Rubber sealing rings are the most vulnerable parts of the mixer design, but they can easily be replaced with a standard repair kit
If the water is digging from the tap, when the handle is in the locking position, there are several options:
- The simplest is when the water appears from under the cap of the swing arm. To fix such a problem, tighten the connection with a key well enough. Is the leak stopping? Well, that means the reason was hidden in the loose fastening.
- If it flows from under the valve body, but no crack is found on the metal itself, the problem is likely to lie in the wear of the gasket under the nut. To replace it, you need to unscrew the fixing nut of the housing and disconnect the mixer from the feeds (of course, previously shut off the water supply). After that, the used consumable is replaced with a new one, and, if the diameter of the gasket is selected correctly, it will be installed in the groove with effort. Then the crane is assembled and checked for operability.
- If on the case itself there is a crack that passes through the water, the crane will have to be completely changed. Of course, it is possible to cover the defect with some waterproof sealant and even "cold welding", but such repairs can only be temporary - it can not be removed by this method.
- Crack on the control lever - this problem can be completely solved by replacing the handle, which will be much cheaper than buying a new mixer.
Note that external body damage may be indistinguishable to the naked eye, but even microscopic cracks give leakage and cause puddles to appear at the base of the faucet. Therefore, inspect the metal with a magnifying glass - with increasing defects to identify much easier.

O-rings on the spout can also cause leakage. Trouble is eliminated by easy and quick replacement of the rubber ring
How to properly disassemble a ball mixer
If neither the tightening of the nut nor the cleaning of the aerator have helped to fix the fault, then you will have to change the gaskets or the "ball" itself. As already mentioned, the mixing chamber is not subject to partial repair - it is not folding. And to replace it you have to disassemble the whole mixer, and at the same time check the safety of other internal elements.
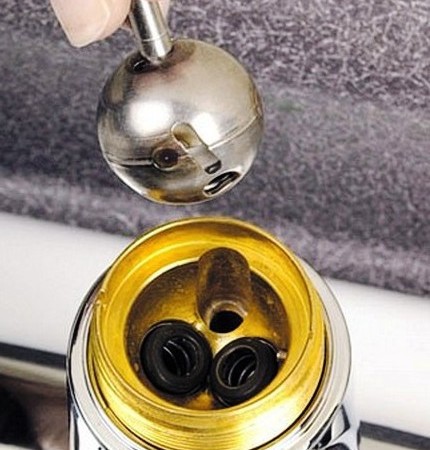
The inside of the mixer with the bowl removed: there are holes that allow water to pass through, and in the closed state prevent it from moving
To work you will need the usual tools from the set home master: adjustable wrench, pliers, screwdriver (straight, cross or hexagonal - depends on the screw, which is completed with a crane).
To get the "saddles" and springs, it is convenient to use a thin screwdriver. Minor details are threaded onto its end and carefully removed
Step-by-step instruction for dismantling the ball valve:
- Shut off the water supply, then open the tap to drain the remaining liquid from the pipes.
- Use a screwdriver or a conventional knife to touch the decorative plug on the mixer body and remove it.
- Remove the screw located under the plug.
- Remove the handle of the lever (if the valve has not been untwisted for a long time, it may take a considerable effort). In order not to damage the chrome exterior coating of the case, it is desirable to work with a key or pliers through a thin cloth or napkin.
- Now you need to remove the cap. To do this, you can use a swivel wrench or angle the sharpened end of the screwdriver so that you can unscrew the part counter-clockwise with a slight push. If the faucet is old, the cap may "boil" and not succumb to an easy depression. In this case, you can slightly tap the hammer on the handle of the screwdriver so that the part "moves away."
- After the ring is unscrewed and removed, inside the mixer you will see a detail in the form of a dome - a cam and a washer. They need to be picked up with pliers, pulled out and washed to remove all dirt and lime deposits.
- Now, from the mixer, you can remove the "ball" itself, also rinse it of dirt and carefully inspect it using the same magnifying glass. If microcracks, furrows, chips or other damage are found - the part should be replaced with a new one. In order not to make a mistake with the diameter, take a spoiled "ball" with you - it will be easier to pick up a suitable analogue in the store.
- After that, you need to get the rubber seal of the valves - the so-called "saddles". They can also be damaged or simply lose elasticity over time, and a loose fit of the "saddles" to the ball chamber can cause water leakage inside the crane. Such details are easy to find on sale, and they are inexpensive, so even if you did not find any defects on the rubber during the visual inspection, but the crane has been working for a long time, you need to replace the seals simply for preventive purposes. And to prolong the service life of sealants will help to apply plumbing lubricant after their installation.
- Then inspect the clamping springs located inside the "saddles". If they are damaged, weakened or sagged - pick up new ones.
- The entire internal cavity of the mixer must be rinsed and cleaned, after which it is possible to start the reverse assembly.
- In the "saddle" spring is inserted, then each element is stacked up to the stop in the recess. On the ball, a thin layer of silicone lubricant is applied, then the part is installed inside the housing in such a way that the restrictive protrusion coincides with the groove.
- Now you need to return the plastic parts - the "cam" and the dome washer. Difficulties at this stage should not arise, because on the body there is a groove, which is easily combined with the projection on the "cam".
Then left to collect top crane: screw the metal cap, install the handle, fix it with a screw and cover with a decorative plug.
Other problems with the operation of the crane
During the operation of the ball mixer, other malfunctions may occur. For example, in the bathroom there is often a leak at the switch from the tap to the shower. In this case, you will have to replace the worn inner packing.
To eliminate this nuance, it is necessary to close the water, close the lever and remove the flexible shower hose. Then arm themselves with pliers and a screwdriver, remove the button, and then the adapter that switches from the tap to the shower. Now it is necessary to replace the old ring of an epiploon and to collect a design in the reverse order.
If the flow does not react to the switch at all, and the water flows simultaneously from the shower and out of the tap, the cause of the breakdown may be worn out ring gaskets of the spool
It is not difficult to replace gaskets, it is much more difficult to find a suitable repair kit on sale. This is why the conscientious manufacturers reserve the spare gaskets with a mixer. If the "reserve" is already used or lost, you can try to make this consumable yourself, by cutting a piece from a suitable sheet of rubber with a thickness of 3-4 mm.
The replacement of gaskets is performed as follows:
- If only the upper gasket is out of order, the operation of the crane can be adjusted without dismantling the mixer completely. It is enough to disconnect the flexible shower hose after disconnecting water, remove the decorative cap, remove the worn out rubber and replace it with a new one. But if this manipulation did not solve the problem, we will have to proceed further.
- It is necessary to unscrew the fixing screw, and carefully remove the slide valve from the valve body.
- Remove the old rubber bands and install new ones.
- Treat the gaskets with grease - this manipulation will increase both their service life and the operation of the unit as a whole.
- Assemble the structure and install the switch in place.
If the button for switching from the tap to the shower does not work, the internal spring may have deformed or broken.
When replacing the spring for a new part, the diameter should be slightly less than the previous one - this will ensure a more tight fit to the stem
To update this part is simple enough - you just need to remove the switch to use a pair of pliers to screw a new spiral onto the rod.
Video instruction on repair of the ball mixer
More clearly, the process of disassembly and repair of the device can be studied on video:
And the last tip: do not save when buying a mixer, because for the period of its operation affects not only the quality of water and other external factors, but also the materials from which the crane's construction itself is made.
If you choose a cheap model, most likely, it will be made of silumin (an inexpensive alloy of aluminum and silicon). Although such cranes look very attractive both in price and appearance, but quickly lose their original gloss and fail. Therefore, for long service without accidents and regular repairs it is worth to look at the proven time of brass.