How to make a vertical welding seam correctly. How to make the right vertical weld seam
Ceiling weld is considered to be one of the most complex joints. This can be explained by the fact that in the process of work it is turned upside down, as a result of which there is a huge probability of leakage of molten metal. How to cook properly the ceiling seam? When connecting ceiling structures, it is necessary to observe especially the safety rules for welding operations, since the possibility of getting hot metal on the hands, the face of the welder, is not excluded.
Any professional of the welded business should know, be able to properly perform seam connections of this type. If in a typical production such a technique is used quite infrequently due to the possibility to turn the welded structure over, then in the shipbuilding industry in the process of fulfillment installation works, when connecting pipelines, this technology is often used.
Crescent moon
When using this technology, the electrode relative to the ceiling is held by the welder at an angle of more than 90 degrees, with the maximum angle not exceeding 130 degrees. Professional welders in this case perform zigzag motion of the electrode, which resemble a crescent moon.
Welding inverter with this technology assumes the execution of works in several approaches, but it is considered quite simple. This technique can be used even by a young, inexperienced welder.
The main thing is to not spoil the seam connection, it is necessary to constantly monitor the welding speed and not allow the digestion of wide ridges, so that there is no leakage of molten metal.
Backward-forward
This technique of welding seams on the ceiling also involves several passes through the electrode. Preliminary, the root seam is made with an electrode whose cross-section diameter is 3 mm, while the current supply should not exceed the average value.
Lesenka
The location of the electrode to the ceiling base is more than 90 degrees, with no more than 130 degrees. The main difference between the technology is the removal of the electrode in the process of welding to the side in order to prevent the spreading of the metal. After it cools, the electrode returns to the seam and the welding work resumes. When using this technique, the suture joints are longer.
Welding of the ceiling joint is considered to be quite complicated and time consuming, but the result is worth it - for reliability and strength such seams have the highest values.
Rules for the implementation of welding ceiling connections
- Pre-welded sides are brought together as closely as possible. In the presence of significant gaps qualitatively perform welding work only a sufficiently experienced welder.
- Next, the cutting of the edges, as well as in the position from below. If the thickness of the metal is more than 0.5 cm, then the bevel is V-shaped.
- It is recommended to bring the electrode to the plane of the ceiling at an angle of 45 degrees. Young, inexperienced welders are advised to start cooking with a half electrode so that in the process of work it is better to monitor its tip, and so it will be easier to form the welded joint itself.
- The welding procedure can be done in such a spatial position due to the tension of the metal plane. In order not to drop off the drops of hot iron, without having had time to grapple with the edge, it is recommended to reduce the current strength.
- With sufficiently tight reduction of the welded sides, the first weld can be performed without oscillating movements by the electrode. This will allow full filling of the joint with molten metal. The next pass should be done a bit wider to strengthen the ligament. On the pipes, of course, it is recommended to perform a wide suture at once.
- In the presence of a small gap between the metal plates to be joined, a discontinuous arc is used, which makes it possible to cool the delayed metal drop. Instantly, without letting the redness of the previous drop pass, the next drop is superimposed.
Safety precautions
- All connected wires to the welding equipment, electrical network should be well isolated.
- If the inverter is not operated, it must be disconnected from the mains.
- If there is no experience of welding, then it is impossible without practical training to start implementing them on open air In the presence of precipitation, as well as in rooms with a high concentration of moisture.
- It is forbidden to weld parts without personal protective equipment: masks, overalls, gloves, shoes, rug.
- Mandatory compliance with fire safety rules.
For newbies! After the completion of the work, there is no need to be afraid of the ugly appearance of the welded seam - these slag formations, after the upholstery of which a qualitatively executed connection will take on a rather attractive appearance.
Unexpected trouble can occur at the moment when you need to make a ceiling seam. It is not so easy as it may seem.
On an industrial scale, such a welding method is practically not in demand, since the connected parts are in reality located in the correct position. Nevertheless, the owner of the garage needs to know how to weld a ceiling seam with electric welding. The need to impose such a seam may arise when installing a pipeline, manufacturing metal construction and various fixtures in the garage.
Since there are many difficulties in welding a ceiling joint, experience and care must be present when performing the welding. The problem with this type of welding is the location of the weld pool, which is in an inverted state. And the molten metal does not want to stay in it. Therefore, when working, you must follow special rules that will help to avoid leaks of molten metal. A special role in this welding is played by safety techniques, ignoring which can burn the body in the face area.
Safety regulations
- When welding, special care should be taken to avoid the possibility of being exposed to electric shock. The cable must not be damaged. If welding machine for the time being not in operation, it should be in the off position.
- It is forbidden to work in the event of precipitation or even in areas with high humidity. The degree of humidity most often can not be determined by inexperienced welders.
- Obligatory clothing, which, if necessary, must completely cover the entire body. All its elements must be reliably refueled. Special attention It is necessary to give the presence of protective glasses and masks for welding.
- It is forbidden to perform any actions that could lead to fire and explosion.
When welding an important role is played by surface tension, the strength of which does not allow the molten metal to break off from the machined parts. To reduce the gravity of the weld pool in its size should be minimal. This can be achieved by removing the electrode at the right time, thus enabling the metal to cure.
The width of the rollers should be 2.3 times the diameter of the electrode. As a rule, when welding a ceiling weld, electrodes Ø up to 4 mm are used. Sometimes there are cases when the working part of the tool is removed - there are undercuts. To avoid this, it is necessary to reduce the strength of the welded current, and fix the electrodes on the edges.
Only dry electrodes are suitable for operation. When the working element is raw, the gases released reduce the quality of the weld, and instead of forming an arc, the electrode "sticks" to the welded surface. In addition, the characteristics of the weld metal on the ceiling are inferior to those of the surface formed by other types of joints.
Ceiling welding is best done by keeping a hand with the tool in your direction, which will allow you to fully control the process, speed and method of cooking. If the thickness of the treated area exceeds 0.8 cm, the penetration should be repeated. For the root suture, as a rule, electrodes are used with a diameter of 3 mm, for the rest - 4 mm.
Note! The chamfer and processing of the ends to be welded must be made in accordance with GOST 10948-64. After the formation of the roller, do not forget to remove the slag coating. Tolerances for welding joints are specified in GOST 5264-80.
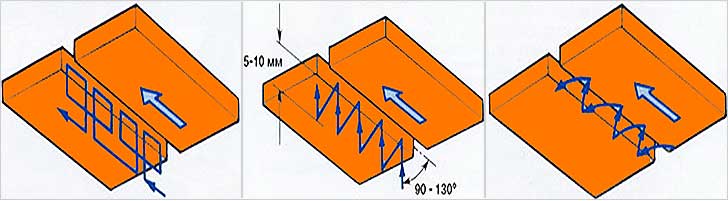
Cooking options
- When cooking with a ladder, the working element is located vertically to the ceiling or with a deviation of 40 degrees from itself. The electrode rises to the ceiling surface and lights up. When the metal begins to melt, the working element is moved about 8 mm, then the process repeats with the overlapping of the hardened metal by one-third of its length in length.
- When cooking a crescent, the working element should be in the same position as in the previous version. Work movements must be zigzag and continuous with the application of the metal electrode on the frozen metal part. The gates are repeated several times. This welding option is considered the most affordable.
- The most reliable, but difficult, is considered a back-and-forth welding method. The end of the working element is constantly moving back and forth, while engaging the frozen metal part and increasing the seam along the length.
Process
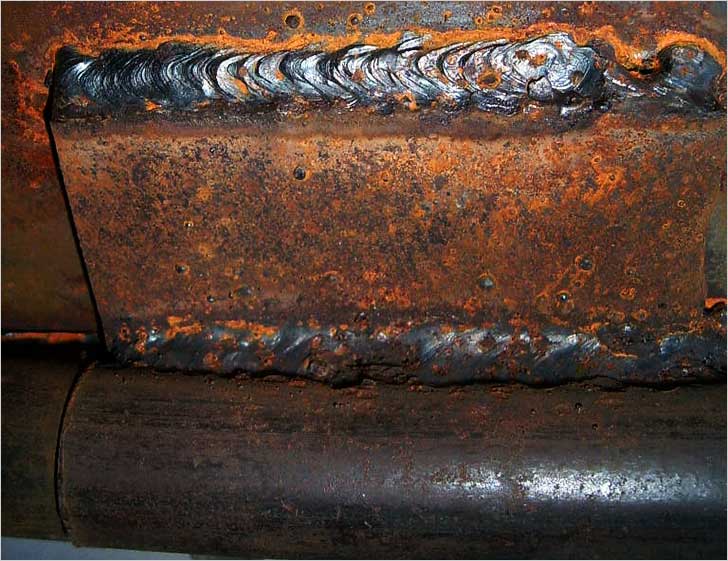
![]()
Ceiling welding is a multi-stage work that begins with the rooting of the root of the seam. In this case, an electrode of Ø 3 mm is used. The current strength should not exceed the average value. Existing conditions that determine how to seal ceilings by welding.
- If there is access for welding and sampling from the outside, then during the work you need to carefully monitor the formation of the platen from below. Undercuts and overhangs should be excluded. It is more practical to make this seam in zigzag steps to the edges with fixation on them. Then, after removing the welding, a queue will come from the joint for the next roller.
- If it is necessary to form a roller from the outside, the progressive steps need to be done in the middle of the gap at a short distance. If the welding arc comes out on the other side, then the welding will be formed in a semicircular form.
With this kind of work, you need to concentrate on the roller on the reverse side. At the same time, it is necessary to control the speed of the welding process and to observe the formation of the lower roller. It should not stick out of the resulting structure, otherwise it will be necessary to make a selection to the base of the metal.
Filling filling
The subsequent 2 rolls are made with an electrode Ø 3 mm at a current with a value above the average or Ø 4 mm with an average value. The choice of penetration depends on the size of the width of the initial roller. In order to avoid tuberosity, it is necessary to fix on the edges of surfaces. After this, the arc is gradually transferred along the edge and the ladder method makes a transition to the opposite edge. If there is a need to change the configuration of the roller, you need to change the speed of work, change the angle of the electrode and increase the pitch of the penetration.
Note! When carrying out welding operations, it should be borne in mind that when creating a large width of the roller, the heated metal will leak and drip.
The next 2 layers depend on the width of the previous 3 rollers and are made over the whole width or in the number of 2 rolls. Further, the layers simply fuse without zigzag motions. When approaching the edge, it is necessary to stop at a distance of the size of the coated electrode. This applies to the edge and the penultimate roller.
For a layer on the front side, a hollow up to 2 mm in size is needed. The number of penetrations will be considered based on the dimensions of the last layer and the metal substrate. If the hollow of the penultimate layer up to 1 mm in size is made 1-on penetration and it is made an arch forward. The welding step is selected based on the configuration of the roller. If the cavity is up to 2 mm in size, the ladder method is used. If you need to make several passes, the rollers at the edge are cooked in different ways. The finishing central roller is installed flush with 2 lateral.
As it became clear, it is necessary to be engaged in ceiling welding with the necessary baggage of experience. It will be difficult for a beginner to make such a seam, since he does not yet have enough skills and knowledge, which, as is known, come during work. So first you need to practice on simpler connections. On the video provided, it is demonstrated how professionals weld the ceiling weld by electric welding.
Video
This video shows how the vertical and overhead seam is brewed:
It is even possible for a novice with little experience of welding to produce welding on a horizontal surface. But to make a qualitative vertical seam without the necessary theoretical knowledge and good practice is impossible. This article presents welding of a vertical seam (video) to help novice professionals avoid common mistakes.
- It is necessary to start by choosing the angle of inclination of the electrode relative to the plane of the article. The optimum angle is from eighty to ninety degrees. At the same time, the maximum energy of the arc is provided, which guarantees deep penetration of the body of the base metal. Also, choosing the right angle will ensure a uniform flow of the molten electrode, which will give an even and high quality weld.
- Welding of vertical seams is always performed from the bottom up, filling the gap between the parts with a molten electrode wire or electrode.
- The end of the electrode should always be directed to the middle of the seam.
- To obtain a quality weld, periodic rotational movements must be performed in order to collect the molten metal at the point where the joining of the two parts occurs.
- The speed of the welding arc along the upper seam line should be chosen so that the lower part of the liquid bath does not reach the top of the previous roller a little or hardly touched it.
- After welding is complete, wait for a certain time until the treated surface cools. Then it follows the hammer to bring down the slag formed on the surface of the metal, formed by the products of combustion.
In order to visualize the described process more clearly, it is worthwhile to look at "Vertical seam, welding: video" - the material presented below.
Quality control of works
After finishing and cleaning the surfaces from scales and slag, it is necessary to conduct a thorough inspection of the joint for the presence of cracks, pores, craters or metal burns.
If such flaws are discovered, then it is impossible to talk about a quality work done. This marriage will in time cause a rupture or breakage of metal, which can lead to serious consequences. Therefore, we must immediately carry out the restoration of the seam.
First, you need to very carefully clean the entire surface with a metal brush or file.
Secondly, to make restoration of the seam only in those places where marriage was fixed. It is not necessary to digest the entire connecting surface of the parts.
Conclusion
Beginners should remember that the theoretical knowledge obtained by viewing "Vertical Seam, Welding: Video" is a very important part of the learning process. Only after mastering the basic principles of the implementation of these works, you can proceed to the practical part.
More on this topic on our website:
-
This type of log refers to technical documentation. This document reflects the full scope of all work performed by the welder. In addition, it reflects the quality, the execution time of that ... -
The technique of welding seams (also referred to as rollers) involves selecting a mode and accepting the manipulation of the electrode. How to properly make a welding seam, video on our site all ... -
Welding works become easier and more accurate, thanks to the use of magnetic corners, so this element is recommended by many specialists in the field of welding. If you use magnetic corners for welding, ... -
To buy a welding wire for a semi-automatic machine, you need to understand this product well and know its average cost. For each specific case, a material with such ...
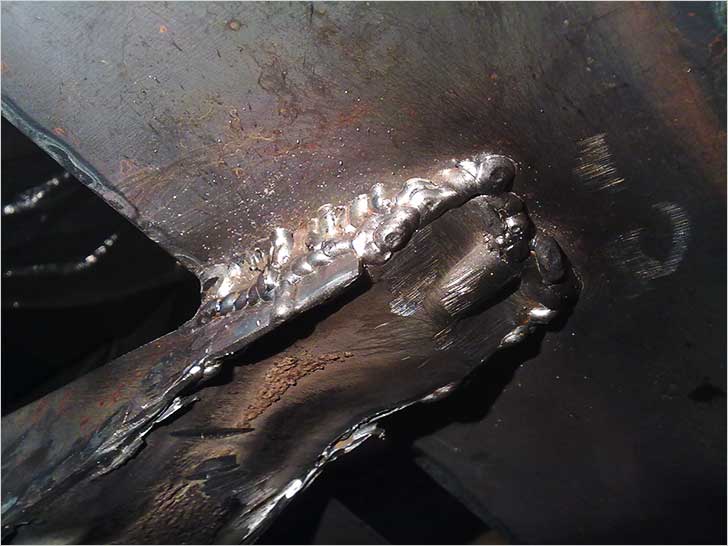
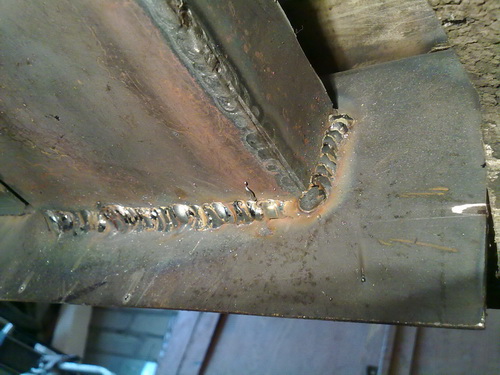
When installing various designs and the manufacture of small parts often requires welding of fillet welds. Such a junction differs from the usual connection of the two sides into a common plane, and requires prior knowledge and training. Such work is fraught with large defects and time costs. From the welder is expected a special ability to drive away the slag in the weld pool, otherwise get. What are the features of this type of seam and how to cook such compounds in different ways?
The corner seam is a fairly common two plates or profile pipes, between the parties of which less than 180 degrees. In metal structures joints are often used, where the sides are exposed at 90 degrees. This is necessary for uniform loading and structural stability.
Angular seams come in different types:
- with contiguous edges at the junction;
- with the application of one edge to the flat plane (T-waves);
- overlapping;
- with cutting edges and without it.
Welding of the corner seam can be made in different spatial positions, which adds complexity in the performance of work. For example, an uneasy T-joint, upside down, is one of the most difficult even for experienced welders. In addition, the corner joint can be welded in a continuous and intermittent manner. They differ in length. Up to 250 mm are considered short, and up to 1000 mm average.
Difficulty with corner welds
To be able to weld a corner weld, it is necessary to know when doing it. Common problems are:
- Uneven deposition of weld metal on the sides of the joint. Since molten iron from the electrode and edges under the action of gravity tends to fall down, most of the seam appears on the lower plate. The upper edge can only slightly melt and this joint will easily decay under load.
- Cuts. The electric arc "gnaws" small areas from the metal surface. When welding in the lower position, it can be monitored and retained by the electrode to weld the filler material to the damaged location. But in the case of a corner connection, "driving" drops of red-hot metal onto the side wall is much more difficult. Therefore, the weld seam has notches on one side.
- Failure of the root. From inexperience, some welders begin to excessively manipulate the end of the electrode on the sides to fill the junction area, but this leads to metal sagging on the sides, and a complete or partial failure of the root of the seam.
- Wrong corner joint crochet. To create high-quality connections, it is important to adapt to the correct speed of electrode control and the choice of correct voltage parameters. Too weak current and slow passage will lead to excessive bulge of the leg. This will mean a poor degree of penetration of the base material. High current strength and rapid electrode control will create a negative catheter with a concave shape. Although this structure implies deep penetration of the sides, there is not enough metal on the seam to resist the loads.
- Incorrect angle. Welding joints are rarely of arbitrary shape with respect to the degree of angle. This requires the holding of the correct dimensions. When passing from one side, the side plate often "falls" in the direction of welding, which spoils the quality of the assembly of the structure.
In addition to these features that occur at the fillet welds, the joint is susceptible to other defects. Among them: holes and voids, solid inclusions, cracks on the boundary of the main and filler metals, mixing of the shape of the seam.
Preparation of the parties
To successfully weld corner seams, you need not only remember the defects, but also be able to. When welding plates up to 5 mm, no preliminary measures are required. If the iron is covered with rust, it is brushed with a metal brush. After that, you can perform marking, installation and welding. In a similar way, you can act when you overlap. Usually two seams are applied, one on each side, which is sufficient for strength under load.
If the thickness of the sides is more than 5 mm, then one-sided edge cutting is required. A bevel at 45 degrees on the attachment plate will allow to create a place for the leakage of the filler material and will strengthen the seam. If it is necessary to weld an element thicker than 10 mm, a two-sided edge cutting is carried out. The cone of the plate can be left blunt, with a thickness of 2-3 mm. This will help to level out the side element more smoothly, and protect against burns and sags from the back side.
After the preparation of the edges and the installation of the parts in place, there must always be piercing on both sides. This will prevent distortions and deformations during the seam lead. Welding must be done alternately on each side. Do not run multiple passes from one part, and then switch to another. Potholders will not hold such a load and will burst.
Welding methods for angular joints
The angular seams during welding are fraught with a number of defects, so it is necessary to remember the reasons for their occurrence and to prevent it. Several methods have been developed that combine metal parts at a certain angle. Each welder can use them depending on the situation or to identify the most qualitative result in his case.
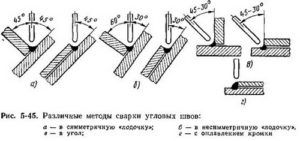
"Boat"
Welding seam this method is applicable in the case of small structures that are not attached to the floor, which can be turned over. This is the most acceptable option for novice welders. The product is placed in the form V, which resembles a boat, and this results in the name of the method.
The electrode is held vertically with a slight inclination towards itself. Welding is conducted without oscillatory movements, in order to fill the root. After slashing, the next pass is made, depending on the thickness of the metal. Subsequent seams can be transversely manipulated by the end of the electrode to give the desired width. This method allows you to apply filler metal evenly on both sides and avoid undercuts with non-fissures.
In the lower position
Large designs that can not be tilted for the position of the "boat" are welded in the lower position. To qualitatively fill the root of the seam, the electrode is placed at 45 degrees relative to the shelves and tilts to the right or left. and there is a seam.
During the first pass there is no need for transverse motions with the electrode. But it is important to regularly do longitudinal jerking by the end to drive off the liquid slag, otherwise it will zapetchet in advance and completely close the visibility of the welding bath. If the root suture was made correctly, then the subsequent layers can be superimposed by moving the crescent. It is important to create a small electrode delay on the side and move without delay on the underside.
Welding of fillet welds will be obtained by observing the above tips. The optimum current strength for a metal thickness of 4-6 mm is 250-300 A. Regular practice will help to master this difficult kind of connections and become a better welder.