How to remove the top lid. How to disassemble the toilet bowl: instruction on working with different structures
Modern plumbing is very fault-tolerant, but sometimes its maintainability leaves much to be desired. Even experienced plumbers sometimes stop at a loss, not knowing how to remove the lid from the toilet bowl or adjust the filler valve.
The main points of repair of the now widely distributed kits we will consider in this article.
Dismounting the lid
Option 1
Let's start with the simplest scenario.
How to open the lid of the toilet bowl, if it is a domestic set of fixtures with a rod that rises with the help of a plastic handle?
- We unscrew the plastic handle, holding the rod.
- We unscrew the brass or plastic hollow screw screwed into the guide rod of the tube.
- Remove the plastic washer under the screw. The cover is free.
Option 2
In most import kits, the lid is held by the drain button. More precisely, its rim.
The procedure is as follows:
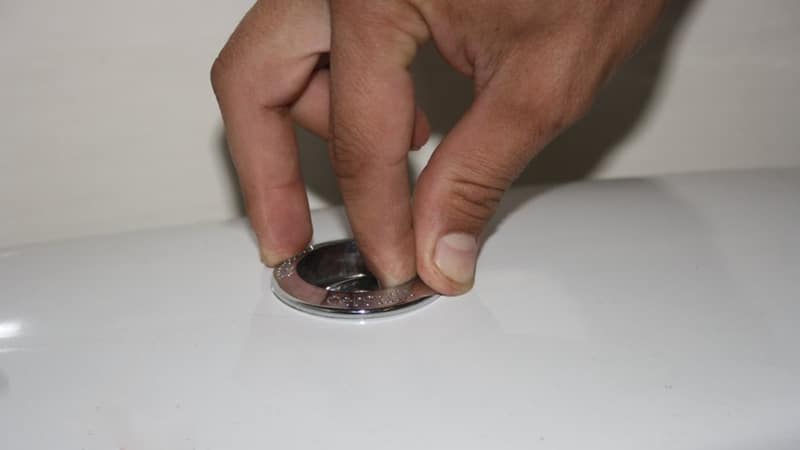
- With dry fingers, take hold of the rim and rotate it counter-clockwise.
Pay attention: in order to build a nut, it sometimes takes quite a serious effort.
To prevent fingers from slipping, rubber gloves can be used. But to use the gas key is only in the extreme case: the appearance of the rim will be irreparably damaged.
- After loosening the nut, unscrew it completely.
- Pull the drain button up, pull it out and remove the lid.
Option 3
How to remove the lid of the toilet bowl, if the rim does not turn when applying a significant effort?
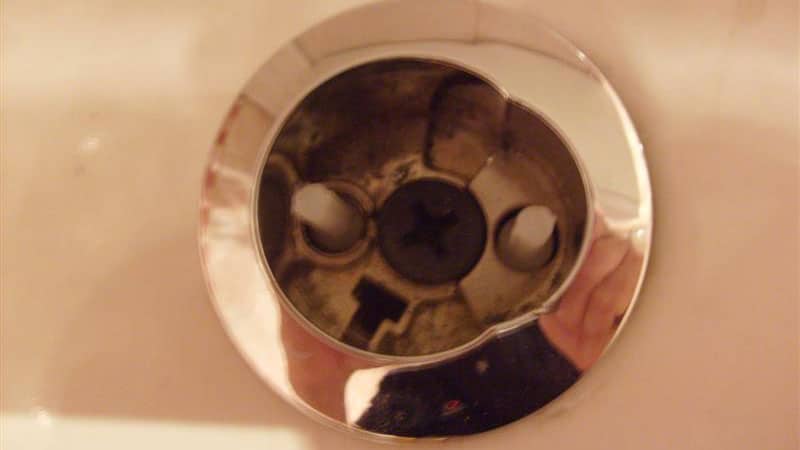
- Armed with a thin screwdriver, we catch the edge of the push-button part of the drain button and carefully remove it.
- Under it is found a nut that can be turned with fingers, tweezers or round pliers. Turn it counterclockwise, then remove the drain button. The cover is free.
![]()
Option 4
In some tank designs, the drain button is screwed to the cover with a nut located on the rear side. The button is a lever mechanism, which when pulled pulls the chain and raises the plum pear. A characteristic feature of the design: when you try to remove the lid, water begins to merge into the toilet.
The lid for the toilet tank of this type is removed as follows:
- Close the water on the tank.
- Raise the cover so that it can be pushed through the fingers, and unhook the hook of the lever from the chain.
- Remove the cover.
Note: again cling the button will be quite inconvenient. A little help with the task of a long tweezers. When dismantling the cover, remember which chain link was hooked: this saves you time, which otherwise will have to be spent on adjusting the drainage mechanism.
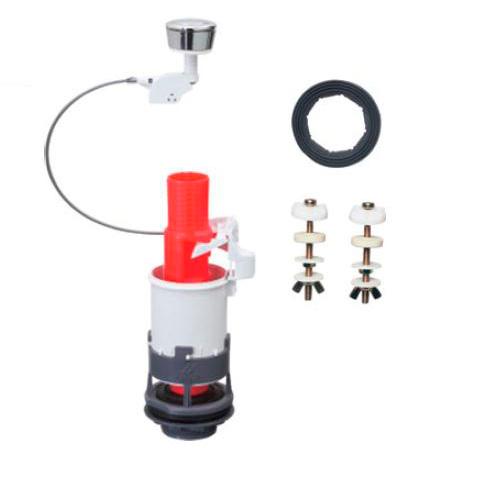
Replacing the drainage mechanism
Option 1
If you have a new tank with imported fittings, replacing the drainage mechanism is simple to indecency. It is a one-piece structure, which does not require the removal of the tank for replacement.
The outlet, saddle and cuff between the reservoir and the shelf will remain old: kits of this type are compatible with each other.
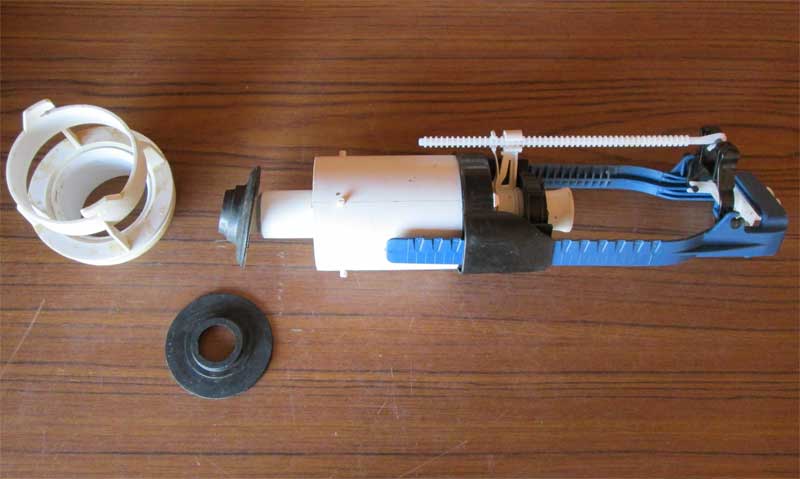
- Close the water on the tank.
- Remove the drain button and cover.
- Turn the drainage mechanism clockwise a few degrees and pull it upwards.
- Clean the outlet and the seat to which the gasket is pressed against deposits and small debris.
- Install the new drainage mechanism and turn it anti-clockwise.
- Turn on the water supply and make sure that the mechanism completely covers the drain in the closed state.
By the way, the situation when it is necessary to completely replace the node is a rarity. In most cases, the problem with water leakage is solved by cleaning the seat or replacing the ring gasket. The operation takes no more than a minute and does not require any special skills.
Option 2
For domestic sets with a separate shelf, replacing the plum mechanism is much more difficult.
No, all operations are intuitive; but the amount of work to complete the replacement of the node will take much longer.
- We cover the water on the tank.
- The lid for the toilet bowl is dismantled after the nut under the drain handle is unscrewed.
- Then we disconnect from the filling valve flexible liner.
- We unscrew the bolts holding the shelf and, often, the seat with the lid. Polyethylene bolts with nuts are easily turned away by hand; if a brass or galvanized bolt was used to install the kit, you will need to use pliers and a wrench. Steel bolts without anti-corrosion protection and do have to saw with a saw blade.
- Having fed a tank back, we pull out release of a shelf from a conical cuff. Be ready to replace this cuff: the rubber will lose its elasticity over time, and the connection after the assembly can flow.
- We put the construction on a flat surface and consistently untwist all the bolts. Of course, avoiding distortions, strictly in pairs. Steel bolts, if any kind soul has made them happy with the owner of the toilet bowl when assembling, will have to be cut.
- After separating the shelf and removing the drain mechanism, carefully remove all debris and deposits around the holes.
- We mount a new mechanism, not forgetting to install a gasket under the brass saddle. As for the bolts, the rules already known to us apply: they are tightened in pairs, one at a time - two turns at a time and without excessive efforts.
- We fix the shelf. Oval gasket under it is better to replace: it certainly ceased to be elastic. As a last resort, he will help out the damage inflicted on both sides.
- We check the design for leaks: stop the release of the shelf with a cloth and fill the tank with the pear lifted with water.
- If not, check the tightness of the sink: fill the tank already with the pear down.
- If everything is in order, you can install the tank in place. The conical cuff is stretched to release the shelf and rolled up to it with a wide bell. After the bolts securing the shelves are twisted, roll the cuff to the socket of the toilet bowl.
- We connect flexible piping and turn on water.
- After all equipment has passed the operational test, the lid of the toilet bowl is installed and fixed with a nut.
Replacement and adjustment of the priming valve
The replacement is reduced to untwisting the nut fixing the old valve, and twisting a similar nut from the new valve. Of course, there must be a rubber gasket on the inside of the tank, which ensures tightness.
With the installation of the filling valve, however, a couple of nuances are connected.
- Reinforcement with a bottom connection is often completed with a plastic filter fine cleaning, which must be placed between the fill valve and the hose. Throw it out immediately: it will be constantly clogged with the smallest sand that is safe for the operation of the valve. Where is the filter more effective? coarse cleaning at the entrance to the apartment.
- Flexible connection is connected without tension and bends with a small radius. The load on the union will significantly reduce the already short life of the hose.
Attention: do not use excessive force when tightening the union nut. They are not only not needed for soft padding; excess force is also able to cut off the thread on the valve.
How to adjust valve response level in modern kits?
There are two options.
- The float can move with some effort on a plastic strip with ledges. To raise or lower it, it is enough to move the rail to a wider part of the hole in the slot of the float.
- No less common screw adjustment. The float is adjusted by turning (using a screwdriver or manually) a long plastic screw.
Conclusion
Unfortunately, the abundance of all kinds of constructive solutions does not allow us to describe in detail all the constructions of the reinforcement. As usual, the video in this article will show more vivid information.
Repair of the drain tank mechanisms is of no particular complexity, but for its implementation it is necessary at least to get inside.
And then there may be a snag: you are surprised to find that the lid from the inside is holding something.
If the cover does not react to all of your persuasions and even to the phrase "open, police," pronounced in a strict voice, we recommend that you read this article. In it we will talk about how to open the toilet bowl and what not to do so that it can be closed again.
The most common reason for urging users to study the anatomy of the drain tank is the uninterrupted flow of water into the bowl of the toilet bowl.
In this case, first of all, you need to determine if there is a leak in the drain hole or water flows through the overflow.
You can do this only after you can look under the lid of the tank.
If you find that water is discharged into the overflow hole, then it is necessary to repair the float valve. Perhaps, the gasket overlapped the crane section, or maybe the water got into the plastic float, and it completely or partially drowned. It also happens that the float jams in a certain position, so that the crane is always open.
If the water level is below the overflow, then it's time to "treat" the drainage mechanism. To pear closer to the saddle, several large heavy nuts are hung over the rod on top of it. If this measure proved to be useless, it may be necessary to remove dirt from the surface of the parts, or they lost elasticity due to natural aging and salt effects. Zudubevshuyu pear or gasket should be replaced.
Open the tank is also in the case if the user fails to drain the water. Most often this kind of trouble is caused by the skewing of individual elements of the drainage mechanism or by their disengagement.
![]() The choice of a flushing system is very important when buying a toilet bowl. After all, this depends on the convenience of its operation, and hygiene. - Types of drainage systems, their advantages and disadvantages.
The choice of a flushing system is very important when buying a toilet bowl. After all, this depends on the convenience of its operation, and hygiene. - Types of drainage systems, their advantages and disadvantages.
Overview of toilet manufacturers, as well as advice on choosing plumbing fixture see the link.
A toilet with a vertical outlet is not a very popular type of construction, but in some cases it is this release that is considered the most acceptable. In this thread, let's look at the order of installing such a plumbing fixture.
How to open the toilet bowl?
Previously produced tanks, from which the rod with a ball screwed on it protruded, opened without problems: it was necessary simply to unscrew the ball, after which the lid was easily removed. Similarly, the tanks are opened with a plastic rod protruding from the lid (the tank itself is also plastic), which must be pushed with a force.
No problem, and opening the tank, designed for installation under the ceiling and having a side lever with a chain tied to it - the lid is also not fixed.
Latch under the release button
But the owners of modern toilets, in which the mechanism of draining is activated by pressing a button, it is necessary to tinker a little.
In such constructions the lid of the tank is held by the latch available under the button and to open it you need to know one small trick. About it and will go further speech.
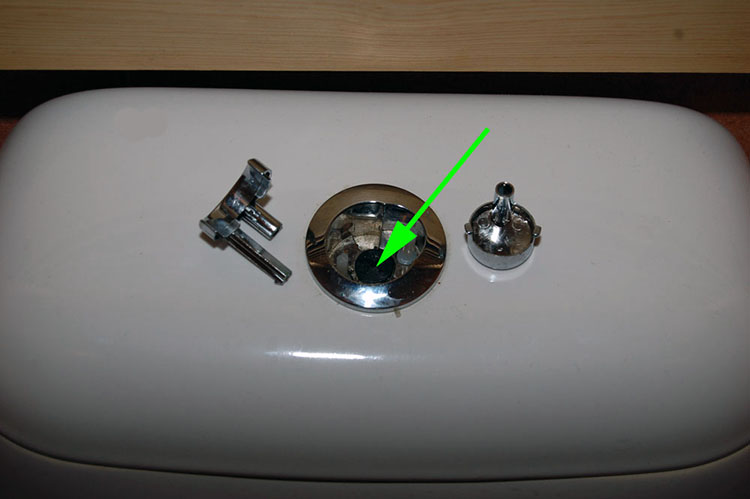
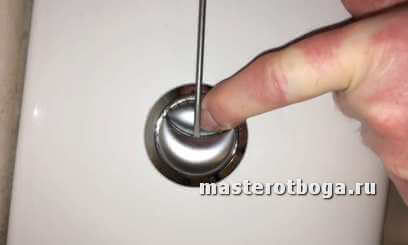
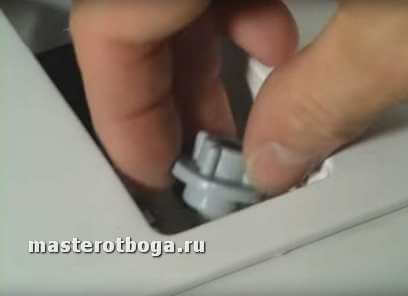
How to open the lid of the toilet bowl with a button?
Cope with a cunning tank with your bare hands will not work, but no complicated tool is needed: just arm with a flat-blade screwdriver. In some cases, pliers can also come in handy.
Looking at the button, you will see a ring around it. In fact, this top part cartridge, which we have to unscrew. To do this, you also needed a screwdriver: with it you need to hook the sleeve and turn it counter-clockwise. It is necessary to proceed with this very carefully, so as not to scratch the lid of the tank and not damage the sleeve, which is usually plastic.
Having built the sleeve from the place, the screwdriver can be postponed - the part is easily twisted by hands.
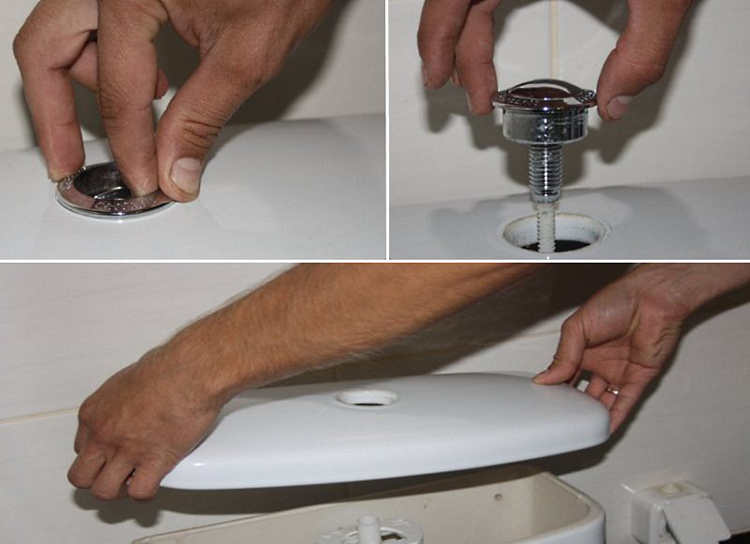
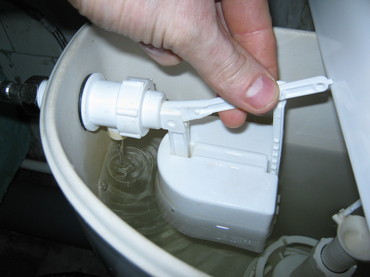
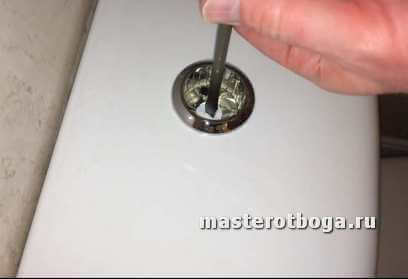
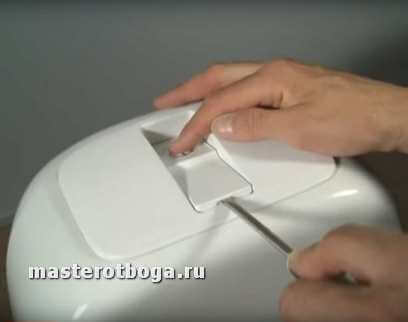
The order of dismantling the lid from the tank
If the drain mechanism of your toilet is operated by a button that can be swung to the right and left, then first remove it.
After dismantling the sleeve, the obstinate lid will make concessions - it can be raised a little. Do this, and then rotate it 90 degrees, laying across the tank.
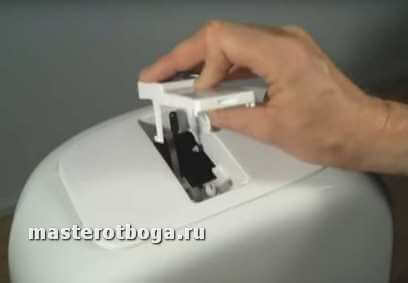
Now you have reached the same latch that fixes the lid. It is easily unscrewed, after which the lid can be removed. Of course, the tank before this should be emptied, and the valve on the water supply line to it - shut off.
If the tank spontaneously emptied at the time when you just lifted the lid, drain valve Connected with button node chain. For convenience, it can be detached, but you need to accurately remember which link and where it was fixed. Otherwise, you will have to spend additional time adjusting the drainage mechanism by choosing the optimal length of this chain.
If the button is composed, that is, consists of two semicircular halves, the instruction for opening the tank has a slightly different form:
- Drown one of the halves. In this case, the inner side surface of the second half will be accessible, in which you will find a groove.
- Inserting a screwdriver into this slot, remove the button half.
- Similarly, pry and remove the second part of the button.
- The slotted screw will be visible in the opened hole - it must be unscrewed.
- Next - similarly with the usual button: the lid should be raised, turn by 1/4 turn, etc.
Co removed by a lid should be treated very carefully, as the faience or porcelain from which it is made is a fragile material. It is better not to be too lazy and take it out of the toilet, steadily placing it on some flat surface where it can not be stepped on.
Install the cover in place only after a complete check of the working capacity of the repaired tank. Even if the repair did not touch the float valve, make sure it is working properly by filling the reservoir with water. If the valve closes reliably, empty the reservoir again and replace the cover in the reverse order.
 The toilet bowl and bidet are usually placed in a combined bathroom. In order to save scarce space and at the same time not to lose comfort, you need to calculate the optimal, and also choose the type of installation of plumbing fixtures.
How to fix the toilet yourself, if the water does not enter the tank? How to diagnose faults and eliminate them, read the topic.
Video on the topic
Often after a long and intensive operation, the toilet flush mechanism becomes unusable. In order to find and fix the problem, you need to know how to disassemble the toilet bowl with the button. Such a difficult task at first glance, it will be quite possible for each owner.
As practice shows, sooner or later, any toilet is subject to leakage, regardless of its cost and constructive features. The source of trouble is often a drain tank.
Usually the cause of the failure of the tank is the breakdown of any part of its design. Often, the rubber diaphragm wears out and lets in water. In this case, you have to remove the siphon and replace it with a new membrane. To do this, remove the drain tank and disconnect it from the water supply.
To fix the toilet bowl it is necessary to disassemble cistern
Sometimes leaks occur due to fouling of the diaphragm and the occurrence of a plaque on it. In such cases, you can do without replacement parts, and just clean it. However, carefully inspect the membrane, the smallest gap can lead to a repetition of the problem. Damaged gasket must be replaced.
Too fast or slow filling the tank with water indicates a possible skewing of the float. To do this, simply remove the cover and adjust this assembly so that the gasket fits snugly and completely against the drain hole. To perform these actions you do not need special tools, everything can be done manually.

When lifting the float to the desired level, the water supply to the tank must be stopped
In this case, it is important to determine the correct angle of the drain assembly by bending the armature of the float attachment. By creating more space for the drainage mechanism, you will ensure that the water is drained when the reservoir is not fully filled, which will save water costs.
As you can see, eliminating any malfunction in the drain tank necessarily entails work on the disassembly of the tank. To find out, how to remove the tank from the toilet, you need to study its device and understand the principle of its operation. Recommendations of professional masters and step-by-step instruction on dismantling are also able to greatly facilitate your work.
Features of the design and principle of operation
To avoid mistakes during repairs and spoiling of sanitary ware, before how to remove the lid of the toilet bowl with the button, you should carefully study the principle of the device of the drain tank. Regardless of the cost of the model, the design of all products is approximately the same.
The toilet bowl is a tank of faience, polymers or metal, constantly filled with water and covered with a lid of the same material. On the "compact" models, the liquid is drained by pressing a button on it. Products of the old model are equipped with a lever or a rising stem for these purposes.
Since today the toilet types of the first type are especially popular, let us consider the peculiarities of their device.
The scheme of the device of the drain tank
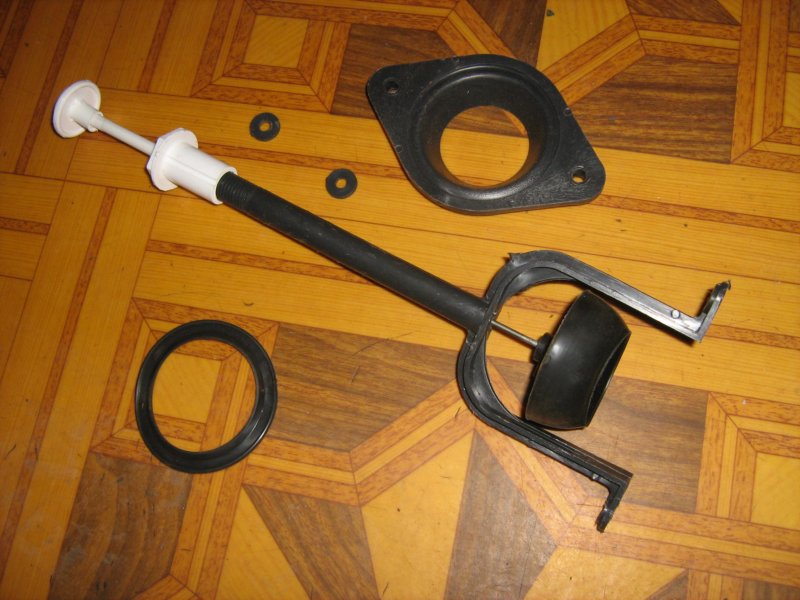
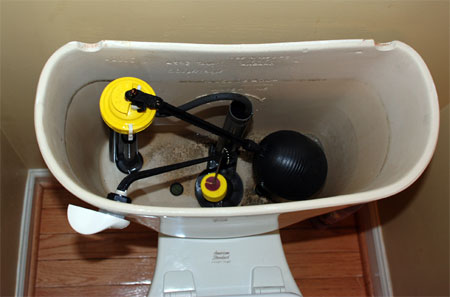
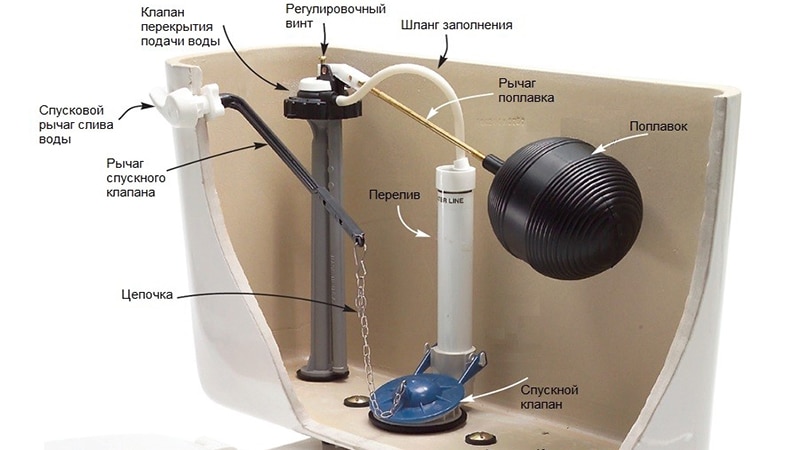
The internal system of the reservoir consists of shutoff and drainage junction. Both these blocks are interconnected. They include a rod for regulating the water supply, overlapping the membrane, a float showing the level of the liquid in the tank, a siphon and the components that connect them.
Locking unit performs functions to fill the capacity and prevent its seepage in the standby mode. Water is recruited into the tank to a predetermined level and tightly clamps the membrane to the drain hole. If necessary, drain the fluid while pressing the button comes into effect drainage mechanism, raising the rubber diaphragm and thus opening the water to the bowl of the toilet.
Normally, either the locking unit breaks down, and then the liquid constantly flows into the bowl or floor, or drainage, when the drain button does not work and when it is pressed, the tank remains full. In some cases, water does not enter the reservoir at all.
To determine the nature of the malfunction and eliminate it, before removing the lid from the toilet bowl, you should find out the order of disassembling the tank.
Disassembly manual
Of course, you can always turn to a plumber, who will quickly and accurately repair. However, breakages of this kind usually do not pose a great deal of complexity, therefore it will be more expedient to solve the malfunction yourself. At the same time, you will not spend extra material and acquire some skills in plumbing.
The tools necessary to carry out the work are found by every owner
So, to find out how to open the lid of the toilet bowl, first of all, you need to stock up with the necessary tools for this. Usually their list looks like this:
- sanitary pipe key number 1 or its Swedish adjustable analog;
- lever-amplifier on the adjustable wrench; it may be required if the toilet has been in operation for a long time and is being disassembled for the first time;
- pliers;
- screwdriver.
In addition, you should remember some of the nuances of removing the lid. Professionals recommend choosing a convenient place to work, where you could see all the fastenings and dismantle them without difficulty. It would be superfluous to know that it is necessary to unscrew the nuts from the earthenware case very carefully, avoiding their skewing so as not to damage the fragile material.
Do not forget before you open the toilet bowl with the button, close the water supply valve, otherwise you can accidentally arrange a flood. If the valve is rusted and does not lend itself, in this case it will be appropriate to seek the help of specialists. Trying to open it yourself, you can simply cut off the tap, which threatens to flood the housing.
After making sure that water access to the toilet is blocked, you should drain all the liquid from the tank. After these simple actions it will be possible to proceed directly to dismantling the lid of the tank. Here it is necessary to say that there are models with one or two buttons. The principle of work in both cases is approximately the same, although, nevertheless, it has some differences.
Drain the water from the tank, you can start to dismantle it
The process of dismantling the product with one button on the lid
Before how to remove the lid from the toilet, you need to firmly take hold of the button ring and turn it around. If the element is tightly clamped, you can use the pliers, but do not forget to wrap the ring with rags or just paper. This will help avoid scratches on it. As soon as you feel that the attachment has yielded, proceed only by hand.
Scroll the piece in an anti-clockwise direction, otherwise you will tighten the fastener even more than risking completely tearing the thread from the base cylinder. Unscrew the ring carefully, so as not to damage the surface of the tank. After removing the part, which has a cylindrical shape, you can proceed directly to the removal of the lid.
Unscrew the locking button ring carefully
The design is fixed to the button itself on a special clip with snaps on both sides. To start, you need to slightly raise and turn the lid perpendicular to the tank. This will help you gain access to the clothespin. Do everything smoothly and slowly so as not to spoil the fastening points inside the tank.
Further, having developed a detail, it is possible to undertake one hand for the right latch, and another - for the left. Rotating the clothespin around its own axis, unfold the nodes in opposite sides to each other. A characteristic click will say that the mount is released, and you can remove the cover unhindered.
Actions when removing the cover with two buttons
In order to remove the cover on the model with two buttons, you need to drown one of them. On the inner surface of the second key there is a small depression. It is necessary to poke the part behind this slot with a screwdriver or any other sharp object and remove the button case. In the same way, you need to get the remaining key. Now you have access to the spline mount, where the lid is fixed. The screw must be carefully, trying not to break the thread, unscrew.
After removing both keys, unscrew the locking cover of the slotted screw
As with the one-button mechanism, the lid should be slightly raised and gently rotated until it assumes a perpendicular position relative to the toilet bowl. The latch that fixes the lid is removed in the same way as in the first case, unclipping the clothespin in opposing sides, while rotating it. After clicking, the cover can be removed.
Nuances when disassembling the toilet bowl
Now, when you know how to remove the lid of the toilet bowl with a button, you can proceed to the action. However, while working, it is still worthwhile to follow certain recommendations of specialists.
First of all, during the dismantling, you must be careful, especially when working with ceramic products. Any, even insignificant mechanical impact, can lead to the appearance of a crack on the faience surface. Remember that you can not buy a lid separately from the tank, so in case of damage to the product you will have to replace the tank completely.
The above described method of removing the cover is suitable for models in which the water supply systems are brought from the side. If water enters the tank in another way, carefully inspect the cover for additional fasteners. Most likely, you will have to dismantle them.
Most models have a lateral water supply to the tank
The water drain system also has its own characteristics in different models. Sometimes it just gets twisted, but there are products where the lid rises, and under it there is a screw securing the drainage mechanism.
To eliminate some breakdowns, removing the cover is not enough. If there is a need to disassemble the water supply valve in the tank, it is necessary to release this unit. To do this, unscrew the nuts holding it, located on the water supply hose. In most models it is connected to the side wall of the case. Such actions can be carried out with the help of a pipe wrench and pliers.
The drain assembly is removed by gently scrolling it counterclockwise. Remember that all the parts of the tank are made of plastic, so do not make significant efforts to dismantle them to avoid accidental damage. After unscrewing the unit, remove it and remove the gaskets that secure the mechanism to the tank.
To remove the tank completely, you need to unscrew the nut between it and the bowl of the toilet bowl
If necessary, remove the tank completely, you need to unscrew the nut that connects it to the toilet body and remove the rubber sealing insert.
All dismantling work is quite easy and will not take much time. However, the masters recommend that you accurately remember the sequence of actions during the disassembly, and if possible, record it. Because to assemble a structure is always much more difficult than to dismantle.
Having found out a malfunction of a drain tank, it is not necessary to address at once to experts. Knowing his device, and also having free time and desire, you can always try to cope on your own. This will save you money to pay for the work of the master and gain skills in plumbing.
Most models have a lateral water supply to the tank To remove the tank completely, you need to unscrew the nut between it and the toilet bowl. To eliminate the toilet fault, you must disassemble the drain tank. When the float is raised to the desired level, the water supply to the tank must be discontinued. performance of works, there are at each owner Drain water from a tank, it is possible to start its dismantling. To unscrew a fixing button a ring it is necessary extremely accurately Having pulled out both keys, otk rivet locking lid slotted screw. There are wrenches or pull-out buttons. The action of the drain mechanism
It is very important that the devices work properly and perform their function stably. This also applies to the toilet bowl. How often do we use such a simple but very important device? Every day and not once. Therefore, if something in its mechanism fails, it inevitably entails problems. As a rule, something breaks in the tank, and to fix, you need to climb into its bowels. In this article, we'll figure out how to remove the lid of the toilet bowl.
Why do I need to remove the lid?
The parts inside the toilet bowl can be divided into two components: the water draining mechanism and the water dialing mechanism. The set of water occurs to a certain level, after which the shut-off device (valve) is triggered. When we push the button or pull up the release lever, another locking device (elastic, pear) rises and water pours into the toilet bowl.
Everything is basically simple. These mechanisms are adjustable depending on the size of the tank. Usually, they are made of plastic, some parts of rubber, and in time can deteriorate. Therefore, if you notice a problem, you need to climb inside and either adjust the devices, or change them. If you decide to look inside the tank, then you have one of these problems:
Water is constantly poured into the toilet.
Descent of water does not occur.
Insufficient amount of water when drained.
Water runs from under the tank.
Some general rules.
These rules relate to the collection and analysis of any mechanism, and they should be followed when disassembling the toilet bowl.
1) When you disassemble any device (part, assembly, mechanism), remember the order of your actions so that when you reassemble, there are no problems.
2) Do everything neatly: fold the fragile parts so that they do not break (this applies to the ceramic cover of the tank), put all fasteners in one place and so that they do not roll under your feet when working.
3) If something is not unscrewed (it is not removed, does not turn), then, most likely, you are doing something wrong. Understand the unfamiliar mechanism, apply effort gradually. Grandfather's method to hit harder than a hammer to earn, will not work.
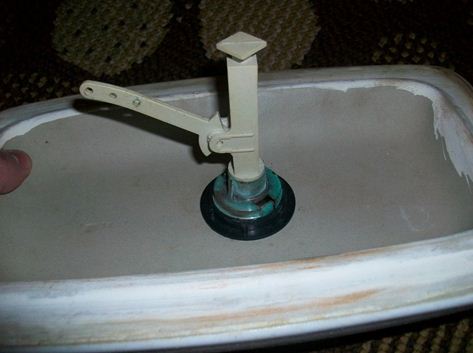
So, let's start with the simplest. How to remove the lid of the toilet bowl without a button. This device has all the toilet bowls of the old model and some new models. The lid is not fixed to the tank and in order to remove it, you just need to unscrew the cap on the release lever.
![]()
How to remove the lid of the toilet bowl with a button.
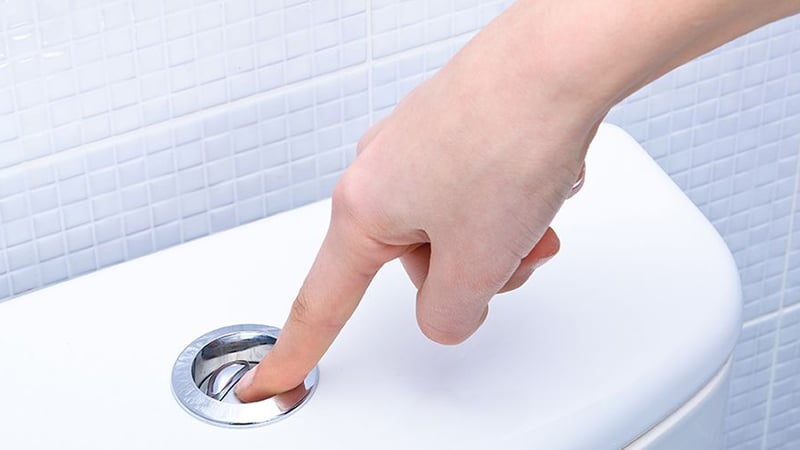
Most modern models of toilet bowls have exactly this structure. The button has a thread on the end and simply turns counter-clockwise. For convenience, it is better to press the button (drain the water). Then calmly unscrew the thumb and forefinger.
How to remove the lid of the toilet bowl with two buttons.
In this case, the button should not be unscrewed, but simply removed from the glass (base). To do this, one of the buttons should be drowned, then hit the second with a sharp object, for example, a flat screwdriver.
Under the buttons there will always be fastening elements, these may be nuts, hooks or screws depending on the toilet bowl model, having unscrewed them, you can remove the button and remove the lid of the toilet bowl.
How to remove the lid of the toilet bowl of foreign manufacturers.
Ifo.
We take out the button with a flat screwdriver. Under the button we find the nut by 12, and unscrew it with the socket wrench. Then he removes the glass, which is held by means of special pushers. They should be simultaneously pressed and at the same time pulling the glass up. Then remove the lid. A short video will help to cope with the toilet bowl of this brand.
Jika.
How to remove the lid of the toilet bowl from this model? Carefully take out both buttons. Under them we find a screw, which is unscrewed with a Phillips screwdriver, then take out the glass. Done!
Gustavberg.
Press the button, and on its end we find a slot. This slot is made so that you can pull out the button by inserting a flat screwdriver into it.
Then we pull out the button.
Below it we find a plastic nut, which is unscrewed with a special key or with the help of pliers. Unscrew carefully, plastic elements are fragile.
That's the whole science, now you can imagine how to remove the lid of the toilet bowl of such a device. As you can see, the parsing scheme is almost standard. You just need to remove the buttons and see what kind of fasteners are installed under them, and then disassemble it. Usually the manufacturer takes into account that the tank will occasionally peek, and therefore tries to do everything as simply and clearly as possible.
Finally.
Let's sum up a little to finally figure out how to remove the lid of the toilet bowl. If the device is a simple lever - unscrew the cap. If one round button - unscrew it counter-clockwise. If the buttons are two or one, but it has a non-standard shape (square, triangular, oval) - take out the button and look under it.
Dear visitors site , I hope this article is useful to you and will help when repairing a toilet of any type and manufacturer.
Failure of the toilet is a rather unpleasant situation, and in order to eliminate the breakdown, it is first necessary to disassemble the structure. It is not always possible to call plumbing, and you have to cope with the problem on your own. Each of us knows that for the normal functioning of the toilet, connected to centralized or autonomous sewerage, it is necessary to ensure the smooth operation of the drain tank.
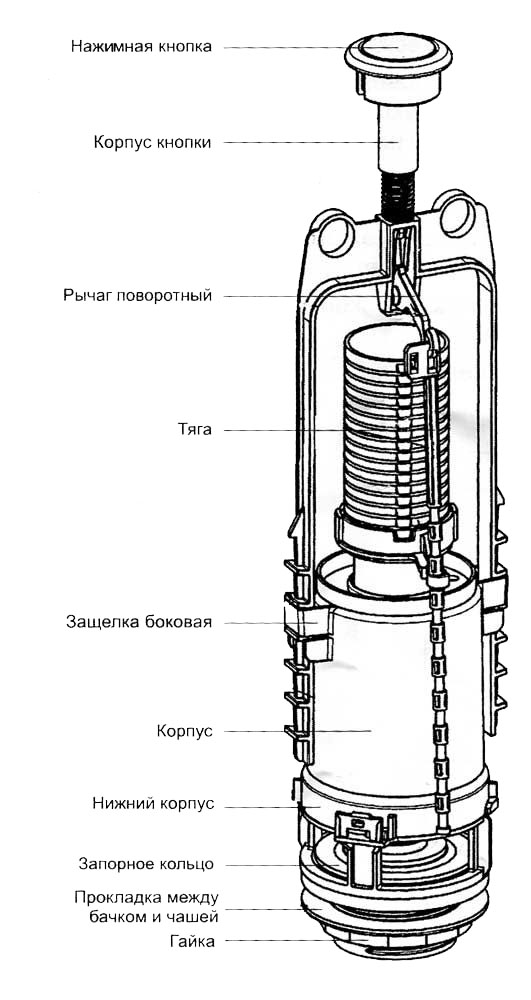
The most common fault in the toilet bowl is the failure of the tank fittings. Eliminating this problem is a simple task, but for this it is necessary to correctly disassemble the design of the tank. In this material, step-by-step instructions and some important recommendations on how to disassemble the toilet bowl with a button will be submitted. And first, look at the photo of the mechanisms used in modern toilets. The picture shows where the flush button is located and how it is fixed on the device:
 |
 |
How to properly disassemble the toilet bowl with a button? And what is needed for this?
In most cases, all modern toilets have a similar design, but there are some modifications that differ from standard options. With the old models it was much easier, there was no difficulty with how to disassemble the drain tank.
Let's analyze several options for the location of buttons on the toilet bowl:
Modern structures are arranged in such a way that simply raising the lid of the tank is difficult. But, nevertheless, this work is quite possible for everyone, this will require: a flat screwdriver and any metal object with a flat end.
Step-by-step instructions for the standard tank design with a button of manufacturers such as IDO, IFO pr.
- Take the screwdriver, and slowly turn the ring around the button counter-clockwise. Pushing the ring with these actions, then turn it off with your hands.
- We unscrew and take out the ring.
- Now, a little raise the lid and turn it 90º, it should be located across the tank. Thus, it is possible to remove the two-side clothes clip that fixes the button. To do this, you need to rotate one end to the left and the other to the right, so the clothespin will spin in the center.
- After that, you can unhinderedly remove the lid of the tank.
- Having eliminated all malfunctions trigger mechanism it is necessary to check the operation of the toilet bowl in an open state.
- Having convinced of the serviceability of the device, we collect the construction in reverse order.
How to disassemble the toilet bowl with a double button?
- Gently clicking on one of the halves of the double button, we find on the inside of the other half slot, hooked on which you need to remove the second half of the button. To do this, use a flat screwdriver.
- In the hole where the button was, you can see the slotted screw, which must be unscrewed.
- Next, you can already raise the lid of the tank a little. Raising it, rotate it by 90º, and place it across the tank. You can already remove the clothespin that holds the button.
- Remove the cover of the tank.
- We spend repair work, and we check the operation of the toilet bowl in an open form.
- We assemble the structure in reverse order.
Carrying out any plumbing work, you must follow the safety rules. For more confidence, you can visually familiarize yourself with the instruction by looking at how to disassemble the toilet bowl with the video button. And one more thing, if you are not at all familiar with the arrangement of the toilet system, it is safer to use professional plumbing services. By ignorance, you can not only damage the integrity of the device, but also lead to the flooding of its neighbors.