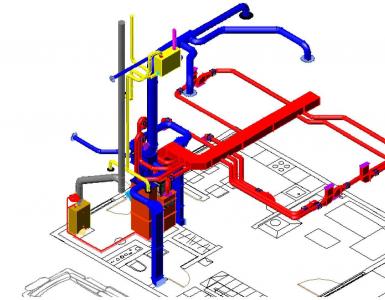
Installation of several outlets in a row. How to connect the outlet to an electrical outlet
It is difficult enough to imagine our present life without electrical appliances. All these devices not only make our life simpler, but also significantly supplement it. However, at the same time, in order for electrical appliances to work, it is necessary to have sources for their connection, which are electrical outlets, and, consequently, the question arises as to how to connect the outlet.
 You can connect the outlet correctly any adult
 Sockets are available in every house, and besides, several pieces, but that's what to do if you need to install a new outlet, for example, after repair or with a simple need to connect more electrical appliances, which often happens. It is worth noting that it is quite possible to connect an electrical outlet yourself, without calling an electrician at home, but in this case it is necessary to know the basics and the principle of installation.
Types of electrical outlets
Whichever simple at a glance the design did not seem electrical outlet, but, nevertheless, the socket outlet is different, and one should distinguish between them.
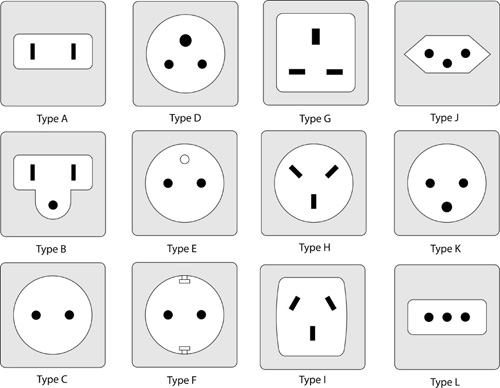 There is a large variety of sockets, but we have the most popular C-class outlets
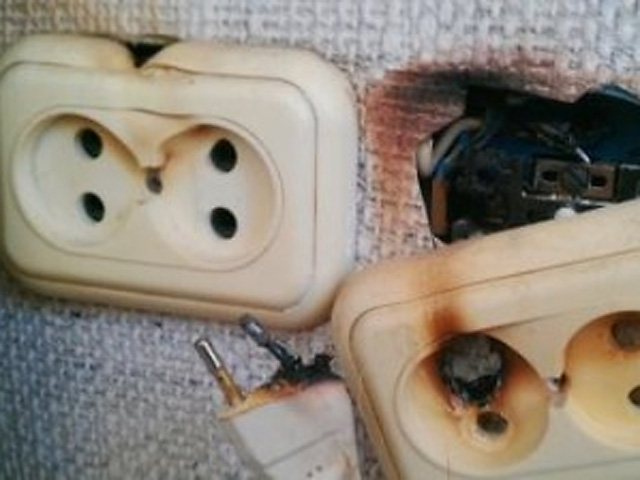
 - Sockets type C5 have the appearance of a "standard" Soviet outlet, which have been preserved in the dwellings of most people. These outlets have a square view, a large round cutout for the plug of an electric appliance, and two round holes where the plug itself is inserted. These sockets are most effective for most old appliances, they are beautifully masked on the wall, they do not need to be grounded, but with all this, their design is not the best kind.
- Sockets type C6 or so-called "euro sockets" are much more prominent on the surface of the wall, they are easier to break. At the same time, the sockets of this series have a more pleasant appearance, withstand current up to 16 A, while the C5 series sockets are only up to 6 A. In addition, such sockets are used by most home electrical appliances, since the plug holes are several wider, and also, such sockets can be grounded, which is natural, more safe for electrical appliances and people.
Arrangement of electrical outlets
Contrary to most expectations, electrical outlets in addition to its appearance also have significant differences in the internal design. This is primarily due to the fact that to maximize the design of the outlet, make it more secure.
Electrical sockets type C5 are the simplest in their design. On their inner side to the ceramic or plastic base are attached two transitional contacts, which in turn are attached to the electrical wiring of your apartment. The principle of operation of the C5 type outlet is quite simple: by inserting the plug into the socket, you close two contacts located there, and electricity goes to your electrical appliance.
It is worth noting that, depending on the types of electrical contacts in sockets type C5, they are divided into spring and petal. The petal contacts are less reliable, since they are able to lose their stiffness with time and when inserting an electric plug, it can retreat and spark. Spring contacts are more reliable, as the wear of the spring does not practically occur, and the mechanism itself can work up to several tens of years.
As a rule, holes for electric plug in sockets type C5 have a diameter of 4 millimeters, while most modern electrical devices have a pin diameter of 4.8 millimeters in the plug, as a result, as a supplement to such an outlet, most likely will have to buy an adapter for a euro outlet.
The device of socket type C6 is made more qualitatively from the design point of view. This is primarily due to the fact that the design provides for a special grounding contact. As a rule, the contact arrangement in C6-type sockets is almost always petal, but due to the improved design, such sockets do not blend for a long time, and, consequently, do not spark after a certain time. Nevertheless, the rest of the device of C6 sockets is almost identical to the C5 outlet.
Connecting electrical outlets
In order to connect an electrical outlet, you must first determine the purpose for which you install it. If you only need the outlet to recharge your mobile phone or turn on your desk lamp, then the connection method will be quite simple in this case. First, disconnect the ceramic or plastic contactor from the socket, carefully clean the connecting wires of the electrical wiring, fold them into a small ring, insert the received ring into the cavity of the contactor and press it with a special screw.
A similar operation should be performed with the second wire, also fixing it well with a clamping screw. After that, it is necessary to insert the plastic or ceramic contactor into the cavity of the socket, fix it with the latches (clamps) there and install the outlet on the necessary place in the wall.
In the event that you intend to connect powerful electrical appliances, it is worth considering the fact that the large current passing through them leads to the expansion of the metal, as a result of which, over time, the socket can begin to spark. To get rid of this problem, it is necessary to use special spring-loaded clamping washers, which are installed under the head of the clamping screws. In all other respects, the installation process is exactly the same.
A question may arise about how. To do this, just get a C6 type outlet, which, when inserting the plug of the electrical appliance, touches the grounding contact, as a result, there is no need to connect additional wires.
Ways to install an electrical outlet
Typically, electrical outlets are mounted on the wall, but the way they are fixed may differ. Sockets type C5 are fixed on the wall surface with the help of special whiskers, which can be adjusted by tightening the fixing screw. In the event that the clamps alone are not enough, then a special wooden bar is mounted in the wall, on which a plastic or ceramic contactor is mounted (depending on the type of outlet), after which the socket is fastened to the contactor with a fixing screw, thus, walls.
Sockets type C6 usually do not have whiskers, and therefore, the process of their installation in the wall is carried out exclusively on special substrates or by installing the same wooden bar.
Parallel connection of electrical outlets
As a rule, electrical outlets are connected in parallel. This is primarily due to the fact that in this case electrical circuit there is less load, the wires are not heated, and the stability of the connected electrical devices is much higher.
In order to connect an electrical outlet in a parallel circuit, it is necessary to remove the two wires from the current outlet (if it is already connected) to another outlet (connected in parallel) and fix them with the same clamping screws. The connection scheme of the socket in parallel mode, as a rule, is realized in network filters, and in places where it is required to connect many electrical devices, for example in the kitchen.
Transfer of electrical outlets
The problem of carrying electrical outlets is well known to everyone. It is usually connected with repair, when an obstacle is installed on the old place of placement of the outlet, for example furniture, which does not allow using this outlet.
Usually, the transfer of the socket is carried out by building electric wire, that is, by adding a wire of the required length. This option is the most simple, but, nevertheless, unsafe, as it can cause a short circuit. The most actual method of transferring an electrical outlet is to completely replace the electrical wire from the junction box.
After the electrical wiring is long enough, you can connect the electrical outlet in the ways described above. In order to hide the wire, you can use special boxes, or even plaster the wire in the wall.
Safety instructions for connecting electrical outlets
 Electro installation work require compliance with safety rules
 It should be noted that when connecting electrical outlets should adhere to strict safety precautions:
- Before the beginning of electrical installation works, it is mandatory to turn off the electricity, then once again make sure that the electrical network is broken.
- Work only with a special tool with insulated handles.
- When the length of the electrical wire is long, it should be carefully laid in the wall, or cut to the required length
- When increasing the electrical wire, it is necessary to solder it, and do not "twist".
- Use only wires and equipment specifically designed for electrical work, rated for rated power and amperage.
- When installing an electrical outlet on the wall surface, make sure that it is tightly installed and insulated.
Observance of the elementary rules will allow you to perform in a qualitative and safe manner any work connected with the connection and operation of electrical outlets.
Connecting a triple socket outlet to non-professionals can cause confusion. But there is nothing difficult in this, and following our simple advice, you can connect everything in just a few minutes.
The main thing here is mindfulness and not disregard for safety rules.
Before proceeding directly to the connection, it is necessary to determine the possibility and correctness of the decision we made. For this, the rated current circuit breaker, which feeds this group, as well as the absence of prohibitions on the installation of sockets in a room of this type.
So:
- Before installing the triple socket into an already working group electrical network, it is necessary to determine whether the circuit breaker will withstand an additional load. To do this, we need to calculate the possible rated current in the socket. This is done by summing the nominal currents of the most powerful consumers electric power, which can be connected in this outlet.
- If we know only the nominal power of these devices, then we consider the rated current, starting from the formula I = P / U × cosα. Where I is the rated current, P is the nominal power of the device (usually indicated in the passport or on the body of the device) and cosα is the coefficient power of the appliance (you can find the value of the device instruction manual, but if you did not find it, you can take it equal to 1).
- Now, summarizing all the rated currents for this group, we can check the conformity of the automaton to these parameters. Often the machine needs to be replaced with a more powerful one. But if the outlet is designed to connect low-power video and audio equipment, then perhaps this is not required.
Note! According to p.6.2.2, the maximum permissible rated current of the circuit breaker feeding the group network can not be more than 25A. So, if you have already installed an automatic machine in 25A, you will have to think about the division of the group or restrictions on the connection of devices to this group.
- Also, if the installation of a triple socket in an already existing group involves monitoring the cross-section of the supply wire. Often, if the machine is not suitable, then the existing wiring will not meet the new requirements. Therefore, again, you have to think about the limitations of the connected load for this group.
- Well and at last it is necessary to be defined, and it is possible here in general to establish an outlet? Mount the outlet can not be in the bathrooms and store rooms. At the same time, there is an exception for bathrooms, which allows performing the installation when installing in the power circuit of this group of RCDs.
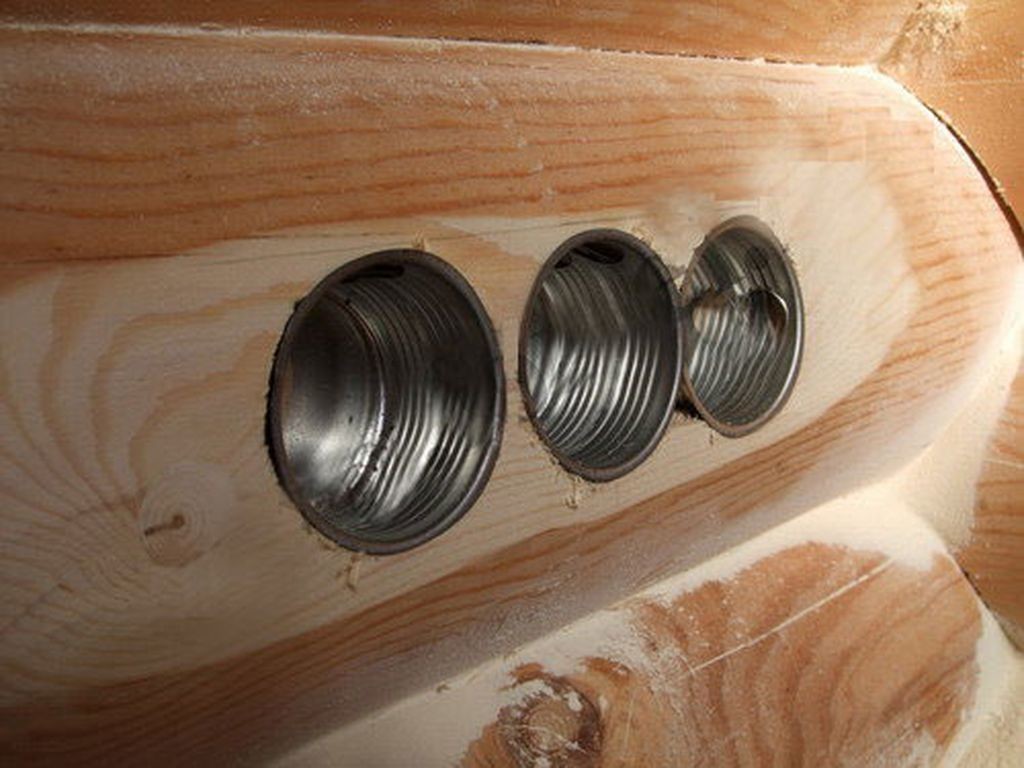
- In addition, if it is to be installed on a flammable foundation, care must be taken to ensure its fire safety. For this purpose, the embedded under the socket must be made of non-combustible materials. Usually for this, steel products are used.
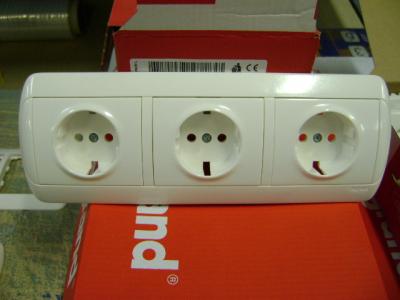
Installation of triple socket
We collect a triple socket
At the moment, the market presents a huge number of various outlets. But either the price of them "bites", or they do not meet our requirements. Therefore, often a triple socket is assembled from three ordinary outlets.
How to make a triple socket, we now tell:
- To do this, we need three conventional sockets, the required nominal parameters. This can be one socket for 6A, the second for 10A and the third for 16A. The main thing is that they meet the above requirements. Also we need a patch for a triple socket, which will create the appearance of a single whole.
- We measure the necessary height from the floor, usually 30 cm, but you can choose any other height. At the installation site of the outlet we draw a horizontal line parallel to the floor.
- Now we remove the decorative caps on the front side of our single sockets and install a triple lining in their place.
- We put on the sockets overhead boxes and apply our triple outlet to the mark. We mark the place of the walling of the wall under the embedded boxes (see).
Note! If you use plastic boxes with guides (they are also called mortgages under gypsum board), then it's enough to put the mortgages and attach them to the installation site.
- We drill the wall and install the boxes. We attach them and install the sockets directly. If you did everything according to the size, then you should get a good triple socket. At the same time, its price is often much lower than for similar stationary analogues. Now it remains to connect.
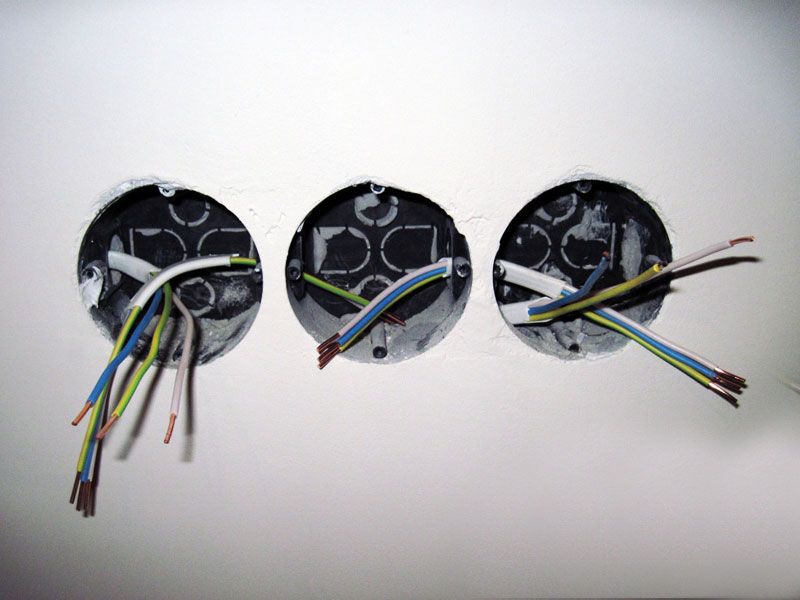
Connection from junction box
The most common case is connecting the outlet directly from. It is used in 99% of cases when installing rosette groups, and also in most cases when adding outlets to already existing groups.
So:
- First of all, we make a connection between the sockets. To do this, we need a wire with a cross section of not less than the wire that we plan to connect to.
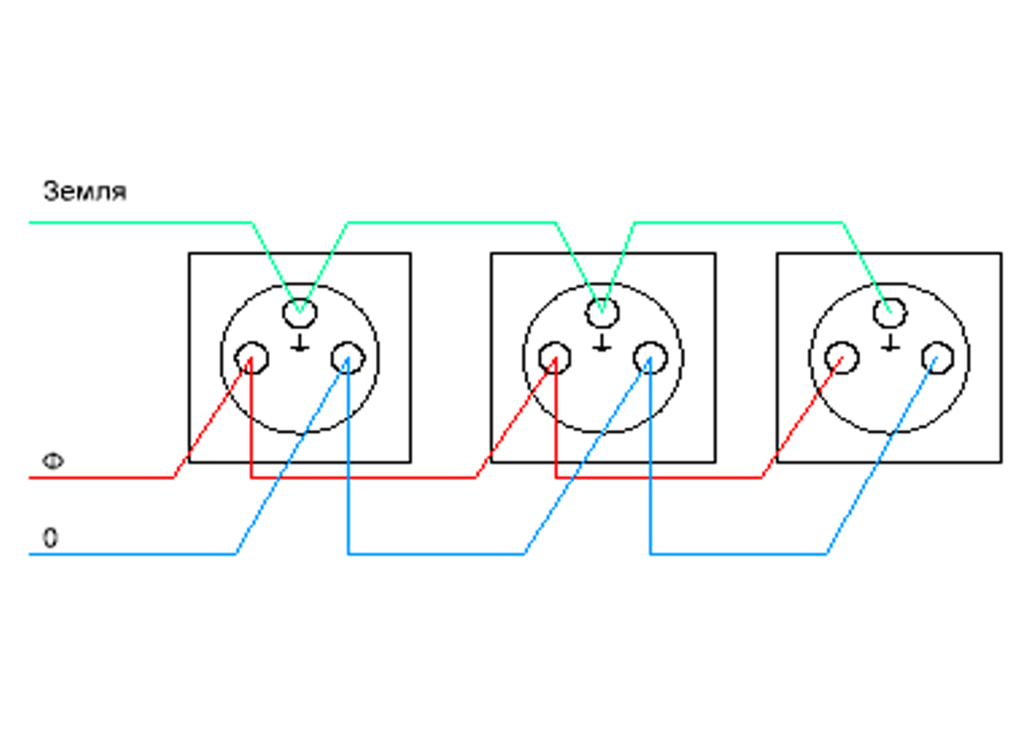
- From the outlet to which you plan to connect, we make jumpers to a neighboring outlet. And from the next - to the third outlet. In this case, the grounding wire is fixed to the grounding contacts, and the ground and neutral conductors are connected to the power cables.
- Now our triple socket in one socket is ready for connection. But before performing it, you need to relieve the tension from the group you are working with. In addition, if the wires of other groups pass through the junction box, they should also be removed from the voltage.
- We open the junction box and determine the phase, zero and protective wires of our group. If your electrical network is installed in accordance with the norms of the PUE, then the blue wire - zero, yellow-green - protective and the third - phase. If this is not the case, then we are looking for these wires by means of a short-time power supply. The search methodology is described in other articles of our website.
- Now connect the phase wire in the junction box and on the socket, then do the same with zero and protective. It is important not to confuse the place of connection of the protective conductor, the phase with zero can be connected to any power contacts of the outlet.
- After connecting all the wires and closing the junction box, you can apply voltage and test the operation of our outlets.
Connecting one outlet from another
This method is often used when adding a new outlet to an existing group. It is designed to reduce the amount of work associated with the strobing of walls and reduce the final price of connection. Although it is rarely used, it also has the right to exist.
- In order to make such a connection with your own hands, you should first of all collect our triple socket, as described above.
- The next step is to remove the voltage from the outlet from which the connection is to be made.
- Then we open this outlet and then proceed according to the adjusted scheme. In fact, we install a jumper, as between the sockets in our triple socket.
- This completes the connection and you can apply voltage to all of our rosette group.
Conclusion
Now you know how to install a triple socket and assemble it from several single outlets. We hope this helps you in creating a comfortable electrical network for your home.
I would just like to note that the additions to the existing network have certain limitations. Therefore, they should be used only in exceptional cases.
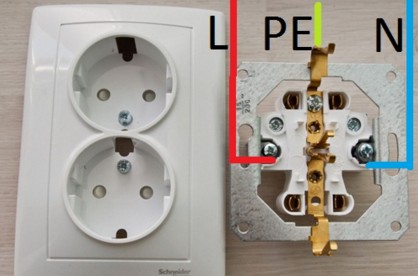
Double outlet is considered quite popular. In a single housing you can see two electrical connection points. They are intended for feeding from one working group a phase, zero and grounding. Sometimes many electricians may have significant connection issues. Connection diagram double socket will help to carry out this process qualitatively.
We are confident that thanks to this scheme readers of the site "" will be able to perform the correct connection process. Also in this article you can see a simple scheme for connecting a double socket with and without ground.
Now you need to study the connection scheme. In the photo you can see the optimal and important connection scheme for a double socket.
If you decide not to use a dual case, but a dual version, then the connection of the wires will look different. Dual sockets have two different connection points. They will be in separate junction boxes, and you can connect them using a loop.
Below, we provided a circuit for connecting the twin outlets. We hope that this scheme will be useful.
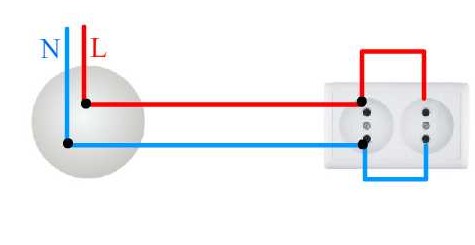
If there is no ground in your house, then the circuit will look different. Below we put a photo of the circuit of connection of the double socket without grounding.
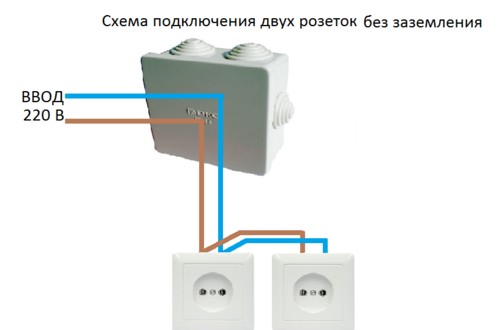
Electric jumpers can be used only if you connect not too powerful devices. Otherwise, you will need to. A branch will need to be done for each product.
Here's a video that will help install a double socket.
This is all the information we wanted to bring to your attention on the double socket. In carrying out electrical work there is nothing difficult. You can do this yourself. We are confident that with our instructions you will be able to connect the outlet yourself. Finally, we want to tell you that you choose only a quality manufacturer.
If you choose a quality manufacturer, then you can be completely confident in the quality of your devices. They will last a long time, and you will not have any problems.
Replacing or installing the outlet in most cases does not require the call of the master at home. It is enough to get acquainted with the theory and safety rules to get down to work and perform it quite successfully.
Often in the kitchen or in any other room, where several household appliances are used simultaneously, there is a catastrophic lack of a free outlet.
Solve the problem if you install a double socket.
Before you start, you need to determine, i.e. accessory wires. To do this, you need a screwdriver-tester and rubber gloves.
The cover of the old socket is removed and measurements are taken with the help of the tester. In the phase, the indicator lights up, and the neutral wire indicates the absence of a light signal. Of course, there are cables for colors, but it's better to be safe.
Then the line must be de-energized through the meter - this is the basic safety rule. The levers are turned off! This is the lower position of the switches.
The voltage at the installation site of the double socket is checked again.
If there is still current in the phase (that is, the line is not de-energized), you must turn off all the machines, not just those that you think control the wires going to the outlet.
Before you put a double socket, you will need the following tools and materials:
- insulation tape;
- sharp knife for stripping wires;
- cross-shaped and flat screwdriver;
- pliers.
Dual sockets are devices with a single clamp, equipped with distribution slats.
On a note. This outlet is not very convenient if you plan to use two powerful devices - the voltage is the same, but the current in each of the outlets will depend on the load of the neighboring one. Therefore, it is preferable to connect the two outlets in parallel.
The cable is used the same as the main wiring in the room. Materials should also be the same. If the piping is done aluminum wire, it is also used when connecting outlets.
Use caution. The total load on this type of outlet should not exceed 10-16 A.
Stages of installation - do everything in order
The scheme for connecting a double socket consists of the following steps:
This completes the installation work. If the quality of the installation is doubtful, please contact a professional electrician. He will inspect your work and make sure that the operation will not lead to electric shock.