How to connect a double switch with a socket. Wiring diagram of the switch and socket, detailed manual.
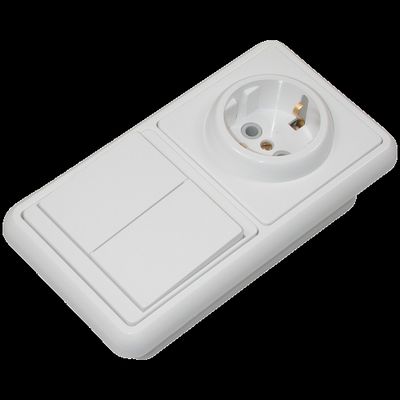
On our website about electricity you have already read about how to connect the outlet and switches . Now let's look at the connection of the unit, which consists of a single socket and a two-button switch. Basically, such blocks are put on the bathroom and toilet, well, and the outlet in the hallway will not hurt.
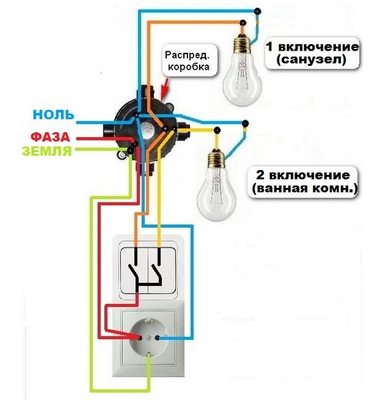
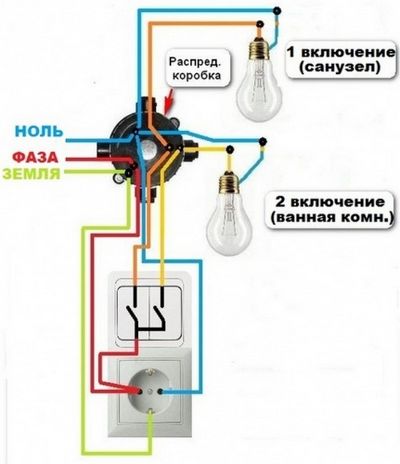
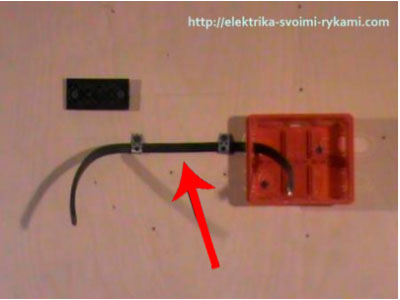
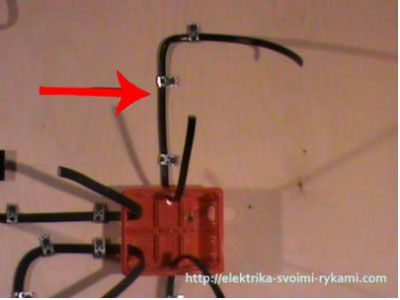
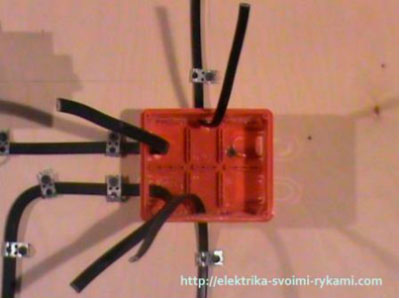
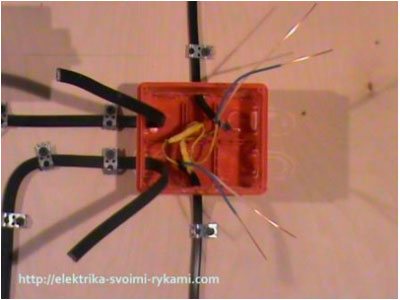
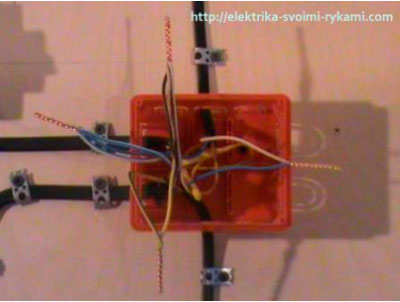
Let's count the wires that go from the dose box to the unit with a socket and a two-button switch.
- Wire - Phase
- Wire - Zero
- Wire - Ground
- Wire coming from the switch to the bathroom lighting
- The wire from the switch to the toilet lighting.
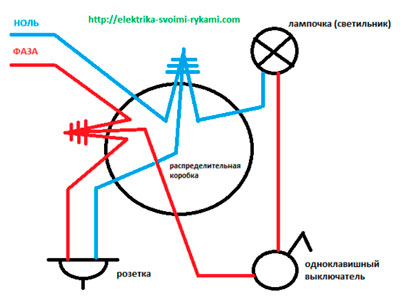
In total, we counted five wires, in order for everything to work they must be properly connected in the unit. Below you can see a clear diagram of the connection with explanatory notes. Under this scheme I will talk about the appointment of each wire and about where it should be connected.
In order that you would better understand everything on the diagram all the wires of different colors for explanation we read the list below. It is possible that you have a block of wires of a different color or even one-color ones. If at you such situation that ring up and mark all wires for convenience of connection.
So, here's the list of colors for the wire on the diagram:
- Blue - Zero
- Red - Phase
- Yellow-green - Grounding
- Beige - outgoing bathroom lighting phase
- Yellow - outgoing phase of toilet lighting
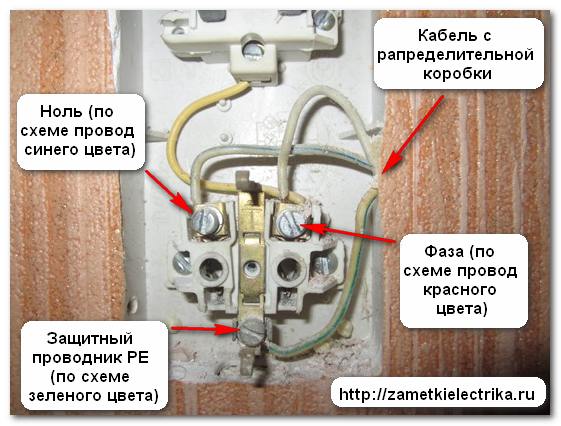
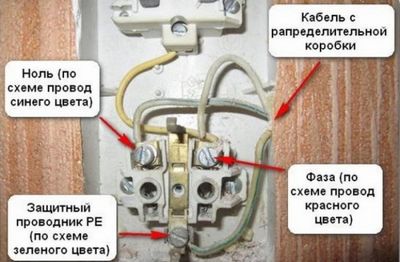
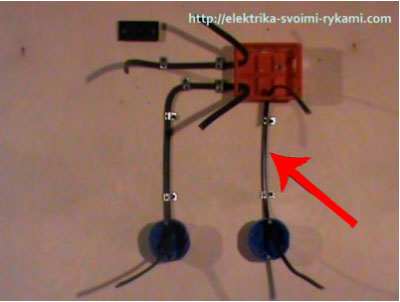
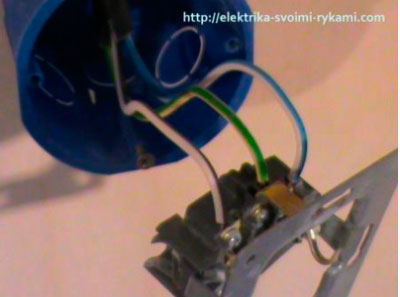
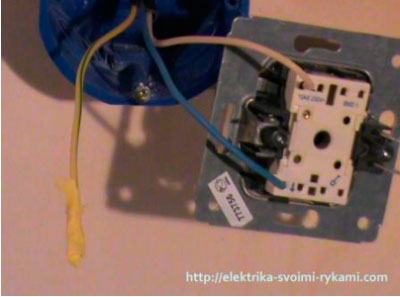
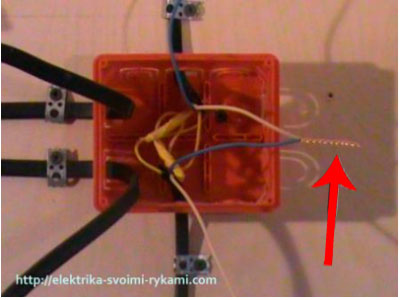
And now in detail, first of all make sure that there is no tension. In the unit consisting of an outlet and a switch, the power from the dose box is connected to the outlet. We connect the phase, zero and ground to the socket on the special contacts.
![]()
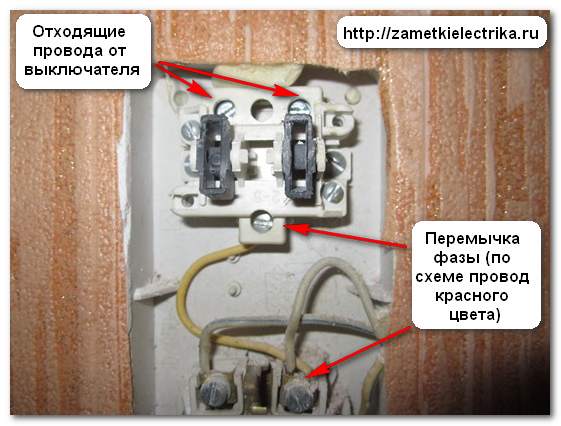
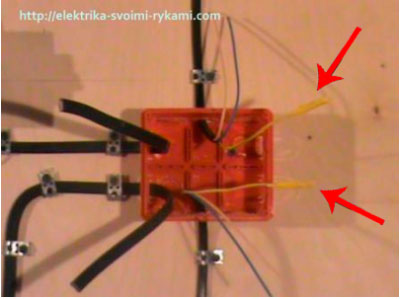
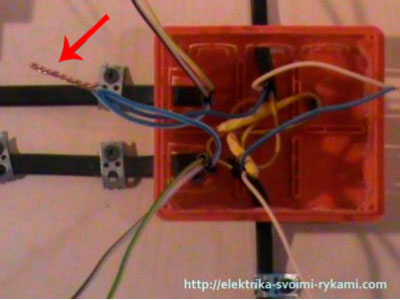
Depending on the manufacturer, a jumper on the incoming contact of the switch can go from the outlet. About how to connect the switch and the principle of its operation, you can also read on our website. If the factory jumper is not present, then we manufacture it ourselves. Cut off a piece of cable and we connect a phase wire on the socket with the incoming contact of the switch.

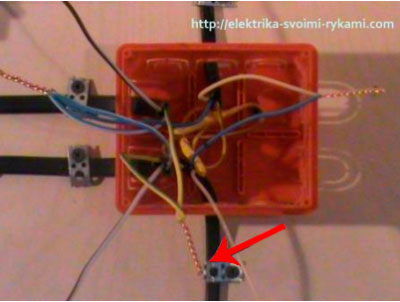
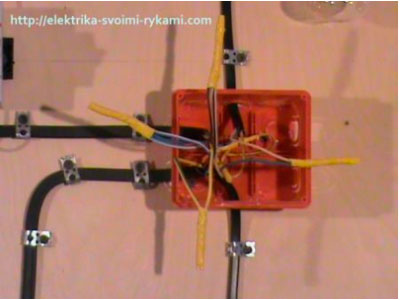
We have two wires that are connected to the outgoing contacts of the switch and from there go into the dose box. The connection in the dose box is also simple and described in the previous article.
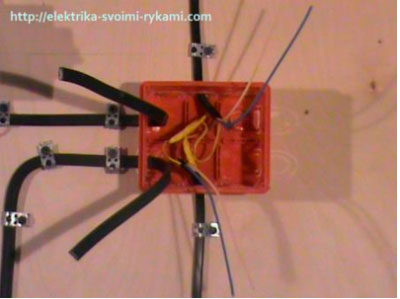
For what would you all understand until the end in short I'll write what to connect in the dose box. Three wires (phase, ground and zero) are connected to the main twists of the power box. Two wires going from the block switch, respectively, connect with the wires going to the bathroom and toilet.
For those who do not really understand here is a good article about connections in dose boxes , if you have any questions, ask in the comments I will answer in the shortest possible time.
The selection and installation of electrical appliances in living quarters is not the most important part repair work, but still have great importance in matters of visual finishing. The range of various devices today is wide enough to find the most suitable product for yourself in shape, color, size and design. You can economically place a switch with a socket in one housing. Such a combination has recently become popular with many buyers.
The advantage of combining a socket and a switch into one housing
The main advantage of installing the combining unit for the switch and socket is the ease of connection. In these cases, there is no need to make two holes in the wall and to conduct contacts in several places, as with separate connection of sockets and switches. Shtroby with this necessarily have to be masked through a small cosmetic repair. Additional convenience, of course, can be considered the location at the same height of the switch and outlet. For proper compliance with European standards, this is the principle of installation.
Due to the availability of these devices, it is always possible to buy the cheapest switch and outlet and lead installation in one circuit. The ease of installation of these electrical appliances makes it easy to do the work yourself. If necessary, the unit is easily transferred to another location. In this case, two separate podvodki to put it is not necessary. It will not be necessary to level the switch and the outlet at the same level.
Mounting Features
Connect the triple switch with a socket in one housing, it is possible on almost any surface, whether it is a foam block, gypsum board, stone or brick. Installation of such devices is possible both indoors and outside the building. For outdoor installation it is recommended to use models with the provided protection against moisture.
What disadvantages are there?
The negative side of such devices is the need to replace the entire unit with its partial failure. It will not be possible, for example, to remove the damaged element of the switch and insert a new one. And yet, this disadvantage is not so important, if you compare it with the advantages of using combined cases.
How to choose a suitable block?
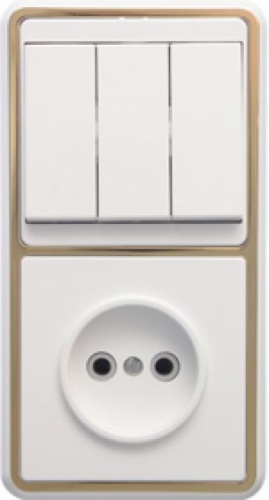
A socket with a switch in one housing is available for sale in the modern market in various combinations, which are classified according to two basic principles. The first is the number of keys of the switch and the second is the appearance of the unit. For example, in one housing you can purchase single socket and triple switch or any other combination, which for selection is given a huge amount.
In addition, we distinguish between internal and external sockets. The first ones are used for concealed lining, and the latter for open. Outdoor switch with a socket in a double case compared with the inside looks more cumbersome. However, this will be the only an option If the accommodation is equipped open system wiring, and its replacement will be difficult.
How to install a socket with a switch in one housing?
The unit is connected in approximately this way. After the power is turned off, the markings are made for the subsequent installation of the housings. The wall is checked by a crown in the right place. Perforated holes, which are intended for cable laying, must be broken.
The installation boxes are interconnected, and special connectors are inserted into the slots. The cable is pre-cleaned and wound in the boxes. The construction is fixed to the wall with screws fixing. Wires must be prepared for connection.
The cover from the socket is removed, and the contacts are connected to its terminals. The socket is installed in the box after the screws are unscrewed. The switch wires are isolated and then connected. The cover of the unit common for the socket and switch is installed, and the lid is closed. The power is turned on and the quality of the device is checked.
Suitable places for installation
Such devices are convenient to install in corridors, bathrooms, as well as other rooms where there is a need for compact electrical devices. In such places, the sockets mainly serve as temporary power supplies for a variety of electrical appliances.
Theoretically, a switch with a socket in one housing can be installed in any corner of the house or apartment, but you should pay more attention to planning. It is best to choose a suitable place for installation in accordance with the plan of the dwelling. You can choose the number of keys, depending on the location. If it is planned to install switch blocks with outlets in humid rooms, you will need a device with special curtains for protection. Also, basic rules and installation requirements will be required.
Installation of the unit with one-key switches
A modern switch with a socket in one housing is becoming increasingly popular among buyers. To mount such a block, several simple actions are performed. It is necessary to lay a phase and a zero to the junction box from the central flap. In addition, there should be two three wires from the unit and two from the light bulbs, in which separate devices are combined.
The phase contact from the flap is fastened to the wire that is routed to the socket, which is connected to the terminal on the switch by means of a jumper. The remaining two phase contacts from the switch and the cartridge of the consuming light source are twisted and isolated. In the event that the unit provides grounding, it is necessary to connect it with additional wires.
Thanks to this scheme, the socket integrated with the switch in one housing will function independently of the switch that will perform its main functions to turn off and turn on the light bulb.
Scheme with a switch with two keys
Here is another description of how to connect a socket with a switch in one housing. You can see photos of devices of this type in the review. Basically, the units that unite and the outlet are mounted on the partitions between the doors to the toilet and the bathroom. The ability to control lighting in two rooms appears when only one block is used. In this case, it is always possible to power any consumer of electricity from the outlet.
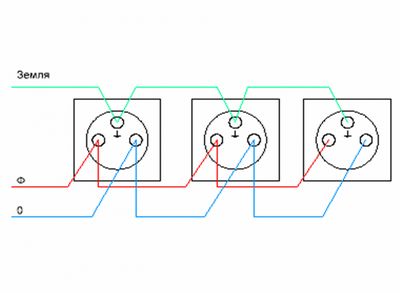
A socket with a switch in one external enclosure requires the installation of five conductors to the electrical coupled system from the distribution block. The neutral wire from the distribution board, as well as the grounding conductor, must only be connected to the outlet. To output the phase to double switch special jumpers are provided in the switching blocks. Two free veins are connected to the switching contacts of the switches, through which the phase will be fed to the appliances in the bathroom and toilet.
In the distribution boxes are made the twisting of the contacts that feed through the switch phase, as well as free veins, aimed at the bulbs of bulbs in the toilet and bathroom. The grounding from the consuming device and the zero wires are taken in the junction boxes by the method of connecting bare ends with twists intended for powering the outlet. If there is a need to change the sequence of buttons that supply power to the bulbs in the bathroom and toilet, on the switching contacts, you just need to swap the veins in places.
What is the difference between one method and another?
You can see that the connection scheme for a single and dual switch, combined in a housing with a socket, differs only in the required number of contacts. For the first option, you need four wires, as well as grounding, and the second requires five.
Conclusion
Sockets, light fixtures and switches are the main components of any apartment, office space or garage. Therefore, every attentive and caring homeowner should understand the principle of connecting such devices after carrying out all repair work or the self-erection of new structures with their own hands. A double socket with a switch in one housing will be very useful in solving problems of placing devices in a small area or at the same distance from the floor.
As a matter of fact, it is the usual switch, only combined in one case with the socket.
There are blocks with one, two and threekeys. In principle, they have the same circuit, the only difference is the number of pairs of contacts of the switch.
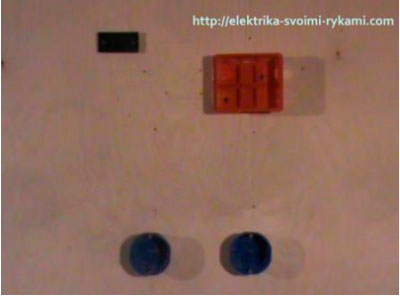
As an example, consider a block with a two-key switch and a socket.
One button switches on the lighting in the bathroom, and the other - lighting in the corridor. In general, the outlet is used for temporary connection of various electrical appliances, for example, a vacuum cleaner when cleaning an apartment or an extension cord while performing any repair work.
In the bathroom I have a separate outlet, so an electric shaver, hairdryer, washer connect to it, and accordingly, do not load the outlet in the corridor.
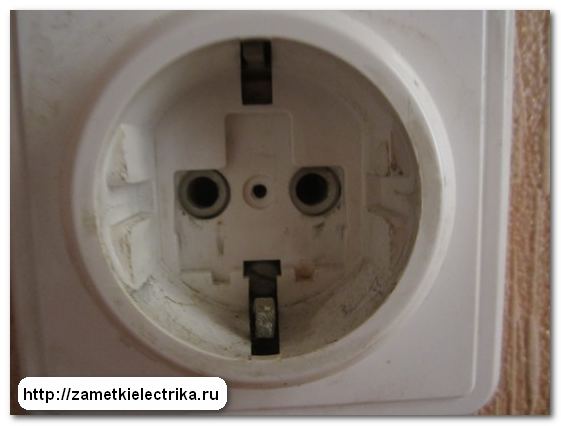
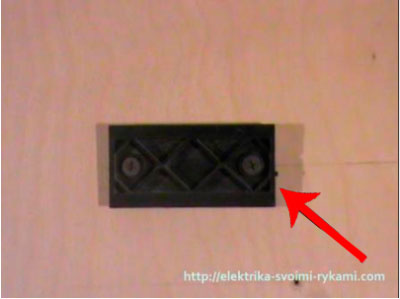
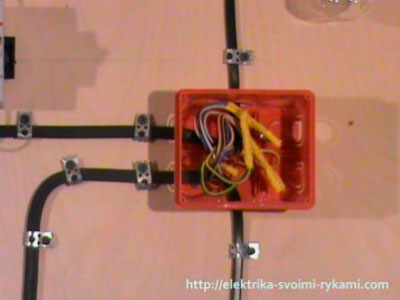
Let's look inside the block. To do this, unscrew the screw of the protective curtain from the children and remove it.
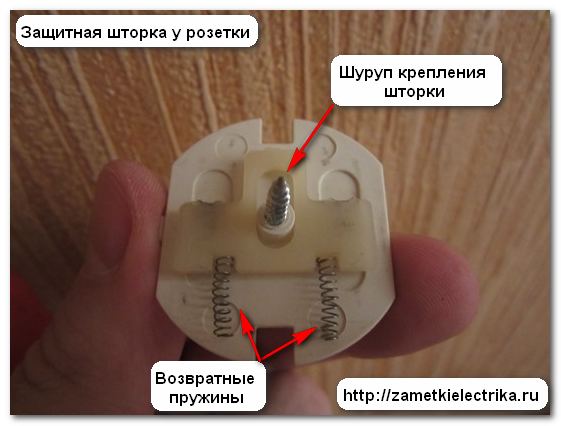
A protective curtain is removed from the socket.
Then, one by one, we take off the keys of the switch.
![]()
Now you need to unscrew the two fastening screws top cover and remove it.
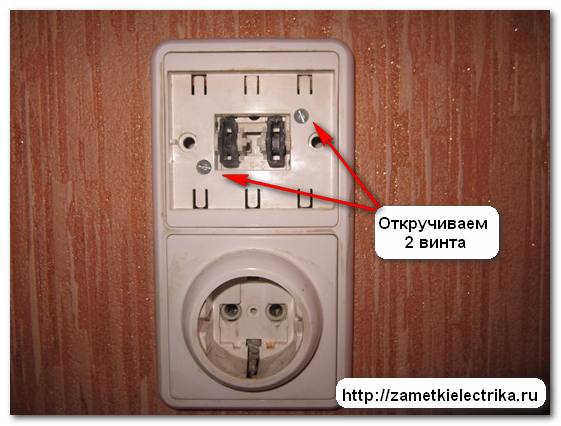
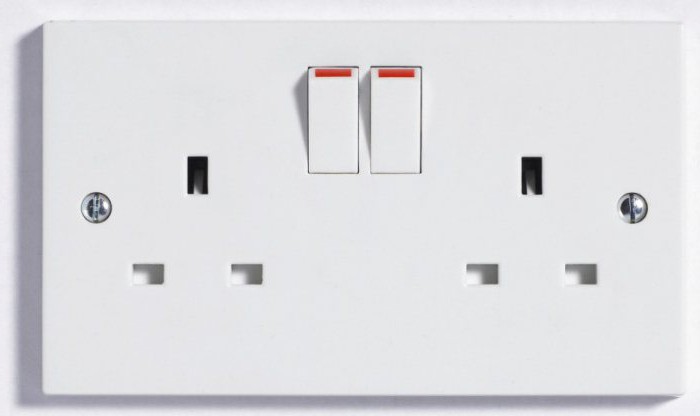
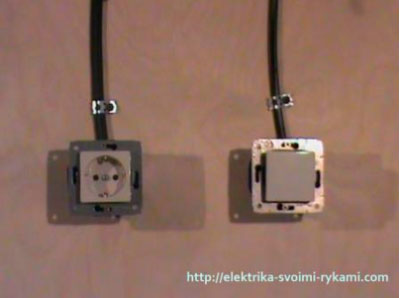
The photo shows that this unit consists of a socket and an ordinary two-button switch located in one housing.

Now let's move on to the wiring diagram. There are two options. We will consider each variant separately.
Connection of the socket-switch unit. Option 1
In the first variant, let's look at the scheme that most often occurs when connecting such units.
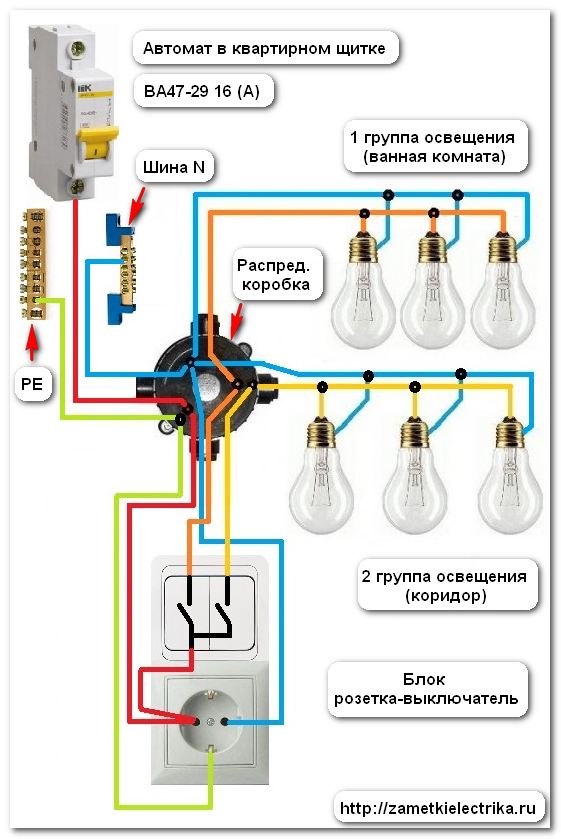
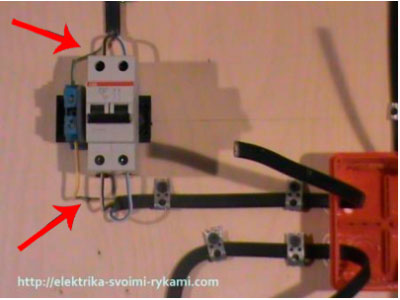
An automatic device for 16 (A) is installed in the housing shield. From it to junction box a copper 3-core supply cable is laid, for example, VVGng (3x2.5).
Do you know why a cable with a cross section of at least 2.5 mm² is necessary?
This is due to the fact that the rated current of the outlet is 16 (A). This means that the cross-section of the conductors of the supply cable must be at least 2.5 mm2 /

If this is disregarded, the cable will begin to warm up when the cable is overloaded in the outlet line or the lighting line, which can lead to a fire.
A copper 5-core cable is laid from the junction box to the unit, for example, VVGng (5x2.5).
The phase (red wire in the diagram) is connected to one outlet of the outlet. From the same output, there is a jumper to the common contact (terminal) of the two-switch switch. Zero (blue wire in the diagram) is connected to the other socket outlet. Protective conductor PE (green wire in the diagram) is connected to the screw of the grounding contact of the socket.
To the other terminals of the switch wires are connected (they can not be seen in the photo), which go to 2 groups of lighting: a bathroom and a corridor.
How to connect the switch-outlet box. Option 2
As I mentioned above, the first version of the scheme is not quite correct. But this does not mean that it can not be used.
The fact is that according to modern requirements, power circuits and lighting circuits are recommended to be divided (PUE7 item 6.2.4). And in the first variant, at us they turned out united.
PUE 6.2.4
6.2.5
Work lighting, security lighting and emergency lighting are allowed to be powered from common lines with electric power plants or from power distribution points (with the exception of 6.1.28). In this case, the requirements for permissible deviations and voltage fluctuations in the lighting network must be complied with in accordance with GOST 13109-87.
6.2.6
6.2.7
When using busbar trunking as a power supply network, instead of group shields, individual protection and control devices connected to the busbar can be used to supply groups of luminaires. At the same time, convenient and safe access to these devices should be provided.
6.2.8
In places where the lines of the supply lighting network are connected to the power line of electric power plants or to power distribution points (paragraph 6.2.5.), Protection and control devices shall be installed.
When feeding the lighting network from the power distribution points to which the power receivers are directly connected, the lighting network must be connected to the input terminals of these points.
Here is the scheme of the 2 options:
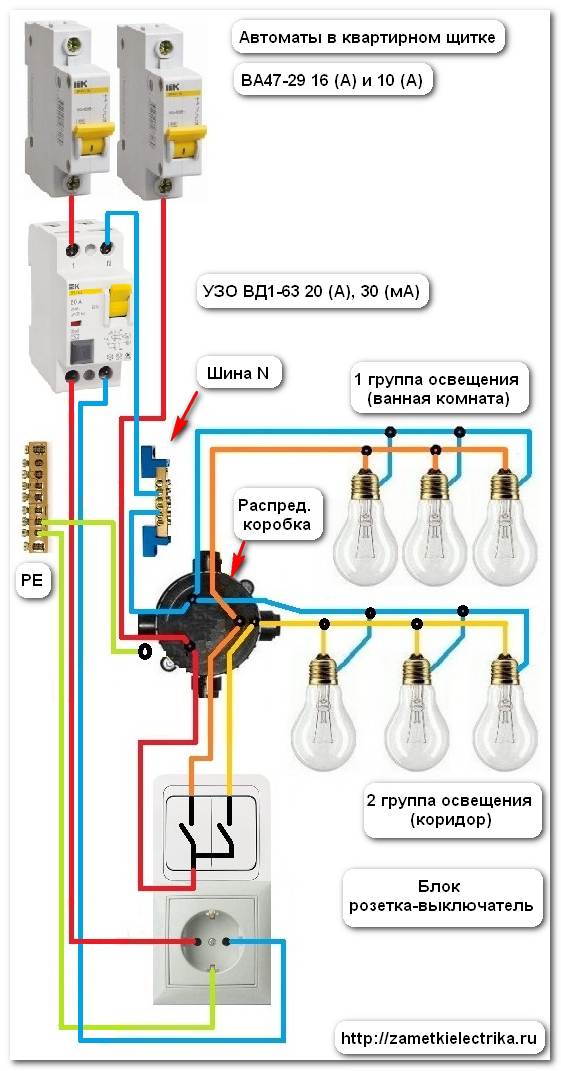
The socket line will be protected by a 16 (A) automatic device with a RCD of 20 (A), 30 (mA), and a lighting circuit with a 10 (A) automatic device without an RCD.
With a three-core cable, for example, VVGng (3x2.5), we supply an outlet, and with another three-core cable, VVGng (3x1.5) - a junction box and a two-button switch.
And the last. If you have installed in the wall of the Soviet block switches + socket and the outlet does not climb the eurovisil, then you can simply drill the inlet openings of the outlet.
When starting work, the first thing to do is take care of your safety. Turn off the electricity on the shield, and then check with a special indicator screwdriver to see if there is any voltage on the line. The principle of its operation is so simple that it makes no sense to explain it. But here it is necessary to understand that poor-quality test screwdrivers can show stress where it is not in sight.
The use of a socket block with a switch
Usually, the connection of the switch and the sockets is performed by a single unit where they can not be separated or undesirable. For example, in the kitchen, bathroom, toilet or on the balcony, where there are several light sources and want some of them to be turned off.
In places of high humidity, the outlet can be very dangerous. Water (especially dirty) conducts a good current, which means that at one point not only the outlet itself may be damaged, the wiring harness in the apartment may be damaged. and also a person who, through ignorance or negligence, established it there, may suffer.
Experts usually "take out" the outlet outside the room, but that everything looks neat, combined with switches.
What do I need to know before installation?
Scheme of connection of the unit from sockets + switch
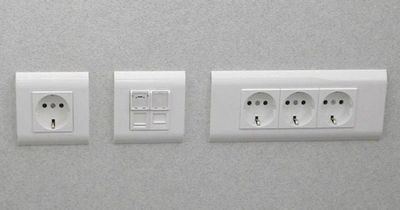
In the previous article, I talked about how single or double electrical sockets are connected to the wiring or to each other by a loop. Now I will tell you in detail about how to properly connect the blocks consisting of a socket + light switch or three, four outlets.
Take into account. that in one block under one cover not only switches, electric sockets are combined, but also telephone and computer if necessary.
Before starting work to connect the electrical outlets, you must turn off the power supply and check that there is no voltage with the indicator screwdriver.
How to connect the socket outlet switch
Most often a block consisting of a double switch and an outlet It is installed in the apartments on the partition between the doors of the bathroom and the bathroom. One single unit is used to turn on the light in these two rooms, as well as to connect electrical appliances used in the bathroom, such as an electric shaver, a hairdryer, etc. Why an electrical outlet is taken out of the bathroom- I already told you in an article called Installation electric sockets and switches in the bathroom.
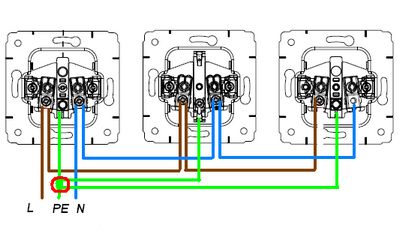
In the connection scheme of the socket unit and the two-switch switch Use 5 wires from the junction box to the unit.
The grounding conductor (on a light green color scheme) and zero (blue) from the junction box are connected directly only to the socket in the unit. The phase (red color) is connected to the socket and then the jumper is connected to the common contact of the incoming phase of the switch.
The remaining two wires are connected on two switched contacts, through which the phases are connected to 2 lamps when the keys in the toilet and bathroom are pressed. Those. it turns out that the outlet will always have a phase, zero and ground, and also the phase will be on the lower contact of the switch. And on the top contacts it will appear only when you press the keys.
In the junction box wiring are made 2 twists from two wires (on the scheme of yellow and beige colors). Screw the switched phases from the switch to the phase conductors leaving the luminaires.
Necessary for the work of lamps nil and grounding conductors They are taken from the junction box with the same connections from which the socket from the unit is connected.
In order to change the inclusion of keys on the block. you need to change the yellow and beige wire on the switch.
The connection scheme of the unit consisting of a socket and a single-key switch is completely analogous, with the only difference that one wire or beige wire drops out of the circuit.
To connect the three keyswitch, you need a sixth wire or a 6 core cable, which will be connected to the third switched contact on top of the yellow and beige wire.
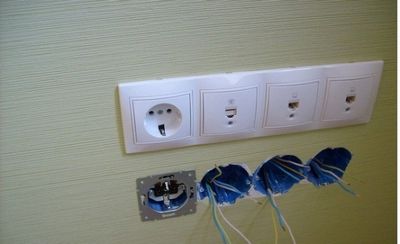
How to connect 3 or 4 sockets in one unit
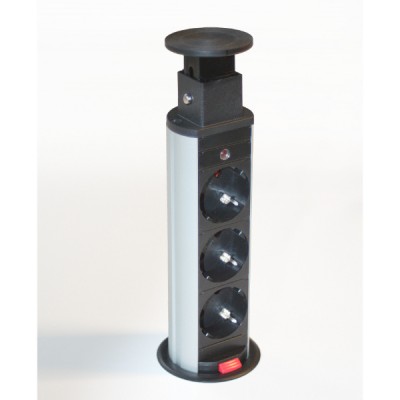
If you need to install in one place more than 2 outlets for connecting electrical appliances, household appliances or a telephone, a computer network, then a block of outlets is used, ie all the outlets will be under one lid.
Electrical outlets in the block all are connected in parallel. 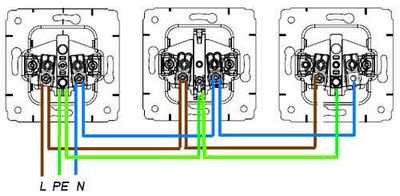 Before starting the connection, it is necessary to make and make jumpers from 3 wires to each seat. Do not make the jumper very long, because then the wires will interfere and do not let the outlet sit tightly in the junction box.
The socket block is installed and connected in the following order:
Scheme of connection of the unit from outlets and the switch
We have discussed how to connect a 220-volt socket. It was the turn of the story about installing a block from several devices.
Important! Modern modular units often include not only power sockets, but also computer and telephone.
Safety precautions
Prior to the installation of the unit (and any other work related to wiring devices), it is necessary to disconnect the automatic device to which this unit will be connected. After turning off the required machine with the indicator screwdriver, you need to make sure that there is no voltage. In residential buildings of old construction, where machines are not installed, it is required to remove the plugs.
Connecting the power socket + switch
Established place of installation of such a modular product - in the corridor on the partition separating the bathroom and the bathroom. On one panel there are switches of lighting devices in these rooms and a socket for electrical appliances, which are constantly used in the bathroom. The product without protection against moisture in the bathroom is dangerous, so blocks without moisture protection are mounted in the corridor.
To connect the unit with a two-button light switch in the bathroom and bathroom it is required to lay five wires from the switchbox to it.
- The grounding conductor on the diagram is shown in light green, zero - blue. Two of these conductors directly go from the switchbox to the outlet.
- The phase is indicated in red. This conductor is connected to an outlet, then by a jumper - to the common contact of the incoming phase of the switch.
- The remaining two wires are connected to two switched contacts. Through them, the phase is connected to the lighting devices when the keys are pressed. These are fixtures in a bathroom and a bathroom. This circuit provides a constant phase, zero and ground at the outlet, and the phase on the lower contact of the switch buttons (zero goes to the lighting device). On the upper contact, the phase appears when you press the keys.
In the switchbox, two twists of wires are made. On the diagram they are marked beige and yellow. Screw the switched phases from the switch to the phase conductors leaving the luminaires. Zero and grounding conductor are taken in the switch box from the contacts to which the socket in the unit is connected.
Important! To change the order of operation of the keys, it is required to swap the beige and yellow wires on the switch.
If a single-key switch is to be installed, the beige or yellow conductors must be removed from the circuit.

Use of a three-key product requires the use of a 6-core cable. The sixth core of the cable is connected to the third switched contact from above along with the beige and yellow conductors.
Connectivity
If you need to use a significant number of electrical appliances, a computer and a telephone install modular products. The peculiarity of their installation is that all connections in them are made in parallel.
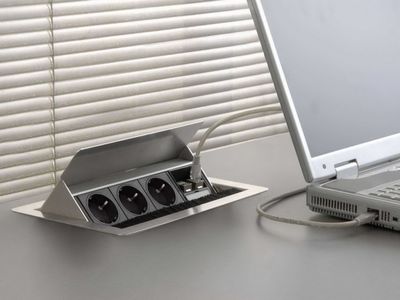
Usually they are installed in the living room or in the kitchen. In the living room is traditionally hidden behind the TV, for the kitchen recently appeared very interesting solutions with furniture products or worktops. Such hiding in the table model can be used in other areas of the apartment.


How to connect sockets in a modular product?
Let's consider the scheme of work on an example of a block of three elements.
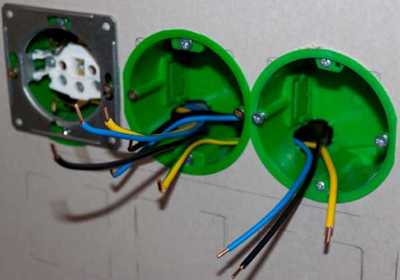
First, out of three wires, the jumpers are made and inserted into each podzetetnik (in each seat), not very long, so that in the future they do not interfere with the installation.
Then disassemble all the installation devices. Wires or cables coming from the junction box are cleaned. The jumper wires between the junction boxes are also peeled.
Advice! It is better to leave a small supply of cable from the junction box when sweeping. In the future, you will have the opportunity again to clean the wires and make a new connection.
The first device is connected as a normal wiring device for 220 volts. The device itself is installed in the back box by level. Wires of the same color are connected in parallel. Then the second device is installed. The third leads to three wires. The reliability of installing all devices is checked, the common lath and front panels are mounted.
When installing the unit in one common junction box from the junction box, connect the first outlet, the remaining devices are connected to it through the screw terminals.
The installation of a module for labor-intensive purposes is a little more difficult than connecting a conventional wiring device with 220 volts. Having shown attention and accuracy in work, it is possible to perform this work to any person.
Sources: http://elektrik24.net/provodka/vyklyuchateli/s-rozetkoj/kak-podklyuchit-8.html, http://jelektro.ru/vse-o-elektromontazhe/podkljuchenie-bloka-rozetkivykljuchatel.html, http: //bouw.ru/article/kak-podklyuchity-blok-rozetok-ili-blok-rozetka-viklyuchately
From the outlet, the switch and the light bulb, the electrical wiring of any room begins, whether it is an apartment,
house, garage or cellar. Ability to perform will always be relevant always and everywhere, with
any repair, redevelopment and construction. In this article you will find a detailed guide, in which this issue is considered in detail. Following step by step instructions below, you can easily run circuit diagram of the switch and socket, learn this yourself and be able to teach others. So, let's move from words to deeds. Let's analyze the question from the very beginning to the end. The installation of any electrical circuit always begins with a junction box. Next, the wires, subwindows, protection devices electrical circuit, sockets switches and fixtures. Let's go in order.
Mount the installation elements
For maximum clarity and clarity, we will analyze the complete cycle of editing the circuit from beginning to end. Thanks to this, we give the most detailed answer to the question of how to connect a socket with a switch. As an example, let us take the scheme concealed wiring, then what is usually under the layer of plaster.
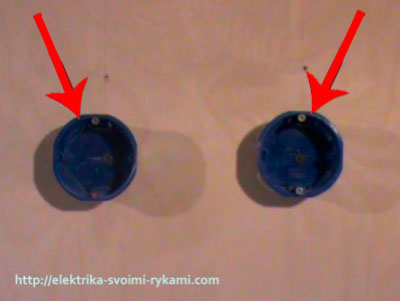
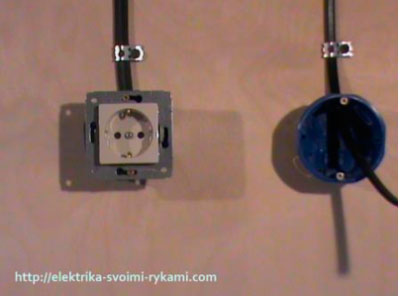
Install the junction box.
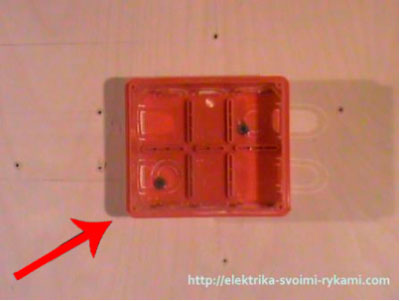
In one we will install the switch, in another socket.
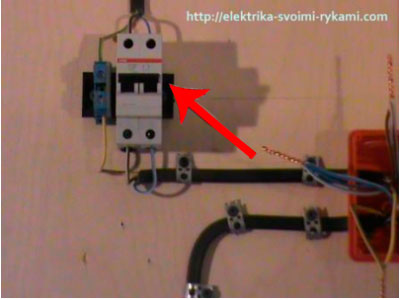
Now we will mount the DIN-rail, in our case it will serve as a part of the power cabinet, it will be equipped with an automatic switch that performs the function of protecting the electrical circuit from short circuits and overloads, which so detrimentally affect all elements of the circuit.
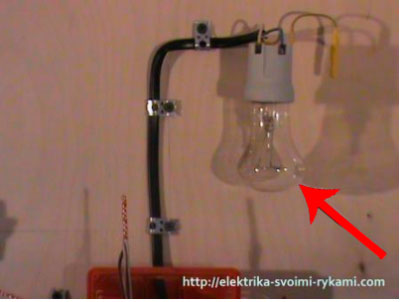
The last detail completing the first stage of installation is the lighting element. In our example, they will have a bulb with a cartridge, clearly, simply and clearly. Therefore, we will postpone its installation to stage number two.
We lay wires
First of all, let's wire the supply junction box. In our example, we use the wire of the grade BBGGPP, the feeder uses a three-wire wire with a cross section of 2.5 squares. The cross-section is selected by the method of calculating the load on the chain, these calculations you can easily perform on their own. Here, you will find a detailed description of that, I assure you there is nothing complicated here.
On both sides it is necessary to leave a supply of wire for connecting the wiring elements (automatic, socket, switch) 10-12 centimeters, in the terminal box 10-15 centimeters. Too short wires will be inconvenient to connect and connect, so it's much better not to save.
Here you need a wire with a cross section of 2.5 squares.

On the switch is 1.5 squares.
Now, lay the wire on the lighting, we have a light bulb with a cartridge.
We have laid all the wires necessary for the execution of the scheme, go to the third stage.
Installation and connection of wiring components
Let's start by installing a protection device. For our circuit we use a two-pole circuit breaker rated at 25 amperes. The choice of the required amperage of the protection device is made after calculating the cross section. Immediately determined with the color of the wire:
- blue, white with a blue stripe - zero (neutral)
- yellow with green stripe - ground (ground)
- the remaining wire will be the phase as a rule it can be black, white, brown, red, orange or white with a black or brown stripe
In our example, there are two kinds of white and white wire color schemes with a brown stripe.
In order not to get lost in the colors of the wires, it is best to use a wire from the same manufacturer.
Before carrying out any further work, it will be necessary to turn off the electricity. Disconnect. Check for absence using the voltage indicator. How to do this is discussed in detail in the article. Remove the outer layer of wire insulation, measure the required amount for connection, remove the required amount of the second insulation layer from the copper core and connect the wires to the circuit breaker. For more information about the connection, see the article.
Now connect the outlet. We clean the wires, measure the right amount, insert the wires into the terminals, tighten the screws, check the reliability of the fixation. More in the article about the connection, you can read in the article.
We establish the mechanism of the socket in the sub-socket.
Next we connect a one-button switch. Prepare the wires, remove the outer insulation layer, measure the required amount and connect the stripped wires to the terminal clamps. Isolate the unused earth wire.
A detailed example of the connection is discussed in the article.
We install the mechanism in the podrozetnik (mounting cup).
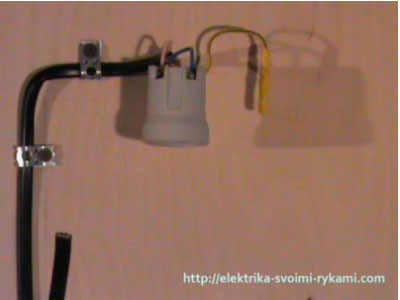
We connect the cartridge. We remove the insulation from the wire, measure the necessary number of phase and zero conductors for connection, clean and connect. Well we extend the contact screws with a screwdriver, we make sure of reliable fixation by shaking the wire left to the right.
All the elements of the circuit are installed and connected, go to the next stage.
Scheme connection of the switch and the socket, connection of cores of wires in the junction box
It remains to fulfill the last final and most crucial stage of the scheme execution. Let's get started.
To make it simple and understandable, we'll start connecting the wires with the switch and the luminaire (in this case the bullet and the bulbs). Prepare the wires, remove the outer layer of insulation. 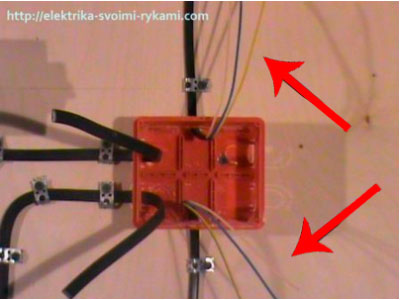
In our example, a three-wire wire is used, the choice is due to its functionality, as it is possible to redo the circuit without problems. For example, a single-key switch can be converted to a two-button switch or, on the ceiling, there was a simple lamp with one bulb, and a chandelier became (in some chandeliers a partial lamp system is used, for example, 10, one key switches to 6, the second switches to 4, respectively). You can also use the third wire as the grounding of the lamp housing or chandelier, for example in rooms with high humidity. Poet extra yellow-green vein, which we now will not use, we isolate and clean in the junction box, that would not interfere.
Now we clean 3.5-4 centimeters of copper veins of all the remaining wires.
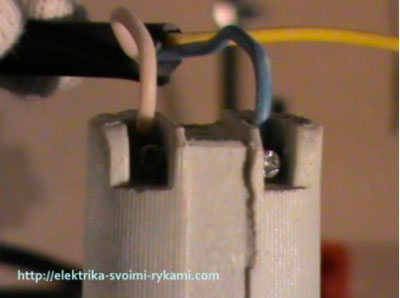
Next, we connect the two wires to each other, the blue core from the wire going from the switch (outgoing phase) and the white phase conductor from the wire going to the light bulb. The connection is done by twisting the cores of wires between each other.
Now, remove the insulation from all other wires.

We clean for the subsequent connection the insulation of all 6 cores by 3.5-4 centimeters.
Two yellow with a green stripe.
And three-phase, one white and two white with a brown stripe.
The scheme is almost complete. Now you need to check the correctness of its execution. We turn the bulb into the socket.
We are twisting in the junction box, so that they do not touch each other and apply voltage to the circuit breaker of our circuit. Turn on the machine, move the lever to the up position.
Press the switch button, the light comes on.

The socket can be checked with the help of any electrical appliance, we insert its plug into the socket and check the operability.
Everything is all right, everything works.
Now we turn off the electricity and isolate twisted strips using an insulating tape.
Gently lay them in the junction box.
The scheme is completed.
Wiring diagram for circuit breaker and socket
Having completed the installation of the circuit with our own hands, we saved:
- time to search and money to call an electrician - 200 rubles
- installation and connection of a bipolar circuit breaker - 300 rubles
- installation of the grounding terminal - 150 rubles
- installation, gluing of the inner junction box - 550 rubles
- assembling of the junction box, method of twisting - 300 rubles
- installation of a luminaire, a chandelier with a connection (450 rubles for 1 lamp, a chandelier from 800 rubles) - an average price of 600 rubles
- installation of a cover ( brick wall 200 rubles - 1 piece), we have 2 pieces - 400 rubles
- installation of a socket of the concealed installation (1 piece for 200 rubles), we have 2 pieces - 400 rubles
- installation of a one-button switch - 150 rubles
- the installation of the wire is open on the wall up to 2 meters (35 rubles - 1 meter), for example 4 meters - 140 rubles
- installation of wire open wall, ceiling, over 2 meters (50 rubles -1 meter), for example 15 meters - 750 rubles
- shtroblenie walls 19 meters (120 rubles - 1 meter) - 2280 rubles
Total our savings amounted to: 6220 rubles
We also received a detailed answer to the question of how to connect a socket with a switch and learned how to execute the circuit independently and now we can safely use the knowledge gained.