How to fix a flat hood. How to install the hood: its features, varieties and installation
- electrical safety
- Ventilation issues
- Air duct
- How to draw a hood in the kitchen
- Electric installation
- Cleaning and care
Installing the hood with your own hands - it's quite feasible home master, even if the kitchen is already framed and repairs are not expected in the near future. Under one condition: the hood must be reliably grounded or unscrewed (the metal parts are connected to a "dead" neutral). Also, you need to determine in advance what type of hood is best for your kitchen. With this and begin.
Types and classification of kitchen hoods
By the principle of action, the hoods are divided into evacuating and circulating. The first throw out the air outside, the second - run through the filter with the scent absorber and release back into the room. The evacuation hood can be turned into a circulation hood, replacing the air duct with a carbon filter, similar to those used in gas masks.
Circulation hoods do not interfere with proper ventilation, but they are not very popular: they are more expensive, the filter does not provide 100% purification and requires periodic replacement. In addition, the evacuation hood also throws away excess heat, and circulating - no.
In the place of installation, the hoods are divided into built-in (integrated), desktop, fireplace and island ceiling. Table hood - horizontally located elongated bell, which is part of the technological kitchen equipment. It is used in professional kitchens.
Fireplace hood - a separate device and an integral part of the design of the kitchen. Fireplace hoods are put in elite kitchens and are often designed individually. Ceiling island exhaust - a few air intakes in the ceiling. For the device requires a false ceiling and a developed system of air ducts; its installation by its own forces is complicated and requires considerable expenses.
Thus, for a city apartment or a private house of an average secured owner, the only acceptable option is the hood-hood built in the kitchen furniture above the hob. In fact, this is the same fireplace hood, only simpler and cheaper.
Video: a bit about choosing a hood
electrical safety
The kitchen extractor refers to the category of electrical appliances that create an increased risk of electric shock. In the extract, fat and moisture settle, it creates conditions that favor electric breakdown from the fan motor to the metal casing. The kitchen, in turn, is, from the point of view of electrical safety, a room with increased danger: it often has a high air temperature combined with a high humidity.
Therefore, the kitchen hoods are connected to the mains by three wires: phase, zero, and earth, in yellow insulation with a longitudinal green stripe. Before installing the hood, ensure that it is properly grounded.
If the house is equipped with a ground loop and eu-sockets, there is no problem: during installation, the ground wire is connected to the earth plug of the plug; it is indicated by a special icon in the form of three parallel lines of different lengths. But most residential houses have no grounding loop. In this case, you must provide the ground yourself.
Protective earthing device
For protective earthing, there is no need to dig a trench and clog the pins. And in any case, you can not ground the hood to a plumbing, heating, and even more so gas pipe. You need to connect to a blank neutral.
Open the opening flap in the apartment or in the entrance (only carefully - there is 220 V!) You will see that the electrical wires in the flap come out from the walled pipe. Most likely, it will be a threaded pin with some already connected ground. This is the blank neutral: this pipe is perfectly grounded. From it you need to bring to the installation site of the hood flexible multi-wire with a cross-section of at least 2.5 sq. Mm, and draw the hood to the mains through a 6.3A automatic disconnector.
A warning:if other earth connections are connected to a blank neutral, do not unplug them at all in order to "plant" their own. This is dangerous for the life of both your and other consumers. Fit your terminal over and tighten with a nut. If the neutral pipe is smooth - gently prune it, and pull the grounding wire by pulling on the clamp. It is best, of course, to agree on this directly with ZhEKovsky electrician.
Ventilation issues
Installation of a kitchen hood almost always violates regular ventilation in the apartment. Most often it is recommended to pierce an additional window for it, leading either to the ventilation duct or to the street. Both of these methods do not solve the problem.
From the additional window in the ventilation duct its cross-sectional area does not increase. At best, the hood will throw three-quarters of the children's food into the ventilation, and a quarter will go back to the apartment. And with a strong wind or draft from the lower floors, everything can go back. Or get to neighbors who, as you know, are far from always tolerant and benevolent.
Kitchen hood with flapper
The outward ejection, firstly, requires a project coordinated with the operator, as the bearing wall is affected. Secondly, it is inevitable that the condensate will settle in the air duct and on the fan motor, which approximates the probability of breakdown to 100%.
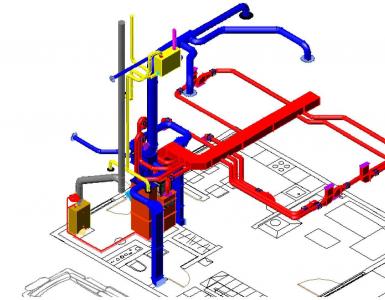
Meanwhile, the way out of the situation has long been known: an additional piece of air box with a clapboard valve. His device is clear from the picture. We give only a few explanations:
- The window under the exhaust duct is square with a side equal to 3/4 of the diameter of the duct. In this case, the area of its cross-section will be equal to that of the duct, the perimeter will be slightly smaller than the circumference of the duct, and the connection will not cause difficulties.
- The damper is made of 0.5 mm aluminum (better) or thin and rigid non-flammable plastic sheet: glass fiber glass with a thickness of 0.5 mm or fluoroplastic. But the best damper is aluminum. The smaller the specific weight of the material of the flap, the more clearly triggered the cracker.
- The damper is pulled up by a thin weak spring so that it, forcibly lifted to the upper position and released, smoothly dropped into place. A rigid, slightly tensioned spring is not suitable. The diameter of the wire from which the coil spring is recommended is 0.2 - 0.3 mm, the diameter of the spring is 3-5 mm, and its length is 120-150 mm.
Note:familiar with the electronics of the master sometimes make a damper with the control of the electromagnet, triggered when the exhaust fan is turned on. There is no sense in this: a spring-loaded damper is self-regulating. If the natural outflow of air increases with the hood turned on, the flap, which has been raised up to the stop, will lower to a certain intermediate position, and as much ventilation as it can pass through the ventilation duct.
About odor neutralizers
The hood above the stove is often supplied with an odor neutralizer. Neutrals on sale are of three types: chemical, electro-ionization and ultraviolet. Let us consider which one is preferable.
- Chemical neutralizers require a periodic, and quite frequent, replacement: their active element is tightened with a fat film, not yet developed its life. In addition, chemical neutralizers themselves emit evaporation into the air, they do not have odor, but can be harmful to health.
- Electroionization neutralizers are arranged in the same way as a conventional air ionizer. But, since the concentration of impurities in the air above the cooking surface is much higher than in the living room, the discharge has to be created stronger, up to the visible "crown". The ionizer itself is closer to the person working at the plate, and it can be exposed to an electric field with an intensity higher than the allowable one.
- Ultraviolet neutralizers require periodic cleaning of the lamps from the deposit of burning. Lamps have to be changed about once every two years, the price is not a penny. But the ultraviolet neutralizer is completely harmless and safe: the ultraviolet lamps emit a few times less than the sun on a clear summer day. Along the way, the question of lighting the hob is also solved: in addition to ultraviolet light, the lamps emit and visible white or slightly bluish light.
Air duct
Kitchen hoods are not equipped with a duct. Its best option is a corrugated aluminum pipe with a diameter equal to the diameter of the top opening of the hood cap. The aerodynamic resistance of the corrugation at a length of up to 1.5 m is completely lost against the background of losses from accidental vortices in the ventilation. But the corrugation can be cut with ordinary scissors and simply molded into a square in order to mate with a cracker. And most importantly - the corrugation never tones and does not rumble, and the hard box resonance properties can suddenly change, and the hostess will have to prepare for the accompaniment of a monotonous itchy sound.

Often, the hood of the hood looks quite unaesthetic, so it's better to think in advance about the location of the plate or where to hide the nondescript element.
How to draw a hood in the kitchen
Tool
For the hood device, you will need to buy or rent a jigsaw with a clean cut saw. The rest of the tools are ordinary household tools.
Clapper
Installation of the hood in the kitchen begins with the manufacture of a box with a cracker. Material - thin aluminum, sheet metal or galvanized. For the convenience of work, the cracker should lie on the cupboard above the stove. Further, in the ventilation window, the cracker will be planted on the mounting foam, and to the cabinet it will be glued with mounting glue or silicone; this will exclude resonance.
But first we only try on the cracker, and on the upper board of the cabinet we mark the hole corresponding to its lower window. This can be done with a pencil right from inside the cracker, removing the shutter for a while. Also delineate the sides of the crackers - this is necessary for accurate final installation.
Further, we free the cabinet, remove it, and cut it in the bottom board with an electric jigsaw by the size of the lower frame of the hood. For cutting in advance, inside the contour of the hole, we drill an auxiliary hole with a diameter of 8-12 mm, we thrust a saw blade into it and cut it out along the contour. If you are not a very skillful master, do not get upset because of flaws: with the described method of installation they will not be visible.
The next step: in the upper board of the cabinet cut out a square hole under the window of the cracker, with an allowance of 3-5 mm in the sides. It already requires a certain amount of accuracy: if the corrugation too "leaves" from the window of the cracker, you have to "smear" a lot with silicone. True, from below it still will not be visible.

A typical layout of the kitchen hood
Corrugation
We put the cabinet "on the back", pierce through the holes a piece of corrugation of the desired length. Its upper end is formed by hands in a square (or in a rectangle, if due to a configuration ventilation window the flap and its window had to be made oblong), thrust into the upper hole. Angles for 1.5 - 2 cm cut with scissors and bend outward.
Installing a cracker
We hang the cabinet with corrugation in place. On the bent strips of the corrugation at the top, and on the tree in the corners between them we apply a "sausage" of silicone without breaks. Having tilted the box with the cracker up, we put it into the ventilation window, we put it on the board of the cabinet exactly between the marks. If the silicone on the sides is too much, then immediately remove the stains with a cloth moistened with table vinegar.
Approximately half an hour (the building silicone seizes fairly quickly) blow out the foam between the edges of the cracker's box and the edge of the ventilation window. It is better to do this with a foam gun: it has a long nose and it gives a thin stream.
Mounting the hood
The hood from the bottom is inserted into the cutout of the cabinet. Corrugation at once does not have to be worn: the hood will simply press it upwards. Attach the hood with screws to the cabinet through the mounting holes. We put the hood on the branch pipe and fix it with a yoke or simply wrap it around with a soft wire. Sealing is not necessary: this will make it difficult to disassemble for cleaning, and at the point of transition of the branch pipe to the corrugation according to the laws of aerodynamics, the pressure will always be less than atmospheric pressure. In addition, the corrugation protrusions, smashing under the yoke or wire, will in themselves already give a sufficiently tight connection.

If there is no cabinet and the bell is large
The wardrobe above the stove is not hung by everyone, for fear of a fire. And the hood works better if the socket is the size of the plate. In this case, a U-shaped frame from a corner of 20-25 mm on five screws in dowels is fastened to the wall under the bell to the wall. If the wall with plating is also on 5 collet pins 4-6 mm in diameter.
The air duct is hidden in a PVC box of the appropriate size; it is then pasted with a self-adhesive film of the desired color and pattern. Doing in the wall a pipe under a pipe with a diameter of more than 100 mm with modern wall thicknesses is unrealistic, and on the upper section of the box the cracker fits in no way worse than on the cabinet.
Electric installation
Wiring for the hood must be laid in advance. How - depends on the design of the kitchen. If the hood is turned on with a plug into the outlet, then you can just throw it behind the furniture. If the connection is permanent through the machine, the wiring should be hidden in a PVC box, under the baseboard or behind the wall paneling.
With constant connection, the machine MUST be included in the phase break, and during installation the machine is switched off and the ends of the supply wires, even not exposed, are wrapped with electrical tape.
When connecting the hood, first connect the ground. If, suddenly, the hood is connected with two wires, the grounding wire must be connected by loosening a few screws at the back, pushing the bare end of the ground wire under the hood frame and tightening the screws. The main principle of connecting the protective earth: connect where it can strike.
Cleaning and care
The hood, approximately every six months, must be cleaned from burning, otherwise fire may occur. For cleaning of the hood, which is mounted by the described method, weaken the retaining corrugation on the branch pipe, remove the corrugation, unscrew the screws holding the hood, and remove the hood. Now all parts of the hood are easily accessible for cleaning from the inside. Only the corrugation should be cleaned carefully: it is thin, and it is easy to damage. But the replacement, if necessary, will cost a penny. The silicone joint at the top without special efforts is cut with a thin sharp knife.
Video: an example of installing a kitchen hood with your own hands
1) When mounting the hood with the use of boxes, a preliminary departure of the master for measurements is required - 500 rubles.
2) I drank a hose for broaching, rework in the air vent and corrugated hose is paid separately - 450/650 rub.
3) Cashless payment is possible with an additional charge of 2% to the amount, provided that the amount of the service exceeds 3 000 rubles.
The price of installation and installation of the hood depends on the type of equipment and the complexity of the work. Our specialists will be glad to offer you a complete connection of the exhaust hood, while you will be presented with a gift - up to 5 m of cable free of charge!
Complex installation of household equipment differs in cost from installation to ready-made communications.
The hood in the modern kitchen becomes an integral part. The functions performed by it are very extensive - removal of odors, steam, burning, air purification - all this can be done with a properly installed hood. However, the hood, like any other device, has strictly defined operating conditions and needs to be installed by a specialist.
Materials for installation of hoods
| Hood for extracting | |
| The box (plastic) | |
| Adapter (plastic) | |
| Turn for the box (plastic) | |
Knee joint (plastic) |
|
| Flange for air vent | |
| Metal clamp 145-160 mm |
The installation of the kitchen hood must be carried out in strict accordance with the instructions. Let's consider the basic stages of installation of the hood, which consist of mounting the hood, connecting to the ventilation, connecting to the electrical network and checking the operability of the appliance.  Proper installation to the ventilation system determines the speed of air purification, and a qualitative connection to the power supply and protection from power surges will provide safe operation. Unfortunately, the installation scheme of this equipment does not give a complete picture of some important nuances, therefore installation and installation of this device must be done only by a professional!
Meanwhile, it is important to keep in mind that the types of hoods are different. From this in many respects depends the feature of connecting the hood in the kitchen. The general rule is that the distance from the hood to the cooker should not be less than 75 cm.
When installing a built-in hood of electrical installation works it is necessary to produce and adjust the kitchen interior to the dimensions of the hood.
In principle, there are different types of dome and island type hoods. This is due to the peculiarities of their design. It should be taken into account that the island type hood does not cover the entire surface area over the kitchen stove. Dome hood, on the contrary - covers the hob completely and requires the required installation level.
Kitchen hoods of the Modern type mean, at installation, installation of a socket with grounding, placing the hood on the prepared fixtures, mounting the corrugated hose from the ventilation hole to the hood.
 The cost of installation of kitchen hoods in accordance with the type:
Kitchen hood "classical" (m \\ pcs) - 1950 rub. + cost of materials, or 2000 rubles when using customer's materials.
Kitchen hood "dome" (m / piece) 2000 rub. + cost of materials, or 2500 rubles when using customer's materials.
Kitchen hood "island" type - (m \\ pcs) - 4000 rub. + cost of materials, or 4500 rubles when using materials of the customer.
Price for materials:
| Material (m / piece) | Price, rub.) |
| Gofra 1 m | 800 |
| Plastic box 1 m | 600 |
| Knee joint (plastic) | 250 |
| Turn for the box (plastic) | 250 |
| Adapter (plastic) | 250 |
| Flange for air vent | 250 |
| Tightening clamp 150-200 mm | 150 |
| Drank in the closet and shelves (depending on the complexity) | 400 |
| Dismantling of an old hood | 400 |
| New cabinet installation service | 800 |
| I drank a hose rope for broaching | 350 |
| The price of dismantling the old hood | 400 |
How to install the hood correctly? Only a professional can cope with this task, or will there be enough of our own knowledge and strength? This question is faced by a large number of people, and each decides for himself how to act in this situation. Of course, the best option is to install the device by a specialist. And this is understandable: so you are guaranteed to get rid of errors during installation and you can be sure that the technique will work after installation properly. However, if you still decided to try to mount the hood yourself, it would be superfluous to read our instructions.
The fact that modern cuisine can not do without this miracle of technology, everyone knows. But often the buyers are faced with the question of how to hang the kitchen hood correctly, so that it will most effectively clean the air rising from the stove, or remove it from the room. To do this, follow the simple guidelines.
The main rule, which is important to observe, concerns the selection of the hood. Even if you are well aware of how to hang a structure, but it does not match the dimensions of an electric or gas stove, all diligence will be in vain. The rule says: the breadth of the kitchen worker must match the width of the plate (Figure 1).

The next main question: at what installation height is the hood installed? When the exhaust design is too low in relation to the plate, cooking becomes inconvenient. Therefore, when choosing the installation height, consider the growth of users. They should be comfortable to operate and operate the device. And an excessively high location will not allow the efficient capture of fumes. Experts advise to observe the height of the installation in 65-75 cm from the electric plate to the hood. For gas stoves, the optimum height will be 75-85 cm (Figure 2).
Varieties
Classification of extracts is carried out by type and place of installation:
dome (mounted to the wall like, under the suspended kitchen cabinet, and independently of it);
fireplace (according to the installation actions it does not differ from the dome type);
island (installation of this type of hood means fixing to the ceiling, provides more space in the room);
angular (installation is carried out in the corner of the kitchen);
built in with a sliding panel (mounted in a suspended kitchen cupboard);
flat (fastened with the back side to the wall, and the top directly to the cabinet itself).
Features
Kitchen hood, depending on its installation, can work in the following modes:
- assumes that all air is diverted outside the kitchen. This mode is most effective, since the technique removes all cooking fumes in the ventilation shaft and creates a low noise level. To connect the hood to this mode of operation, it is necessary to purchase a plastic duct (or its analogs) and additional adapters (Figure 3).

The mode of "filtration" (recirculation) - means that the hood is not connected to the ventilation system, it is based on the principle of air recirculation. In this case, all the air, passing through the carbon filters, is cleaned and goes back to the kitchen. To operate the device in this mode, special carbon acrylic filters are installed on the engine. Usually, in four months they require replacement, that is, two or three times a year. After this time, the carbon filters should be replaced with new ones to improve the efficiency of the device. It must be said that it is easier to mount the unit operating in recirculation mode, since it is not necessary to take into account the connection to the ventilation system. But it is necessary to recognize that the productivity in this case is reduced in comparison with the regime based on the removal of air into the ventilation shaft (Fig. 4).

Performance
The productivity is measured in cubic meters per hour (m 3 / hour). In order to understand what your hood should have, you need to determine how much air it can take out of the room in one hour of operation.
Therefore, in order to choose exactly the device that will fit the dimensions of your kitchen, you must first determine the air exchange in the room. To calculate the volume of the room-rectangle, multiply the parameters of width, height and length.
Length x width x height = room volume m 3
A x B x H = V (m 3)
For example, if you take a room with a length of 4 m, a width of 3 m, a height of 2.5 m, then its total volume will be 30 m 3. According to SES ( health standards), the air must be in time to be updated in the room where food is prepared, for one hour at least 10 - 12 times. Therefore, the resulting volume of the room is multiplied by at least 10. As a result, a properly selected hood for a kitchen with a volume of 30 m 3 should have technical characteristics for a capacity of 300 cu. m / hour.
And considering that the technique should not constantly work at full strength, we recommend to focus on a slightly higher value, i.e. taking into account the power reserve. Usually the obtained performance value is advised to multiply by a factor of 1.3.
Total, 300 x 1.3 = 390 cubic meters. m / hour.
For efficient operation of the hood in the table below are presented specifications on productivity (m 3 / hour) taking into account the minimum reserve factor depending on the kitchen area and ceiling height.
| Productivity, m 3 / hour | Ceiling height, m | ||||||
|---|---|---|---|---|---|---|---|
| 2,5 | 2,7 | 3,0 | 3,2 | 3,5 | 4,0 | ||
| Kitchen area, m 2 | 6 | 234 | 253 | 281 | 300 | 328 | 374 |
| 7 | 273 | 295 | 328 | 349 | 382 | 437 | |
| 8 | 312 | 337 | 374 | 399 | 437 | 499 | |
| 9 | 351 | 379 | 421 | 449 | 491 | 562 | |
| 10 | 390 | 421 | 468 | 499 | 546 | 624 | |
| 11 | 429 | 463 | 515 | 549 | 601 | 686 | |
| 12 | 468 | 505 | 562 | 599 | 655 | 749 | |
| 13 | 507 | 548 | 608 | 649 | 710 | 811 | |
| 14 | 546 | 590 | 655 | 699 | 764 | 874 | |
| 15 | 585 | 632 | 702 | 749 | 819 | 936 | |
Table. Calculation of hood productivity
It should also be taken into account that the more performance characteristics, the higher the fan speed, which in turn begin to make noise.
For effective operation of the device it is necessary to take into account not only the area of the room, but also the number of family members, and how often you prepare (Figure 5).

This is the optimal performance of the hood, which will allow it to successfully cope with the tasks assigned to it and to work long in your kitchen.
Ducts
Another important point when installing the hood in the kitchen is the installation of the air duct. He, by the way, can be made of plastic or semi-rigid aluminum. The first option is better, but more expensive, the second option is cheaper.


 Fig. 8. Connection plastic ducts with ventilation grille
The installation of a plastic duct (Figures 6, 7, 8) is more complicated, as it requires adapters, a ventilation grille (wall cuff), all possible connectors, horizontal and vertical bends (Figure 7) in the form of the letter "G". Also, special adapters (Figure 10) (reducers) will be needed, allowing the transition from round to rectangular. In addition, you can use an adapter and another version, which will simplify the transition from a larger diameter to a smaller one (Figure 11). It is designed to connect the air duct to the exhaust outlet of the hood. A large number of additional parts (Figure 9) of various types allow you to mount any type of complexity. Such installation is not easy (especially for a beginner), but such air ducts have almost no shelf life and prevent excessive noise generation during operation of the device. We recommend that you choose this option - a rectangular or circular PVC product.


For corrugated air ducts (made of semi-rigid aluminum), only a grid with a fitting is required, a plastic adapter (included in the hood) and two clamps (Fig. 12a, 12b). During installation, it is stretched along the entire length to remove the folds. Because of them, noise may occur during operation.


It should be noted that corrugation is much inferior in terms of its aesthetic and performance characteristics of the duct system of plastic. Firstly, it is unattractive, difficult to mask, and always striking. Plastic is more attractive in appearance and such a system can be laid on top of cabinets in such a way that it will be virtually invisible. Secondly, corrugated is more inclined to increase noise, rather than air duct from PVC, which has better sound insulation properties.
To achieve maximum duct productivity, it is best to choose as short a length as possible. This will reduce the noise level during the operation of the hood, and also improve the quality of the removal of bad air from the room. Bends at an acute angle and pipe turns of 90 degrees are not desirable.
If you are only interested in correct installation hoods in the kitchen, then it is necessary to select the air duct system so that the air duct has the largest possible diameter. This will significantly reduce power losses, which will go to "pushing" air mass. Consequently, the efficiency of the exhaust design will be higher.
Reducing the diameter of the duct is not recommended, but if you need to use a smaller channel cross-section, you need to use a special adapter (Figure 11). In this case, the cross-section must be reduced by only one step. Timeliness of the constriction allows avoiding unnecessary power losses, for this purpose the adapter is usually mounted on the site of the outlet flange of the hood. The standards for the inner diameter of the exhaust channel of the exhaust structures are 100, 120 and 150 mm.

It is convenient when the ventilation is on the same side as the extractor. Then the duct system is held at the top of the kitchen cabinets (Figure 13). If the ventilation duct is located on the opposite wall, then the duct will have to be laid on the ceiling. In this case, it can be hidden in special boxes, painted in the color of the ceiling or walls.
If the ventilation system is routed through the attic and other cold rooms, premature cooling of the air occurs in it, and condensation may form inside the individual sections. This phenomenon will lead to the fact that with the passage of time, the thrust force becomes insufficient and mold will start to form. In this case, it is necessary to insulate the ventilation inside the house with heat-insulating materials.
Conclusion
Compliance with these rules will ensure high quality of the hood. All these measures will prevent the emergence of additional loads on the motor of the device, which can affect its performance, caused by aerodynamic drag in the duct. If you do not follow these instructions, this could cause an incorrect air discharge and motor overload.
In order to install the hood correctly, read our installation instructions for aggregate data of various varieties. We will describe in detail how to mount
No modern kitchen can do without stretching. They are relevant in separate kitchens, but are especially important when the apartment is a studio where the kitchen space is combined with the living room and all the smells immediately spread throughout the room. The article will tell you how to choose and how to build the hood in the kitchen with your own hands.
The method of mounting the extract directly depends on its model. So first we need to consider what types of hoods are there.
Types of kitchen hoods
A hood is a device that filters air over a stove or hob. Classify them according to several parameters.
The difference in the method of air purification
- Hoods with a flow cleaning system. They perfectly cope with the purification of air from oily fumes and soot. Connect directly to the ventilation shaft. For maximum efficiency, the size of the hood must match or be larger than the hob. To handle the flow system, it installs powerful and quite noisy motors.

- Hoods recirculating. They have carbon filters. Passing through them, the air is cleaned and gets back into the room. Filter cartridges need to be replaced often, they can not be washed. Most often this system is equipped with flat models of hoods.
Tip: the filter is in any type of hood. But somewhere it consists of several metal lattices in the collection, which can be washed, and somewhere it is disposable coal. If in recirculation models its function is clear, then in flow-through hoods it protects the ventilation shaft from large fat particles.
Important. Modern models of hoods are equipped with a special system ARS. As soon as something burns on the stove, it automatically turns on. In addition, it has a motion sensor, it is closer to it, the backlight is brighter.
The difference in the method of attachment
- Dome or fireplace. These are high-power devices. Often complemented by great functionality. They attach themselves to the wall above the stove, occupying the whole space above themselves. Do not need to change the filters.
- Built-in. These compact models are almost invisible on the kitchen set, as they are built into a special niche. They require direct connection to ventilation, which allows them to cope with fat and unpleasant odor. Lattices are metal and require their regular cleaning. Washing in the dishwasher is acceptable.
- Island. They require a lot of space, since they are attached to the ceiling above the stove. They are equipped with a powerful motor that can quickly cope with the cleaning task. This is due to the fact that they are often installed in the middle of the kitchen, above the working island. Extracts from this category have beautiful designs and a high price.
- Flat. Mount in the case where there is no access to the ventilation shaft. This self-contained device works from the network. Has a medium-power fan that drives dirty air through replaceable cartridges. The cost of the hoods themselves is low, in contrast to the filters that will have to be bought periodically.
- Corner. Relevant if the stove is located in the corner of the kitchen unit. Due to the popularity of the mold, it is produced with flow and recirculation systems.
Important . When choosing a model, one should pay attention to its height. During installation, it should be located above the gas surface at a distance of 75-80 cm, and above the electrical surface - from 65 to 80 cm.
What type of hood to choose
Extract is selected at the design stage of the kitchen set. It is necessary to know in advance its exact dimensions and method of attachment. In addition to these parameters, it is necessary to take into account the noise level (especially important for studio apartments), management method and operating modes.
Tip: The power of the hood should be calculated based on the overall dimensions of the kitchen.
Power
- As a rule, household hoods all have almost the same power. But there are interior models that have a beautiful design, are low-power and they need to work for a very long time to clean the air.

- If the cleaning system is chosen for public catering places, then the power index is very important. The higher it is, the better.
- To accurately calculate the power, it is necessary to resort to the formula, which consists of the ratio of the cubic volume of the kitchen and the productivity of the hood. For example, the length of the kitchen is 6 m, the width is 3 m, the ceiling height is 3 m. The cubic volume is 54 m³. The resulting value is multiplied by 10 to obtain 540 m³ / h. It is in this form and indicates the capacity of the manufacturer in the characteristics. The resulting value is the lower value when selecting the hood, otherwise the model will not cope with air purification.
Modes of operation
- Almost all modern hoods have several modes of operation. In some cases it is a pushbutton switch, which you can select from one of two modes. But more often - a few buttons (4 or more). More expensive hoods have touch control.
Noise level
- The degree of noise is affected by the air capacity (the parameter that is calculated with the volume of the kitchen) and the power of the fan. The higher they are, the higher the noise.
- But, as a rule, low-cost options rustle more strongly because of the lower quality of the materials used. Therefore, it is worth checking its work even when buying in the store.
At what height is the hood correctly installed

- On average, its lower edge should be above the plate by 65-90 cm. The lower, the more effective its work. But if you fix the hood below 65 cm, its individual elements may deteriorate due to high temperature, too strong steam or fatty spray. And it will be inconvenient to cook. To put above 90 cm it is possible only in the event that the owner's growth is high and the capacity of the device is sufficient.
Tip: if the cooker is electric, then the mounting height of the hood is 65-70 cm, and if it is gas, then 75-90 cm.
Installing the dome hood with your own hands
- Dome hoods have a flow filtration system and require direct connection to the ventilation shaft. To operate the fan next to it should be located socket.
- Before assembling the hood, the kitchen set should already be installed. Given the height and width of the product, markings are made under it.
- The hood should be firmly attached to the wall. Therefore, under the fittings for the hood in the kitchen, first drill holes (if the wall is wooden) or hollow out with a perforator (if concrete or brick). In them insert dowels and to them with bolts fasten fastenings for an extract (which goes in the complete set).
- When the frame is fixed on the wall, it is time to connect the hood with your own hands. For this, on top Domes put the corrugation up to the air duct and tighten it tightly with a yoke. The second end is brought to the ventilation grate and fixed. In order to get it sealed, they sell plastic contours.
- With the help of a lit match, check the efficiency of the hood and if everything is good, the corrugation is covered with a decorative cover that is provided with the hood.
How to install a built-in hood with your own hands
Unlike the dome hood, the built-in is almost invisible on the kitchen set. It is installed either in a hinged box or in a sliding panel. Consider an easier way to install in the locker.
- Hinged case, in which the hood is built, is ordered strictly according to its size. These characteristics must be included in the instructions for the hood.
Tip: if the kitchen is already ready, then you have to make a fit for the size. And if the cabinet itself can be reduced independently, then its facade will have to be ordered anew.
- Since the hood is built-in, its lower edge should be in the level of the cabinet. Therefore, the bottom is raised to the height of the device and screwed to it. The weight of the structure is quite large, it is necessary to carefully assemble the cabinet. The bottom is recommended to be fixed to the Euro-screws.

- The cabinet will mask the air duct. In it a hole is cut for the corrugated tube. If the ventilation shaft is located in the wall behind the cabinet (this is often done in country houses especially for drawing), then saw out and back. If as in the apartment at the ceiling, then the upper one.
- The cabinet is put on the floor, on its side and to it, on self-tapping screws, screw the hood body. Then everything is put in place and firmly fixed. Due to the high weight of the cabinet with the hood, it is not enough to attach it to the wall with the bolts. For reinforcement, the metal profile for the hinged cabinets is first screwed to the wall, and the assembly is already hung on it.
- Then the hood is fixed to the hood and ventilation. The hood is connected to the outlet and tested for operation. It remains to attach the facade of the cabinet, and the work on this is over.
How to install a flat recirculation hood
- This is a suspended structure that hangs over the hob. Since the purification system in it is recirculating, therefore, it does not have an air duct and its shape is flat.

- On the hood there are holes for its fastening on the wall. Under them in the wall, the perforator makes holes and inserts the dowel-nails.
- To them are attached awnings (if they are included) and they are attached to the hood.
- It only remains to connect it to the network and the hood is ready for operation.
The principle of installing the hood is simple, but there are nuances that will determine the quality of its operation and ease of use.
How to properly connect the duct to the hood
- Only with the independent construction of the house can you design a vent in the kitchen under the hood in such a way that it will be located side by side and only a small adapter is needed for the connection. In all other cases, either a flexible corrugated tube or a plastic rigid pipe for the duct is used.
- If the choice fell on a plastic smooth pipe, then fittings in the form of turning corners are needed. It will also require at least 2 adapters, which connect the duct with exhaust and ventilation.

- All junctions fit tightly to each other, but to achieve complete tightness they put on the sealant.
- The main advantage of such a pipe is a beautiful appearance, which does not need additional decoration with screens and boxes.
- It is much easier to work with a plastic corrugated tube, but because of its low aesthetics, it is desirable to disguise it.
- If for a lining to ventilation it is necessary to skirt pipes or corners, the corrugated tube is simply irreplaceable. It easily bypasses all obstacles without additional connecting elements.
- Goffre sell a different diameter, you need to choose the size of the hole on the hood.
- One end of the corrugation is attached to the hood and tightened with a yoke. Fixation is durable and no additional insulation is required. To the ventilation it is fixed with a grate.

Tip: if there is a suspicion of deterioration of the hood, replace the corrugation. When used in it, grease and burns settle, which hinder effective operation.
How to properly connect the duct to ventilation
- Ventilation is in every apartment, located in the kitchen and bathroom and is a grille and an opening behind it, which leaves in ventilation system The mines of the house.
- To attach a hood to it, a special shield is bought in the household goods store. It is the same size as the grille on the ventilation.
- The grill is removed and a flap is fastened to its place, which is made of cast plastic with a round hole for the duct of the air duct.
Unfortunately, direct connection though and simple, but has an important drawback. When designing old houses, ventilation was not provided for using it for hoods in each apartment. Therefore, through the common channel, the smell through the hood can be tightened into the neighboring apartments. In addition, the pressure of the air flow in the mine will change, and only the most powerful hoods can extract air into it.
- To avoid this, you can invite a specialist ventilizers, who after a survey on the spot will give recommendations on choosing the model of the hood, its power. Perhaps, and will carry out the necessary cleaning of ventilation.
- You can also make ventilation yourself by connecting the duct directly to the street through the window.
- The last option is the installation of a recirculation hood, which does not require an air duct.
Tip: in modern houses individual ventilation ducts are provided and there will be no such problems.
Mounting the kitchen hood with your own hands video
Where is it better to place a rosette?
- Very often, the hoods have too short a wire to reach a normal outlet. And in most homes there is no special outlet for it. Therefore, either you have to do wiring and wall shroud, or use an extension cord.
- If repairs are done in the kitchen, it is advisable to make a separate outlet for the hood.
- It should not be located in the immediate vicinity of the plate and sink. It is best to make it up, to the right or left of the hood.
- To protect against voltage surges and burn out of the motor, the socket is grounded.

Assembling and installing the hood is a fairly simple process that you can handle on your own. But it is important to follow the instructions given to the specific model. And then the kitchen, and the whole apartment, will be under reliable protection from burning and strong smells.
Many species repair work you can do it yourself. One such case is the connection of the hood to the ventilation system. Even an inexperienced home master is able to cope with this crucial stage. Especially when the aluminum duct for drawing is used as an air duct. This type of construction material during installation does not require many years of experience and special knowledge.
Corrugated pipe is represented on the market of building materials in a variety of options - these are color models of small diameter made of plastic and a serious culvert from stainless steel. Material, size, color, price - all this for any buyer.
It is difficult for a novice home master to choose exactly what is ideal for solving the problems that arise.
Due to inexperience, it is possible to choose the type of pipe for ventilation, choosing the color or material that harmoniously fits into the interior
What can be corrugation
One of the convenient and simple solutions for the kitchen is the use of a corrugated pipe to connect the hood to the ventilation system. To buy exactly what is required, not to get lost among a large number of proposals and not to overpay for an air duct, you need to sort out a little with the main types and purpose of the corrugation.

Corrugated pipes with a large diameter of 3.0-3.6 m can often be seen under the roads and railways. They are installed to perform culverts
Gofra is actively used by builders and domestic craftsmen as an important element in the arrangement of communications. Its popularity is due to high strength, a variety of sizes and materials, and a long service life.
In appearance, the corrugation is rectangular and round. For kitchen hoods, buy a round air duct.

Rectangular variants of corrugation are more often used in industrial premises
You can often find corrugated pipes made of such materials:
- cink Steel;
- stainless steel;
- aluminum;
- textile;
- high and low pressure polyethylene;
- polyvinyl chloride.
The scope of application depends on the type of material and the diameter of the finished product. To arrange household ventilation, they often buy corrugated aluminum and stainless steel.

The plastic corrugation that connects the hood with the ventilation duct creates more noise than the aluminum analog
According to the manufacturing method, the corrugated pipes are:
- wireframe;
- spiral-winding.
The first type of product is a metal frame, covered with aluminum foil or polymer film. it flexible air ducts. They have the ability to return the original appearance without deformations after stretching the whole length of the corrugation.

Spiral-wound corrugation is made of stainless and galvanized steel, made of aluminum. It is much more expensive than frame analogues
The second type of air duct is made of metal bands. The finished product is half flexible - it can stretch 2-3 times, but it can not return to its original state. It will be necessary to make an effort to give the tube the desired shape, and the deformation traces will be clearly traced.
Many manufacturers offer flexible corrugations with thermal insulation and without. The first option allows you to expand the scope of use of products. So, with the help of four-layer flexible pipes it is possible to lay ventilation ducts both inside and outside the premises. And the distance will not be of fundamental importance.

In the manufacture of thermally insulated products, mineral wool or glass wool
Scope of construction materials
A wide variety of corrugated pipes, which differ substantially in their size and type of material, eloquently testifies to various areas of use of this building material.
Half-length flexible pipes of small diameter, made of plastic and polymers, are actively used for paving electrical cable. This can be a channel for telephone, computer, power and other wires. Most often, electricians use corrugation with a diameter of 1.6 to 4 cm.
Half-flexible corrugation made of galvanized or stainless steel has become one of the actual options for the arrangement of the heating system. In practice, this type of pipe is easier to assemble. The ability, if necessary, to bend any section without breaking the inside diameter of the product helps to easily bend corners and other complex areas during installation.

Gofra of galvanized and stainless steel is much more expensive than aluminum analogues. But the tubes of solid material looks aesthetically pleasing
Flexible corrugated pipe types are used for ventilation systems. The diameter, most commonly used for household ventilation, is from 10 to 15 cm. There are cases when a pipe with a diameter of 20, 30 or more cm is required. Although this is not the running dimensions, it is also not difficult to find the required option.
As for the material of the products, the corrugation, bought by the masters for arrangement of ventilation in the kitchen, is flexible and made of aluminum foil. Variants with plastic material and stainless steel are used less frequently in everyday life.

Such popularity of flexible design is due to the convenience of its installation. The price is quite reasonable and meets the requirements put forward to this product by buyers
Ventilation ducts of textiles are used for arranging communications in production facilities. They do not interfere with the very rapid transfer of air in the room. It is this feature that facilitates their use in meat processing plants, in public catering and other types of premises.

Tissue ventilation ducts can be quickly and easily dismantled. They are not difficult to clean and disinfect
Plastic and polyethylene corrugation is used to connect plumbing, water supply to washing machines, dishwashers and other equipment. With the arrangement of sewerage without corrugated pipe also can not do. Especially in complex areas where the use of a rigid structure can be difficult.
Gofra: how to choose correctly
The wide choice of corrugated pipes offered by the sellers can create certain difficulties in choosing the appropriate option for the ventilation arrangement. Therefore, in order to buy the right product, you should follow these parameters:
- diameter and length;
- material of the product;
- quality;
- price.
The diameter should be in accordance with the recommendations given in the instructions for the purchased exhaust model. If you stay on a larger or smaller version, expensive equipment can at best not cope with its functions to remove smells from the kitchen, and at worst - burn out from overexertion.

Gathered in the store to buy corrugated, you need to carefully study the technical characteristics of the hood, and before buying, do not hesitate to measure the product
Therefore, do not ignore the recommendations given by the manufacturer. Sometimes, together with the hood, an air duct is supplied. It's great if it works in a particular case - the length will be sufficient and the material will suit. Otherwise, you will have to visit the building materials market yourself and purchase a more suitable option.
Another situation when, together with the hood, they offer to buy corrugation immediately. Here you need to be extremely careful, because not always the seller cares about the comfort of the client. He can offer stale or too expensive goods. The length in this case should be measured in advance, so as not to buy extra meters, trusting the seller's experience.

The flexible pipe for ventilation in its original form has a length of 60-70 cm. But it stretches for 3 meters. It is worth considering when buying
The length of the corrugation needed to connect the hood to the ventilation duct is measured by a tape measure. Measure the need to do from the entrance to the hood and to the entrance to the wall. The path should be chosen exactly the one that is to be repeated to the pipe. It should be borne in mind that the corrugation may bend, depending on the technical parameters specified by the manufacturer. For example, by 180 degrees.
The ability to bend under the desired angle allows you to pave the most optimal path. The pipe will be mounted in a stretched state. This point should be taken into account.
The second parameter that influences the choice is the material of the product. Sometimes the color is suitable plastic version. In this case it is necessary to remember the greater noise created by the air duct. If this question is not fundamental, then the range of models can be expanded.

Polyethylene corrugation is not used for ventilation. These products, depending on the diameter, are suitable for transporting and pumping bulk and liquid substances
To buy did not disappoint, do not forget about the documents confirming the quality of the purchased goods. Do not hesitate to ask the seller for a certificate of quality and manufacturer's warranty.
In addition to the document, you should carefully inspect the corrugation - there should be no dents and suspicious scratches. Do not be afraid to stretch the full length of the flexible pipe and check it for gaps or holes - they should not be. If the corrugation is of questionable quality, then it is better to refuse from its purchase.

The flexible pipe will be installed in the ventilation system in a stretched form. Therefore, it is necessary to examine it properly in this condition before acquiring
The price also matters. It's good to buy similar offers from other manufacturers before buying to avoid overpaying. Also, it will greatly help to save knowledge of the required length of the duct.
When choosing, you should consider where exactly the corrugation will be used. If you plan to install it on the street or in systems air supply ventilation, where there will be heating / cooling, then you should pay attention to models with thermal insulation. It is more convenient to buy a finished product, than then by own means to warm a flexible pipe.
Fineness of corrugated pipe installation
Connecting the corrugated to the hood and the ventilation system will be within the power of the domestic master. To do this work, it is necessary to take:
- flexible tube;
- clamps;
- aluminum tape;
- grating with check valve;
- silicone sealant;
- adapters from round to square.
The last point is useful in case when the extractor has a square or rectangular branch pipe, and the corrugation is purchased round.

There are on sale adapters for a smaller and larger diameter. They should be used only if necessary, so as not to reduce the productivity of the exhaust equipment
All the necessary parts are good to buy with the corrugated pipe. This will not make a mistake with the number of necessary spare parts.

All components for the future installation of the air duct should be selected, after removing the measurements on the site of the upcoming installation (+)
If you need to connect 2 or more flexible pipes between each other, you can use aluminum tape. It well connects the material of the metal ducts, provided they are accurately glued to the surface.

Aluminum tape can not only connect two corrugations between each other, but also seal a randomly broken hole
The corrugated pipe must be stretched to its full length. In this condition, one end must be attached to the exhaust outlet of the hood. For fastening it is necessary to use a metal branch pipe and a sealant.

The sealant should be applied only on a dry and clean surface. Otherwise, it can not reliably close the joints
Then, after every 1.0 meter vertically or 1.5 meters horizontally, the corrugation must be pinned with additional clamps. These devices will ensure the correct fixing of the duct. If the ventilation opening is only 0.5-0.8 meters, then no additional clamps will be necessary.

For long distances ventilation duct Do not make sharp corners - each of them will reduce by 10% the productivity of the hood
If the entrance to the ventilation is more than 3 meters, then you need to choose a more powerful model of the hood or stretch corrugated pipe On a straight line under the ceiling to shorten the path. After all, the longer the channel, the more powerful the equipment should be.
By installing additional clamps, it remains to connect the corrugation with the vent by inserting its second end into the corresponding hole in the wall grill.

Wall grilles for ventilation come with integrated check valve or without it
The joints of the grate with the pipe should also be properly treated using a sealant. Now we have to check the quality of the installation. To do this, turn on the hood and attach a sheet of paper - if it is attracted, then everything is perfectly mounted. So you can start decorating.
As a decor, a decorative hood of the hood can be used. Sometimes this is clearly not enough. Then the owners connect fantasy, selecting the most the best option, for example, to hide the pipe in the hinged lockers.

Sometimes the ventilation duct is hidden in a plastic box. If you put in it also the lighting, then no one will guess about the metallic corrugation.
Depending on the style of the kitchen interior, the corrugated pipe can be hidden under the suspended ceiling. If the furniture in the room is in the style of hi-tech, then the metal corrugation will organically fit into the overall picture.

It happens that the air duct fits perfectly into the interior of the kitchen, being a logical continuation and not getting out of the overall composition
When to replace the pipe
Gofra is an inexpensive and very worthy solution to the problem of home ventilation. If it is installed correctly, then there will be no problems with the use. The main thing is to follow the recommendations given by the manufacturer of the product.
Care for the corrugated duct is not particularly necessary. One is unpleasant - it's very inconvenient to get the dust from the walls. Over time, in 8-10 years, a rather thick coating of fat, dust and dust particles is formed inside the pipe. You will not be able to clean it. The only way out is to put a new corrugation.
If we compare the service life of 10 years with the cost of a new ventilation duct, the replacement does not at all look like a problem.

When replacing, it is necessary first to dismantle the old pipe, and then to install a new one
When dismantling it is necessary to perform all the actions, that during installation, only in the reverse order. After removing the pipe, it is necessary to thoroughly clean the joints, to clean the ventilation grill or even replace it at all. Then perform all the steps to mount a new corrugation.
Video about the selection and installation of corrugations
Video clip on how to connect the air duct in the kitchen - the features of using a corrugated pipe:
Metallized corrugation used as an air duct in cooker hood, can be hidden behind a decorative casing. This video instruction will help to correctly connect it to the hood:
A visual video about additional details used when connecting the pipe from the corrugation to the hood:
Video review of flexible corrugated aluminum pipe:
An interesting video about how to produce air ducts from aluminum foil:
Having dealt with the features of choosing and installing corrugations, you can save by doing everything yourself. These works do not require special skills and professional tools, which makes it possible to do without calling specialists. A quality corrugated pipe, correctly attached to the hood, is able to provide ventilation for the kitchen not less than for the next 10 years.