Wood stoves for garage. How to make a brick oven in a garage
Before each owner of a vehicle there is a question how effectively and economically to heat garage. If the premises are not sufficiently exploited, a compact and portable of the heating unit. When garage-Master of large sizes is visited often, there is a place for preservation and storage of food products, portable installation will not be enough to get an even temperature in the box. The optimal option in this case will be brick oven.
Create brick structure own handswith the help of drawings and diagrams it is possible, however, for the reliability is invited an experienced stove. The specialist will be able to correctly choose the building material, give practical advice for safe use stove.
What should be oven made of bricks:
- the size homemadeshape is obtained compact for unhindered movement of the machine and people;
- a long time brick oven maintains an acceptable temperature regime;
- there is a rapid warm-up stoves;
- a brick oven burns little oxygen and does not emit harmful substances in garage-mastership.
The standard rough does not fit in a typical machine box, as the room has significant temperature changes. Clay masonry mass, because of its hygroscopic structure under severe conditions, will crack and swim. Also, the structure takes up space, for its burning, a person needs extra space. It takes a long time to get the heat in the room.
Typical stove for garage-workshop

Usually, brick The unit is made on two and a half clay blocks. As fuel, dry wood is used, the coals of which give heat to the walls of the product for a long time. A fireclay brick is being built stove, fireclay powder is also added to the connecting compound.
Masonry is always carried out on a specially erected foundation. If a plate is planned for heating food and water, the length of chamotte puzzles increases.
Important points:
- Construction is most often carried out at the back of the garage-workshop.
- Chimney own hands is made removable. In summer, the hose is removed and a ventilation duct is produced.
- Under the base is laid a layer of waterproofing, which is covered with continuous masonry.
- The clay mortar is tested for quality before use: a small ball is rolled, which does not crack during drying, when it falls from a meter height to the concrete base it retains a geometric shape.
- For long-term use homemade stove The furnace is spread only with fireclay bricks.
- The ash and furnace doors sit on the wires or are wrapped with asbestos cords before laying in the general masonry.

If desired garage-Master can be equipped with a rough Swedish type. It is a ducted convector stretched from ceiling to floor, to the front part of which there is a chamber compartment. In an air chamber according to the principle of an oven, Swedish gases heat the hob in a special niche. Extra heat leaves in the drying compartment.
What is attractive about the unit with their own hands:
- a heat exchanger with a storage capacity is easily integrated into the common mechanism, since the oven and convector do not have energy feedbacks;
- the convector can be economically made from a simple brick on a cement mortar, since all the flue gases burn out in the chamber compartment;
- a tall narrow form of the stove warms up the box in height;
- options homemade stoveremain the same if part of the flue gas goes into the stove, then returns to the convector.
A bell-furnace with a brick in the garage-workshop
Self-regulating design has a high efficiency. Smoke gas burns under the roof of the hood and gives off heat to the "body" of the product, only then the vapors leave the chimney system. Kolpakovaya stove is endowed with the properties of a gas filler: when open, the hot gas under the hood does not release heavy cold masses from the haylo into the duct. It prevents the ingress of carbon monoxide with an open cat, and brick oven remains warm.
Plate with shield
On the basis of the Swede an interesting design was born. The duct and chamber compartment is separated mechanically due to the failure of the drying and cooking niches. As a result, a lower floor load is obtained, so brickthe form own hands Fits on the insulation layer without additional foundation. Under the shield, a damping cushion is built on the basis of basalt cardboard. For greater stability of the narrow and high flap, a mechanical connection with the wall opening is established.
Russian stove

Russian stove - the device
For very spacious garages-masters with intensive exploitation brick oven. Its efficiency is 80%, the frame can be supplemented with a stove and decorate with decorative elements. The construction is voluminous and complex, so without the help of a stove-maker one can not do without. A single module is an analog of a building, parts of which are adjusted through corners. Before choosing the desired design, the premises are calculated (withstand temperature conditions up to the following furnaces).
- Stove compartment.
On sale there is a large number of ready-made fireboxes with a transparent or deaf creature. Buy easier and more reliable than done own hands. What to look for before buying:
- the dimensions of the fasteners are consistent with the dimensions of the brick;
- for long-term use it is better to take a cast iron product;
- also pay attention to the depth of the narrowing of the combustion chamber to the grate, ash well.
The grate is selected taking into account the type of fuel. Too much distance between the rods, and the fuel will burn quickly, not having to give heat to the walls. If the lattice misses a little air, the wood will not have time to burn out and soot with heat will also fly out into the pipe.
For a high-calorie large-lump and low-ash fuel, a deeper ash pan is selected. For low-calorie fuel in brick The aggregate depth of the ash pan should be small relative to the height of the combustion chamber, so that the air intake does not decrease, and the fuel burns out to the end.
- Oven chimney system in garage-mastership.
Looking accurate calculations in order to avoid "whistling", when cold air flows rapidly fall into a too wide chimney channel. If the resulting smoke pipe smokes occasionally, it is increased by several rows of bricks no more than half a meter. Also, the pipe is built up in the case when the aerodynamics of the terrain changed (the high-rise buildings were built, the forest grew).
Heating in the garage - an urgent issue for every car owner. It is understandable: without heat in such a room during the cold season it will not be comfortable even for a short time, and it will not be possible to make additional work either - the hands will simply rustle on the run. To solve this problem, each garage owner comes up in his own way, installing homemade heated devices.
How not to warm the garage
Definitely should immediately abandon the idea of heating the garage electrical appliances. No significant changes in heat transfer will be noticeable in them, but everything will be reflected only in the accounts. In addition, there is always an increased probability of fire due to a wiring fault.
The best oven for garage by own hands - this is an oven made of brick or metal. The following will be presented detailed instructions on its manufacture.
Basic requirements for garage heating

A garage stove made of bricks or metal sheets is a heater that has the following features:
- ecological compatibility;
- compactness;
- ease of maintenance;
- intelligibility in the assembly;
- presence of a removable pipe for smoke, when the furnace is not operated.
The main functionality of such a furnace
Such a device must provide the most rapid heating of the garage. In addition, it can very quickly be used to dry clothes or simply warm up the kettle.
Determine with the construction
Having decided to lay down the oven for a garage made of brick or metal, it is necessary to decide, at the very beginning, what form it will have. The produced construction from the pipe will have a round shape, and if it is made of sheets, it is best to stop on a rectangular version.
Brick luggage

The oven in the garage of brick has its own characteristics. To produce it you will need a special red brick (called chamotte) - it has an excellent heat capacity. Before you put the masonry, you must first draw a sketch. These drawings should be strictly adhered to later in the construction of the furnace.
Features of the garage stove
The stove in the garage of brick or metal has general requirements to internal device. In such constructions, the prepared areas for the ash-blast furnace and firebox (the first products of combustion are output, and the ash accumulates in the second). The immediate furnace zone must be higher than the place where the ashtray is located - here it is necessary to separate the horizontal partition, which has slits, which are necessary for the ash to fall down. It is also important that it is planned to heat the stove (if firewood, then the slits should be made at least 4 cm wide, and when coal and smaller branches are used, it is enough 1-2 cm in diameter for the slits in the partition).
Relevance of the zone for disposal of used products
Metal and brick stoves for the garage, in their design, they also mean special zones intended for the removal of combustion products-it will be located behind or on the top of this of the heater. If the rear method is chosen, then the pipe angle should not be less than 30 degrees - this ensures a good draft. It is preferable to use the same vertical variant.
How to increase the heat capacity of a garage watch

In order to increase heat transfer, additional ribs are welded to the sides of the stove. This can be done with several metal plates having a thickness of not less than 5 mm and making a right angle with respect to the plane of the wall. This is justified by the laws of physics: the contact with the air increases, and so does the heating inside the room.
Correct housing at the stove
If we are talking about a metal barge, then the best option for her body will be a pipe 30 cm in diameter. Excellent, if the thickness of the walls will be at least 5 mm. When such material is not available, then sheets with the same thickness will do.
Advantages of a brick kiln
Burzhuyka of brick with their own hands will have the following undeniable advantages over metallic:
- compactness (takes up less space in the volume);
- more even heating and cooling of the room;
- non-volatility of the furnace;
- higher efficiency compared to the same metal.
Stove burzhuyka made of bricks or metal: the required elements
The optimum option for a pipe into which smoke will escape is a similar diameter within 12 cm. A special box intended for collecting ash must be made. In order to make it, a steel sheet with a thickness of about 0.3 cm is quite suitable.
Brick oven for garage: masonry technology
How to make a brick stove for a garage? To gain confidence in the correctness of the actions performed will help such a scheme:
1. Put in the wall at the furnace one brick ().
2. We make the output from the firebox with a section in the brick.
3. Next we go to the extension.
4. Make a series of edges.
5. We make the restriction to the brick parameters.
6. Repeat the edge.
7. Now a brick-burger requires a bolt.
8. Narrow to the dimensions corresponding to the size of the output tube.
9. We cover all with wool kaolin, which has a sandy-clay solution as a part (for details see:).
10. We wait, while the oven from a brick in garage will dry up (so it is possible to check up efficiency).
Tools for self-making stoves from metal

A very important tool for the preparation of material in the manufacture of the stove is the Bulgarian. It is this saw that will help to shorten or lengthen the workpiece - it is enough to use the disk for its entire thickness, cutting off the line from the right side. Combining the metal is best done with a welding machine.
Checking the correctness of the welding machine
A similar check can be made by the following algorithm:
- Connect the device to the network.
- We prepare the electrodes (MP-3, ANO-21, and 4 mm for the diameters).
- On the welding machine, choose a current equal to the range from 140 to 160 A.
- The type of electrode holder that belongs to type No. 2 is checked.
- It is necessary to have overalls and special means of protection (clothes from tarpaulin are allowed, a welding mask with a C6 light filter is put on your face, leggings are on your hands)
Stages of work on welding the furnace body

To weld the body and bottom, it is enough to follow this scheme of actions:
1. Connect the tack welders at a right angle 3 side walls and bottom.
2. The bottom is located at a height of not more than 50 mm - this will reduce the heating of the floor.
3. After pothaking, check for perpendicularity of the planes (to check this, you can attach the front wall).
It is important to remember that all welding can best be done horizontally with a T-joint.
Partition preparation
In order to weld the partition located between the furnace and the blower, we perform the following actions:
- Make slits in it so that ashes (they are located at a distance of 50 mm from the walls of the stove, and each step - at least 10 cm). The distance from the septum to the bottom should not be less than 10 cm.
- Cut a hole in the back - smoke will go into it.
Welding work on an ashtray and partitions
To connect the remaining structures, you need to do the following: - Lean the front of the burzhuyka in the place where it is planned to make a partition located between the furnace and the blower.
- Make a marking for the ash-pit and openings for the firebox (rectangular).
- Cut out these holes in the bulgarian and save these rectangles.
It should also be taken into account that the lower part of the holes must necessarily coincide with the partition located between the blower and the height with the furnace.
Completion of work
In conclusion, the following work is done:
- Weld the doors of the furnace and podduvala already to the canopies.
- Weld the front part.
It is very important to make sure that when welding, the doors are raised to the top of the opening (maximum). This must be done with the expectation that under the influence of temperature in the subsequent, they will begin to sink in more so that it is difficult to close.
How to make a metal garage lorry from a pipe?
The starting material for the manufacture of such a furnace will be a metal pipe in a thickness varying from 0.5 to 1 cm, and the height will be at least 1.8 m. All work on the fabrication will proceed as follows:
1. Cut the pipe itself into a couple of parts: the thickness of one will be 0,6 m (the tank), and the second one 1,2 m (heater and furnace). The remaining piece is the door for both the firebox and for the bluff.
2. In the second part, make a cutout, intended for the podduval (20 cm in width and 6 cm in height) and firebox.
3. Weld a plate of metal on top of the sump with the same center.
4. In this center, weld four lugs, which will fix the grate.
In order for such a pipe not to burn out, the thickness of the first meter in it should be at least 0.3 cm.
Thus, the homemade stove garage garage stove is ready. Now the main question is how to heat it.
Stove heating options
A furnace of a brick or metal can be heated in the following ways:
- solid fuel;
- waste materials.
Under solid fuel is implied:
- pallets;
- wood material;
- coal.
Among the variants of spent fuel are:
- waste oil;
- combustible mixtures.
Each of these methods has its own characteristics.
Wood burning method

If the owner has decided: the brick oven in the garage will be heated with firewood, then he can not worry because an unpleasant smell will be released during combustion. On the contrary, such a burzhuyka will be characterized by a relatively large coefficient of efficiency as an economical option. In addition, it can always be upgraded, thereby increasing heating. This can be done by using a hood heat exchanger (the air warmer in this case will go up, and the cold - down). A similar type of stove will perfectly be heated on charcoal.
Diesel heating option for metal furnaces
Diesel heating is suitable for burzhuek with a metallic origin. Work such stoves will be mainly on waste engine oil. This option is considered very economical, since such fuel is always available. However, their operation can not be called fireproof: the combustion temperature can reach almost 900 ° C. To prevent negative consequences and simultaneously increase the heat transfer, plates of metal equal to a thickness of at least 5 mm will be welded on the sides of the housing. It is necessary to provide for a vertical branch, in which products of combustion will be released.
Advantages of using waste oil for heating
This kind is recognized as an excellent raw material, capable of heating even a small room. This is evidenced by a number of the following indicators.
The furnace for a brick garage is found in many buildings. The price of such a design is not high and it is used often. As a fuel, too, you can use different resources, this is gas, as well as some equip with electric tans. But many people use traditional solid fuel.
Today we will look at how a brick oven for a garage is made. What can be used as a heater, and how to do it all. On the video in this article you can see different variants install.
Garage Heating: Basic Requirements
Garage furnaces made of bricks must meet certain requirements. And the choice of the garage garage heating system should be treated with particular attention.
Attention: Proper organization of suitable heating equipment is a guarantee of property safety and owner's life.
Furnace construction made of bricks or sheets of metal is a heating structure with the following features:
- Small size;
- Environmental Safety;
- Ease of operation;
- A clear scheme of assembly;
- Removable chimney.
By means of such a furnace structure, it is possible to promptly heat the garage box of any size, and if necessary, you can dry clothes and boil the kettle. The compactness of the oven will allow it to be placed anywhere in the garage, using a minimal space.
Attention: When laying a brick or metal furnace, you need to determine the future shape of the structure. If a pipe is used as a basis, the final shape will be circular. If the use of metal sheets is intended, then the oven structure will be in the form of a rectangle. Everything depends on the imagination of the owner and the possibilities of the garage. To enclose a brick is better of course a rectangular construction.
Basic variations of heating
Organize optimal system heating in the garage box different ways. Choosing the right heating method will ensure safety and quality heating. These factors can not be ignored.
To determine this or that option, you should carefully analyze the technical capabilities of the garage:
- Does the room allow you to place a specific heating system on your square;
- Presence of financial opportunities at the owner;
- How often is the garage used - regularly or seasonally used;
- Area of the room.
Many car owners use their own garages as a parking space, a station maintenance or a repair shop, using the services of a professional car service only in the most serious cases.
So:
- In this regard, there is a need to provide maintenance of the car on its own. In general, it is in winter that motor vehicles are exposed to minor malfunctions, breakages, and repair work in cold conditions does not always bear the desired results.
- Installation of a heating system or an entire system is only a matter of a certain time, because sooner or later each garage owner faces this need. Warm garage in the cold season will be a protection for the main parts of vehicles and create a favorable atmosphere for the owner's stay.
Attention: It is the brick oven that is most acceptable. After all, it has a large heat capacity. Only need to choose the correct source of heat.
Installation of heating equipment in the garage can have three options:
- Heating with natural gas with installation of gas equipment;
- Furnace structures with fuel in the form of firewood, coal, fuel briquettes;
- Electrical appliances with additional wiring.
All options vary in cost, installation features, technical characteristics, but it is necessary to take into account that not every method of heating is suitable for a particular garage.
It is worth considering all the options in more detail:
| Natural gas | A fairly economical way to heat the garage room.
|
| Solid fuel | There are many advantages to this method.
|
| Electrical devices | Expensive fun for the garage, an additional expense item to the family budget every month (or according to the terms of the garage cooperative).
|
Construction of brick stove
A brick stove is the most economical way to heat a garage. To carry out the laying of stove construction it is possible with the help of specialists, but you can do it yourself. Fold the oven in the state of everyone, having the slightest idea of the skills of construction.
- The first step is to prepare the material. Brick and clay mortar are the main constituents of the future furnace. Classic brick masonry is not suitable for furnace construction due to its poor resistance to high temperatures.
Attention: Preference is given to red clay brick, which is famous for its refractory properties due to the technology of making by roasting. And for the furnace part it is best to use fireclay material.
- The product is durable, resembling a stone. Such a brick not only withstands the action of fire, but also repels moisture.
- The mortar for laying the furnace is a combination of water and clay. The type of clay will depend on the need to add additional components, for example, river sand. The ingredient allows you to remove excess fat from the clay.
Selection of clay for solution
Clay solution, at first glance, the same, visually can not be determined, fatty clay or not. To date, there are no special measures to establish the quality characteristics of any clay.
- Very often in the clay mixture already there is a small drainage in the form of pebbles, sand. These components can greatly affect the bonding ability of the clay during the addition of bricks. Determine the properties of clay can be at home, it is enough only to own the usual skills of children's modeling.
- Clay is combined with an aqueous solution and thoroughly mixed. The composition should be dense, elastic, reminiscent of clay. From the material, a ball-shaped figure with a diameter of up to 7 cm dips and dashes to the floor.
- The results from falling and hitting the floor will tell you about the type of clay that is available. If the ball is broken into small pieces, the clay contains a filler in the form of sand, and its structure is low-fat. If the pellet is flattened, then this is characterized by a high content of fat in the clay.
- A normal and ideal variant of clay is one that, during the experiment with the ball, will not lose its shape, it will not crumble into small parts, it will not spread on the floor.
- When making a solution yourself, it is always worthwhile testing the clay in this usual way. Such a method will prevent the future furnace from endless reconstructions, make it lasting and durable. The furnace in the garage should have the best characteristics, because it will ensure the safety of property, save savings.
- Clay solution is prepared in a spacious container, which, if necessary, you can climb an adult man, because knead the clay better legs.
- Soaking clay in water takes about three days, and then you can begin the process of preparing clay mixture. This action will require rubber boots and strength, because trampling clay is not an easy task.
- The finished solution should be checked for large particles and removed from the mixture. To make sure that the clay is cooked correctly, it's enough to see that it drains slowly from the trowel and looks like a thick sour cream.
Base for brick oven
The problem with choosing a place is quite urgent, since the garage is still a place for a car and equipment for its maintenance. Despite the limited space, it will be necessary to unload some corner for the future furnace.
- By equipping the stovepipe, it must be ensured that it does not cross the floors on the roof of the garage box. This will prevent the collapse or other unpleasant moments leading to the restoration of the garage.
- In the chosen place, you need to excavate a pit depth of 70 cm, focusing on the soil layers. When the shovel reaches the sand, then the foundation can be poured into the pit.
- For this, the bottom of the pit is paved with gravel, and a layer of cement is poured on top. This will allow to provide a special strength of the foundation, and the stove construction will not collapse at the base.
- To prepare the solution, you need 1 bucket of cement, 3 buckets of sand, 1 bucket clean water. If it seems that the solution is dry, add more water. With this mixture, the foundation surface is leveled. The base dries for about 24 hours.
- Then the foundation is covered with waterproofing in 4 layers and the process of laying brick walls of the furnace begins.
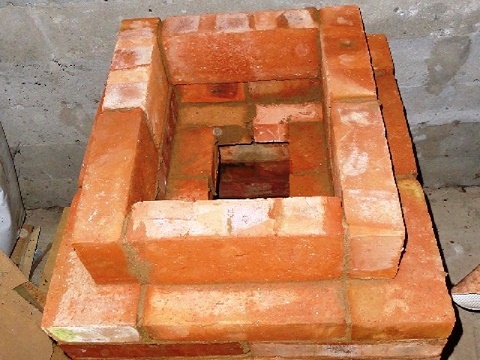
Masonry Furnace
Brick laying is carried out in accordance with the algorithm on the basis of which the position of each unit is based individually.
- First put the base. For this, the markup is done and after that it is necessary to check the diagonals. As a result, the correct geometric shape should be obtained.
- Now begin the masonry of the walls. To do this, we do the pan of continuous rows.
- Now we need to place a grate. For this we make a cut in the brick with the help of a Bulgarian. The lowering should be larger than the grate by 5 mm. This will save us from expanding the material when heated.

- Then do the masonry on. Just at the same time do the installation of the doors. They must be fastened with a wire. Which is passed into the frame and after that the ends are laid in the masonry.
Attention: The doors must be wrapped around the contour with an asbestos thread. This must be done necessarily.

- Masonry working is often done with the use of refractory material.
- During the masonry, we watch the dressing. The seam should not coincide.
- The brick must first be laid out along the length and check the placement. After this, if necessary, it is fitted with a Bulgarian and only then put on the solution.
- We make sure that the seam is full and there are no dentists.
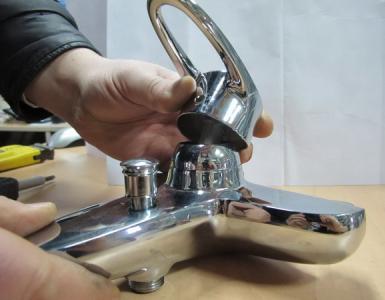
In the finished furnace it is necessary to mount the metal links: the shutter, the door into the furnace hole, the frame for the pipe. After installing the furnace, you can start using it for its intended purpose. So look through the photo and make your choice. The instruction will help you avoid mistakes.
How to make a room for the car, we have already discussed, talked about the fact that it is better to insulate. But here's how to heat? Despite the prevalence of infrared heaters, there are many motorists who prefer to make their own hands for a garage for firewood, sawdust, shavings, working off.
Let's immediately identify the common options that are selected by motorists:
- Burzhuyka - vertical, horizontal, of two barrels;
- Long-term burning - bubafone, rocket;
- On working off;
- Traditional, brick.
We will do everything simply - an ordinary burzhuyka
It is most simple to do by yourself. Homemade burzhuyka It is not anything complicated: the tank is divided into a part of the fuel and an ash-pit installed below. The photo below is a vertical type.

Advantage is fast heating and omnivorous, and the disadvantage is a lot of gluttony. This is due to the fact that the smoke will go directly to the chimney, taking the lion's share of heat from the room.
If you want to make such a simple oven, you can use sheet metal, and if you want to speed up the process - use a cylinder, barrel or pipe. The main condition in the selection of material - the thickness of the wall, so the barrels are not very suitable, because the thickness should be 2-3 mm. You can get such homemade variants.

By the way, the horizontal one is the most practical, with the help of it it is easier to sink, since there is no problem to use longer logs, and there is more efficiency, since the smoke must travel a certain distance before it enters the chimney.
How to make your own hands - we follow several steps:
- We make the door to load the fire and the door to clean the ash. AT horizontal type It will also be necessary not only to cut the hole under the door, but also to weld an ash box from below;
- We make the bars from the fittings and weld with a step of 20 mm. They will keep firewood;
- If there is no bottom, as in the case of a horizontal turbine, we make it;
- In the upper plane, cut the hole under the chimney and weld the branch pipe. Its diameter should fit the standard chimneys, and the height should be at least 10 cm. Then the connection of the chimney will do without problems;
- We install hinges, doors, and locks;
- We weld the legs.
The horizontal type of the turbojet practically does not differ from the vertical one. The only difference is that holes are drilled in the lower part and an ash box is installed from below. The problem may be that to the convex part you need to make a flat door, see how it is decided in the photo below.


Furnace for a long-burning garage
The most perspective type is a design using the principle of long burning. Here are two original designs.
Bubafon
A funny name, but incredibly simple and original design. It can be said that it has spread more recently. A long-burning furnace is operating on wood, sawdust or chips. The disadvantage is that the wood needs to be prepared before laying. Another interesting fact is that such a system can be supplemented with a water jacket and heat the garage with radiators.
Another not obvious drawback is that to evacuate the ash, you need to turn the body. But you can download it several times without first cleaning it. In principle, the one who knows how to weld, probably will be born several solutions to this problem.
The principle of action is as follows. The fuel is pressed by a heavy load with a pipe in the center. That is, the cargo not only presses on fuel, but also brings oxygen to it through the riser. Burning occurs in a direction from the top to the bottom. Not immediately notice that the chimney is located on the side of the shell. Since it should be made horizontal, make sure that it is not longer than 40 cm, otherwise the pull will greatly decrease.
Pay attention to the photo below. As the diagram shows, incineration occurs both from below, and from above from the pancake. All elements: the lid, a pancake as a cargo - have gaps, due to which the constant movement of air is maintained.

Differences from burzhujki it is a little. The set of materials is about the same.

If you want to see how you can solve the problem with the need to clean the ash - the diagram below will help you.

Oven rocket for your garage
Now let's move on to another common "rocket" design. Let's start with the simplest version - a pipe welded with the letter "g". Burning of firewood is carried out in a horizontal section, the intake of air is carried through it.


In the photo on the right, the plate marked with the number "3" forms a gap for air access.
Now let's analyze the advanced system of the rocket furnace. It has several interesting features: a second housing, air supply for secondary burnt pyrolysis gases (in the zone "5", air is supplied through a small lumen "b") and a chimney connected to the bottom. Efficiency is increased due to measures for thermal insulation of the main pipe and sealing top cover - then the heated gases will remain inside the structure longer. The principle of operation is as follows: firewood is loaded into the boot box with a lid, as in the photo on the left. The air is supplied through the damper "A" - it needs to be set up in such a way that there is a lack of oxygen for the burning of firewood, then the gases will burn with the air that penetrates the "B"


But in the photo there is an upper layer, marked yellow. This is thermal insulation, which can be made of non-combustible substances, for example, mineral composition or clay clay. Such thermal insulation ensures the most complete burning of pyrolysis gases. The thermal insulation is held between the two pipes. The first one is called the riser, and the second is the shell. As in the case of the simplest variants, the rocket can be supplemented with a water circuit.
Oven kiln - a simple option
We use gas cylinder from under natural gas or oxygen. They are practical to use due to the fact that the thickness of the wall they have large enough. The size of the homemade oven from these materials is enough to heat the room in 85 square meters. m, that is, for a garage that is less than almost twice, it is quite suitable.
A huge advantage over previous designs is the automatic fuel supply - gravity. The system is not cluttered with a turbo burner or forced submission oxygen. A few key points: oil is fed through the riser, which is located in the middle. The fuel burns down, and the heat rises through the perforated structure. In the diagram below, everything is housed in a casing 22 cm in diameter.

There are many modifications of such a system, which differ in the number of layers. In the photo below, there is an option for working with an interlayer of water.

Private garage - the room is specific and in winter it is usually very cold. Neither for a person, nor for a car, such a microclimate is completely useless, but using standard electric heaters is usually too expensive and inefficient. It remains to make a garage for your own hands, choosing one of the suitable options.
Capital garage with insulation is not available to every car owner. Most often at the disposal of the owner of the vehicle is a metal structure, devoid of any warming. Any thermal energy leaves this structure almost instantly.
When solving the problem of heating a garage, one should not evaluate its need for heat, relying on a similar experience with a residential house. And it's not just a lack of insulation. There is a so-called square-cube law, which states that when the dimensions of a geometric body decrease, the ratio of the surface dimensions of this body to its volume increases.
This affects the size of the heat loss of the object, so heating one cubic meter of a small room, such as a garage, requires more heat than heating a large house. If for a two-storey structure there can be enough for a heating appliance with a capacity of 10 kW, a considerably smaller garage will need an aggregate with a capacity of about 2-2.5 kW of heat energy.
Effective heating of the garage can be done with the help of the so-called "warm hat", formed in the process of naturally-limited convection warm air in room
To maintain a very modest operating temperature of 16 degrees, the stoves with a capacity of 1.8 kW will suffice. If it is necessary to maintain only the optimal temperature for storing the car in the parking lot - 8 degrees - the unit will fit for 1.2 kW. It turns out that the fuel consumption for heating a unit of the garage space can be twice as high as for a residential house.
To thoroughly warm the entire garage, its walls and floor, will need even more thermal energy, i.e. even more powerful heater. But even if there is insulation, the heat will leave the room too quickly. Therefore, it is recommended to heat not only the garage, but only the so-called working space.
The idea is to concentrate the heated air in the center of the room and around it in such a way that a layer of cold air remains between the walls and the ceiling. As a result, technicians and people will always be in a cloud of comfortable temperature air, and the consumption of thermal energy will noticeably decrease.
This phenomenon experts call a warm hat, it arises from naturally-limited convection. The intense flow of heated air rises, but it does not reach the ceiling a little, because its kinetic energy is extinguished by denser cold layers.
Further the hot stream is distributed on the sides, slightly touching the walls or at a short distance from them. Almost the entire garage becomes warm, under the influence of convection processes, even the inspection pit warms up. To achieve a similar effect, the garage furnaces relatively low power, creating an intensive but not particularly dense flow of warm air.
An alternative option for heating a garage is to use a variety of infrared heaters. For a garage with metal walls, such equipment is not particularly suitable. Infrared radiation is badly reflected from metal surfaces, it penetrates through them, as a result of all the heat will simply go to the street.
For brick garage with walls in the half-brick infrared heater specialists also do not recommend. This material does not pass infrared waves, but does not reflect them either. The brick absorbs this type of thermal energy and eventually gives it away. Unfortunately, the process of accumulating energy and its return takes too much time.
A few words about insulation
The economy class garages are almost never insulated from outside for a very simple reason - it's too expensive for a room that is not always used. Yes, this is not always possible, for example, in garage cooperatives the buildings are placed very close to each other, the gap does not allow the installation of a heater.

For insulation of the garage, you can use materials such as fiberboard, which are damped by fire. The use of plastic in such a room is unacceptable
But the internal heat insulation of the garage space can be problematic. When installing a thermal insulation material directly on metal walls, the so-called dew point occurs at the point of contact. place of accumulation of condensate. Almost always when exposed to moisture, the insulation material deteriorates quite quickly.
And for the structure itself, this situation can be disastrous. In a metal garage, insulation can be supplied, but it is better to install a suitable material at some distance from the wall, about 20-50 mm. From the floor should retreat to 50-70 mm. As a profile, it is best to use washers to avoid creating closed loops under the cover.
With this installation option, the condensate will also appear, but due to the air circulation under the insulation layer the moisture will gradually evaporate without causing any appreciable damage to the structure. But for a garage that is heated constantly, this option is not suitable, because the humidity inside the room most of the time will be excessively high. This will put at risk both the health of people and the condition of the car.
As a material for such "ventilated" insulation it is recommended to use plates, for example, fiberboard, particle board, i.e. wood self-extinguishing during ignition. The recommended thickness is about 5 mm. Perfect fit flat ondulin or its analogs. These materials have the ability to reflect infrared radiation, which provides efficient heating.
But the plastic, even with damping properties, is strictly not recommended in the garage. Such materials ignite poisonous fumes during ignition, because of which people who avoided fire can simply get poisoned. It is also forbidden to use slabs with asbestos as insulation.
When insulating a cold brick garage it is recommended first to plaster the walls with vermiculite composition to protect them from moisture. The walls of the metal garage should be painted in two layers, pre-priming the base.
Overview of possible options
For the garage, the following types of home-made stoves are most often used:
- brick wood stove;
- burzhuyka;
- long-burning furnace;
- oven for working.
Each of these options for garage stoves, made by own hands has certain advantages and disadvantages. Some units can be combined to expand the possibilities for heating the garage and make this process more convenient and profitable.
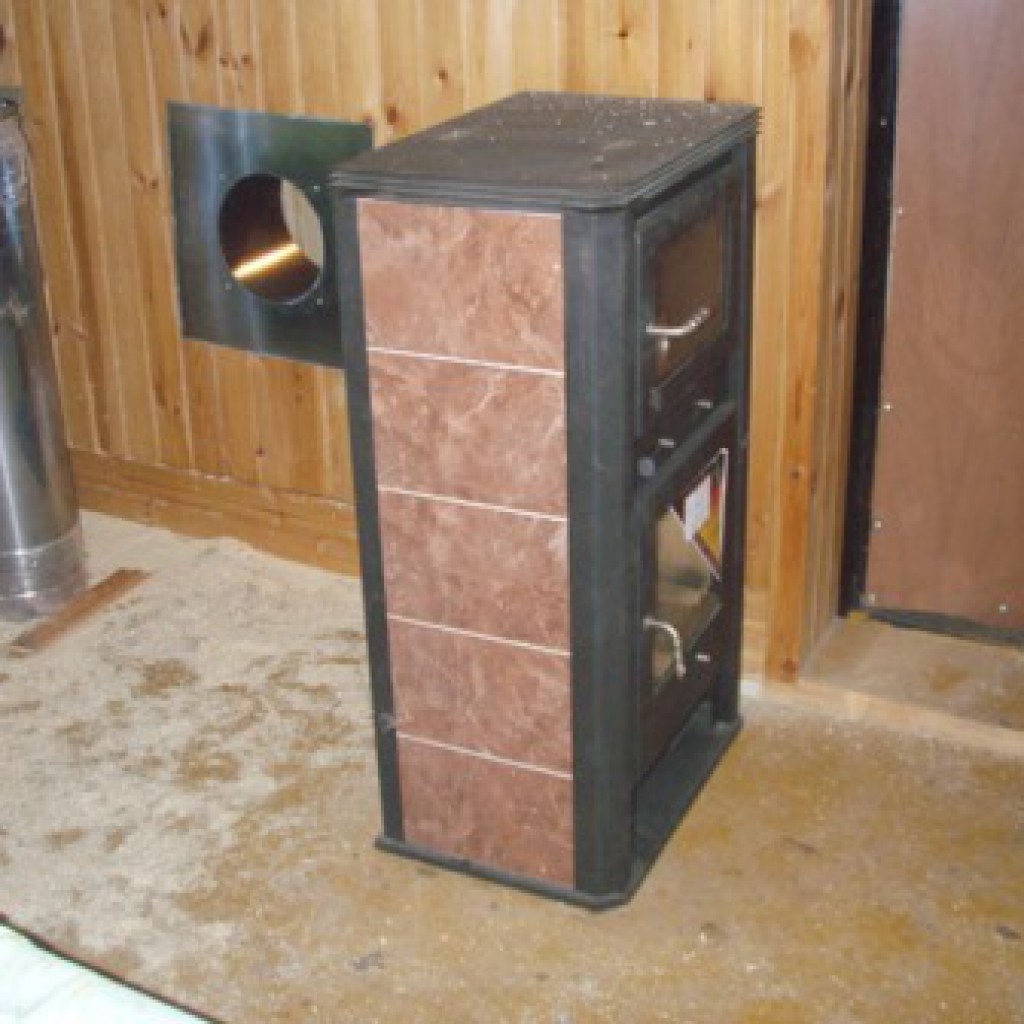
Brick: problems may occur
A brick oven is sometimes made in a garage, although this is not the easiest option. The device with a two-two-and-a-half-brick base will cope with heating a small space, but such an oven does not warm up too quickly, and then gives heat for a long time. Therefore, it is not very suitable, if the owner enters the garage only for a short time.
A brick stove in a standard garage usually has very modest dimensions, it will take about an hour and a half to reheat it, it's necessary to kindle such an oven in advance
Create the warm hat mentioned above with the help of wood stove is practically impossible, since it is not capable of producing a sufficiently intense flow of warm air. It is recommended to melt this furnace in advance, about an hour before the start of work.
To combine a wood-burning stove of this type, fireproof and fireclay bricks will be needed. Add to the masonry mortar fireproof clay, as well as fireclay powder. The fuel chamber is made at the level of the second or fourth row, which in the clutch is usually no more than nine. Of course, you need to arrange a chimney.
It is also made of refractory bricks, and a steel insert is put inside. The chimney is led out through the roof, the masonry should be neat and level. When choosing a brick oven for your garage, it should be remembered that constant swings After a while, the moisture will lead to a deterioration in the viscosity of the masonry solution, i.e. the device will not last long.
Burzhuyka: simple and reliable
The simplest version of the homemade stove in the garage is an ordinary burzhuyka. It is not difficult to make from improvised materials. Suitable and sheet metal, and an old gas cylinder, and a piece of pipe or an unnecessary barrel. The main thing is that the thickness of the metal is at least 5 mm. If a cylindrical object is used, its cross section must be at least 300 mm.

Classical burzhuyka consists of a shell with a grate, a ash pan, a loading door and a chimney, which can be vertical or lateral
On the chimney it is recommended to take metal pipe with a wall thickness of 2-3 mm and a section not less than 120 mm. A furnace is cut out of the metal or workpiece (cylinder, pipe, barrel, etc.). At the bottom arrange a grate for fuel, and under the grate make a box for collecting ash. For this element is suitable and metal thickness of 3 mm.
At the top the camera is closed and the chimney is led upwards vertically. It remains only to attach the legs from the metal corner. In order to increase the efficiency of heating, some masters weld small metal "wings" to the sides of the turbojet. This will increase the area of contact of air with hot metal, i.e. will accelerate the heating of the room.

The garage for the garage can have a round or square configuration, depending on the characteristics of the material from which it is made
For the burzhuyki should prepare a smooth and solid foundation, covered with fireproof materials. The surrounding walls should also be protected from possible fire. In addition, in the immediate vicinity of the burzhuyki there should be no foreign objects.
The surface of such a stove can be heated to very high temperatures. You should remember about the danger of getting a serious burn if you accidentally touch it. When working with an old gas cylinder, you also need to be careful. There have been cases of explosion of gas residues when cutting such a container. Experts recommend first filling the cylinder with water to displace the combustible residues.
Oven kiln: efficient, inexpensive
The construction of such an aggregate is a little more complicated than a burzhuyka, but its effectiveness beats many records. For starters, there is oil for every car enthusiast, and if it is not enough, you can buy such fuel in almost any service center for more than a moderate price. Unlike burzhujki, such furnace do of two departments connected by a perforated metal pipe.

The old gas cylinder is perfect for making different types of homemade garage stoves. It is necessary to cut this container with welding very carefully
In the lower section, waste oil burns, which gives some heat and turns into a combustible gas. Through the pipe, this gas enters the second combustion chamber, simultaneously mixing with a small amount of air. The resulting gas mixture during combustion gives an impressive amount of heat.
The first chamber in which the waste oil burns can be made of sheet metal or a suitable metal container of a square, circular or rectangular configuration. In order for the combustion process to proceed correctly, in this capacity a damper is made to control the amount of air entering the chamber.

Before the manufacture of the kiln on the working site, it is possible to find and study the drawing of such a device, although there are no strict requirements for configuration and dimensions
From the bottom you need to attach the legs from a corner or a thick wire, the main thing is that they are strong enough to withstand metal structure. A round hole is made from above and a perforated tube is inserted into it. Usually this pipe serves as a support for the upper chamber, and also exposed to high temperatures from the burning oil.
Therefore, a construction with sufficiently thick walls is required to support both additional weight and temperature. Otherwise, it will very soon burn out. The upper chamber is usually made in the form of a short and wide cylinder of thick metal. From above, you need to put a chimney, the lateral location of the pipe to remove smoky gases in this case is not allowed.

The furnace on the working consists of two separate chambers, which are connected by a perforated tube. In the process of burning, an open flame bursts out of these openings, which makes the device fire hazardous
The requirements for the installation of the kiln on the working site are approximately the same as for a burzhuyki: an even and strong base, protecting the surrounding space from overheating and ignition. Burn in such a furnace, you can almost any waste oil: carburetor, transmission compounds, fuel oil, diesel fuel, kerosene, etc.
However, one should refrain from experiments with compositions that are characterized by light and rapid ignition, i.e. from burning in such a furnace gasoline or various solvents. An insignificant amount of gasoline is allowed to be used for ignition work.
And gasoline spilled directly near a heated furnace can lead to a serious fire. It is impossible to officially authorize the installation of such a furnace, this is prohibited by fire safety standards. Owners of a private garage have the right to install such an aggregate, but they bear full responsibility for possible fire.

A curved perforated pipe is used in a kind of kiln on the mine, which can also be used as a burzhuyk, burning not only oil but also firewood
An interesting solution can be a hybrid of burzhuyki and ovens on working off. To do this, the chamber in which the work is burnt is supplied with a curved perforated tube, and the burger is made two-chamber, so that not only firewood, but also waste oil can be burned in it. The unit can be used for two types of fuel, depending on the situation.
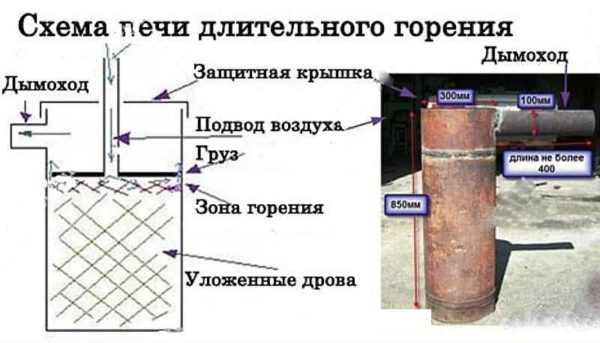
Long-burning furnace: high efficiency
The principle of operation of this furnace allows you to get the maximum amount of heat when burning conventional firewood. Fuel in a large amount is loaded into the combustion chamber, there is also fed a moderate amount of oxygen. In such conditions, wood does not burn immediately, but slowly smolder, releasing flammable gas.

A long-burning furnace is usually made from a cylindrical container, but it can be made square if the conditions for smoldering firewood are provided
This gas burns in the upper compartment of the combustion chamber at a very high temperature, which ensures a high efficiency of this type of device. Load fuel into the long-term combustion furnace no more than twice a day, so these devices are more suitable for the constant heating of the garage or for use for a long period.
It is easiest to make a long-burning furnace from a metal barrel with thick walls. Capacity of about 200 liters is considered optimal for such purposes. From above you need to make a cover with a chimney and a hole for supplying fresh air, necessary for burning.

The chimney of a long-burning furnace is usually removed from the side, and a hole is made from above for the pipe through which air is introduced
The section of the chimney should be about 150 mm, and the pipes for air - 100 mm. An important element of this type of furnace is a load that presses down smoldering firewood. To produce it, you will need a metal circle a bit narrower than the diameter of the barrel, as well as two pieces of the channel, which will serve as a weighting agent.
In this element, an air supply hole is also made, then a pipe with a section of 100 mm is welded to this hole. It should be slightly longer than the height of the stove body. On the side make a loading hole for firewood with a door, and from below put a lattice and a capacity for ash, weld strong legs.

For a long-burning furnace, dry firewood is best suited for the minimum amount of resin
Firewood burns in a long burning furnace almost completely, leaving a small amount of waste, so a large ash pan is not needed here. To start such an oven, you need to load firewood from above, press them with a load, then cover the structure with a lid, passing into the corresponding hole the air pipe. As the amount of firewood decreases, the load will drop. To install such a furnace, a strong base and a safe environment are also necessary.
Video on garage stoves
Detailed review of the manufacture and operation of the kiln on site:
Here is shown the process of creating an interesting version of the long-burning furnace:
This video demonstrates the experience of making a classic burzhuyki:
The options for home-made stoves are quite diverse, and the designs of such devices are not particularly complex. There will be skills in working with metal, welding machine and quite accessible materials. A properly made oven works efficiently and serves a long time.