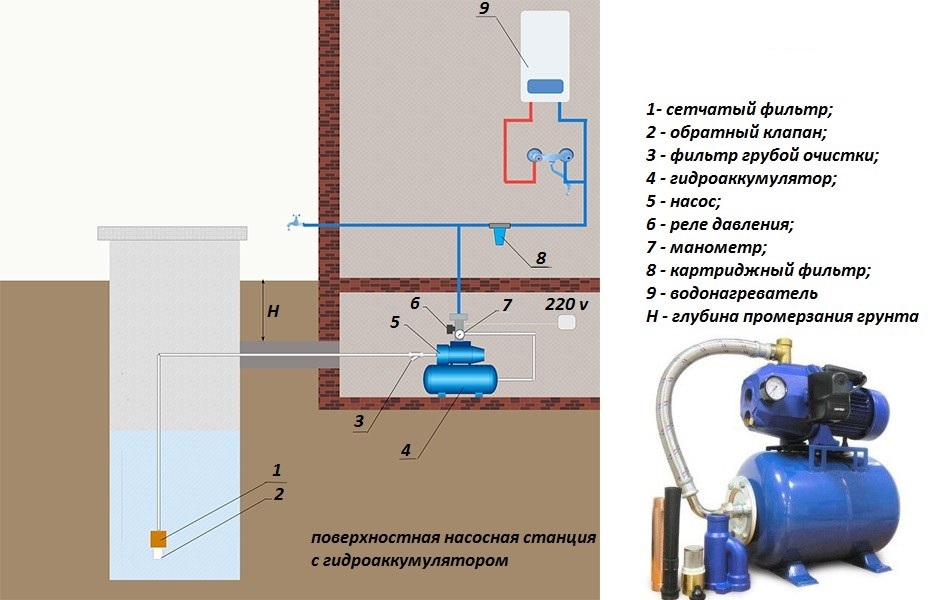
Submersible pump with accumulator and pressure switch. Water pipe with surface pump. Choose a membrane tank with knowledge of the matter
Residents of country houses are perfectly familiar with such a phenomenon as the variable water pressure. It causes a lot of inconvenience. Fortunately, the solution to an unpleasant problem was accumulators, which can be easily connected to the water supply system.
The hydraulic accumulator solves the problem with variable water pressure
What is a hydroaccumulator?
By this term means a special device that eliminates many shortcomings installed water supply in a private house. Previously, everyone called it an expansion tank.
It is not so difficult to understand the principle of installing a hydraulic accumulator. With a detailed study, it will be clear not only to the professional, but also to the beginner in this matter. The scheme of water supply to a private house with a hydro accumulator should be considered in stages in order to avoid confusion during the installation and adjustment of equipment.
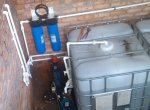
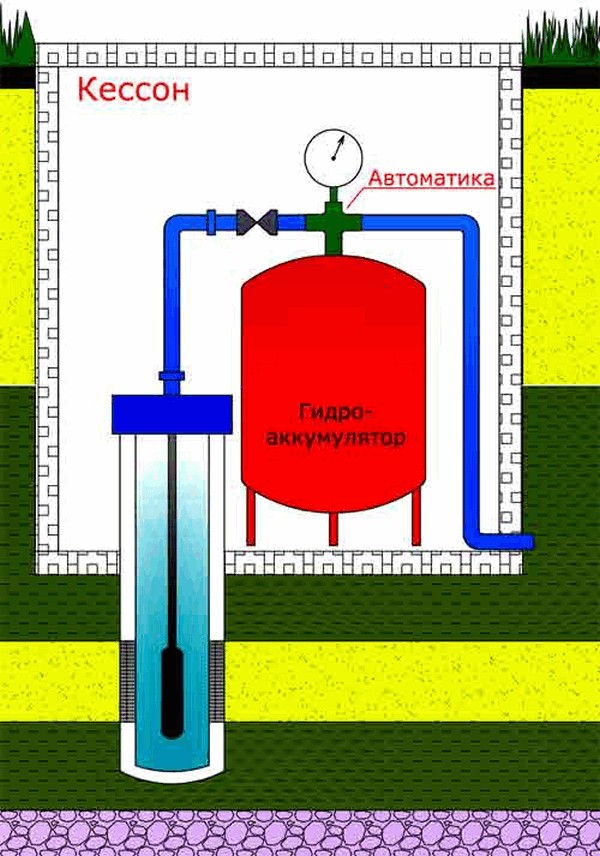
The private water supply system with accumulator tank sooner or later, will start to interest every suburban resident who has access to water through the work of his own well.
Special features of mounting the accumulator
Before answering the question how to connect the accumulator for water supply systems, it is necessary to understand the nuances of carrying out these works, which allow to correctly install the device.
- It is allowed to install the battery only in a room where the air temperature is above zero.
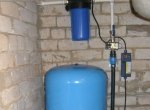
- The prepared device should be positioned as close as possible to the pump that supplies water. That's why in most cases, your accumulator is preferable to install directly at the entrance to the house.
- To check the functioning of the equipment, it is necessary to discard all the water from the membrane tank.
- Before you start installing the accumulator for water supply systems with your own hands, you should carefully read the instructions for the specific product. Do not neglect this recommendation. Familiarization with the rules of connection and configuration will avoid serious errors that can provoke a breakdown of equipment.
When all the rules have been studied, it is possible to proceed with the installation of a hydroaccumulator for water supply systems.
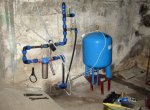
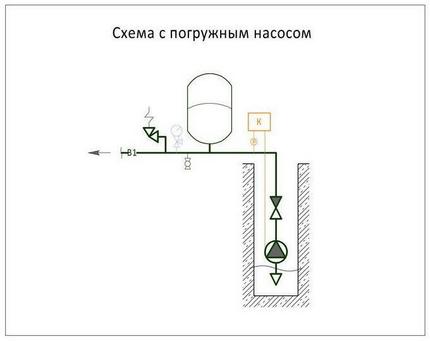
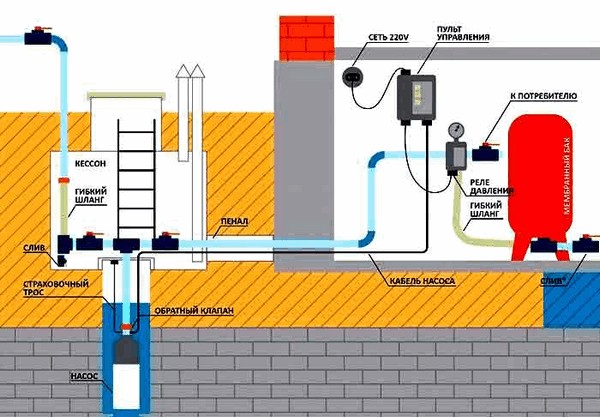
Connecting a water battery with a submersible pump
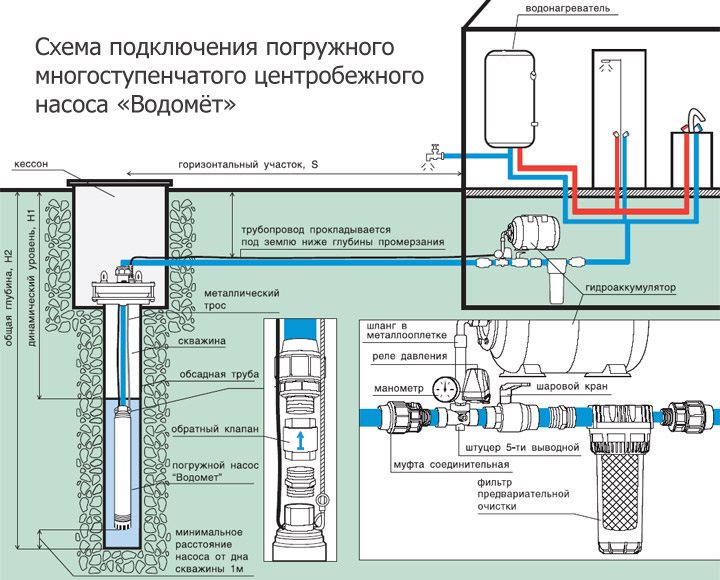
The connection scheme of the accumulator for water supply systems to the submersible pump must have a non-return valve. Thanks to his presence air masses They will not be able to squeeze the incoming fluid through the membrane into the well. The valve is accepted to be connected directly to the pump before working on connecting the remaining parts of the system.
![]()
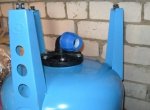
Before mounting the accumulator, it is necessary to install submersible pump
Initially, you should install the pump.
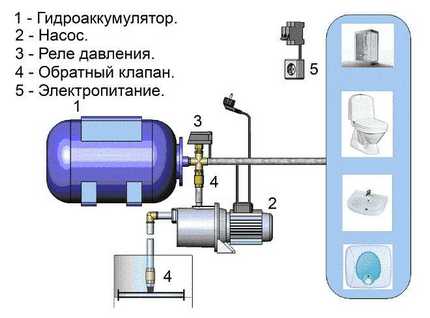
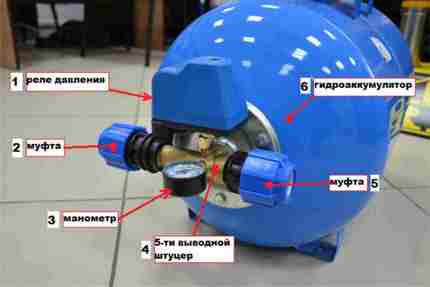
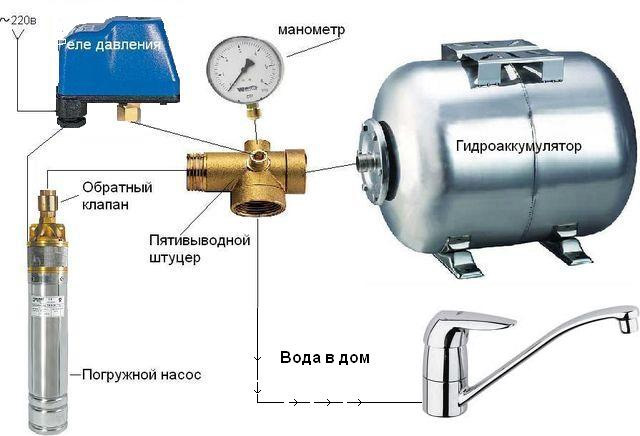
Determine the depth of the well, and then lower the unit to pump the liquid down. It remains to fix the pump securely. It is important to check that the pressure switch and the pressure pipe are well connected. It is recommended to use a five-way manifold. A battery is gradually connected to it, and a water pipe that supplies liquid to consumer areas. The unused connector of the collector is used for the purpose of individual connection of the control system of the working equipment.
Connection of the submersible pump can not do without ensuring the sealing of all the existing associations. For such work, it will be necessary to use a pack or a tape of a FUM.
How to connect a hydraulic accumulator to a surface type unit
Before you start the connection, you should accurately determine the water supply parameters and calculate the desired pressure. If you believe the official data, the system with a minimum number of consumer zones can do with a pressure of 1.5 atm.
Scheme of connecting a hydraulic accumulator to a surface pump
It is increased to 6 atm in those situations when it becomes necessary to provide additional pressure for additional equipment. Do not try to achieve maximum pressure for water supply. After all, it can easily damage the connecting elements and important communications. To avoid such situations, the correct adjustment of the system will help.
After choosing the nominal pressure, they begin to think about what its reduction should be considered permissible. It is upon reaching this mark that the pump will be able to turn on. The maximum value is set on the control relay. Measurement of air pressure in the battery, while there is no liquid in it, is carried out in the nipple. The final value of this indicator should not exceed the minimum mark by 1 atm.
At the end of this work, you can start collecting the circuit for connecting a water battery using a collector with five inlet openings. The first thing to do is to attach the hydraulic accumulator itself and only after it the pump pipe, the water pipe, the pressure switch and, of course, the pressure gauge.
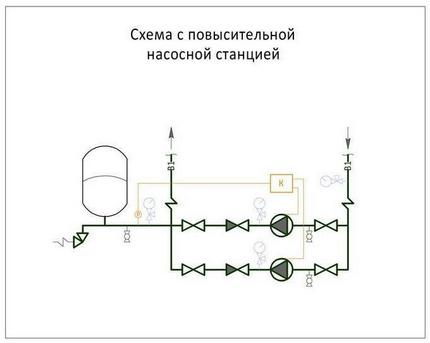
Connecting the equipment to the pumping station
Standard stations consist of a whole set of interconnected parts, among which is a pumping unit, control devices and a water battery. Due to this, the connection scheme of the equipment to it is similar to the system of connection to a simple pump.
It's harder to try to connect pumping station with increased volume of fluid intake. It is usually used for water supply of a number of houses, which are united by one well. Such stations are working properly due to participation in the process of several pumping units.
One of them should function all the time. The system will not be able to operate normally without two mini-collectors. One is connected to the nozzles of the pumps, the other is used to supply pumping water. This technical solution allows, if necessary, to repair the pump, while the second will continue to fulfill the main duty - to provide a country house with water.
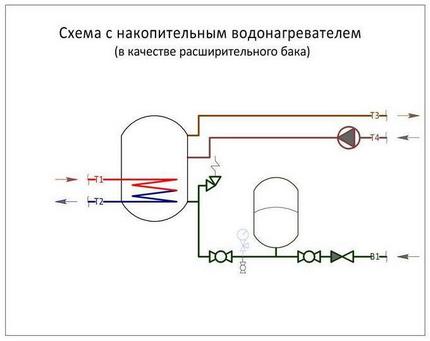
Connecting the accumulator to the water heater
The easiest way to understand the principles of installing a water battery during the installation of the heating system.
The principle of operation of the water supply system and the functionality of the hydraulic accumulator is almost the same. Two types of equipment differ from each other only in the tasks performed during the work. As is known, when heated, water has the property of expanding, thereby destroying certain elements of the system.
For this reason, it is recommended to take care of a reservoir capable of changing its own volume in advance. Accumulators have expansion tanks that are connected to the return line, which is before its connection with the boiler during circulation.
Installing the accumulator
The accumulator due to its complex structure can not be called a simple water tank. This device is always in working condition. It is for this reason that it is very difficult to carry out installation without errors.
The tank itself must be securely secured to the floor through rubber gaskets, which will prevent excessive noise and unnecessary vibration. Rubber adapters must be used to attach it to the pipeline.
During installation, a person must have easy access to either side of the accumulator. It is difficult for an inexperienced person to choose the right place for his location. Therefore, it is simpler to ask the professional workers familiar with the procedure with this request. They certainly will not miss out on any little thing that can provoke a serious breakdown of the unit.
Even after careful study of the lessons on installing a water battery to the water supply system, one can not be 100% certain of the correctness of the actions performed.
In such a situation, it is easy to make an insignificant mistake, which in the future will cause the failure of all equipment. To avoid such trouble, it is necessary to enlist the support of the master familiar with this procedure.
Any owner a country house It is interested in the fact that the water pipe it has installed works without fail. If there will be regular interruptions with water supply, household appliances will quickly fail. Any pressure jump in the water supply system is dangerous for the water heater and dishwasher. Connecting the accumulator to the water supply system will help prevent a number of possible problems.
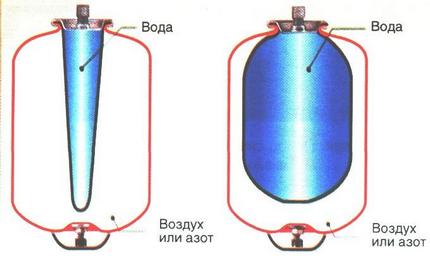
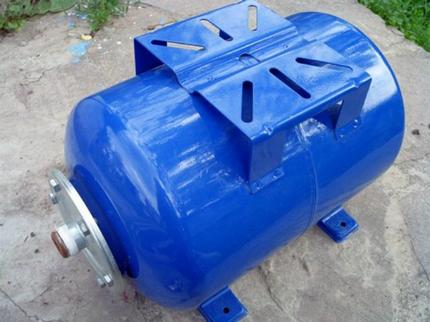
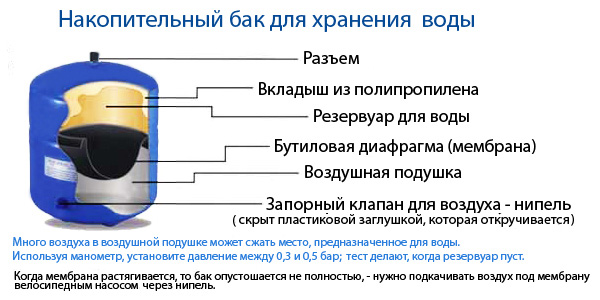
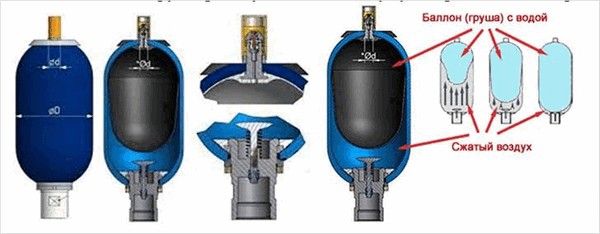
A hydraulic accumulator, otherwise called a hydraulic tank or a membrane tank, is a sealed metal container in which a water-filled elastic membrane of a pear-shaped shape is placed. In fact, the membrane, placed in the body of the tank and attached to its body by a flange with a branch pipe, divides its capacity into two parts: water and air.
With an increase in the volume of water in the tank, the volume of air naturally decreases. As a result, the pressure in the water supply system rises. When the user sets the pressure parameters, it is fixed by the relay, which systematically gives the command to turn off the pump.
Image Gallery


The tank body is made of metal, but the water does not come into contact with it: it is enclosed inside the membrane chamber, which is made of strong rubber butyl. This bacteria-resistant material helps water not to lose the qualities that sanitary and hygienic standards impose on it. Drinking water when interacting with rubber retains all of its remarkable properties.
Water in membrane tank falls through the connecting branch, equipped with a threaded connection. The discharge nozzle and the outlet of the connecting water pipe should ideally have the same diameters. This condition avoids additional hydraulic losses inside the pipeline system.
In those accumulators that are part of the domestic water-supply systems, air is used. If this device is intended for industrial use, gas is pumped into it
In order to regulate the pressure inside the device, a special pneumatic valve is provided in the air chamber. The air is pumped into the compartment provided for it through a normal automotive nipple. By the way, through it you can not only fire the air, but, if necessary, and squirt its surplus.
The air is pumped into the membrane tank, using a compact car or simple bicycle pump for this purpose. When water enters the rubber pear, compressed air exerts a pressure on it, preventing the membrane from breaking through. The pressure inside the accumulator is also regulated by means of compressed air.
![]()
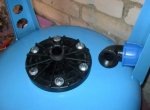
The hydraulic accumulator consists of the following elements: 1 - metal housing, 2 - rubber membrane, 3 - flange, equipped with a valve, 4 - nipple through which air can be pumped, 5 - pressurized air, 6 - legs, 7 - pump mounting platform
How the membrane tank works
If the system has just been mounted, most of the internal volume of the accumulator is occupied by that chamber, which is designed for air. Entering the pear-shaped membrane through the branch pipe, the water compresses the air. This occurs until the intended pressure is reached. The relay then turns off the pump. The operation of the relay can be adjusted.
When we open the valve and use water for our needs, the system becomes depressurized. Air, pressing on the membrane, helps the water to leave the tank. This process will occur until the pressure in the system drops to a minimum of -1.5 atm. At this point, the pump must pump up, pumping water into the tank.
As is known, there is also dissolved air in the water. When it accumulates inside the membrane bag, the operation of the accumulator deteriorates, so it must be vented. On some models for this purpose there is a special valve. If the valve is not present, it is necessary to arrange once a month for the membrane tank prophylaxis.
It is important to properly install the accumulator in the water supply system. Then when it breaks or when it is carried out on it preventive works, the device can be easily disassembled so that you do not have to completely drain the water from the entire system.
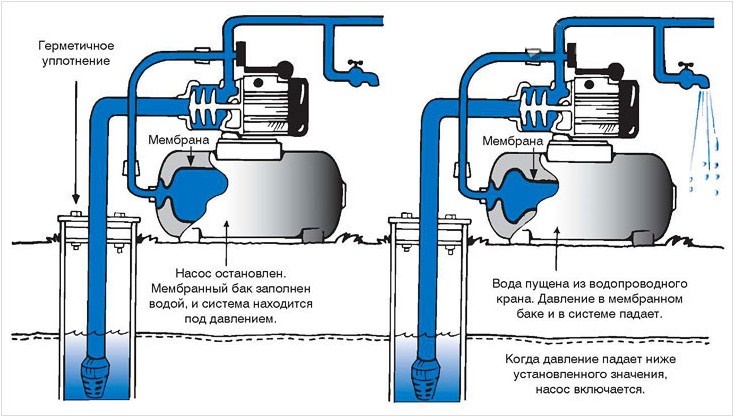
When opening any faucet the volume of water in the tank decreases, as a result, the pressure drops. The pressure drops to the set value fixes the relay, which starts the pump (+)
The role of the accumulator in the water supply network
It would seem that the device simply passes water through itself. Could you do without it? In fact, it is with the help of a tank in the water system that a stable pressure remains. The water pump, if it is available, does not turn on often, which makes it economical to use its service life. In addition, the water extraction and transport system is reliably protected from water hammering.
If, for any reason, the voltage in the mains is lost, a small "emergency" water supply in the tank will help solve the primary economic tasks. Let's clarify the list of advantages that this rather simple device provides.
- Premature wear of the pump. There is some water in the membrane tank. It meets the priority needs of the owners of the cottage. And only when the stock runs out, the pump starts. It should be noted that all pumps have a rate of inclusion for an hour. If the accumulator is present, this indicator will not be exceeded, and the unit will last longer.
- Stabilization of pressure in the system. If you simultaneously turn on the two faucets, for example in the bathroom and in the kitchen, the pressure drops can affect the water temperature. This is very unpleasant, especially for those households who are taking a shower at this moment. Thanks to the accumulator of such misunderstandings can be avoided.
- Hydraulic attacks. These phenomena, which can damage the pipeline, can occur when the pump is turned on. With a hydraulic tank, the risk of a water hammer is virtually excluded.
- Stock of water. AT a country house The problem of water supply is particularly acute. If there is a sudden power outage and the pump can not perform its functions, then to solve urgent problems it is no longer necessary to store the water supply in a bucket or other tank. In the capacity of the accumulator it is available and is regularly updated.
Obviously, the presence of this device in a water-supply system independent of centralized networks is not accidental. It is necessary and useful.
What are the hydraulic tanks
Membrane tanks are operated as part of pipelines mounted for different purposes.
- Cold water supply. The tank is used for storage and delivery cold water, protects a variety of household appliances from water hammering when pressure changes in the system. Prolongs the life of pumps by reducing the number of their inclusions.
- Security hot water. The device used in this case must work successfully in the high-temperature mode.
- Heating systems. These tanks are called expansion tanks. They function in closed heating systems and are their important components.
Depending on the configuration, the tanks are horizontal and vertical. However, the principle of their operation does not depend on the configuration.
Hydroaccumulators intended for inclusion in the water supply system are painted in blue, and those that work in heating circuit, - red. These two accumulators have some design features, which is clearly seen in the presented scheme
A feature can be called availability special valve For bleeding air in the upper part of vertical models, the volume of which exceeds 50 liters. This air, as already mentioned above, accumulates in the upper part of the chamber as the device works. Therefore, the presence of a bleeding valve in this place is a reasonable measure.
If the air masses are to be released when horizontal models are used, then a drain or a separate tap located behind the membrane tank is used for this purpose. To remove air from devices of small size, it is necessary to completely drain the water from it.
Since the vertical and horizontal models are equally effective and functional, the appropriate device should be selected based on the dimensions of the room in which it will be located. Which model will better fit into the room, they take it.
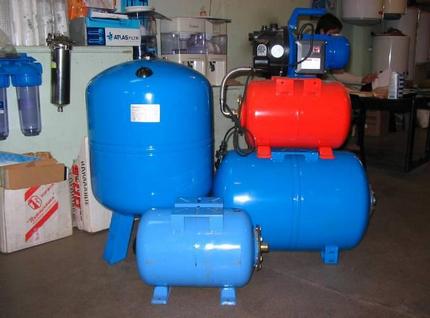
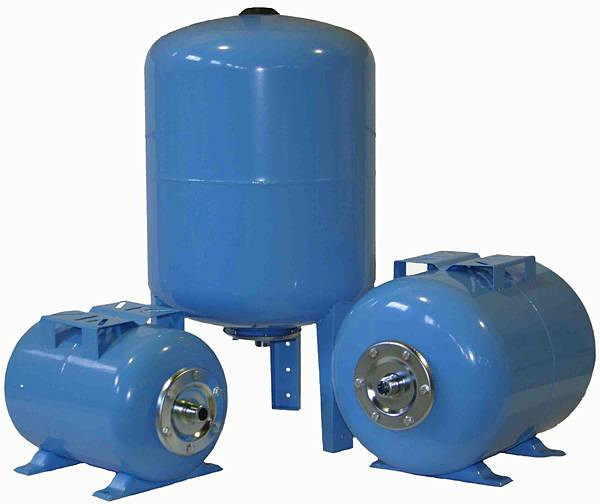
In addition to the design features and different purposes, the tanks can differ also in their capacity: this photo shows the accumulators of various volumes, designs and purposes
Diagram of connection of a membrane tank
This device can be connected to the water supply system in various ways. The choice of the scheme for connecting the hydraulic accumulator depends on the quality of the accumulator and the functions to be assigned to it. Consider those connection schemes that are most popular.
Image Gallery

In the pumping station
The pump unit of the boost type is used to continuously maintain and regulate the pressure in pipelines with active water consumption. Usually at such stations there is a pump, which operates in a constant mode. If you need to connect additional pumps, the accumulator helps to compensate for the pressure jumps that occur in the system.
As part of the water supply system of the boost pump station, the hydraulic accumulator functions as an emergency source of water supply and a kind of damper that prevents water hammering if additional capacity is connected
The same scheme is used if the supply of electricity to the boost pumps in the system is unstable, and the water supply, nevertheless, must be uninterrupted. In the period of power failure, the water supply that is contained inside the accumulator is used. In fact, the membrane tank plays a role of a reserve source of water supply during this period.
The more powerful the pumping station, the larger the tasks that are assigned to it. It should support a greater pressure, the larger it should be and the volume of its accumulator.
For submersible pump
In order to maximize the life of the submersible pump unit, the number of its inclusions within an hour should correspond to the declared technical specifications device. Usually this indicator is on the order of 5-20 times.
If the pressure in the water supply system drops, when the minimum value is reached, the relay activates, which includes a pump supplying water. At maximum pressure values, the relay switches off, the water supply stops.
If there is a submersible pump in the water supply scheme, the hydraulic accumulator will extend its service life, since it will not have to be switched on and off if the costs of water consumers are insignificant
If the water supply system is autonomous and small, even a small amount of water consumption can start the pump. In this case, the operation of the pump will be ineffective. And the device itself will not last as long as its owner would have liked. That reserve of water, which is contained in the membrane tank, will save the situation. In addition, he will not allow a pressure surge at the moment when the submersible pump starts its work.
To choose the tank of a suitable volume, you need to know the following characteristics: power and frequency of the pump, the estimated water flow per hour and the height of the installation of the device.
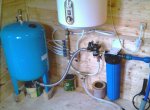
Accumulator and water heater
If there is a storage heater in the wiring diagram, then the accumulator functions in it expansion tank. If the water is heated, then its volume will increase. It will expand. For a closed space, which is the water supply system, such a process could lead to devastating consequences, if not for the tank.
In the scheme with accumulator water heater The accumulator is used as a expansion tank, which saves the system from ruptures, because incompressible water expands perfectly when heated
For inclusion in this scheme it is necessary to choose a hydraulic accumulator, taking into account its following characteristics: the maximum temperature of the heated water and the maximum allowable pressure in the water supply system.
Choose a membrane tank with knowledge of the matter
The tank is a tank, the main working organ of which is the membrane. Its quality depends on how long the device will last from the moment of connection to the first repair. The best products are considered to be food (isobutured) rubber. Metal body of the product is important only for expansion tanks. In the same place where water is contained in the pear, the characteristics of the metal are not decisive.
If you do not draw special attention on the thickness of the flange of your acquisition, then in a year and a half, and not after 10-15 years, as you plan, you will have to buy a completely new device or, at best, change the flange
Particular attention in choosing a device should be concentrated on the flange, which, as a rule, is made of galvanized metal. The thickness of this metal is very important. With its thickness of only 1 mm, the service life of the product will not be more than 1.5 years, since in the metal of the flange a gap is inevitably formed, which will disable the entire device.
At the same time, the guarantee for the tank is only a year when the claimed service life is 10-15 years. So the hole will appear just after the expiration of the warranty period. And to weld or weld thin metal will be impossible. You can, of course, try to find a new flange, but, most likely, you will need a new tank.
To avoid such misfortunes, you should look for a tank whose flange is made of stainless steel or of thick galvanized steel.
Connecting the accumulator to the circuit
As it became clear from all written above, the membrane tank is not just a container with water. This is a special device involved in a continuous workflow. Therefore, the procedure for installing it is not so simple as it might seem. To fix it should be very carefully, taking into account the factors of vibration and noise.
It is necessary to fix the accumulator on the surface with the help of rubber gaskets to reduce the noise level during its operation and to reduce the influence of vibrations on the device itself
To the floor it is fixed with the use of rubber gaskets, and to the pipeline - using adapters made of rubber. And it should also be taken into account that the diameter of the piping can not be reduced at the output of the hydraulic system.
With a new tank should be treated with particular care, filling it with water under a weak pressure. The membrane from long storage could be cascaded. A sharp stream of water can damage it and even completely disable it. It is more correct to remove all air from the pear of the membrane before you start filling it with water. The location for installing the accumulator must be chosen in view of its availability.
Correct setting of a new device
The new tank should be checked for the level of its internal pressure. It is assumed that it should be 1.5 atm. But in the process of transporting the product from the place of production to the warehouse and during storage, there could be a leak that reduced this important indicator at the time of sale. Check the pressure by removing the cap on the spool and taking measurements.
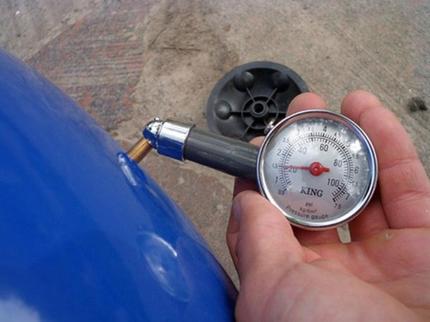
To measure the pressure, you can use different devices, but the optimal is a relatively inexpensive car manometer with a metal body and a sufficiently expanded scale of measurement results
To measure the pressure, you can use different types of gauges.
- Electronic. These are expensive devices. The result of their work can be affected by the temperature and the charge of the battery.
- Mechanical. They are produced in a body made of metal, called automotive. If this device has successfully passed the test, then it is better not to find it. To get the most accurate value, since you will need to measure only 1-2 atm., It is better to buy a device with a large number of divisions on the measuring scale.
- Plastic. Such devices sometimes are equipped with pumps. The error in the testimony of such Chinese models is too great.
If the tank has a smaller volume of air than it needs, its place will be taken by water. This will affect the water pressure in the water supply. When high pressure and the head will constantly be high. More pressure will provide a smaller supply of water in the membrane pear, so the pump will have to be turned on more often. If there is no light, the water supply may not be enough for all needs.
Therefore, sometimes it would be wiser to sacrifice pressure to achieve other important goals. However, below the recommended values, it is better not to lower the pressure, nor to exceed the limiting characteristics. A lack of pressure can lead to the contact of the surface of the pear with the tank body, which is undesirable.
Optimal air pressure
To ensure that household appliances work normally, the pressure in the tank must be in the range of 1.4-2.8 atm. For better preservation of the membrane, it is necessary that the pressure in the water supply system be 0.1-0.2 atm. exceeded the pressure in the tank. For example, if the pressure inside the membrane tank is 1.5 atm, then in the system it should be 1.6 atm.
It is this value that should be put on the water pressure switch, which works in conjunction with the accumulator. For a single-story country house, this setting is considered optimal. If we are talking about a two-story cottage, the pressure will have to be raised. To calculate its optimal value, use the following formula:
Vatm = (Hmax + 6) / 10
In this formula, V atm. - the optimum pressure, and Hmax - the height of the highest located point of water. As a rule, we are talking about the soul. To obtain the desired value, the height of the shower head relative to the accumulator must be calculated. The obtained data are introduced into the formula. As a result of the calculation, optimal value pressure, which should be in the tank.
Please note that the received value should not exceed the maximum allowable characteristics for other household and plumbing fixtures, otherwise they will simply fail.
Image Gallery


Connection Details
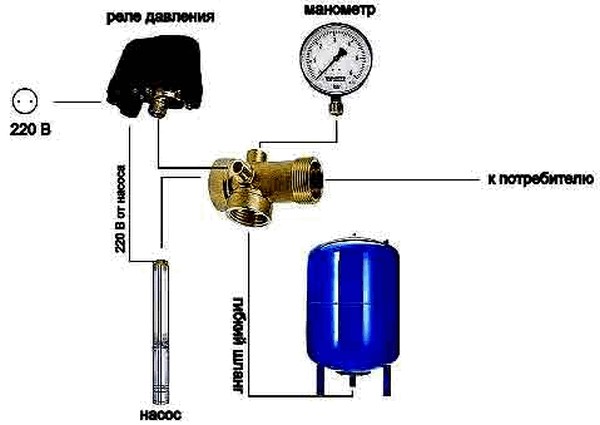
If we talk about the independent water supply system at home in a simplified way, then its components are:
- pump,
- accumulator,
- pressure switch,
- check valve,
- manometer.
The last element is used in order to be able to quickly control the pressure. The constant presence of it in the water supply system is not necessary. It can be connected only at the moment when test measurements are made.
As you can see, it is on this diagram that the manometer is not displayed, but this does not mean that it is not needed at all. Just turn it on at the time of the performance of the control measurements
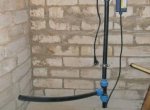
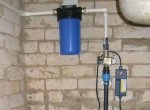
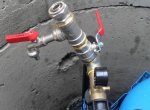
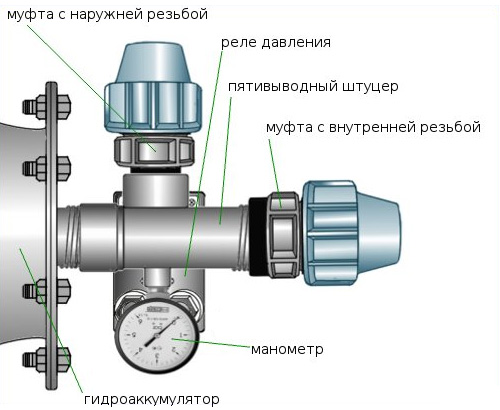
With the participation in the scheme of the surface pump, the hydraulic tank is mounted next to it. The non-return valve is then installed on the suction pipe, and the remaining elements form a single bunch, connecting with each other using a five-branch choke.
The five-drive device is perfectly suitable for this purpose, since it has terminals of different diameters. Incoming and outgoing pipelines and some other ligament elements can be connected to the nipple with the help of American women to facilitate preventive and repair work on separate sections of the water supply. However, this choke can be replaced by a bunch of connecting elements. But why?
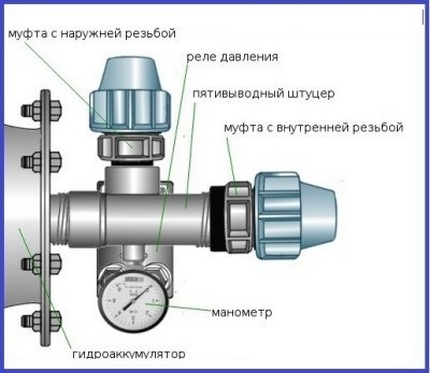
In this diagram, the connection order is clearly visible. When the connection to the accumulator is connected, it is necessary to check the tightness of the connection
So, to the pump the accumulator is connected as follows:
- one inch lead is attached to the nozzle of the tank;
- a manometer and a pressure switch are connected to the terminals by a quarter of an inch;
- there were two free inch outlets to which the pipe from the pump was mounted, as well as the wiring leading to the consumers of water.
To those parts that end with couplings, a pipe from the pump and a water distribution system that will go to the consumers of water
If a surface pump operates in the circuit, then it is better to connect the accumulator to it with a flexible hose having a metal winding.
To the submersible pump, the hydraulic accumulator is connected in exactly the same way. A feature of this scheme is the location check valvea, not having any relation to the issues that we are considering today.
Video instruction for connecting the hydraulic accumulator
If, after reading the text, you still do not understand how to connect the accumulator, look at this video, which briefly but clearly shows all the nuances of this procedure.
The tank is an important component of the water supply system. With its help a whole complex of problems is solved. And it is not difficult at all to carry out the competent connection of the accumulator with your own hands. But the advantages of using it are indisputable.
Providing an uninterrupted supply of water to the cranes and household appliances, it is impossible without the use of a hydroaccumulator. Failures in the supply of water create an additional burden on household appliances connected to the water supply system and pumping equipment. Especially dangerous is the increase in pressure, which in a short time is able to disable the dishwasher or washing machine, as well as damage the pump.
It is for constant pressure in the system and to ensure a smooth start-up of the pump motor, special tanks were built, which accumulate water and create pressure in the pipes. At present, there are several types of hydraulic accumulator, differing in the way they are used.
What it is?
Any hydraulic accumulator is a container in the form of a tank, the body of which can be made of steel, cast iron or extra strong plastic. Inside is the membrane or as it is often called, pear. The membrane is attached to the body by means of a flange with a branch pipe through which water enters.
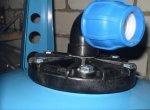
The body has a technical hole for the nipple, through which the required volume of air is pumped into the tank. For convenient installation, the accumulator is equipped with legs and a platform in the upper part of the housing for installing the pump.
An automatic control unit with a manometer and a pressure switch is installed on the branch pipe - this is the "heart" of the entire water supply system.
Operating mode
The principle of the device is extremely simple and at the same time effective. With the help of the pump, water is pumped into the pear, causing its expansion. The air under the casing of the casing (between its walls and the pear) creates an external pressure that pushes water into the water pipes, thereby creating the necessary pressure and pressure of water. Also, air prevents rapid wear and tear of the pear. The air pressure is 1.5 bar.
![]() The pressure in the system is monitored automatically using the control unit, which is responsible for the timely activation and shutdown of the pump. The upper and lower indicators (on off and on) can be seen on the manometer. The relay is adjusted according to the technical passport of the pump. Do not exceed the maximum recommended by the pump manufacturer.
The pressure in the system is monitored automatically using the control unit, which is responsible for the timely activation and shutdown of the pump. The upper and lower indicators (on off and on) can be seen on the manometer. The relay is adjusted according to the technical passport of the pump. Do not exceed the maximum recommended by the pump manufacturer.
All hydroaccumulators are divided into three varieties:
- designed for cold water and water pipes (painted in blue);
- designed for hot water (red color);
- special for heating systems (they are often called expansion tanks).
It is believed that the hydraulic accumulator due to the correct regulation of pressure saves the pump equipment from rapid deterioration. The more capacious the accumulator tank, the less often the pump turns on and wears out. However, the larger the battery, the higher its value in the market. And this factor holds back many owners when buying a battery for domestic water. Manufacturers offer to date different models, capacity from 5 to 100 liters. The largest battery will cost 15 000 rubles. With the help of these devices can be adjusted.
How to connect?
The algorithm for connecting the accumulator is slightly different, depending on the type of installation and the type of pump.
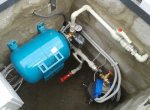
Pipeline with surface pump
 This is the most common engineering solution for a country house. In this case, the pump is always located inside the ancillary, and sometimes the living quarters. Next to it is a hydroaccumulator with an automatic control unit.
Battery connection algorithm:
- The air pressure is checked by means of an automobile pressure gauge through the nipple. Its value should be 0.3 bar less than the pressure set by the manufacturer on the relay.
- Nodes and materials for connection are prepared: a connector with five leads, a FUM tape or a tow, a pressure gauge and a pressure switch (come with the equipment).
- The connector is mounted to the battery by means of a flange with a check valve.
- All other elements are fixed. Screw water pipes for water intake and supply, connects to the corresponding terminals of the relay connector and a pressure gauge.
- The pump turns on and all connections are checked for leaks.
Water supply system for two residential houses from one pump
This is a rare engineering solution that allows one source to be used for abstraction of water.
Battery connection algorithm:
- The air pressure in both batteries is checked in the manner indicated above. The pressure should be the same otherwise the water will not flow into one of the batteries!
- There is a water distribution system for two separate systems. For this, a tee is connected to the pump in the well, connected to the pump and two water pipes in different houses.
- The automation is mounted only to one of the accumulators. The second one connects pipes for water supply and supply, as well as a manometer.
A more practical solution would be to install one battery for two houses with a tee-in. Such installation requires a more powerful pumping equipment, but thus there are no problems with adjustment of hydroaccumulators (the synchronization of pressure is not necessary).
A similar connection principle is used to amplify an already installed pumping station. The second accumulator will reduce the load on the engine, allowing the pump to switch on less frequently.
Connection of submersible or borehole pump
 The most important value in such a water supply system is the installation of a non-return valve, which is mounted immediately behind the pump in front of the water intake pipe and ensures the maintenance of pressure in the system (the water does not flow off arbitrarily).
The order of work is as follows:
- Measured with a rope equipped with a sinker, the depth of the well or well.
- The pump descends into the mine to a depth of about 0.5 meters from the bottom. Pre-installed a non-return valve!
- The water inlet hose or pipe is connected to the pressure switch. For this purpose, a nipple is used for five connectors.
- A manometer and water supply are connected to the connection. And the choke is attached to the accumulator.
- All connections are checked for leaks. It is necessary to use the FUM tape to ensure the integrity of the entire system.
Mounting the pressure switch
When connecting this important technical node, you should pay attention to special labels. To do this, the protective cover is removed from the relay. Under it are the contacts indicated by the corresponding indexes. "Pump" - the place of connection of the specified unit, "network" - the point for supplying the power cable.
If no tags are found (this drawback is present in some models of accumulators), the owner will have to contact an electrician, since it is impossible to determine by eye the method of connection. To seal the place of connection of the relay with the union, a technical flax (seal) with a sealant or a tape FUM is used.
Rules of operation
 Experts recommend that when choosing a hydraulic accumulator to focus on the intensity of water consumption and the number of family members. For a family of two people it is enough to have a device for 24 liters. Houses with large families and high water consumption need a more capacious battery. If you install a 24-liter model and connect a powerful household appliance, the head in the system will constantly fall, causing frequent pump starts and wear.
AT maintenance The device includes a regular check of the air pressure by means of an automobile manometer. The pump must be switched on too often. This is a sign of depressurization of the hydraulic accumulator or rupture of the rubber pear. Both breakages are easily eliminated. However, delay in repair can cause a pump failure.
It is mandatory to adjust the factory settings of the pressure switch for a specific water supply system and a pump. The optimum difference between the upper and lower pressure index (according to the integrated manometer) is one or two atmospheres.
A large capacity battery will prevent the pump from turning on frequently and provide a water supply in case of an emergency.
Accumulators with a horizontal position are used for installation.
Vertical batteries with higher capacity are ideal for working with submersible pumps.
A hydraulic accumulator is an installation that is used to maintain pressure and create a reserve of water for domestic purposes during pump shutdown. This device is presented in the form of a water tank with a rubber elastic membrane inside it. The membrane itself has a hermetic connection to the metal casing of the tank, which is carried out by means of a flange. The space located between the metal casing and the membrane is filled with compressed air.
Without the use of this unit it is rather difficult to imagine a qualitatively functioning of the whole. Accordingly, the issue of choosing this device is as acute as possible. Given the lack of specific knowledge in this area, it is difficult to choose the most suitable device. In this context, it would be advisable to involve a third-party specialist in order to obtain advice.
Principle of operation of the accumulator
The accumulator consists of a metal casing and a membrane. Also in the device is installed a flange with a through-valve and a nipple, intended for pumping water. The principle of operation of the device is quite simple.
At the initial stage, the pump starts pumping water, which subsequently falls into the rubber membrane inside the hydraulic accumulator. The capacity is filled until the pressure is at its maximum. The level of this indicator can be pre-set on the relay-regulator. If the maximum pressure is reached, the pump is switched off automatically. It should be noted that the frequency of the frequency of switching on and off the pump directly depends on the volume of the accumulator - the more it will be, the less often this procedure will be carried out.
Thanks to the installed hydraulic accumulator, the pressure inside the water supply system can last for a certain period of time. This will allow a little to maintain the entire system.
Types of accumulators
First of all, when choosing hydraulic accumulators, attention should be paid to the volume of the device, which can vary from 24 to 1000 liters. To do this, you must first analyze the amount of water that is regularly consumed for household purposes. If we talk about the minimum requirements in the form of a toilet, shower, kitchen, watering beds in the adjacent area, it is quite possible to do with a battery with a volume of 24 liters. If we are talking about more global goals, then we should take advantage of a more substantial device. In extreme cases, if necessary, in order to increase the amount of water consumed, it is possible to additionally install a second hydraulic battery of minimum size.
Classification by installation method
According to this feature, hydraulic accumulators can be horizontal or vertical. The difference between these devices is not only in the method of placement, but also in the different removal of excess air.
- In hydroaccumulators vertical type A fitting is provided with a valve through which the air is vented. In horizontal hydraulic accumulators it is necessary to use an additional section of the water pipe, which consists of a ball valve, a drain and an air outlet nipple. Here it should be noted the fact that there is no valve in the horizontal accumulators of the minimum volume.
- Hydraulic accumulators horizontal type are used for the subsequent installation of external pumps on them. Vertical ones are used when working with submersible pumps.
Classification according to purpose
Here it should be noted that there are three types of hydraulic accumulators. Each of them has its own design features and various operating conditions.
- The first of them are intended for cold water. They are used to supply and store liquid. In addition, such devices are capable of performing a protective function, minimizing the possible damage from the mechanical impact that occurs as a result of water hammering during pressure surges.
- The second type of accumulator is used for hot water . The peculiarity of this device is that it is able to function at the highest possible temperature values of the liquid.
- The third type of hydraulic accumulator is used for heating systems and is its very important element. Such batteries have the form of expansion tanks.
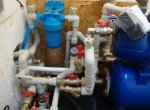
Features of connection to the surface pump
The hydraulic battery can be connected to a surface or submersible pump. The technology of work in different cases will be somewhat different. When connecting to a surface pump, you should first pay attention to checking the air pressure in the tank. For the procedure, you may need a choke with five outlets, a manometer, a tow and a sealant.
The sequence of actions will look like this:
- Checking the pressure in the tank.
- Connecting the connection to the tank.
- Relay connection.
- Connecting the pressure gauge.
- Connecting the pipe leading to the pump.
- Testing and running the system.
The connection here is necessary for a good connection between the pump, the accumulator, the pressure gauge and the relay. The fifth output may be needed to connect water pipe, leading into the house.
At the initial stage, connect the connection to the tank by using a rigid hose or flange. After that, a manometer, regulator and a pipe running from the pump are screwed to it.
Important! At the end of the work, it is necessary to seal all threaded connections by using a pack and a special sealant. The pump must be started only after a thorough examination of all areas for the presence of leaks.
Features of connection to the submersible pump
Submersible pump, in contrast to the surface, located directly or well. From there, water flows directly into the hydraulic accumulator. When connecting the device in this case, it is very important to focus on installing a check valve, which is necessary to prevent water from being squeezed out by the membrane.
The hydraulic accumulator in this case is installed on the pump before the water is supplied. In some cases, the thread on the cover of the device for pumping water is cut. This is necessary in order to facilitate the installation procedure.
Very carefully, the installation of the check valve should be carried out. This solution will help prevent the membrane from being squeezed back into the well. This directly affects the quality of functioning.
After the installation of the check valve has been successfully carried out, it is possible to proceed with the resolution of the next issue, which involves the connection of a water supply pipe. Preliminary, the length of the pipe should be measured. To do this, you can use a simple rope with a load at the end. Measure the data from the very edge of the well to the pump. It is advisable to make it so that after a calculation of the length the pump can hang over the surface of the bottom of the well at about 20 or 30 cm in height.
An obligatory element in a private house is a hydraulic accumulator for systems. It smoothes fluctuations in water pressure, saves the life of the pump and feeds the system during a short-time power outage.
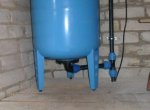
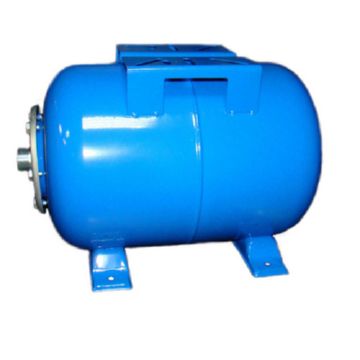
The body of accumulators is a sealed metal tank, usually cylindrical. It is available for both horizontal and vertical installation. Differences - in the placement of legs.
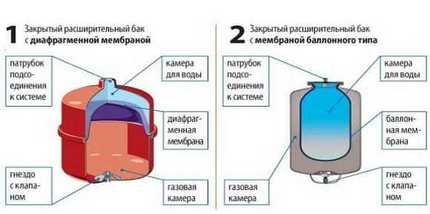
Depending on the operating element used, the hydraulic accumulators are of two types:
- Membrane.
- Balloon.
If a membrane is used in the tank, it divides its internal space into two parts: one contains air, the other enters water. In the membrane unit, the working element is not removable. At its impulse the whole accumulator is replaced. But the membranes are durable.
In the cylinder accumulator, the working element resembles a pear. It is located inside the air chamber and is filled with water. This type is convenient because the failed balloon ("pear") can be replaced by yourself.
Connection diagram
Where is it better to install a hydraulic accumulator for water supply systems?
Depending on the pump used, there are three options for placement:
- In the house after the surface pump, if installed.
- In the pipeline entering the house, when using a submersible pump.
- In the septic tank after the intake pipe, if there is a low-capacity submersible pump in the system.
You can make installation of the accumulator for water supply systems by yourself. For installation in the house use a special fitting for five pins ().
To each of them are connected:
- Accumulator.
- Pump.
- Pressure switch.
- The line of consumers.
- The manometer.
How to properly connect the accumulator for water supply, is indicated in the figure.
The only optional element is a manometer, without which the system can work successfully. It can also be installed elsewhere, for example, on a hydraulic accumulator, where the cylinder is attached.
Having bought a pumping station, you do not have the issue of placing elements (). After all, everything is arranged in it, as required. You will need to connect the water inlet and outlet, as well.
When you choose a submersible pump, the scheme of connecting the accumulator to the pump and the water supply system will be as follows.
If the installation is carried out in a septic tank, the following elements are connected to the five-branch fitting:
- Accumulator.
- Fence line.
- Pressure switch.
- The main water supply to the house.
- The manometer.
In the septic tank, the scheme of supplying a private house from a well with a hydro accumulator looks like this.
For any method of installation, it is advisable to install an overhead valve near the accumulator.
Do not try to stick the accumulator after the boiler or in the heating system. Adventures on the Internet can give you such an idea. Modern boilers and gas boilers do not need additional units. They are not afraid of temperature expansion. If compensators are needed, they are there. High blood pressure is reset by safety valves.
Preparation for work
How does the accumulator work for water supply? It is charged by the pump to a certain pressure and then feeds the consumer system with water until the pressure drops to the lower limit.
Then the pump starts up again. For everything to work properly, you need to make settings and check the filling of the tank with air.
Pressure adjustment
The Russian manufacturing plants usually set the pump on-pressure to 1.5 atm, and its shutdown at 2.5 atm.
Foreign relays are adjusted to 1.4-2.8 atm. There are parameters that are unusual for a private house: 5-7 atm. In this case, make sure that the relay can be adjusted in the desired range: 1-3 atm. Information about this is in the passport of the goods. After purchase, set 1.5-2.5 atm.
You can adjust the controller and to other numbers, but it does not make sense. After all, at 2 atm the main household consumers are calculated: a shower, a washbasin, washer. Only some, for example, Jacuzzi, require 4 atm. At 6 atm or higher, seals in the system and consumers fail.
The difference between the pump on and off pressure should not be more than 1.5 atm. A large drop leads to a strong stretching of the membrane (balloon) and a shortening of its service life.
If the pressure is indicated in bars, nothing changes in the settings, because 1 atm = 1.01 bar.
Pumping air into the accumulator
To measure the air pressure in the battery tank for water supply can be a manometer for the wheels, and pump up - by a car pump.
How much to pump, it is indicated in the passport and on the hull of the accumulator. But it is better to use other numbers to make the device work correctly. The air chamber must contain 0.2-0.3 atm less than the pressure at which the pump starts.
For example, if the relay is set to 1.5-2.5 atm, then the air chamber is pumped up to 1.2-1.3 atm. This is done at the set pressure of water in the system.
Replace work item
If the pear-shaped balloon has lost its tightness, replace it. You can determine the malfunction by instable pressure in the system and frequent switching on the pump during water consumption.
Are there any doubts? Click on the spool of the nipple. With a torn "pear", there is hardly any hissing: the air mixed with water.
The first stage - removal of the flange
To change the cylinder, you must first detach the flange of its attachment to the tank.
To do this, do the following:
- Switch off the pump.
- De-energize the system.
- Defeat the water pressure. To do this, just open the tap in the washbasin so that the pressure on the manometer is zero.
- Close the overhead crane, which cuts off the accumulator from the system. If it does not, you have to drain the water through the drain cock. It should stand at the lowest point of the consumer line.
- Unscrew bolts on the hydraulic accumulator flange. Usually, there are 6 of them. At the same time, the water that has entered the air cavity begins to come out. Let her go completely.
- Remove the flange.
The main cylinder mounting is carried out with a flange. But often manufacturers make another fixation with the opposite side, using the union. If the tank is vertical, the flange is on the lower end, and the union is on the top.
The fitting may have a water pressure gauge, an air bleed valve from the water cavity or a plug. Nearby manufacturers have a point of charging the accumulator air.
The second stage - the extraction of the tank from the tank
If the flange is the only place for fixing the "pear", then remove it from the outside. Otherwise, it is necessary to unscrew and remove everything from the union, including the fixing nut, and push it into the body of the accumulator.
Clean the tank from the inside
.
The third stage - installation
Now you will learn how to assemble a hydraulic accumulator for water supply.
Follow the steps:
- Prepare a new pear-shaped cylinder of the same model as it stood. The product number is written on the housing of the accumulator.
- Place the "pear" in the tank in its place, having previously screwed into it the fitting removed from the torn cylinder. If the accumulator is small, you can easily get into the hole by putting a "pear" on your arm. Otherwise, pull the nipple over the fishing line, which you need to wind on its thread and tie it to the knot.
- Remember how the choke was disassembled, and mount the old elements back on it.
- With its protrusion, the container must rest on the flange of the tank. Bring the ledge out. It is a fastening part and at the same time a gasket.
- Spread your hand with the "pear" so that it will not be twisted.
- Install the flange and tighten the bolts.
At the final stage, connect the hydraulic accumulator to the system, fill the air cavity of the tank, apply electricity and turn on the pump.
Check that after the pump has been automatically turned off, the water pressure on the manometer has reached 2.5 atm or the value that is set on the regulator.
If the pump is not working smoothly, dispose of air-cork: open the wash-stand tap or use the bleed valve.
Ensure that there is no leak in the cylinder mounting area.
Selecting a size
Before you buy and install a hydraulic accumulator for water supply systems, you need to calculate its required volume. The correct calculation is when the pump is switched on with a periodicity of 10-30 minutes.
If you spend 15 cube per month. m of water, then a day goes polkuba.
Break the expense for the daytime hours. It will be about 50 liters per hour. If you buy a 50-liter accumulator, you should have it enough. The volume of the water chamber is 3-4 times smaller: approximately 15 liters. Hence, the pump will be switched on an average of 3 times per hour.
But you can have busy periods of the day: watering the garden, washing, bathing. Measure these watches separately. If the frequency of the pump is less than 10 minutes, select a hydraulic accumulator of more than 50 liters.
Excess volume, which you can not spend for an hour, is also undesirable. It will lead to stagnation of water.
Perhaps the following articles on water supply will help you:
Video about the principle of the accumulator.