Installing a washing machine in the bathroom. A typical earthing scheme is based on modern PUE. How to connect the washing machine to the sewer
Connection of communications and installation of the machine are the most expensive services of service centers. If you know the initial skills of plumbing works, then you can save a couple of thousands and install the device yourself.
When self-assembly Do not neglect the advice of the manufacturer and look at the instructions. Some models may have technical nuances and clever loopholes that the user should be aware of before starting work.
Choosing the Right Place
Connecting the washing machine to the water pipe with your own hands will not do without the right choice of location and access to basic communications - water, electricity, sewage. To reduce noise to a minimum and guarantee safe work apparatus, it is necessary to find an optimally flat and stable place away from heating devices. The concrete base is the most stable base for the machine. If necessary, the unit can be "adjusted" using rotating legs.
Where will the washing machine fit:
- Bathroom - a classic of the genre and almost ideal. Communication is close, the working area is convenient, the only inconvenience is the risks associated with high humidity in the room.
- Kitchen - the choice of those who do not fit the stylalka in the bathroom. Most often, the machine fits next to the sink or mounted in a built-in kitchen set.
- Toilet is the solution for the desperate. Narrow and wall-mounted washing machines - the best option, able to save space. The main feature - the supply of communications requires sophisticated methods and selection of tools for each individual case.
- The living room is most often a hidden option, like "a stylalka in a closet." For this premise, it is almost always necessary to separate pipes.
Remember, if you chose the option "Stiralka in the living room", you have to mount the pipes. Most often this option involves the installation additional pipes supply and discharge of water. The system will have to lead from the bathroom or from the kitchen - from where closer. Sometimes it is necessary to install the socket separately.
Ways of tapping into the water pipe

First of all, the methods differ depending on which pipes are used: metal, metal-plastic or plastic. So, if you have the first option, it is most convenient to use the "vampire" clamp, here is the second case - a tee fitting, and in the latter for a good connection you will have to solder a tee in the pipe.
Do not forget that there are simpler and cheaper ways to connect to the water pipe - through the gates.
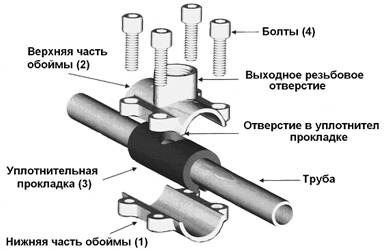
Connection to a metal pipe
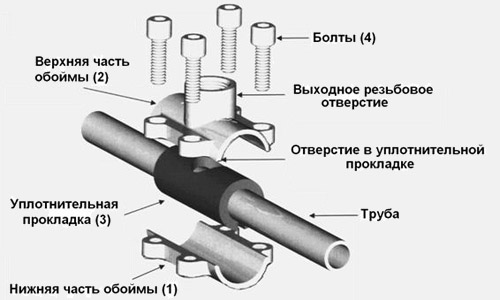
For tapping into the pipeline from the metal you will need a mortise clamp. In the assembled form, the device plays the role of a tee and provides the supply of water to the washing machine. The tightness of the connection is ensured by the elastic band that comes with the clamp.
Selecting the location for the clamp

From the choice of location for the device depends the reliability of the connection to the pipeline, as well as the convenience of its installation.
- Clamp is better to install on the pipe section, which is located after the coupling.
- Select the most even section of the pipe so that the yoke tightly adjoins it.
- First of all, it is necessary to clean rust, paint or other coating from the pipe on which the clamp is mounted. This can be done with a file, sandpaper or a conventional knife.
- The guide sleeve must be inserted into the yoke inside the long end, tightly fixed in the hole of the gasket. In this way you will ensure immovability of the gasket and it will not move during the installation of the clamp.
- After these preparatory manipulations, attach both parts of the device to the pipeline, then press all the bolts (four of them).
- While holding the clamp, tighten the bolts.
Tighten bolts better crosswise. So you eliminate the skew of the parts and thereby ensure a better fit of the gasket to the pipe and clamp. Try to make the gap uniform from all sides.
During the tightening of the bolts, the bushing guide will be pushed out by itself. When it comes out completely, the gasket will fit snugly against the pipe.
It happens that the bushing itself does not come out. Then you can tighten it with a screwdriver.
After the work is finished, it is necessary to check how well the device is installed. To do this, look through the hole of the yoke on the gasket. If it has a round hole, then the clamp is clamped evenly. Otherwise, tighten or loosen the bolts.
Paving the way for water

Before you start, do not forget to close the water, only after that you can start drilling a hole in the pipe:
- Take the guide bushing and insert it into the hose clamp with the inside.
- Place a 6-7 mm diameter drill on the drill.
- Put a basin or other container under the clamp (after drilling, water flows from the hole).
- Drill a hole.
- Open the nearest mixer that is powered by this pipe.
It is better to open the valve slowly. If this is done quickly, then the jet can break out by two meters and the basin will not help. As the water dries, it will wash away part of the chips formed in the drilled hole.
- Remove the debris from the yoke with a cloth or bandage. Toilet paper is also good for this. At this point, the tie into the pipeline is over, now you can connect a tap, pipe or hose to the clamp.
Connection to a metal-plastic pipe
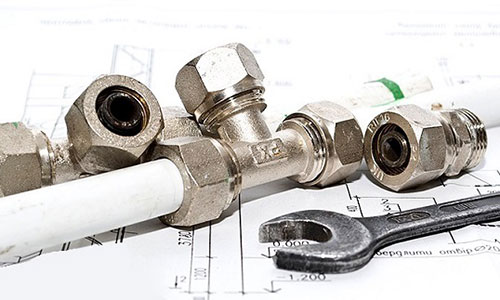
The connection scheme of the washing machine to the water pipe from the metal-plastic differs from the previous one, it is simpler, and instead of the clamp you will need a tee. For work you will need a wrench and a calibrator.
Progress:
- Measure the mounting length of the tee.
The installation length is the length between the beginning of the fittings, that is, without taking into account the thread.
- Find an even section of the pipe, measure the mounting length on it, cut off the resulting piece.
- On both halves of the tube, put on the nuts, as doing this after expanding the holes with a calibrator will be very difficult.
- Extend the ends of the tube with a calibrator so that the tee fittings are inserted into it.
- After you put on the tightening ring and insert the union as far as it will go into the pipe.
- Tighten both nuts alternately, while holding the tee so that it does not scroll.
Cutting into a plastic pipe
Perhaps the connection to a plastic pipe is the most difficult, since it requires the presence of a soldering station and the skills to work with it.
In this case, you can get by using the "vampire" collar, but plastic pipes thinner walls, so they have a smaller outer diameter. Consequently, tightly clamp the clamp will not succeed and it will be necessary to put additional gaskets between the clamp and the pipe. Therefore, it will be difficult to mount a sealed structure.
If you have a soldering station, there will be no problems with the installation of the tee. It is necessary to cut off an extra piece of pipe, after having measured the installation length of the tee, and then insert the tee and seal the structure.
Do I need a tap?
The answer is obvious - a tap for connecting the washing machine to the water supply is necessary. The machine may break and then it will have to be taken to repair. And if the tap does not, then you have to shut off the water completely. And repair can last not one day. Now sit without water or clog tightly the hole of the pipe?
Where should I install the faucet?
The closer the valve is to the tee, the better. If there is a violation of the tightness of the pipe or the connection of the hose to the pipe, you can always block this section. In extreme cases, the valve can be installed in front of the filling hose. The latter has the property of quickly failing, especially if the machine often moves from place to place.
Which is the best choice?
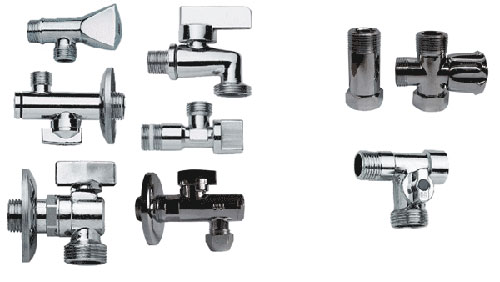
Do not buy cheap valves. They do not last long, and it is rather difficult to replace such an element. You can use both conventional walk-through models and angular ones. It all depends on where it will be installed. Acquire a faucet that will be convenient to use later. Experts recommend installing after the tees angle valves, although the ball is quite suitable. In order not to spoil the appearance of the room, you can buy a decorative corner model from stainless steel.
Crane installation
For installation, you will need a FSM tape and a gas wrench. A thread is required at the end of the pipe. On tees, it is present, so it's easiest to install the valve on them.
Installation process:
- on the external thread, wind the FSM tape;
- turn the tap first with your hands;
- tighten it with a wrench.
In the case of a metal-plastic pipe, the crane can be installed in a similar way to the tee.
Connecting the inlet hose
Basic rules for simple and successful installation:
- the length of the hose should not exceed 3 meters;
- before it is better to install a crane;
- for connection to the pipe, it is necessary to reel the PCB tape for better sealing.
First, screw the hose to the washing machine. You can do it with your hands without tools. After this, screw the hose nut onto the pipe or the tap.
Control start
After all the above manipulations, turn on the machine and run the trial program. The machine should get water without problems, start washing and discharge. Check the system for leaks and start using.
Buy such a necessary and integral now household appliance, as a washing machine - this is only part of the case. The main importance is the connection of the washing machine - it is not possible to properly install and connect such a device to everyone, and to connect it to the ready communications yourself, you should carefully read the step by step instructions with photo. If you are not confident in your abilities, it is better to call a professional specialist right away.
How to connect a washing machine yourself
Installing a washing machine with your own hands can save a lot of money. Before proceeding with the installation, you will need to determine the location for the household appliance. In recent years, this device is increasingly placed in the kitchen, tk. it is convenient and due to the fact that bathrooms in the houses of old buildings have a relatively small area. Sometimes this problem is solved in the corridor, the hallway. In addition, check the connection diagram for the communication systems and the instructions that come with the selected washing machine model. Main stages:
- preparation;
- connection to the sewage system;
- connection to the water supply;
- aligning the device position with a level;
- connection to mains.
To which water to connect
To plug washing machine the machine must be connected to a cold water. In addition, you will need to adjust the height of the drain for waste water. If the device is equipped with two carts, then this fundamentally changes the case, because it can be connected to both cold and hot water. Before installing the household appliance and connecting it to the hot water, familiarize yourself with the negative aspects of its use:
- If very dirty laundry is poured immediately hot water, then the dirt seems to "boil", after which it is more difficult to wash it.
- Rinsing in hot water is performed worse than in cold water.
- To hot water, unlike the cold, not such strict requirements are made.
- When the gulf immediately hot water, all the supplements (enzymes) in the powder immediately die, not having had time to fulfill its purpose.
Connecting the washing machine to electricity
When planning to connect a washing machine without the help of a master, pay special attention to the connection of the device to the mains. For a start, it would be nice to consult with a knowledgeable master about this. In addition, do not forget that the socket electrical network to connect the household appliance must be waterproof. All works at this stage are carried out according to the scheme:
- To ensure the necessary protection against electric shock, it is absolutely necessary to ground the switchboard. For this purpose, use a special tire with a cross-section of at least 3 mm.
- To connect, use electrical outlet three-wire type with the presence of phase, zero and ground wire.
- At the last stage, the grounding wire must be carefully insulated.
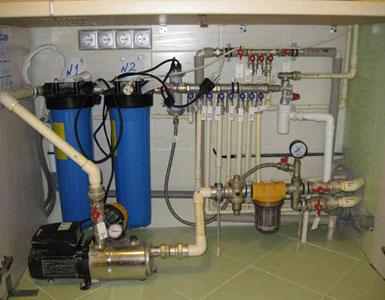
How to connect a washing machine to a water pipe
If you are professionally connected to a water pipe, you must use stop valves - Ball Valves. Thanks to them, if necessary, you can turn off the consumer. Self-connection to the water supply requires a thorough approach - use flexible hoses with a diameter of 3/4 inches for this operation. Do not make a mistake with the length of the hose. Connection order:
- Make in a certain place water pipe thread, then install the valve. After each wash, the water must be completely shut off.
- To prevent mechanical particles from getting into the drum of the device, install a protective filter mesh.
- For the supply of water, the use of ready-made additional taps to the flushing tank or to the mixer is used, by connecting the pipelines through special tees. Before each wash, you will need to unscrew the mixer hose and connect the filler pipe.
Tee for connecting the washing machine
The best way to connect a washing machine to sewer pipes is to perform a stationary drain of water. In this case, you do not have to worry about how correctly the temporary hoses are installed. To connect the machine is best to use a crane-tee, which is convenient in that its availability allows you to cut into the water supply several household devices, for example, a washing machine and a dishwasher. Types of cranes: directly tees and passing models.
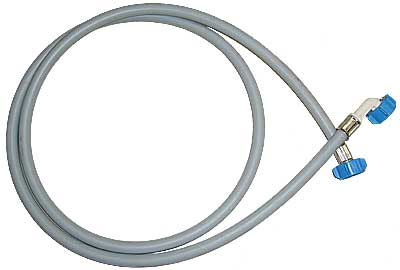
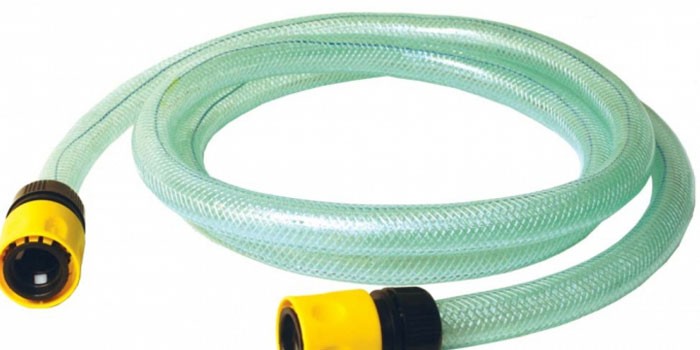
Hose for connection
When planning to bring all the necessary communications to the car, using, for example, a fixed connection, take care of purchasing the filling hose in advance. Its base is a tube made of PVC, reinforced with a braid of nylon and reinforced yarns. The ends are strengthened by means of metal sleeves. The length varies from 1 to 5-6 m. It can be enlarged with special connectors (adapters).
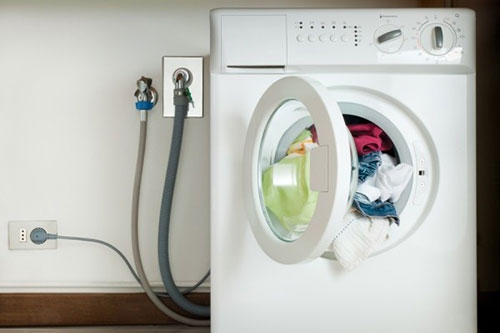
How to connect a washing machine to a sewer
Connect the drain necessary in view of some features. For example, devices without special valve (reverse), which transmits water only in one direction, can not be installed without taking into account the level limit on which the outlet hose is located. Pay attention to the location of the drain hole. If it is in the lower part of the hull, the drain hose will have to be lifted and fixed at a certain height. This approach will prevent untimely outflow of water during the washing process.
Organization of plums
Many home masters believe that in this process there is nothing complicated, because you can simply throw the drainage pipe over the edge of the sink or bath. This approach can not be called appropriate, because it is not safe. Often, washing machines are connected to the sewage system in order to organize the draining through the siphon of the sink. This scheme is reliable and simple - due to the difference in altitude, the water from the drain can not penetrate into the hose (drain) when it is empty. True, the smell of sewage can penetrate into the cavity of the household appliance.
You can purchase special siphon, having a tap for connection of a hose (drain). Inside it is a non-return valve. Such a product perfectly delays bad odors by letting drains into the sewer. Another way is to organize the drain directly to the sewer, but keep in mind that this method is the most expensive and time consuming. It is ideal if the washing machine is away from the sink.
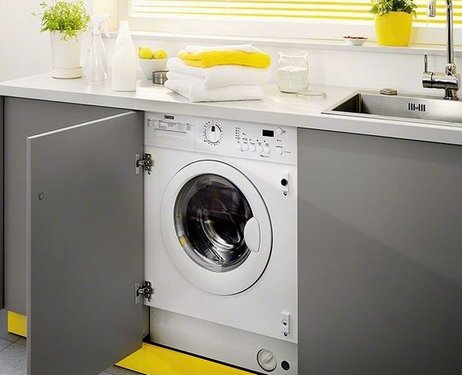
How to connect a washing machine in the kitchen
Compared with the installation in the bathroom, the installation of such a machine in the kitchen is an opportunity to collect all the key household devices in one room. In addition, the kitchen has more free space. Due to this, the choice of the model of the machine for embedding is practically unlimited. True, the powders stored next to it can evaporate harmful substances, so you need to keep them away from food. You need to install it.
At last your dream has come true - in the house has appeared. Washing now becomes a pleasure! But before this happens, you need to install and connect the washing unit. You can do it yourself, you do not need to invite specialists.
First of all, carefully read the instructions to your washing machine. Unpack it and remove the seals located on the sides of the machine (if any). Then carefully look, whether there are scratches on the machine or any defects, and also check up a complete set. And if everything is in order, you can install the washing machine in a permanent place. For successful operation of the machine it is necessary to connect it to electricity, water supply and sewerage system.
Installing and connecting a washing machine
Check the strength of all joints and joints again. You can turn on the water and open the tap, letting water into the machine. And now it's time to start a trial wash. To do this, select the program that is minimal in time, and select the maximum temperature (this is required to remove residual grease from the machine). Closely monitor the process: is there no leaks, does not "pluck" the electricity of the car body, does not it "jump". And if the installation of the washing machine you had the right, then the washing will be successful.
To install a washing machine it is not necessary to call a master whose services will not be expensive. Using the recommendations of the manufacturer, how to connect a washing machine yourself, you will be able to correctly implement all the necessary manipulations with minimal financial costs.
First of all, you need to think about the place where the unit will be installed. Modern models that require connection to water and sewerage, have a stationary placement, since their transfer is very difficult.
When determining the location of the machine, it is necessary to take into account factors such as:
- available near the water supply and sanitation system;
- possibility of easy connection to the mains (preferably not through an extension cable, but directly);
- the presence of an even (better reinforced) floor;
- a harmonious combination of the washing device with the interior of the room;
- free access from all sides: in addition to easy loading of laundry, it is important to have a clearance from the side of the wall so that you can get accidentally dropped underwear or another object.
In practice, washing devices are usually put in the bathroom, in the kitchen or in the corridor.
Bathroom. This is the traditional location of the machine, as in this room, which has all the necessary communications, it is easy to equip a drain and supply water.
The disadvantages of this option include the miniature size of most bathrooms, which is why the owners often have to choose compact models. In addition, for such spaces is characterized by high humidity, which can affect both the state of electrical wiring and the health of various parts of the "washers".
Kitchen. This room is also often used to mount the unit, which is usually installed under the sink or next to the sink. Since this room is usually also small in size, washing here sometimes hinders the owner. In addition, the temperature and humidity conditions in the kitchen also do not always correspond to the rules for the operation of washing machines.
Automatic typewriters are often used in kitchens. In this case, both built-in and conventional models can be used
Entrance hall and other office space. An unusual, but quite acceptable option is to install an automatic device in the hallway, closet, utility room or even a spacious wall cabinet. The only obstacle in this case may be the lack of easy access to communication systems.
The purchased machine is delivered to the apartment in a packed form. All rotating parts are fixed by fastening elements (bolts, bars, staples), which protect the device from accidental damage during transportation.
Before starting the installation, it is important to remove all fasteners (bolts, clamps, clamps) that protect the machine parts during transport
The imported "styralku" should be released from the box, after which it is necessary to remove the fixing parts:
- From the rear wall of the unit you need to remove the clamps, which are installed for the rigidity required for the transport of household appliances. Similar elements are also held by the flexible parts of the structure, namely the hose and electric cord.
- After this, it is necessary to remove the bars laid between the tank and the body of the device. To do this, it is enough to tilt the "stick" forward slightly.
- It is also necessary to remove the bolts that are installed on the front of the machine to fix the drum. In the holes from the removed elements, it is better to insert plastic plugs immediately (they are usually included in the model kit).
The released fasteners must be carefully packed and stored: they can be used when contacting the customer service.
Steps of connecting the machine
To start the operation of the washing device, the following steps must be performed correctly:
- align the device, giving it an optimal position;
- to connect to a water pipe for a water intake, necessary at washing;
- connect to the sewer to drain the water when implementing the set program (washing, soaking, rinsing, spinning);
- connect to the mains to ensure electric current, which drives the motor of the unit.
Aligning the washing machine
For the automatic machine to be used with maximum efficiency, its installation should be approached with the utmost care. Particular attention requires a floor foundation, which must meet a number of criteria:
- strictly horizontal surface;
- strong structure;
- sustainability;
- protection from vibration and other influences that are unavoidable in the operation of the unit.
If the basis does not meet this criterion, it is better to take measures to implement them. On fragile surfaces it is desirable to produce a cement-sand screed or to strengthen existing floors in the place of the alleged installation of a washing device.
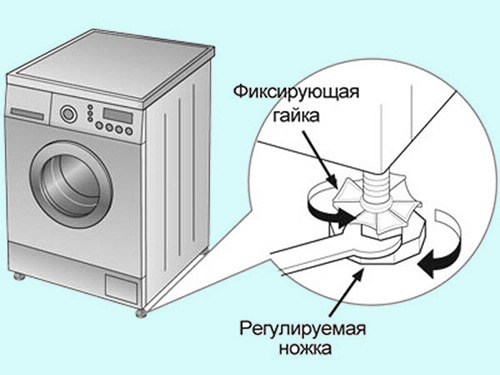
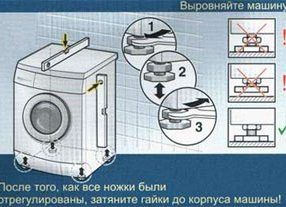
The diagram clearly shows how to adjust the height of the legs of the washing machine, which is necessary to give it an immaculately horizontal position
After making sure that the base meets all the previously mentioned requirements, you can proceed with installation.
Completely unpacked machine with the retracted fastening elements is put on the chosen place. On the upper surface, the horizontal orientation of the installation is determined, while the angle of deflection, which is verified by top cover, should not exceed two degrees. Exceeding this indicator leads to a sharp increase in vibration, which has a very negative effect on the condition of the nodes and significantly shortens the life of the machine.
Adjustment of the position of the unit is achieved by changing the height of the support legs: to increase the distance from the floor, they can be unscrewed, and to reduce - to screw.
It is strictly forbidden to put under them improvised materials that can slip out from under the supports during work, which can lead to the creation of an emergency situation. At the same time, it is allowed (and even recommended) to put a mat of fine rubber on a sliding tile surface.
As soon as the body of the machine takes an ideally horizontal position, tighten the locknuts counter-clockwise, fixing the optimum height of the support legs.
- the greatest degree of stability of the unit is achieved with maximally screwed up adjusting supports, but this option is only permissible for a perfectly flat surface;
- when installing the machine on an inclined floor for fixing supporting structures, it is advisable to use fixing parts;
- to check whether the unit is correctly installed, you need to try to swing it diagonally. If the process is done correctly, there is no free stroke or its amplitude is the same for different diagonals.
After verifying the correct position of the unit, you can proceed to the next steps.
Connecting the machine to the water supply
The most difficult and responsible part of the installation of the machine is its connection to the water supply system. To do this, you should:
- Evaluate the location of the unit to choose the connection method, on which the selection of hoses, fittings, fittings depends.
- When determining the necessary length of flexible pipes, it is important to consider that they should be placed behind furniture and sanitary equipment so that they do not interfere with walking.
- As a rule, complete with a machine hoses are offered, however their size is often insufficient. In this case, it is better to purchase extension cords that facilitate the installation.
- Required elements for connecting the "stilalki" to the water pipe is also a ball valve or a valve, the choice of which depends on the layout features.
Usually, the connection is made on the straight section of the pipeline, using a tee or a tube of the pipe, to which is attached a flexible connection from the toilet bowl. Sometimes it is more convenient to apply fasteners to the mixer (when pumping cold water to it). It is also possible to connect the unit by means of an additional mortise clamp.
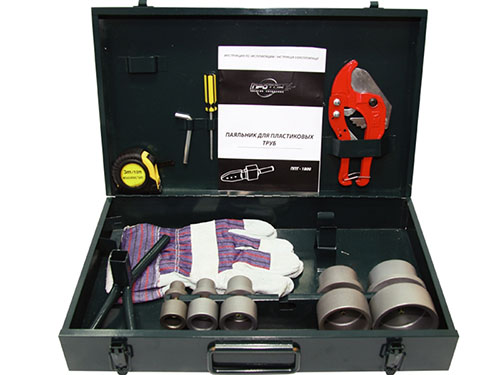
Preparation of materials and tools
To connect to a metal pipeline, you will need gas and wrench wrenches, as well as gaskets - FUM tape or carded linen (preference is best given to the latter, since it swells under the influence of moisture).
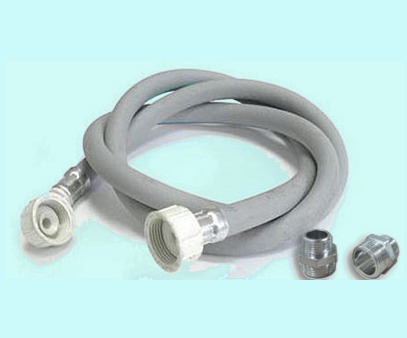
To connect the washing machine to the water supply system, you will need flexible hoses, fittings of different types, as well as all kinds of fittings
If we are talking about a sidebar to an internal water pipe made of polymers, we will have to use special equipment for soldering plastic pipes, calibrator, as well as special fittings designed for plastic and metal-plastic.
Having prepared everything you need, you can proceed directly to the connection of the washing machine to the water.
Fastening the hose to the washing machine
First of all, you must connect the enclosed or purchased separately hose directly to the unit. To do this, you should:
- in the end of the hose expose the filter (its convex edge should be directed toward the direction of the washing machine;
- tighten the nut in the place where the hose is fastened to the device. The tightening is done manually, the use of keys is undesirable. Rubber seals used for fastening, promote tightness of the connection.
After this, it is possible to start connecting the machine to the water source. There are several possible options.
Connecting the "machine" to the toilet
The easiest and quickest way to connect the washing device to water supply, which has become widespread. Instead of complex installation operations, it is enough to make a few elementary steps, even for a beginner.
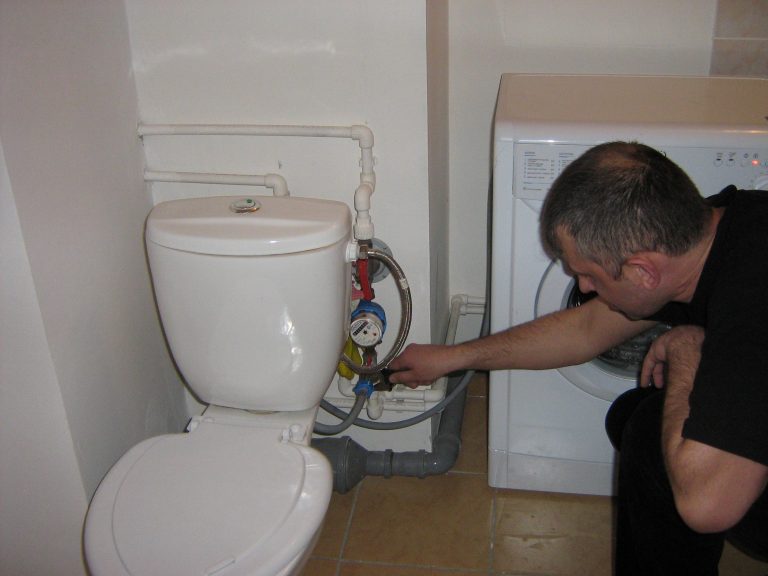
The easiest way to connect the machine to the water pipe, using the toilet bowl. This elementary manipulation is easily performed even by a beginner
To connect, you must:
- remove flexible piping from the tube;
- wind the fitting-tee;
- connect to it a flexible piping from the tank and a hose for supplying water to the "stylalka" through the valve or shut-off valve.
Unfortunately, this option can not be used when installing a washing device in a separate bathroom or kitchen, because the automatic unit and toilet should be in the same room, preferably a short distance from each other.
Attaching the machine hose to the mixer
A popular option is also to connect the washing unit to the mixer, which can be used in almost any room.
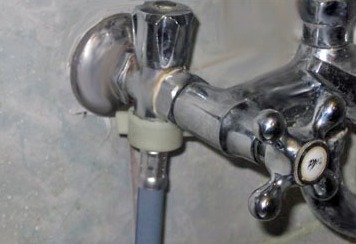
The water supply to the unit can be ensured by connecting the machine to the mixer. This is a fairly easy way, which can be applied not only in the bathroom, but also in the kitchen
For this method, a special version of the tee is required, the design of which provides for an integrated ball valve. This part is installed in the space between the cold water supply tap in the mixer, cold water to the same detail.
This method is reliable and simple, but it has a significant disadvantage, because the hose, by which the water pipe is connected to the "stick", is always in sight. You can hide it by arranging a box with the subsequent finishing with tiles.
Cutting into a plastic or polypropylene pipe
The connection of the "automatic machine" to the communications from the metal-plastic can be done almost anywhere. To do this, it is sufficient to cut the pipe by installing a metal tee in place of the cut, thanks to which it is possible to make a branch of the communication to the washing unit.

It is also possible to connect the "stylalki" to the metal-plastic pipe. To do this, a special fitting is installed on the pipeline section, to the end of which a hose
To perform this operation, you must take the following steps:
- cut the pipe;
- measure the parameters of the fitting (tee);
- cut off a piece of pipe corresponding to the adapter;
- fasten the connecting ring to the nut;
- with the help of a special tool - calibrator - to expand the ends of the pipe in the places of connection with the tee;
- put the pipe on the fitting fitting;
- push the O-rings from both ends, then tighten the nuts tightly.
The shut-off valve to the adapter must be screwed in advance, before the start of the frame. This will avoid damage to the elastic enough metal-plastic pipes. After the connection of the tee is complete, flexible water hoses are fastened to the screwed tap.
If the apartment has a plastic pipeline, you will need a complicated version of connecting the "stilalki". In this case, to perform installation works need not only special fittings, but also a special tool that allows soldering pipe fasteners with adapters.
In this case, a tee is installed on the cold water pipe, to which a hose connected to the "automatic" is connected through a shut-off valve.
Connection to water supply in any place
In some cases, it is convenient to connect the washing device to a specific location in the straight pipe. To perform this operation, you will need a special adapter - a coupling saddle, which is a clamp from the clip with a threaded tap.
This figure shows a schematic representation of the coupling-saddle, by means of which it is possible to connect the automatic machine practically anywhere in the straight pipe
You can buy a similar element at specialized outlets, and it is important to pay attention to the diameter of the fitting, which must match the size of the pipe.
An integral part of the saddle is a collapsible cage: its construction is assembled on the pipe at the point of connection of the "stylalki" to the water supply, and it is important to use a reliable gasket.
The adapter firmly fixed on the desired fragment blocks the flow of water. After that, a hole is drilled through the branch pipe of the saddle. A valve (ball valve) is wound on the coupling outlet, which is used to connect a hose that supplies the washing machine with water.
For greater comfort during operation, it is also possible to connect to the crane unit.
Use of "automatic machine" in the absence of a water pipe
The operation of automated washing devices is possible in the case of water supply under pressure. The lack of a water pipe in a dacha or in a private home does not mean abandoning the usual amenities, because in this case you can use an alternative solution.
To use a modern machine, it is enough to lift a volumetric water tank to a certain height (at least one meter), to the bottom of which you need to connect a hose leading to the corresponding outlet of the unit. Water in the container should be poured in a timely manner.
Cardinally solve the problem with the help of a purchase pumping station. However, because of the high price, this option is usually considered for permanent residence in a house without water supply.
Connection to sewerage systems
Connecting the washing machine to the sewerage system allows to solve the draining problem dirty water, which remains after washing. You can do this by applying different schemes:
- Temporary, by using a special hose, sent to the toilet or bath.
- Constant, providing a device for stationary drainage.
The first method is very simple: drainage of water is made through a hose that is attached to the edge of the bathroom, toilet bowl or sink, which can be done with the help of special fixing elements.
In the second case, two options are possible. The discharge is carried out with the help of a siphon of special design, in which there is a separate tap for connection of "automatic machines", placed under the siphon bend. It is not necessary to replace a similar device with a conventional analog, since it will hold back the waste water, spreading an unpleasant smell.
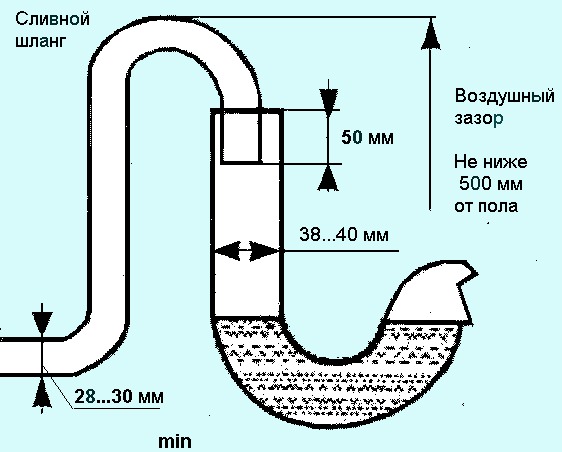
This diagram shows the option of connecting the "automatic machine" to the sewage system using a siphon of a special design, which provides a special hose outlet
The washing machine can also be connected without a siphon. With a diameter sewage pipe in 4-5 cm the tap for the machine of the machine can be connected directly to this element.
In this case, the S-curved drain hose is inserted into the pipe so that it does not touch the sewage, and then is carefully surrounded by the seal and sealed. The distance from the inflection point to the floor should exceed 0.5 m.
The maximum length of the hose is usually indicated in the instructions accompanying the model. If you select a larger part, the load on the pump will increase dramatically, which can lead to unforeseen breakdown.
If the design of the washing unit does not provide for the presence check valve, then when mounting the model, there is a restriction on the height on which the drain hose is located. Specific information the manufacturer, usually leads to the manual.
Features of connection to the electrical network
Specific information on how to correctly connect the newly purchased washing machine to the electrical network, you can read the instructions. Special attention it is required to pay attention to safety rules, since the device has a high level of power consumption (1.5 - 2.5 kW), and also comes into contact with water.
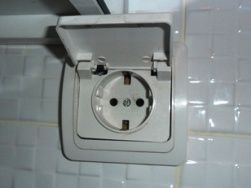
To connect the unit to the mains it is important to carefully select the outlet. The device must necessarily have a ground, in addition, it is desirable to choose a model with a cover
As a rule, a three-wire socket is needed to connect the washing machine manually, in which there is a phase, zero and a carefully insulated ground wire. Switchboard grounded by using a special bus with a cross section of at least 0.3 cm.
When connecting, it is advisable to follow several recommendations:
- Optimal option - individual power supply. In this case, the "washer" is fed from the switchboard by a separate input, and the power is supplied via the additional power cables that are laid. That the wires do not spoil the interior, they can be placed in neat plastic boxes.
- Application of specialized electrical protection devices. In addition to the mandatory automatic switches It is recommended to install a residual current device (RCD) in the power line of the machine.
- Strict conformity of all components of electrical circuits to the required technical / operational characteristics. For conducting wiring it is important to use three-core cables, while the cross-sectional area should exceed 1.5 cm2.
- Connect the socket according to the scheme specified in the instructions. It is important to observe the mandatory condition - the presence of a protective earth. The connection of the wire is mandatory to the grounding bus of the switchboard.
- Connecting the conductor to heating or water pipelines is strictly prohibited, as this can lead not only to the failure of the machine, but also to the creation of emergency situations.
- When choosing models it is better to give preference to rosettes having a high degree of safety; it is desirable that they have a lid protecting from moisture and a ceramic base.
- When connecting the washing machine, extenders, tees and adapters should be avoided: the additional connections that are inevitable in this case may cause a temperature rise in the contacts, which leads to a breakdown of the unit.
It is undesirable that the outlet for the machine is in rooms with a permanent high humidity. If the length of the electrical cord is sufficient, it is better to place the supply device in an adjacent space, for example, a corridor.
Checking the operation of the machine in all modes
After completing all the above work, you need to check the correct installation.
The final stage of the work is to check all systems of the washing machine. It should be carried out strictly according to instructions and affect all aspects of the connection
To do this, you need to inspect all the assembled nodes, and then run a test run of the machine without laundry, during which you need to pay attention to the following options:
- period of time (it should be small), for which the tank is being recruited;
- absence of leaks;
- correct operation of the drain;
- uniform rotation of the drum;
- good spin;
- full-fledged heating of water, which is produced after 5-7 minutes after the completion of water recruitment.
At all stages of the unit operation, there should be no extraneous sounds.
The presented roller explains in detail the process of connecting the unit to the water supply, electricity and sewerage.
Exactly following detailed instructions, how to connect the washing machine to all communications with your own hands, with the installation of household appliances can be handled quickly and easily.