How to properly make a floor for a drain pit. Execution of wall masonry
Thinking about the issue of manufacturing a suburban water pipe? Then you should know that in addition to it you will have to make more suburban sewerage. By and large, it differs little from the system of waste water pipelines that are laid in the city - the difference between them is only at the point of discharge of contaminated water. If in the city all sewer pipes lead to treatment facilities (at least, so it should ideally be), then in the cottage in the role of them a drainage pit is used. It is about it, or rather about its independent construction, and will talk in this article, in which together with the site we will understand with its device, manufacturing technology and materials that can be used to create it.
How to make a drain hole photo
Drain pit: the device and the principle of operation
Constructively, the classical drainage pit is a simple device, which almost every person can make at the dacha - even special skills are not needed here. Moreover, it can be made from a fairly large number of improvised materials. This is on the one hand, but if you look at this device from the other side, then, like all technical devices, the waste pit has its own subtleties and nuances that you need to know. First and foremost, this device and the principle of operation - understand these points, so there will be no problems with the selection of materials for the pit, or with its immediate construction. A classical waste pit consists of the following elements.

More details about the device and the principle of the construction of a drainage pit in the country can be found in this video.
In principle, this and the whole device - as you can see, made by own hands the drain hole is not distinguished by the complexity of the design. Even simpler is the principle of its operation - the effluents falling into the pit are simply absorbed into the soil. This is as for the liquid part of them - with solid wastes things are somewhat different. First they accumulate at the bottom and do everything to hammer the channels in the soil and prevent the rapid absorption of the liquid - they seem to set themselves the task of making it so that they are constantly in the water. In the end, it will happen - when this happens, you just need to start adding to the pit special bacteria that will dilute the solid waste of human life.
Drain pit in the country house with his own hands: what to do
As you have already understood, the main element of the drainage pit, which, in general, and will have to build, is a stub wall, which prevents the destruction of the pit. It can be made from various materials that can be collected quite a lot - naturally, we will not do this and only consider the most common options. The task is not to poke your nose, they say, do this, and clarify the principle, after understanding which, you can independently choose the material needed for the drainage pit from what is available at the dacha.
In general, the principle is simple - you need to create some kind of capacity. How and what you do it from, now it's up to you. It is necessary to carefully cross the dacha, and other storage facilities - you see, something will come up suitable.
How to properly make a drainage pit: bottom filter and its purpose
Bottom filter - without it, no pit can not serve for a long time - it is for this reason that the question of how to make the bottom of the drainage pit should be given special attention. There is nothing complicated here, just need to know a couple of points, which, in general, extend the life of the waste pit in the country.

In principle, these are all the nuances associated with the fabrication of a floor drain filter. They should not squeamish, even in the construction of a small sinkhole - as mentioned above, it is able to extend the life of an individual in two or even three times.
At the conclusion of the topic about how a sinkhole is being made, I will say a few words about its close congeners-septic. They differ from each other in the presence of the second several chambers in which separation of solid and liquid wastes takes place. In the final result, one liquid enters the chamber in which water is sucked into the soil, as a result of which the ducts in the soil are practically not clogged. Consequently, this well serves without pumping for a very long time - if you correctly make a septic tank, then you can use it for almost half a century. On how to do it, read in another article of our site.
If you live in a city in a well-organized apartment house, then you are unlikely to be interested in the problem of the installation of a drain pit. But if you live in "your house without any amenities" or a lover of trips to the dacha, where you do not think about holding a central sewer, these "comforts" need to be created. For this, we are now addressing the issue of construction and installation of drainage pits.
Arrangement of the discharge pit
Before you begin to equip the drainage pit on the site, you need to determine at what level the groundwater flows. A site with a high level can be flooded in spring or after heavy rain, but with a general level groundwater the water level in the waste pit will also increase. This can lead to the fact that the pit will overflow and all its contents will start pouring over the top, spreading the stench to the whole district. Also, with a high level of groundwater, you can not make the drainage pit deep, and spend the coveted meters on its expansion oh, as you do not want.
If the groundwater is at a depth of more than eight meters, then the drainage pit can be dig deep from 2 to 2.5 meters.
The construction of a drainage pit implies the following stages:
- choice of location,
- choice of the volume of the pit (if you call a sewer machine, take into account the size of the tank),
- choice of variety and materials for construction,
- directly the work itself on the erection of the structure,
- arrangement of territory near the pit.
If there is a desire, free time and good physical form, the drainage pit can be excavated independently, and if there are means and do not want to bother - order an excavator, and the work will take from two to three hours.
Take into account the distance to your house, it should be at least five to eight meters.
When choosing the size and volume of the discharge pit, the following factors are taken into account:
- degree of residence (year-round or seasonal),
- number of people living on the site,
- the volume of water expended per person in cubic meters (the norm is 200 liters per day, that is 0.2 m 3.
Usually the drain pits are divided into two types: without a bottom or hermetically arranged. Let's consider, in what their features:
Liquid waste in such a hole seeps into the ground, and the solid is gradually compacted. After filling a pit is buried in the ground or a special service is called to pump out sewage.
In this form, the daily volume of effluents per one cubic meter (according to the SNIP norms) should not be exceeded. It is also forbidden to place a drainage pit on one line or above the water intake points, since it is possible that sewage enters these sources. The pit should be located at a distance of not less than fifty meters from your and neighboring water intakes. It should be remembered that soil and groundwater contamination is a crime against the environment, and is punishable by a large fine.
If there is a well with such a pit without a sealed bottom and filtration next to it, sooner or later do not escape its pollution. In principle, in modern conditions this type of wells has lost its relevance. Although the method is quite simple and does not require large investments.

It can be made of materials such as concrete, brick, reinforced concrete rings with concrete bottom and wood, and then carefully waterproofed.
I must say that this is also enough a simple and affordable way organization of the sewage system, but you can be sure that no contamination of the soil or groundwater can not occur. Therefore, the level of the flow of groundwater you already will not worry - put this capacity at any depth, if you guarantee that the integrity of the structure will not be violated and the flow of sewage will not take place.
Varieties of pits with a sealed bottom:
- Pits made of bricks. First the excavation breaks out. The lower part of the excavation is compacted qualitatively, then poured with mortar from gravel, sand, cement and water. They are waiting for its full freezing, then the walls of the dug hole are covered with a brick (it can be used). For greater reliability, you can use ceramic bricks, as well as natural stone. Between the earth and the brickwork a roofing material is laid for additional waterproofing. After that, the remaining space is poured with concrete.
- Drain pit of iron concrete rings. For the installation of concrete rings, a crane is required. The joints between the rings are sealed with cement mortar. Based on the required depth of the drainage pit, we harvest the required number of rings. Usually their height is one meter. A great advantage of this kind of pits is their reliability and durability.
- Pit from a plastic tank. The simplest way is that plastic containers are already sealed, durable, and have a long service life. But such tanks are quite expensive.
Some "masters of all trades" use for the construction of barrels with a cut bottom, old cases from washing machines or wheels, stacked on top of each other.
You can build a drain pit with a double drain. To utilize wastewater from a bath or bath, use a pit with filtration, and for kitchen sink and the toilet is a sealed pit. Exist different ways cleaning of cesspools:
- Call of the sewerage equipment. Call, make an order, choosing a convenient time for you. Calling a special machine for pumping out sewage, do not forget to think about its free access to the drainage pit: it is unlikely that you will be pleased with the kind of crumbled beds and flower beds. And if you have a very deep pit, it will not be completely cleared until the end due to the insufficient length of the hose for pumping out sewage. This is an "expensive pleasure", and frequent calls "can strike at the wallet."
- Application of biologics. Under the influence of biological granules, organic waste and human waste products decompose into solids, which then decompose and precipitate, and into water without an unpleasant odor. Subsequently, the liquid can be pumped out with the help and fertilize it with a garden or vegetable garden. Bacteria that purify the drainage pits are found in the form of liquid, powder and tablets. When applying, it is necessary to act according to the attached instructions, it does not make sense to fall asleep - bacteria without food will die. Bioreagents are divided into septic tanks and antiseptics, some of them are of high cost and also require financial costs. It should also be taken into account that it is unlikely that the drainage pit will completely be cleared, and the sewer machine will still need to be called up - only much less often (once every six months - a year).
You can weigh all the pros and cons and choose for yourself a more acceptable way of cleaning the drainage pit on your site.
The opponents of the drainage pits - this traditional solution to the problem of the lack of sewage, give the following reasons: unpleasant odor, risk of groundwater flooding, Fast filling and maintenance costs. However, it should be borne in mind that this is the simplest and most affordable way to organize an autonomous sewage system. "To be or not to be" a drainage pit on your site - depends purely on you!
A cesspool or a drainage pit is an invariable attribute of a dacha or a private house that does not have a centralized sewage system. A properly equipped cesspool enables recycling, and liquid ingredients can be absorbed into the soil without causing harm to it.
The demand for this building is due to the fact that its construction does not require specific knowledge and skills. Depending on the model of construction, one person with a similar job can be dealt with within 2-6 days without much effort.
Of course, there are some problems with subsequent exploitation the drainage pit. It is necessary to decide how to pump the waste from the pit, who to attract to carry out such a mission. Much means and volume of the constructed drainage pit it depends on it how often, it will be necessary to pump out sewage from it.
 In rural homes or in cottages, many use the simplest design of a drainage pit. Just buried in the soil old tanks or barrels. With a similar construction collection of sewageand their filtration is possible provided that their number per day will be no more than 1 m³. The sanitary inspection negatively relates to such drainage systems, since they poison the environment and harm the environment.
The most simple cesspool you can build on suburban area for a short time. On the drain pipe, the waste is straight are sent to the tank, the bottom of which is covered with a layer of gravel or pebbles. For the release of methane produced during processing of waste, put a gas pipe on the lid of the tank.
Such a system is not applicable in homes for permanent residence, because in them approximate water consumption per day per average family is more than 1 cubic meter. m. They need a way of removing waste and fecal matter into the ground and their subsequent filtration.Such a system has become widespread among those living in cottages and country houses and cottages.
Its construction does not involve any difficulties, but it is worth taking into account some of the nuances:
- The walls of the pit must be strengthened, since the water entering it will destroy the building. To prevent this, put a tank or container, the wall is laid out of a brick or installed concrete rings.
- Average, the volume of the discharge pit is calculated based on approximately 3 m³ per day or calculate that for each family member per day, water consumption does not exceed 1 cubic meter. m.
- Mandatory installation ventilation system in the pit, to speed up the processing of waste.
When constructing a cesspool of this design, consider that it almost does not require cleaning. In such a system, several chambers for sewage treatment, first they are poured into the first pit, where they are collected. Then when they get together overflow lintel, The impurities will go to the second chamber and the liquid waste will absorb the soil. Solid waste in the first pit will be recycled bacteria for cesspools and go to fertilizer.
Types of cesspools
By the way of manufacturing, the pits are made by categories:
- Cumulative from monolithic concrete.
- With brick walls.
- With receiving capacity.
- Temporary, excavated in the ground.
- With wooden formwork.
- Without a bottom with the release of waste liquid waste into the ground.
According to the regulations SNiP , which determine location of drainage pitson the territory of the household, you must adhere to the following rules:
- Residential houses and outbuildings should be located about 20 meters from the drain pits.
- The distance from the cesspool to the nearest fence should be at least 1 meter.
- The distance to the nearest natural source of water (well or spring) from the drainage pit without a bottom should be within 30 meters.
Selection of material for construction
To make a reservoir for a cesspit, the following building materials are used:
- ceramic or ordinary brick;
- material from plastic in the form of containers, barrels;
- w / w ring.
For the tank, you can use a variety of useless containers: the body from the "styralka" barrels without bottom or tires from the wheels of the machine are stacked on top of each other.
Usually, the form of the cesspool depends on the container used. But the most suitable form is cylindrical, which has highest strength and allows for an even distribution of loads on the walls of the vessel. Capacities of the cubic form are much inferior to cylindrical in strength due to uneven distribution on the walls of loads.
Brick cesspool
 To make a cesspit, ceramic bricks are the most suitable. He has much more long term service,than the usual, and he is not so afraid of dampness. First of all, it is necessary to excavate pits according to previously made dimensions.
At the bottom of the pit can be built small foundation,made of bricks or stones. The walls of the pit are laid out in half a brick to save material, between the ends of bricks it is desirable to leave small cracks, for filtration and discharge into the ground of sewage.
After laying several rows of bricks, it is necessary to carry out drainage padding, It consists of gravel and pebbles between the walls of the pit and brickwork.
Brick walls are removed to the height below ground level approximately 60 cm, at this height made well, it is necessary to cover with a strong cover from any improvised material (metal sheet, reinforced concrete plate).
In the lid it is necessary to provide hOSE HOSE a sewing machine, for a hole you need to make a reliable cover. From the top you can pour the remaining excavation works land and plant a flower bed on it.
Pit of concrete rings
Cesspool in a country house or the dacha can be made from ready reinforced concrete rings . Construction of a drainage pit from reinforced concrete rings is made with the use of special equipment, so without the involvement of experts you can not cope in the construction of this design.
The sequence of works is as follows:

Still often at construction of cesspools apply old tiresfrom vehicles. Most suitable for this purpose are tires from heavy vehicles or tractors.
Sidewall tires are cut with the use of a grinder or electric jigsaw, do not forget to cut pipe inlet for draining. After preparation, the rings from the tires are installed in the pit one on top of the other, and the bottom is filled with drainage from gravel and gravel.
The absence of centralized sewerage systems in summer cottages is not a reason to deny yourself a normal level of comfort. Compensate for the inconvenience can be by installing a local sewer. If it is a question of settling a dacha, then such a simple option as a drainage pit by one's own hands is the most rational. In order to implementditch pit arrangement, it is necessary to calculate the volume of the reservoir, choose the location of its location and determine the material that the pit will be laid out for.
The installation of a drainage pit is the simplest version of a local sewage system. However, it is suitable only if the volume of effluents is relatively small. That is why it is often chosen for cottages, which are used for periodic holidays or for summer living.
Preparatory work
At the stage of preparation for installation, it is necessary to determine the size of the future reservoir, choose the right site for its construction, and decide what materials will be used to construct the tank walls.
Determined with dimensions
In order to properly choose the size of the drainage pit, the following factors should be taken into account:
- The volume of waste water. This indicator depends on how often it is planned to use the house, how many people will be in it, and also on the level of the equipment of the house with plumbing devices.
Advice! It is clear that the less plumbing in the house, the smaller the volume of drains is formed. For example, if there are only showers in the house, then the volume of sewage will be less than in the cottage equipped bathroom.
- Availability of sewerage services. Before making a decision to build, you need to find out how much a one-time call of a sewage disposal plant is and how much equipment can be pumped out at a time. It is advisable to make the volume of the pit approximately equal to the volume of the tank installed on the machine.

We choose the location of the discharge pit
After the necessary volume of the pit is determined, it is necessary to do the selection of the place where the excavation digger will be conducted. When selecting, you need to take into account the following:
- Geological characteristics of the site, namely, the level at which the soil water lies. You can build a pit only if the UGW is low, since the pit itself is made at least two meters deep.
Advice! If the UGW on the site is high, then it is not advisable to build an ordinary drain pit. In this case, it is better to purchase a ready-made sealed plastic container and build a septic tank.
- The pit should be at a distance from the house, the minimum distance is 5 meters.
- When choosing a location, you need to take into account the location of the water intake. The distance between the pit and the well should be at least 30 meters for clay soils, and at least 50 for sandy soils.
- If the site has a complex terrain, the pit should be located in the lowland.
- When choosing a place, one should not forget about the availability of free access to the pit, otherwise serious problems will arise with its cleaning.
Choice of materials
At the last stage of preparation should determine what to impose a drain hole? Most often, brick is used for this purpose, but other options are possible. For example, an alternative option may be a drainage pit from a cinder block or a pit from a slate.
In addition, for the construction of a storage tank is often used well rings from reinforced concrete. It is also possible to build a monolithic tank or install a finished plastic container.
Stages of installation
The construction of the drainage pit takes place in several stages.

Earthwork and foundation pit preparation
The first stage of the work is the preparation of the excavation. Here are some useful recommendations for earthworks:
- It is much quicker and easier to hold the pit of the excavation with the help of digging equipment. But if the site is already planted with plants and landscaped, then there will be nowhere to pass the excavator. In this case, you have to dig the pits manually.
- The dimensions of the pit are determined by the required reservoir, but the depth of the excavation should be made taking into account the construction of the drainage cushion.
- The design of the drainage cushion depends on what type of pit is supposed to be built. If it is a leaky structure, a layer of sand 15 cm high is poured onto the bottom of the tank and is well rammed. Then, rubble is poured over the sand, the height of the layer is not less than 50 cm. Such a high cushion is necessary to provide better filtration and prevent rapid siltation.
- When building a sealed pit, the layer of crushed stone can be 10-15 cm high. On top of the rubble, you should lay a ready-made slab of reinforced concrete or make a screed directly on the bottom of the excavation.
Execution of wall masonry
One of the most popular construction options is a brick drainage pit.
Advice! The contents of the drainage pit is an aggressive environment, which quickly destroys the silicate and porous bricks. To make the construction durable, you should use clay or red brick.
In order to improve the filtering capacity of the reservoir, when laying walls, it is necessary to provide for the construction of holes, that is, the brick is laid in staggered order.
Before you overlay the drain pit with a brick, you should determine its shape. Many beginners in the construction industry believe that the best option will be a tank in the form of a cube. In fact, a more solid and stable figure is the cylinder. When constructing a cylindrical tank, the risk of destruction of the walls is reduced.

The recommended wall thickness is one brick. The tank is laid out in a circle. In order for the red brick drain pits to filter the water better, fill the gap between the brickwork wall and the wall of the tank with rubble, broken brick or similar construction debris.
When you have finished the laying, you should perform the overlap of the pit. To do this, it is necessary to lay the reinforcing mesh or metal corners on top and perform concreting or lay the metal sheets. It is necessary to leave the inspection hatch, so that the contents of the pit can be pumped out.
How can I reduce the frequency of a call to a sanitizer?
In order to reduce the likelihood of soil contamination and increase the periods between cleanings, it is worthwhile to build a structure such as a drain pit with overflow. In this case, the pit is divided into two communicating reservoirs.
The first (hermetic) will receive sewage from the house. Here they are defended, and the heavy fractions settle down, and the clarified water remains at the top. In the upper part of the reservoir, there are "windows" for overflowing liquid into the second part of the pit. Here in the walls are made holes through which the water will be gradually filtered into the ground.
This version of the drainage pit is safer for the ecology of the site. Yes, and it will have to be cleaned less often, since only the first tank, in which solid waste accumulates, will have to be cleaned.
Alternative construction option
If there is no time and the desire to build tanks of brick or reinforced concrete, then you can prefer an alternative. For example, a waste pit from a barrel can be built. To build the structure you need a barrel made of plastic or metal with a volume of two hundred liters.

In order to ensure the possibility of filtration, holes are made in the walls of the barrel, placing them in a staggered order. Also, a nozzle is inserted into the barrel to which a drain pipe will be connected.
To ensure a free outlet of water and to retain solid particles, the barrel should be wrapped with geotextile. The prepared tank is installed in the prepared pit, and the space between the barrel and the walls of the pit is filled with crushed stone.
Cleaning
Any downpipe should be cleaned periodically. For this purpose, a sewage special machinery is used - a machine on which a powerful pump is installed. But it is not always possible to use the services of sewers. We'll figure out how to clean the drainage pit on its own.
If the drainage pit in the dacha is full, then the pump will help clean it. To perform this unpleasant, but necessary work requires a fecal pump. Use normal drainage pump to clean the drainage pits can not, because it immediately zabetsya.
Using a fecal pump, it is not difficult to clean the pit. Difficulties arise with the utilization of the recovered substance. It can not be poured onto the ground or into water bodies, it is necessary to utilize the liquid at the treatment plants.
Advice! In order to pump out the filtering pit more rarely, it is recommended to use special cleaning biologics that promote the decomposition of solid biowaste.
So, the drainage pit can be built by hand in different options. It can be a two-chamber building, and the simplest construction of a barrel. Everything depends only on the needs of the owners and their desire.
Among sewerage systems, which is not difficult to do on their own, still remains a drain hole made of bricks. Of course, it is possible to make such a structure from other materials, for example, from concrete rings, easier and faster. But the brick sewers have their own advantages.
A drained or cesspool is one of the oldest sewerage options on earth. It can be built even without any experience construction works. Moreover, often such a device is created on the site at the very beginning of construction work to provide the builders with a minimal set of amenities.
Technically, the discharge pit is the simplest septic tank or accumulator of human waste. To this capacity, located under the ground, sewage pipe, leading out of the house. To her also piped separately standing toilet, bath and other premises available on the site.
One common cesspool on the site is not the only way to organize such a system. If desired, you can make a separate small capacity for each room. Such a solution can be convenient, for example, if the bath is located at a considerable distance from other buildings.
Waste is gradually accumulated and partially disposed of, depending on the type of structure. As the pit is filled with effluent, it must be cleaned to prevent overfilling of the structure. Modern means make it possible to produce waste with a sufficiently high degree of efficiency.
Varieties of waste pits
From a brick it is possible to build a cesspool of any type:
- sealed;
- with permeable walls;
- without a bottom;
- divided into several sections.
Each structure has certain characteristics. For example, a sealed pit is used in areas with a high level of groundwater. Such a design prevents the possibility of contamination of the environment by sewage.
Pervious drainage pits designed for processing and disposal of gray sewage are arranged with a meter sand and gravel filter in the bottom area. With insufficient throughput of the underlying rocks, they are equipped with small openings in the walls through which the liquid part of the waste is disposed of.
If the capacity of the drain pit is divided by brick walls and inserted into them overflow tubes, you will get a practically self-made septic tank
In the so-called pits without a bottom, the bottom is not concreted. The walls of such structures are erected on a concrete foundation with a lumen, into which a sand and gravel filter is laid directly onto the ground. Liquid effluents will slowly seep through this natural filter, and then enter the underlying subterranean strata, where they are finally cleaned.

The use of bricks makes it possible to create both a sealed drain pit and its permeable version. Most often such constructions are made with a rectangular base, this is the simplest version
A large pit can be divided into two or three sections by partitions, which are connected by overflows. Such a device, like sewer septic tank, allows many times to separate the bulk of solid and liquid waste and improve the degree of their processing with the help of bacteria.
Features of brick sewerage
The use of bricks for the construction of the walls of the cesspool has several advantages. This material perfectly retains impurities and is longevous. With the help of brickwork, you can create a structure of any size and configuration.
When using concrete rings, you have to adjust to their typical sizes. Pouring monolithic concrete - this is no less labor-intensive process than the laying of bricks. It is not necessary to use a high-quality material for decontamination, as well as bricks that have already been used previously.

The brick is suitable for creating drain pits and other structures of arbitrary configuration. In addition, such devices can be installed on a site with a high level of groundwater
Masonry works require certain skills, this is real building art. It is better to master such operations on the construction of sewage facilities, since all the flaws will be hidden in the future under the ground. And yet you should not do the clutch very casually. Uneven brick wall may collapse in time.
The brick borer has one useful property - it is stable practically at any level of groundwater, well resists the swelling of the soil during freezing in winter. Such a drainage pit can be arranged both on light sandy soils and on heavy clayey soils.
How to make a brick sewer
Before you begin to work, you need to determine the size of the future of the cesspool, as well as find a suitable place for the construction. The simplest version of the calculation is based on the average norm. The number of people permanently living in the house is multiplied by a rate of 0.5 cubic meters. meters.
After that it is necessary to calculate the parameters of the pit, depending on its configuration. The capacity is usually made in the form of a cube or cylinder. The first option is preferable, since it is easier to lay a container with straight walls with a brick.
The depth of the pit should not be more than three meters, but practice shows that it is less than two meters or less to service a sewage system. The volume of the pit should now be divided by the chosen height. The figure will be the base area. It remains to choose the length and width for a container with a rectangular base. If a decision is made to dig a cylindrical pit, you will have to use the formula of the area of the circle:
The resulting area should be divided by 3.14, i.е. on the number "pi". From the result, which is a square of the radius of the circle, you need to extract the root, having obtained the proper radius of the base of this cylinder.
Before performing the markup, all parameters must be increased by the size of the brickwork and the concrete foundation. This role is usually performed by a concrete slab 30-40 cm thick. Approximately the same dimensions should have a concrete screed. The thickness of the brickwork for sewerage facilities should be 25 cm on the outer contour, and for internal walls it is sufficient 12-13 cm.
When choosing the parameters of the tank, it should be remembered that its filling by more than two-thirds is undesirable, so the depth of the excavation under the pit should be increased to the required size. Picking up a place for the construction, it is necessary to take into account a number health standards. For example, the distance from the storage tank to the dwelling house must be at least five meters, to the fence - at least two meters, to the source drinking water - not less than 25 meters, etc.
In addition, in areas with a heterogeneous relief, the sewerage facilities should be located lower than the source of water. Finally, it is necessary to provide an opportunity for an access to the sewage disposal equipment. The machine need not be in the immediate vicinity of the cesspool, but the distance between them should not exceed a limit of four meters.
Excavation works
After the markup is completed, you can start digging the foundation pit. The easiest way to order excavator services, but if you need a small capacity and there is a desire to save money, you can handle it manually. The technology of the work is very simple: the ground is digged with a bayonet shovel, and as the trench is deepened, it is chosen with the help of a bucket on a rope. A ladder will be useful to get out of the pit, as well as the usual building level, in order to control the quality of work.

If there is a will or need, the pit for the drainage pit can be made manually using a shovel and a bucket on a rope
The walls of the pit are usually made upright, but the bottom is given a slight slope so that the contents of the container accumulate in the corner above which the maintenance hatch will be located. In the future, this will facilitate the pumping of waste from the tank. On light soils, walls may need protection from shedding, for example, using temporary wooden structures.
Installation of concrete base
If the bottom of the pit is supposed to be sealed, then either a concrete slab should be put down or concrete work should be done. In the first case, everything is simple: choose a reinforced concrete structure of suitable dimensions and install it at the bottom. If the decision is made to concrete the bottom, then first lay a sand cushion about 15 cm thick. The sand should be leveled and tamped, observing the previously made slope.
Then a reinforcing mesh is put on the bottom and a cement-sand screed is poured. After this, you must wait until the concrete foundation is cold. For its complete drying, it takes about four weeks, but during the construction of the cesspool, the work is usually continued already seven days after the foundation is filled.
If it is supposed to construct a cesspool without a bottom, it is necessary to fill the concrete screed with only the space above which the walls will be erected. The center is left open ground, which is subsequently laid sand-gravel filter. To properly perform the pouring of concrete base in this case, you will need to build a wooden formwork.
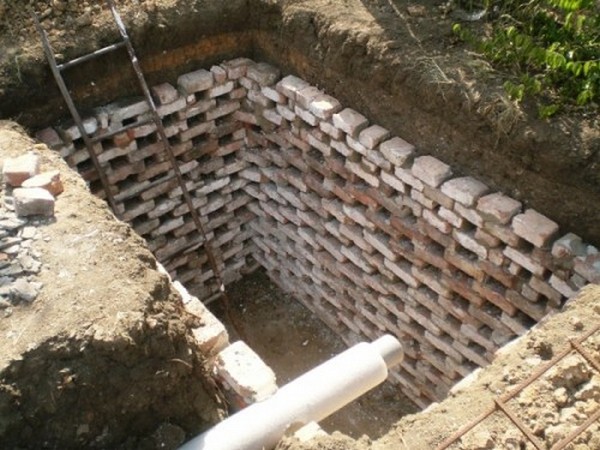
Execution of brick masonry
- cement grade M400 - 1 part;
- building sand - 3 parts;
- water - 0.8 parts;
- slaked lime or clay - 0.5 parts.
Sand and cement must be sifted so that there are no solid inclusions, this will make the solution homogeneous and bring it to the consistency of liquid sour cream. First, a clay castle is made on the base, the first row of bricks is laid on it. Clutch immediately level with the help of a level. The thickness of the clay castle will be non-uniform, since the bottom is made with a slope.

When installing a drainage pit with permeable walls, bricks are laid with a lumen in the places where there should be vertical seams
First, bricks are placed at the corners-beacons, their position is carefully leveled. Further clutch is carried out by rope lighthouses, which are stretched for each row. Experienced masters can perform masonry at once three rows or use a special rack-order. Beginners are advised to first check the level of literally every laid brick. The plumb is controlled by the quality of the masonry along the vertical, so that the wall is level.

The stacking of each row of bricks should be carefully checked with a level. A special thread stretched along the row will facilitate masonry work
Depending on the thickness of the wall, a brick masonry scheme is chosen. If you want to make a wall 25 cm thick, then perform the masonry "in one brick", and if 12 cm - "half a brick". The length of the brick corresponds to the width of the wall. Of course, the permeable cesspit is not done. Usually it is put "in half a brick", while between the individual bricks make gaps, so that through these holes could drain liquid runoff.

The brick laying scheme is chosen depending on the width of the wall. For cesspools, masonry is often used in half a brick (12 cm) or one brick (25 cm)
In any case, one should adhere to the rule: vertical seams between bricks in adjacent rows should not coincide. The laying is carried out as follows: a small amount of a solution is applied to the surface of the base with a trowel. On top, put and press the brick, gently tapping it with a trowel, so that it takes the correct position.

If you want to make a brick cylindrical drain hole, then the bricks will have to be stacked along the arc. It is important that the seams in the adjacent rows do not match, this can weaken the construction
Then the excess solution is selected by the trowel. There is another technology: the solution is applied to a separate brick, then it is put in place. Here are a few useful advice for the performance of masonry work:
- Dimensions of mortar filled with mortar between bricks should be about 6-8 mm.
- The seam everywhere should be the same size everywhere, it will improve the quality of work.
- Brick should be spread along the walls in small portions to shorten the work time (you do not have to bring every brick from the common heap).
- Before laying bricks watered, this improves the adhesion of the surface to the solution.
- Every fifth row is recommended to be laid using a special reinforcing mesh.
Of course, a sewage pipe must be connected to the cesspool. The entry point should be carefully treated with a solution so that there are no leaks. The pipe must be properly insulated, laid below the freezing level of the ground with the required slope. After the masonry works are finished, the walls need to be plastered.

The sewage pipe must enter the sewage system at a small angle to ensure an optimum rate of movement of wastewater and waste
Waterproofing and overhead coating
On the plaster lay a layer of waterproofing material, for example, bitumen mastic. These measures will help extend the life of the sewer. When applying waterproofing materials, follow the instructions carefully. For example, a mastic is required for a dry base.
Now you can set the top overlap. To do this, it is best to purchase a ready-made concrete slab with a hole and a lid. Alternatively, you can consider a self-made concrete structure or an overlap of wood. The last option does not differ by strength, every few years this overlap will have to be replaced.
If the decision is made to make a concrete floor by yourself, you should start it at the same time as the base and with similar technology. The filling is carried out in the wooden formwork. The parameters of the upper overlap must exceed the dimensions of the hole it will cover by at least 30 cm.
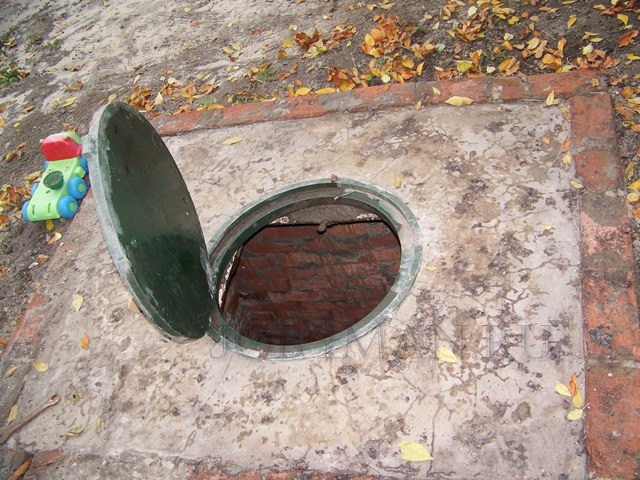
The hole for servicing the waste pit must be large enough so that a person can climb through it to inspect the structure
First pour a layer of solution a few centimeters, then install the reinforcement and fill the main layer. This element should dry for four weeks. In the upper ceiling, you need to make another hole - a vent. The sewage system needs to be properly vented, since with time, sewage starts to emit methane, and this is a dangerous gas.
For the organization of natural ventilation use plastic pipe with a diameter of about 100 mm. On top of the pipe cover with a protective device, the lower part of it also does not interfere with the grate. After installing the ceiling, it is necessary to apply a layer of waterproofing over the structure, a roofing material and even a thick polyethylene film are suitable. From above usually lay a soil-vegetative layer to improve a site and to protect a cesspool from freezing in the winter.
Features of device operation
The main care for the cesspool is that it is emptied and cleaned in time. Essential assistance in the processing and disposal of waste can be a special bacteria, designed for cesspools. Such drugs are usually supplied detailed instructions and very easy to use. They need to either simply pour / pour into the sewer, or pre-mix with some water.

Pumping of waste from the drainage pit is best done with the help of special equipment. Remove drains should be when their number takes two-thirds of the capacity
Such microorganisms are able to process wastes, decomposing them into harmless components. At the same time, the smell characteristic of sewage systems disappears. But it should be remembered that contact with some types of household chemicals for bacteria is disastrous, so you will have to check the composition of cleaning and cleaning products that are available in the house.
After the cesspool has been cleaned, it will not hurt to inspect it and check the integrity brick walls. If necessary, perform minor repairs to the structure: replace damaged bricks with whole, restore damaged waterproofing, etc.
Video on brick cesspools
Clearly, the process of laying a brick when creating a permeable cesspool is presented here:
This video describes the process of creating a cesspool in a site with high groundwater:
A brick cesspool is a reliable and convenient structure. It is not easy to make such a device, but all efforts will pay off, since with the observance of technology such a device can last for many years.