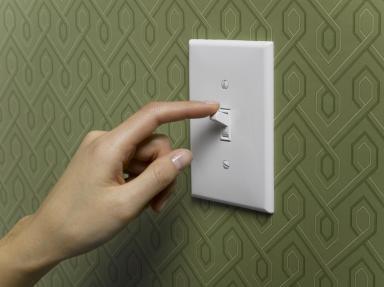
How to install the outdoor light switch. Differences of an ordinary switch from the gate. Mounting the case to the base
For commutation of various types of load, starters, switches, switches are used. These are electrical products that have certain parameters, characteristics, features. When self-installation you need to make sure that the type of appliance used corresponds to the consumption parameters. Otherwise, it is possible to overheat the switching equipment and, as a consequence, a fire.
Purpose of the switch
The electric billboard electric switch is designed to connect devices that use electric current to the power source. Usually this is a simple switching equipment that, when switched on, closes or opens the mechanical contacts, supplying or removing the voltage from the device.
The bill on the waybill differs in the way of installation. It is installed outside the surface.
Types of switches
The industry produces many types of switches:
- external or invoices;
- internal or embedded.
By type of switching they are:
- keyboards;
- sensory;
- rope;
- wireless and others.
According to the principle of work:
- termination switch;
- overhead.
Installation Methods
Depending on the method of installation, the switches are internal and external.
Internal requires preparation of the installation site. In the wall it is necessary to drill out or use another method to prepare a hole. In it, immerse the dielectric box, into which the internal switch will be subsequently installed.
For external training is not needed. This method of installation implies the installation of a surface-mounted switch directly on the surface.
To perform the work you need tools:
- knife;
- a screwdriver is flat;
- phillips screwdriver;
- pliers;
- nippers;
- electric drill.
Installation of switches
Overhead outlets and switches are installed according to the same principle.
Installation of the overhead circuit breaker must begin with the calculation of the conditions of consumption. The following parameters are taken into account: working voltage, power consumption of the system, which must be serviced. The power draws the current consumption. If all the parameters of the circuit breaker are greater than the consumption parameters, it is possible to carry out overhead installation.
Switches are placed on a dielectric gasket installed on the wall surface. In case this device is used on fire-hazardous surfaces (wooden, combustible plastic), this gasket serves as a heat insulation preventing fire from overheating of the circuit breaker in case of overload. Its second purpose is to ensure a reliable fastening of the switch to the mounting surface.
If the holes on the dielectric pad are prepared for fastening, this will facilitate installation. If they are not, then you need to drill a hole of a suitable diameter and fix the switch on the gasket on the gasket. To do this, disassemble the switch and fix it to the wall with screws or screws.
An example of how the one-key bill-on switch is installed is considered. If necessary, you can do the installation of two-, three-key switches in the same way. To do this, the zero conductor is laid directly to the source of consumption. The phase wire is connected to the common bus of the switch. Each output contact is connected to the conductors of consumption (2-3 contacts).
Mounting Features
The installation of overhead switches has its own peculiarities for different types of wire fastening.
If fastening under the screw, it is necessary to remove the insulation by 1-1.5 cm and fix the conductor to its original place with the help of screws. This process can be seen in the figure below. One end of the switch is to the incoming conductor, the other end to the chandelier, lamp or other consumer of electricity.
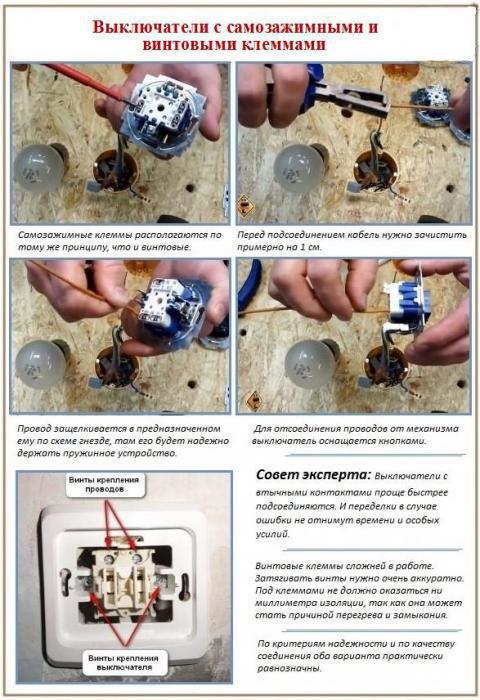
There are models of switching devices that do not have screw connections for fixing the wires. On the rear panel there are only holes for the insertion of conductors. The order of the work is as follows: clean the conductor by 1 cm and insert it into the hole until it stops. The self-clamping contact must secure the connection automatically and, when trying to remove the conductor, holds it tightly. Do not apply a large force to check the strength of the connection to avoid breakage of the switch. The fastening system has been worked out by the manufacturer and is reliable enough for small current loads. A huge advantage of this connection is the lack of a special tool for connecting and simplicity of work.
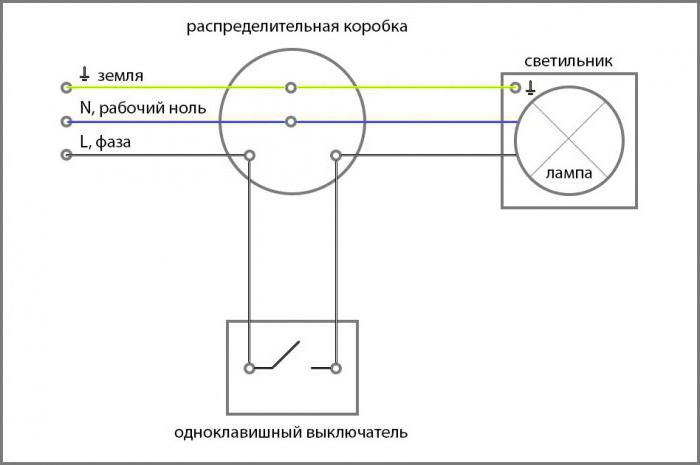
Important! For correct installation It is required to determine the zero conductor and the phase conductor using the instrument. Zero is connected directly to the lighting device, and the phase connection is connected via the switch of the delivery note. Thus, we get: when the switch position is off, there is no voltage on the device, and when the phase is switched on, the phase is switched on.
Safety during installation
It is not recommended to perform work on installing lighting fixtures without de-energizing, because there is a risk of damage electric shock. Therefore, the installation should be carried out by a specialist with an appropriate tolerance group for work in electrical installations.
If the work is done on its own, then the following safety measures should be taken into account:
- turn off the supply voltage;
- check with the aid of the instrument or the indicator that there is no phase at the ends of the conductors;
- perform work by combining all the links according to a pre-compiled scheme, taking into account phase and zero wires;
- apply voltage automatically through the machine with the appropriate tripping current;
- check the operation of the mounted circuit (in case of improperly installed installation, the circuit-breaker will work);
- if the circuit-breaker has tripped, check the correctness of all connections, make an adjustment and again check the operation of the circuit.
Everyone sooner or later meets with a situation when it is necessary to replace an outdated or broken switch in the house. It would seem that there is hard or difficult? But there are some nuances in this matter.
We choose the switch single-key
It is advisable to buy the device in shops specially designed for this equipment, where you can choose a switch you like in appearance and functionality.
When choosing a device, you should pay attention to what parameters of power and amperage it is designed for. For example, a switch whose contacts are made of cermet with silver, can qualitatively work with a current strength of up to 4 A.
Buying a one-key switch, look attentively at it design features: it can be ceiling, push-button or key, flip-over or rotary, inserted into electrical appliances or connected directly to the wire and so on.
So, the one-key switch for hidden wires allows connecting the wiring after the mechanism is installed in the wall. For external wiring, the mechanism is mounted on special wooden or plastic fire extinguishers, which are installed over the wall.
And finally, you should carefully check the build quality of the product.
Single-key switch
This type of mechanism is usually installed in places where it is inconvenient to control the process of turning on and off the light. We are talking about long corridor rooms, staircases, tambours, large factory workshops and the like.
In these places it is recommended to install and connect special single-key mechanisms having three contacts. At work of a product electrical circuit does not break, as on conventional devices, but there is a switching between two contacts. The circuit of the one-key switch, called the pass-through switch, is shown below.

Buying a pass-through switch, pay attention to its type and features, which can correspond to which wiring (internal or external) the device will be connected to. Also it is necessary at sellers to be interested in internal parameters of the mechanism, on what force of a current and loading it is calculated.
Differences of an ordinary switch from a through
These two types of devices differ from each other in their internal features. Have through-switch there is a special mechanism for switching the electrical circuit to three contacts. While an ordinary one-key switch interrupts (does not switch) the electrical circuit across two contacts.
In everyday life, in modern houses and the apartments are still installed and continue to install just simple switches. We will talk about them further.
Features of a single-key mechanism
Switch single-key ordinary - a common and well-known component of indoor lighting. They use it in an electrical circuit with voltages up to 1000 V. Such devices do not have protection mechanisms against overloads and short circuits, but they are simply arranged and easy to install and connect.
Household switches are of the following types and modifications:
Internal;
External;
Modular;
With protection from moisture.
External mechanisms
The switch single-key open installation It is used when it is necessary to connect it to the external wiring that goes along the wall in a special plastic or metal protection. The device, according to the latest rules of fire safety equipment, must be mounted on a fire-prevention base made of non-combustible material. Previously, such switches could be installed on a wooden base.
Internal devices
When hidden wiring It is necessary to know how to connect a one-key switch of the appropriate design. To begin with, you need to make a niche in the wall where the ends of the wires will be removed and the switch installed. Then in this niche a special plastic hollow cylinder is mounted, which should enter the wall niche as tightly as possible.
And already in this cylinder is installed a switch, which was previously connected to the electrical circuit by means of the early output ends of the wiring. In the cylinder, the switch is held by means of metal "legs", which are screwed.
Modular single-key switch
The installation of a single-key switch of this type will be practical and useful for some types of cables. These devices are mainly used in office and industrial premises, as well as in commercial buildings. Products are manufactured only for cable channels.
Waterproof mechanism
These switches are installed in places of high moisture content: bathrooms, cellars, saunas and baths, kitchens. Also, these devices are placed in rooms where water can enter products, for example, in swimming pools or on the street. They are made both external type, and internal.
Important features of the device connection
Connecting a single-key switch is very important. This device should only be supplied with a phase. This should be done in order to make a safe replacement of lamps in chandeliers and luminaires, since only the phase beats the current, and the switch turns it off. Therefore, before connecting the wires to the device, determine the indicator on which wire the phase is.
If the connection is incorrect, there is a high probability of quick failure of the light bulbs, especially for energy saving and LED bulbs. When connecting these luminaires, the phase must necessarily be interrupted.
Circuit-breaker arrangement
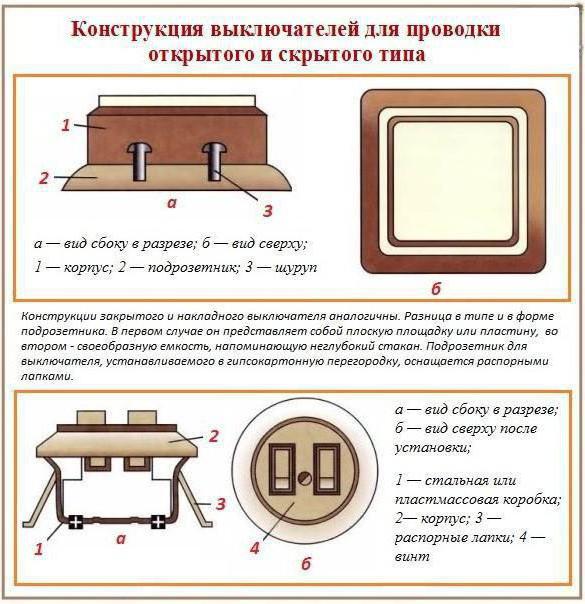
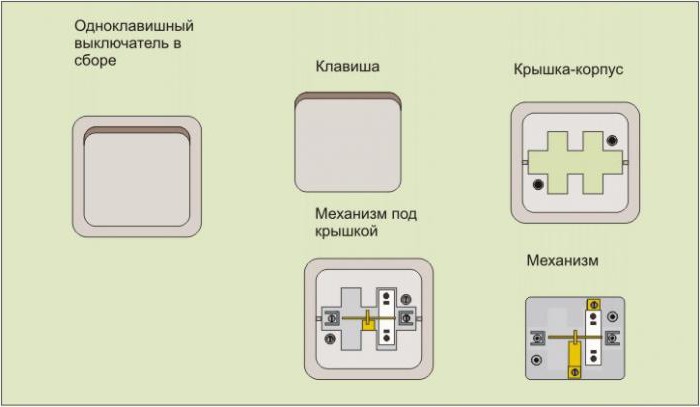
The mechanism consists of external protective plastic elements and internal working components. From the plastic, the rim of the switch is made and a key that interrupts the electrical circuit, i.e. switches on and off the light in the room.
Under the key is a protective frame, which is fixed to the main body with plastic latches or screws, depending on the model. Under the frame is already the working device itself. On the sides of the internal component there are spacer "paws", necessary for fixing with special screws to the sub-machine. Or instead of "legs" can be used metal bars with holes for self-tapping screws.
There are two contacts on the switch: the lead, where the wire with the phase is connected, and the outgoing, where the contact coming to the luminaire is connected.
At the same time many switches do not indicate where this or that wire should be. But this is not terrible, since for single-key mechanisms it is not important what kind of contact to bring the phase to.
Outcomes
We got acquainted with single-key devices of various modifications. Now we know their features and nuances. It is clear that there is nothing difficult to install and connect switches. But this in no way negates the responsibility for the selection of these mechanisms in our homes and apartments. After all, most people often prefer to install at home some "advanced" lighting control devices, technologically new and modern, while not much representing them internal organization and connection parameters. Well, if the owner of the apartment will call for the installation of such a switch master, who understands all the intricacies of new devices. Especially when the circuit-breaker is single-keyed, in which there are not two contacts, as in conventional devices, but three.
But most people consider themselves to be large specialists in household appliances and electronics, try to save money on a specialist and mount a modern switch in the wrong way, which leads to sad consequences.
Therefore, you should not chase the "advanced" switches, if you do not understand how to install and connect them. You can buy an ordinary single-key mechanism, high-quality and accurate, properly mount it, and it will serve for a long time and reliably.
Electricity in the modern world is used everywhere. Devices that provide access to this necessary for all resources are very important for the consumer. These include overhead sockets and switches, very simple to install and operate equipment. Each home master if desired, can easily install such a device. Let's talk about how to do it right.
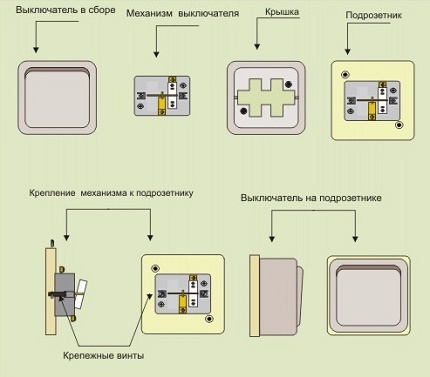
When manufacturing modern outlets, a modular method is used. That is, the socket mechanism is executed as a separate node or function module. It can be installed in almost any standard instrument. The decorative module or cover is easily removed and replaced at the request of the owner, which is very convenient.
Replacing the lining is very simple, given that only the mechanism is attached to the wall when mounted.
Image Gallery


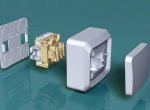

Both modules, both decorative and functional, are made of dielectric materials that are not sensitive to temperature changes, do not collapse and do not change color under the influence of an electromagnetic field or UV radiation. In order to avoid unnecessary additional connections in the path of the current, the terminals and sockets of the sockets are a single unit in the form of a branch of the plate from which the receiving socket is made.
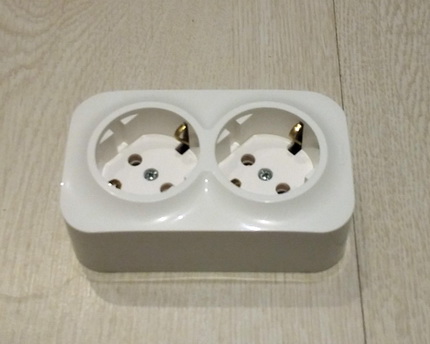
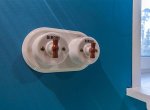
Roset overhead type does not masquerade on the surface. This somewhat spoils its appearance, but it greatly facilitates the process of mounting the device
The reliability of the contact depends on the quality of the mechanical connection of the wires to the terminals. The latter can be of two types:
Screw type terminals
Wires are connected to current-carrying elements by means of screws. The main difference between these terminals is the considerable effort with which the wire is clamped, which ensures reliable contact and good cable retention. To avoid spontaneous unscrewing of the fasteners due to heating or vibration, the screws in these terminals should be used together with spring washers.
Features of spring clamps
Inside the terminal is a spring-loaded plate that fixes the end of the wire and presses it against the current-carrying parts. The advantage of this system is the ease of connecting the wires. However, the force of the cable clamp is practically impossible to control. If it is not enough, you will not be able to notice it during the installation phase. But later the socket with weak contact will quickly fail.
Screw terminals provide a good connection between the conductor and the live parts of the device. They are slightly more difficult to install than spring ones, but they make it possible to obtain a stably reliable contact
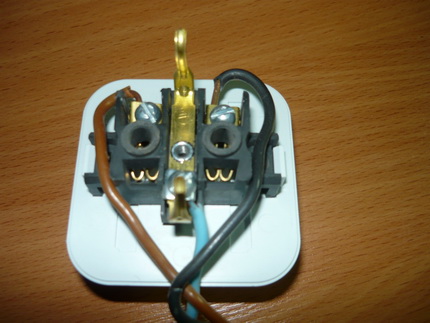
Quite often, not one wire is connected to the sockets of the outlet, but two. Therefore, in the spring and screw terminals there are two holes for wires and two seats. All sockets have at least two receiving sockets and two isolated terminals. For wiring with a three-wire cable, special devices are used with a third terminal - the so-called "ground".
The main difference between a rosette and a built-in analogue is that it is installed on the surface of the wall, rather than deepening into it. This greatly simplifies the installation of the device, but somewhat spoils the interior picture. Overhead sockets are most often used to connect to wiring of an open type, but can also work with concealed wiring, if necessary.
Where to install overhead sockets
The use of overhead electrical installation products is most often associated with the wiring in country houses, the walls of which are folded with a beam, a regular log or a rounded log. True, buried gasket cable in the channels hollowed out in the wood is permissible if the cable is routed through non-combustible sleeves.
The installation of overhead sockets in pairs with switches is now carried out mainly in suburban wooden houses when laying an open type wiring
However, the process of its installation is unnecessarily expensive by the criteria of cost and labor effort. In addition, the sampling of channels can reduce the load-bearing capacity of the partitions and affect not the thermal insulation characteristics of the building as a whole.
The construction of open wiring on wooden walls is justified by a reduction in costs and the ability to control its condition without difficulty. This option allows you to easily identify and repair damage, change the sockets with switches yourself, not only in case of failure, but also if you want to convert the design of the room.
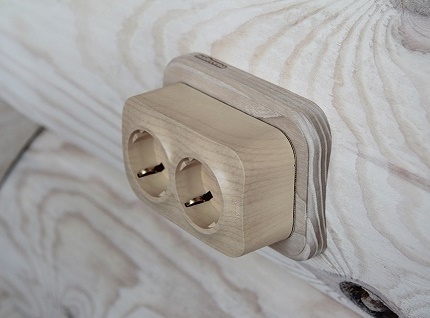
Electro-adjusting devices of the latest generation - the so-called retro sockets and switches are significantly different from the historical predecessors. They are produced in a wide range, the options differ in the degree of protection and decorative design.
Installation of the overhead outlet begins with attachment to the wall of the receptacle made of dielectric material or metal in the form of a plate. Then, the outlet mechanism is connected to the sub-socket, and wires to it. The connected mechanism is closed by an insulating cover
Step-by-step installation instructions
Before starting work, we should prepare everything necessary tools. We need: pliers, a straight or a crosshead screwdriver, a pencil, a sharp knife, or, better, a clerical cutter. Depending on the material from which the walls are made, a drilling tool may still be needed: a drill or a perforator. The cable for connection of the socket of the overhead type can be laid hidden, for example, in the cavity of the wall or strobes.
All work with the electrician must begin with a power cutoff. For this it is necessary to translate the handles of automatic machines on the switchboard to the "down" position
But most often the wire is laid open way: in the cable channel, corrugated pipe or simply over the wall. Regardless of this, the connection procedure is approximately the same. We will consider in detail all the stages of this process.
Power outage
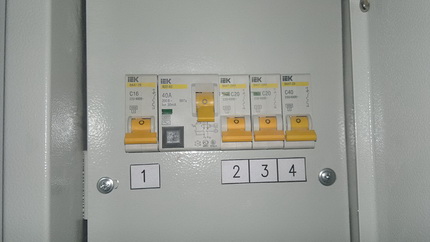
The first thing you should always start working with electrical devices, this turns off the power. To do this, open the switchboard and turn off the machine. More often for this purpose it is necessary to translate position of the handle on the corresponding automatic machine in position "downwards". You need to know that usually one machine "answers" not for all the sockets, but only for some of their parts. For convenience, the devices are usually signed.
If this is not the case, we can determine the automatic machine that we need experimentally. To do this, turn off each circuit breaker in turn and check the presence of voltage in the wiring with the indicator screwdriver. As soon as it does not turn out, then the required automaton is found. Those who do not want such experiments, you can advise to turn off all the vending machines on the shield. After making sure that there is no voltage on the wire, you can proceed to the next stage.
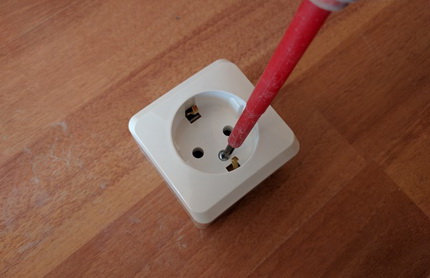
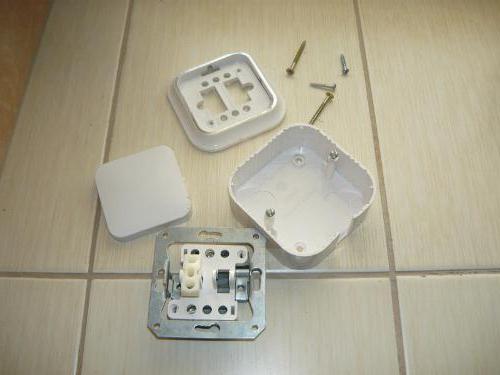
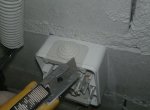
The way of disassembly of the outlet depends on its model. In this case it will be enough to unscrew the fixing screw in the center of the product
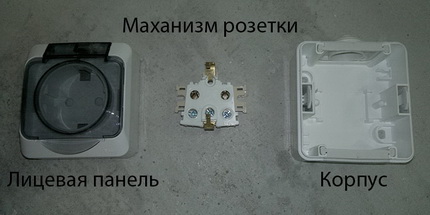
As we already know, the socket consists of two main elements: a functional module or mechanism, and a decorative panel - the body. To install the device, first remove the housing. To do this, we take a cross or straight screwdriver, it depends on the model of the outlet, and unscrew the central fixing screw on the decorative panel. After that, carefully remove the case.
Wall marking and rosette preparation
Some difficulties with disassembling the sockets may arise if you want to install the device in a moisture-proof housing. They are distinguished by the presence of a cover that closes the device. In this case, first open the lid, thus gaining access to the locks that hold the decorative socket panel. Then gently squeeze them with a screwdriver and detach the front panel of the device.
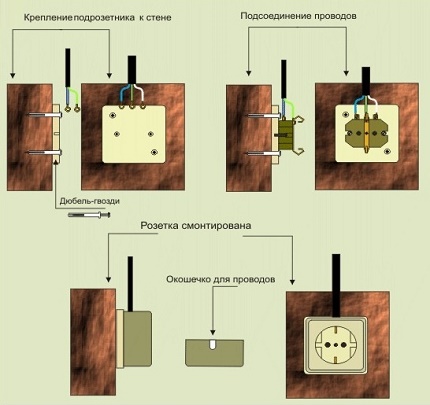
Fastening of the plate-podrozetnika to concrete or brick wall is produced by dowel-nails, to a wooden or plastic surface with self-tapping screws
Now we need to fix the mechanism on the wall. To do this, take it and put it to the place where it should be. Align the position of the part strictly horizontally, then take a pencil and, inserting it into each fixing hole, we plan on the plane the points at which the fastenings will be located. All operations are done accurately, because an error in the markup will cause the socket to be installed obliquely.
Fastening of the mechanism of the device
Depending on the material from which the walls are made, the fixing procedure may be slightly different. Consider the most common variant with a concrete surface. First, using a perforator or a drill, we make holes at the intended points. Their depth and diameter should correspond to the dimensions of the dowels prepared for fasteners.
In the drilled holes in the marked points we put dowels, which improve the adhesion between the base and the fasteners
In the resulting holes we insert the dowels, the so-called plastic plugs, which provide self-tapping good adhesion to the wall. Then apply the mechanism of the socket to the base and securely fix it with screws or screws. We check the quality of the resulting fastening. Its durability depends on the durability and reliability of the new outlet.
Preparing the wire for connection
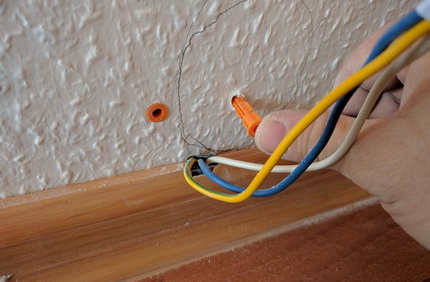
Depending on what type of outlet we have, the actions may differ slightly. Probably, first it is required to get a cable inside the box. Most often, this type of sockets on one side of the body is made with a cap on which several possible openings of different diameters are allocated. In this case, it remains only with a sharp knife or a cutter to remove the desired plug and get a hole under the wire.
If there is no stub, it is less convenient, but not hopeless. It is necessary to cut the hole itself. After that, the wire is wound into the body and cut so that the length of the remaining length is enough to connect. From the cable that is connected to the mechanism, it is necessary to cut off the insulation. Then we separate each of the veins and clean them up to the metal. The length of the bare core should be 0.8-1 cm.
The cable is cut to the desired length. The insulation is removed and the wires separated, the ends of which are cleaned to the metal to a height of about 1 cm
Connecting the mechanism to the cable
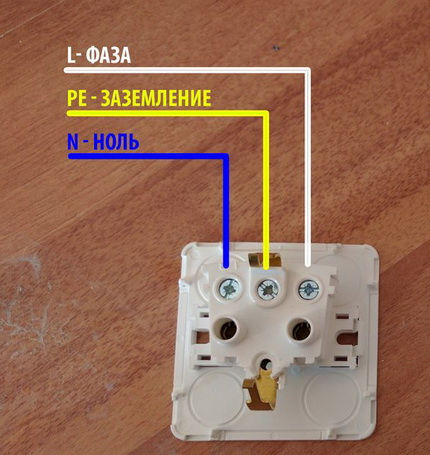
When installing overhead sockets, it is important not to make a mistake in connecting the wires. If a two-wire cable is used in the wiring, one of the wires will be zero, the second - the phase. They are connected to different terminals. Hardly more difficult with a three-wire cable. In this case, the phase and zero are fixed to the terminal terminals, and the ground terminal is grounded. Problems do not arise if the person involved in the connection knows exactly the designation of the wires, but this is not always the case.
The easiest way to determine zero, phase and ground is if the color coding is observed in the wiring. According to this, the working zero or neutral will always be in blue-white or blue insulation, protective zero or ground - in a yellow-green braid. The wire of any other color, most often red, white, black or brown, will be the phase. Unfortunately, in houses with old wiring there is no color marking.
The photo shows the connection scheme of the outlet mechanism to a three-core cable
In this case, you need to determine where the wire is. The easiest way to do this is for two-wire wiring. We need an indicator screwdriver. When you touch the wire under voltage and simultaneously close the contact on the back of the instrument body, the indicator light comes on. If this happens, then the phase is found. The second wire, respectively, will be the working zero or neutral.
To deal with a three-wire cable, you need special device multimeter. First, the earthing switch must be disconnected from the switchboard. Then determine the phase, then successively "ring" using a pair of wires. With a simultaneous touch of the phase and working zero, a certain value appears on the monitor of the device, when touching the working and protective zero - no.
Running a hole under the cable in the socket housing will be much easier if one of the walls has such a plug. Separation into sections with different diameters allows you to easily and quickly make a hole of the right size
Installation of a decorative insulating cover
The procedure may differ slightly depending on the model of the consignment socket. If we are dealing with a separately installed body, insert a mechanism with fixed wires, cover the front panel and fix it. If the mechanism and the body are a single whole, put the decorative panel in place. If necessary, cut the edge of the housing so that the cable can freely enter. We fix the front panel. Our installation is finished, you can check the operation of the device.
Features of the device overhead switches
The most common one-key switch is a two-position switching device with normally-open contacts. The principle of his work is extremely simple. Inside the device is a mechanism with a movable contact. The last one, when pressed, takes one of two possible positions: on or off. In the first case electrical circuit closes, in the second - opens.
The switch of the overhead type, like the socket, is installed over the base. Used most often with open wiring
Important note: only the phase must be connected to the switch contacts. The design of the device is extremely simple and includes two basic elements: the working mechanism and the details of protection. The latter include a key for switching modes, and a frame-case. The contact group of the one-button switch consists of two contacts. One of which is considered to be a waste, the other is suitable.
To the first phase is connected, going to the lamp, to the second - the phase that comes to the switch. The manufacturer usually marks the contacts of the operating mechanism, indicating the appropriate and outgoing contacts. However, if there is no such marking, there will be no problems, since in any variation the device should work equally well. Like the switches, the terminals of the contacts can be screwed or clamped.
The stages of installation of the overhead switch are similar to the sequence of work on installing the consignment socket. First, attach a similar wall to the wall, then the mechanism to which the wires are connected
The former are considered more reliable in operation, the latter are easier to install. The main difference between the overhead switches is that they are installed directly on the wall surface. The appearance of such devices loses to embedded analogs, but they are easier to install. Overhead switches with open wiring are used, but can also function with a hidden system.
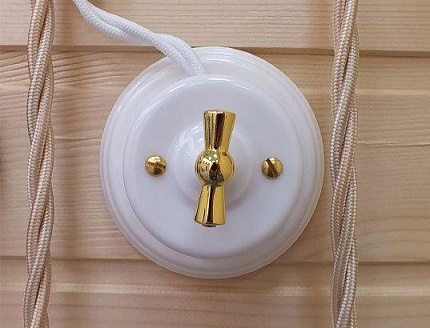
The overhead switches are used for the open wiring device. Models in retro style perfectly combined with the interiors of country houses
The process of installing a single-key switch
First you need to prepare all the tools you need to work. We will need pliers or pliers, a sharp knife or clerical cutter, electrical tape, pencil and level. In addition, it is necessary to prepare fasteners. For wooden or gipsokartonnyh walls will be enough screws, for concrete and bricks you need dowels and a drill or a drill to drill holes for them. Let's get to work.
Image Gallery
![]()

In order to ensure personal safety, we begin the installation by switching off the power supply. For this it is sufficient to turn the lever on the corresponding circuit breaker on the switchboard to the "down" position. If you do not know which of the machines is "responsible" for the right group of switches, the easiest way is to disable them all. Then you need to make sure that there is no voltage on the working wire, which can be done with an indicator screwdriver.
Preparing the device for installation
We begin with the key. It needs to be removed. To do this, we take care of the protruding side parts of the key, carefully squeeze them and pull ourselves. The axial guide keys come out of the grooves, and it can easily be removed. If you can not tackle the part from the sides, you can try to pull on any protruding part of the key. If it does not work out that way, it remains to take a flat screwdriver, carefully pry the key and remove it.
Now before us is the front panel of the switch, behind which the working mechanism is hidden. It must also be removed. In different models it can be attached in different ways. Most often there is a variety with fasteners, which are easily squeezed out with a flat screwdriver. After that, the panel is easily removed. In some cases, you need to unscrew the fixing screws. It remains to get the operating mechanism from the switch case.
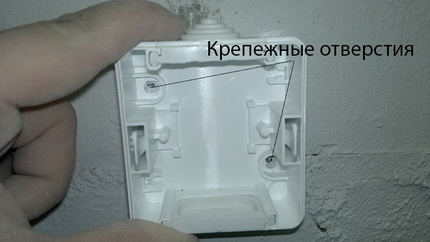
In the case of the switch there are holes for fastening. Their location should be noted on the bottom. For this you can use a pencil
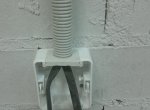
Mounting the case to the base
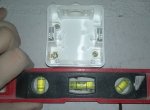
To properly install the overhead switch, you must first fix it on the wall. To do this, take the body and apply it to the fixing point. Take the level and expose the detail strictly horizontally. Having convinced that the case is located exactly on the level, we take a pencil, insert it in turn into the fixing holes of the case and make notes. The resulting markings are used to prepare the wall for installation.
Actually, the way to secure the switch body on the wall depends on what material it is made of. We will consider the most difficult option - concrete. A perforator or a drill perform holes strictly at the intended points. We select the diameter of the drill so that it corresponds to the dimensions of the dowel. We also determine the depth of future holes. After they are ready, we block the dowels.
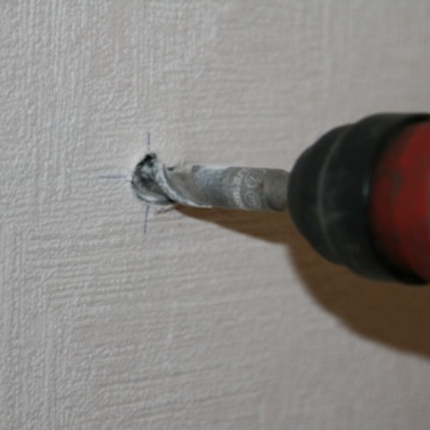
We drill the wall under the dowels exactly in the designated places. Diameter and length of the hole must correspond to the selected fastener
We put the switch body in place and fix it with dowel-nails. We do the work carefully, so as not to damage the plastic part. The body must be well fixed to the base so that there is no slack and no mobility. Take the level and once again control the position of the part. If a misalignment is detected, we correct it by removing the case and performing a new hole.
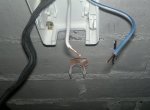
Connecting the device to the wiring
First we need to get the cable inside the switch case. The easiest way to do this is with devices that have special stubs on one of the walls. Even better, if the cap is divided into several parts of different diameters. In this case, it remains only to cut an element of the desired diameter with a sharp knife and the hole under the cable is ready. If there is no hole for the cable on the case, you will have to make it yourself.
If necessary, the cable suitable for the switch is cut and brought into the housing. If the wire is placed inside the plastic corrugation, it is also lowered into the housing. So the connection will look more aesthetic. With a sharp cutter or knife, we remove the insulation from the cable and divide it into separate wires. Each of them is gently scraped to a height of about 0.7-1 cm.
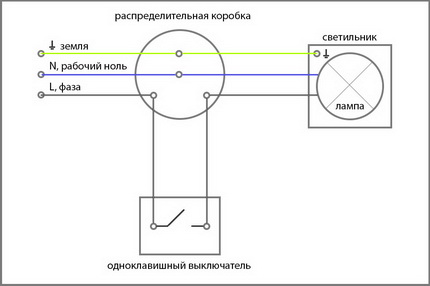
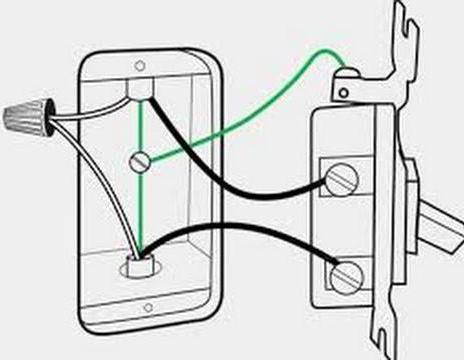
The figure shows the circuit for connecting a single-key switch
To properly connect, you need to know the purpose of the wires. How to do this was described in the case of installing a delivery note. We take a phase wire, if properly labeled, it will have insulation white, and put it into the terminal marked as L. The other control wire in the blue braid is inserted into the terminal marked 1. If necessary, tighten the fixing bolts.
Assembly - the final stage
It remains for us to assemble the device. First we insert the working mechanism into the housing box and fix it inside as it is provided by the model of the device. Then put in place the front panel. We make sure that the latches are correctly positioned. After that, you can put a frame in the frame. We do this carefully, so as not to break the fragile enough element with an excessive force.
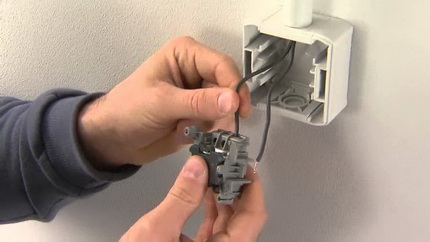
After the operating mechanism of the switch is connected to the wires, it remains only to assemble the device, performing in reverse order all the actions for disassembling it
The switch is installed and ready for operation. It remains to conduct the device's operational tests. We examined the procedure for mounting and connecting the simplest one-key switch.
For two and three-key devices the technology of work will be approximately similar. The main difference will be the connection scheme of the device, where each "key" will be connected to its own lighting device.
Related Videos
Determination of the phase wire before the installation of the electrical installation products:
The process of installing and connecting the outlet of the open wiring:
How to install an overhead switch:
Overhead switches and sockets do not require installation in specially prepared grooves in the base, so their installation is fairly simple. And yet, we should not forget that we have to work with electrical appliances, which require special care. If there is no experience in the electrician, and the wiring in the house is old and there is no marking on it, it is better to seek the help of specialists.
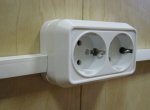
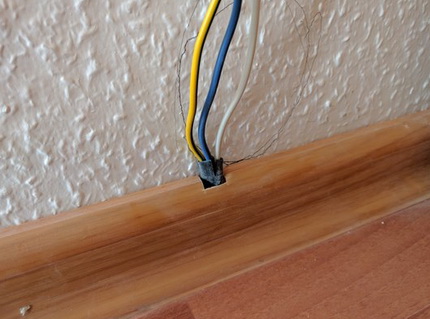
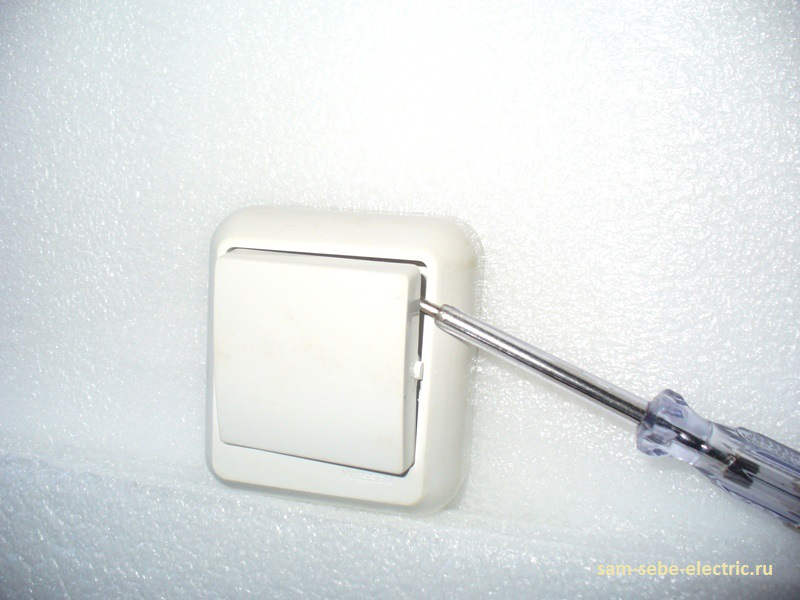
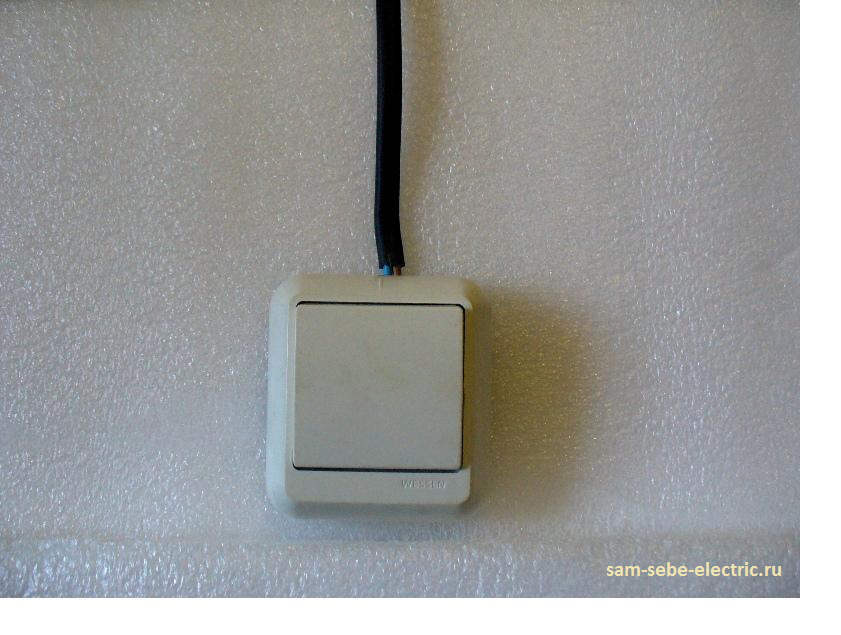
Often I meet in the apartments wiring hidden, and the switch is outdoor. We used to build this way, at least in our city. Therefore, over time, the question arises of replacing the outdoor switch. Here everything is simple and the strob for him is not what you need. Let's see how to install below outdoor switch. All this interesting process I modeled on a small stand and below illustrated each step with photos. Having looked them, you can not only install the outdoor switch, but also dismantle it and if you need to replace it. Watching ...
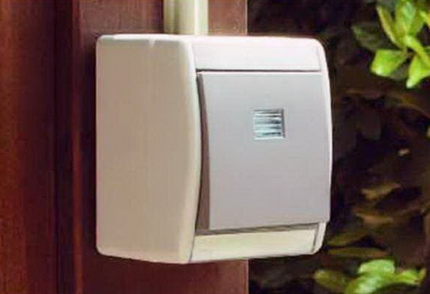
As an example, take this kind of outdoor switch. The installation process of all switches is basically the same, only for different manufacturers their design may be slightly different.
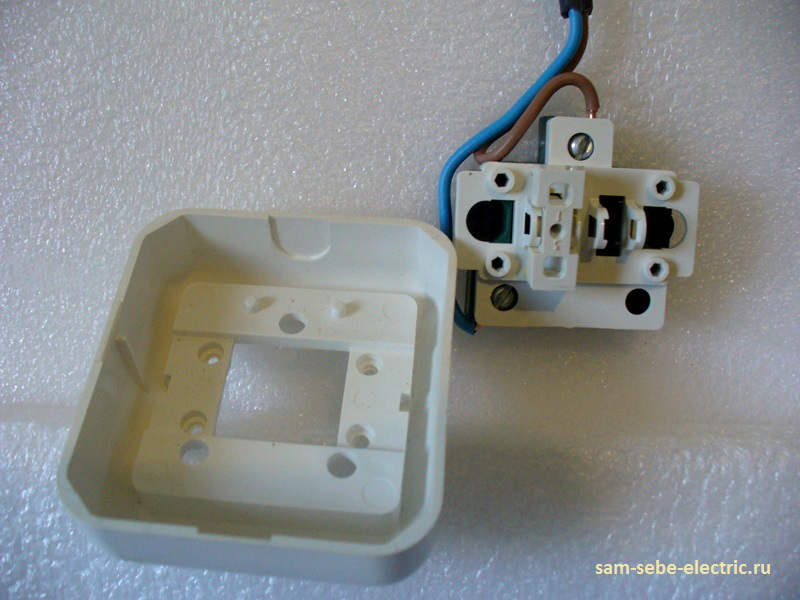
First we need to disassemble it. To do this, use a thin flat screwdriver to press the key and take it out.
That's what we end up with ...
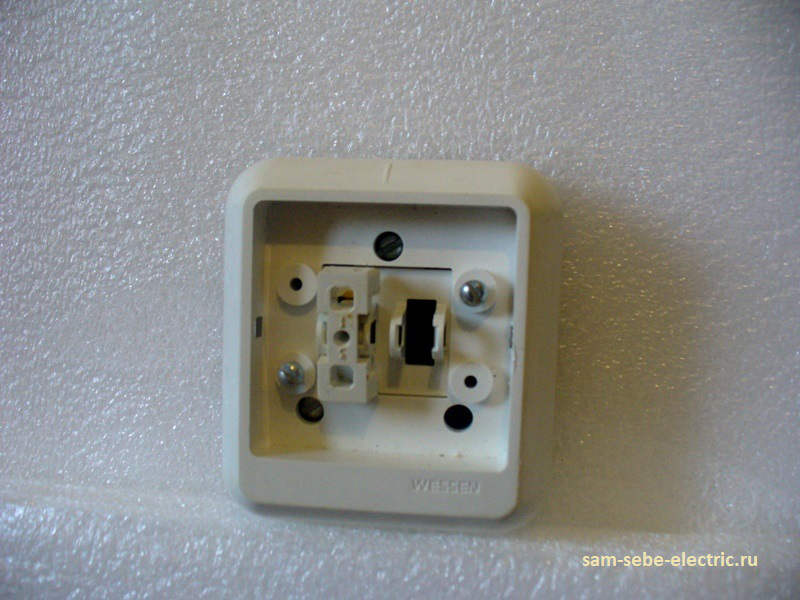
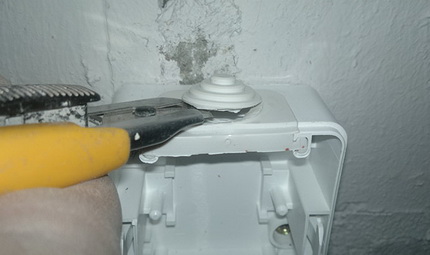
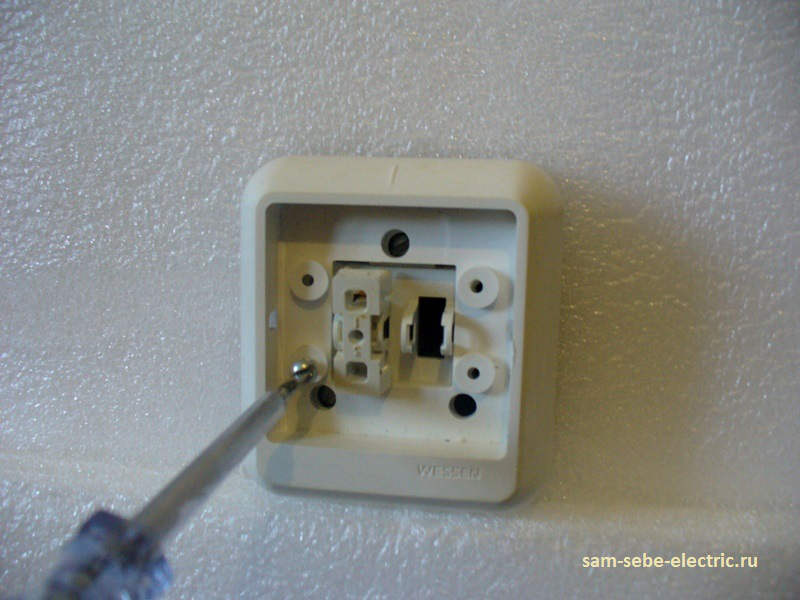
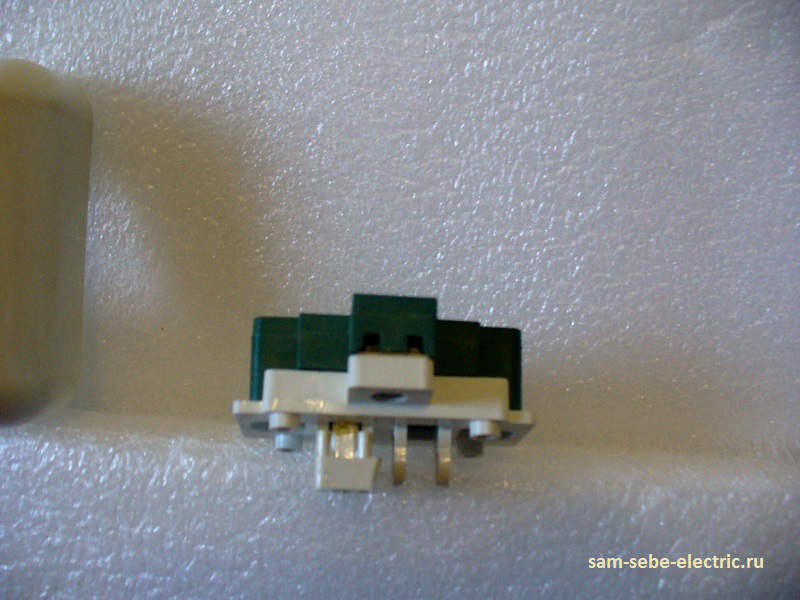
Now it is necessary to remove the switch case. To do this, unscrew the two screws with a screwdriver ...
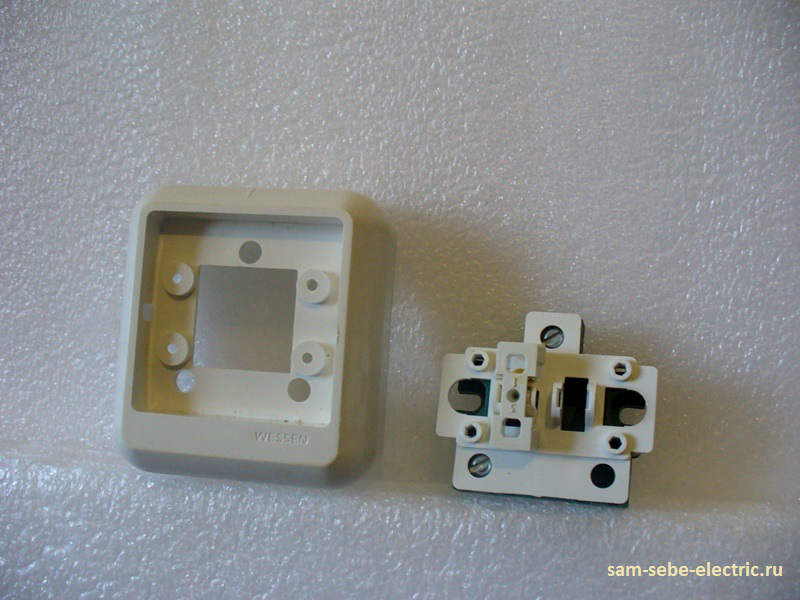
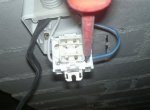
So we got access to the contacts of the outdoor switch. There are only two of them, since the switch is one-key. One residential area will have a phase with junction box, and the other dwelling will go the same phase to the lamp itself (chandelier).
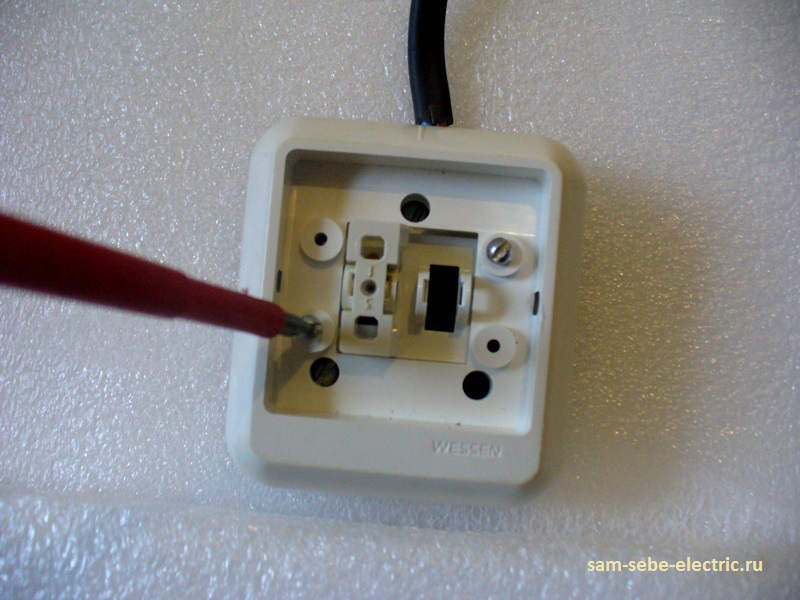
We start the installation of the external switch by connecting the wires. Polarity here does not really matter. In our case, the wire to the switch is above. The wire itself needs to be hidden in the cable duct. So it will be beautiful and safe. Also, the wire can approach the switch from either side or from the wall itself.
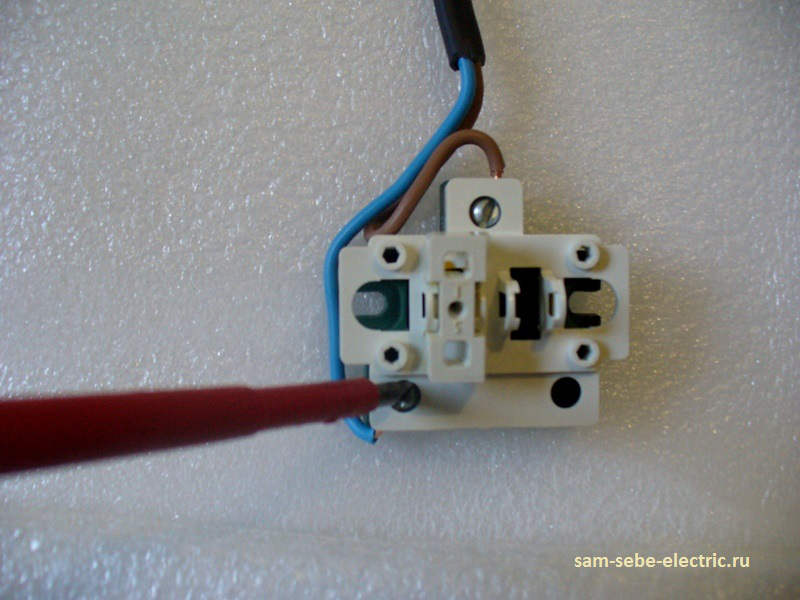
Now you need to fix the outdoor switch to the wall. If the wall is concrete or brick, then fastened with dowels, and if wooden and the like, then we fix it simply with screws. Why did I first describe the connection of the wire to the external switch, and only then its attachment? It seems so convenient to me. Wires to connect to the pins are easier when it is on weight. So they can freely maneuver during the connection of wires and then they no longer interfere with its attachment.
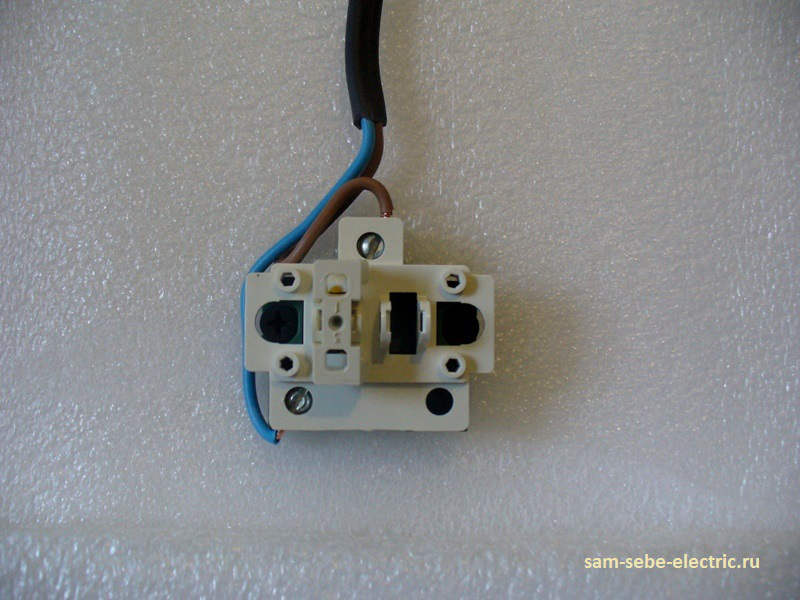
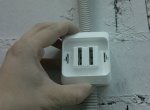
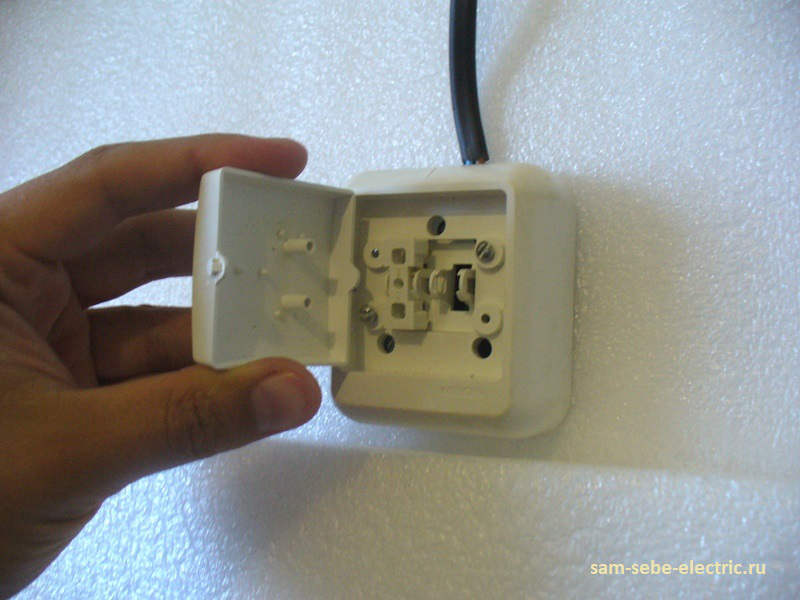
Now we need to put in place the body. If the wire is approached from the side, then the case does not fit into place. Here it is necessary to cut out a small opening in the case for the passage of the cable.
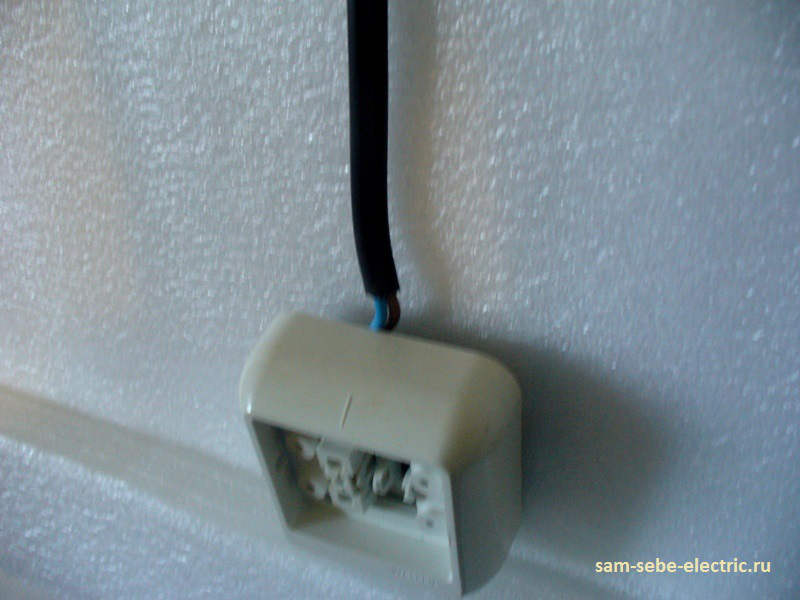
For this, there are special labels, where the thickness of the plastic is quite thin, which facilitates its removal.
After we cut out the opening, put the body in place and bolt it ...
At the final stage of the installation of the external switch, put the key in place. See that the tabs on the inside of the keys hit the switch itself ...
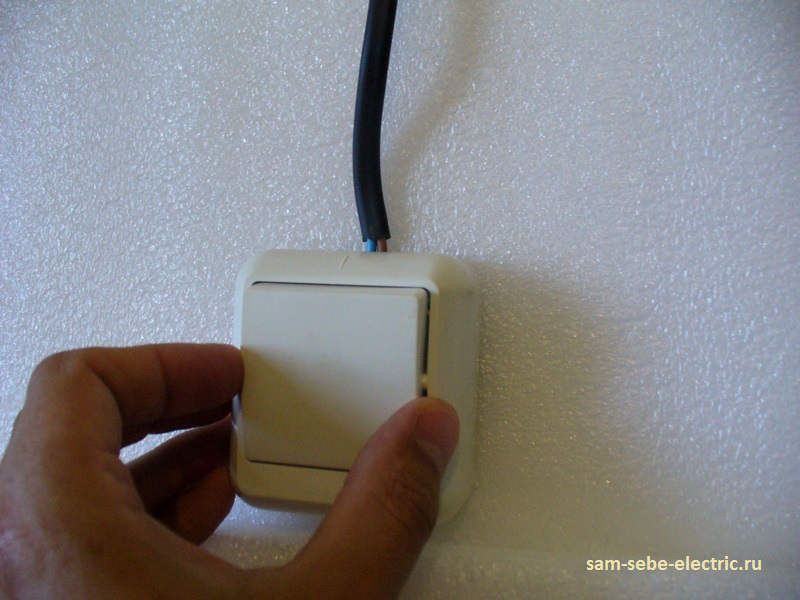
That's all we installed the outdoor switch. It is dismantled in reverse order.
Do not forget to smile:
Sunday school is a lesson
Father: - And tell me, how does electricity flow through the wires?
Disciple: - With God's help!
Father: - Well done - sit down