Wiring connection of the switch. How to install a gateway. General principles and algorithm of installation
Very often situations arise when in a house or apartment it is necessary to produce certain electric installation work. Of these, the most common is the circuit of connecting the switch to the light bulb. As a rule, a single-key switch with the simplest circuit is used for this. Before performing any kind of work related to electricity, it is absolutely necessary to de-energize the electrical network. Only after this, you can proceed preparatory work.
Preparing to connect electrical appliances
Before starting work, it is necessary to choose the most suitable switch and junction box. Next, you need to stock up connecting wires and PVC insulating tape.
At the very beginning, a junction box is assembled where all the wires connected in the desired scheme. Usually, the connection is made by the method of concealed wiring.
The next step is the installation under the switch. At the same time, in power shield, installation of a circuit breaker protecting electrical circuit from short circuits.

Connection of all electrical appliances, is carried out by a three-core universal wire, the cross section of which is not less than 1.5 mm. As a rule, this grade is BBGGP 3x1.5 with a solid copper core and double insulation. This wire connects the dashboard and the junction box with a reserve for subsequent cutting. After that, the wires connect the lamp and the junction box with a circuit breaker.
Scheme for connecting a one-button switch to a light bulb
First of all, the circuit breaker must be powered. After that, the circuit of connection of the switch and the light bulb is carried out in stages. The wires in the cable used are usually blue and black, and also yellow, which has a green strip. For zero, the blue wire is used, for grounding is yellow, and black is for the phase. The colors of the wires for all connections must be observed in a certain order. Stripped wires are inserted into the terminals and clamped with special screws. All other nodes are connected in the same way.

When the luminaire is connected, the wire is also prepared. In this case, the ground is not used, and only the zero and phase wires are used. After preparation, the wires are connected directly to the cartridge and to the switch. After that, the circuit gets a complete look.
To test the operation of the circuit, the bulb must be screwed into the socket. On circuit breaker the voltage is applied, after which it turns on. The correctness of all connections is preliminary. After pressing the button of the switch, the light should turn on, which means that the whole circuit is executed correctly.
Lighting in an apartment consists of many different elements, each of which performs its function. Any of them deserves careful consideration, but in this article I want to go into more detail on the light switch, namely how to install a light switch and what is needed for this. After all, without a switch it is impossible to control the lighting in the room.
Kinds of light switches
To date, several types of light switches are used to control and adjust lighting: timers, dimmers, remote and key switches. All of them differ in their design, capabilities and different degrees of security. But the device of the light switch in its essence and principle of operation is the same for all types.

Dimmers
These light switches are designed to smoothly control the intensity of lighting by changing the power. The adjustment is made using a touch button or a roller knob. Previously, dimmers could only be used with incandescent lamps, but today, thanks to the development of semiconductors, dimmers are installed under any light sources.
Timers
Timers are some of the most complex in their design, rarely used as conventional light switches. Most often they can be seen in the " smart House". These electronic devices allow you to program the switching on and off of light, creating a presence effect or adjusting the lighting periods in the rooms.
Remote switches
Modern technologies have made it possible to create switches controlled by a remote control. Created for convenience, these switches work with virtually any remote, whether it's a remote from a TV or from a music center. This their peculiarity makes it possible to significantly alleviate the lives of people with disabilities.
Rocker switches
The most common switches are keyboards. They can have one to four keys and be mounted with hidden or open wiring. Simple design and connection are their main advantages.
Connecting the light switch
All work on the connection of the light switch is not particularly difficult, it is sufficient to adhere to safety techniques when working with electrical appliances and be able to use the instrument. But before connecting the light switch, it is necessary to perform the preparatory work and purchase the switch itself.
When choosing a new switch, first of all you need to know a number of important technical issues. First, depending on which wiring in the room - hidden or external, will depend on the type of switch, which can also be hidden or external (overhead). Secondly, it is necessary to know the current and voltage in the house network in order to correctly select a switch. Information on these characteristics of the circuit breaker is indicated on its reverse side. Know about technical characteristics it is very important, since an improperly selected switch can get very hot and eventually fail completely, which is fraught with a short circuit and a fire. Thirdly, depending on the type of light sources and lighting devices, a certain type of switches should also be selected.
An important point that determines the sequence and method of connection is the connection circuit of the light switch. It is created even at the stage of the design project, and based on it you can choose the type and type of the switch. Most often, the circuit diagram of the light switch is as follows:
After acquiring the required switch, proceed to the preparatory works for its installation. Before making a light switch, you have to mark a place on the wall for it. To do this, again refer to the design of the wiring, which indicates all installation locations and mark them with a pencil or marker on the walls. Typically, switches are placed at a height of 1 - 1.5 m from the floor, next to the doorway so that the doors open do not block access to them. After that, proceed to installation.
Important! Installation of switches and sockets is carried out after the installation of the wiring. Therefore, if you plan to completely replace the electrician, first you need to lay the wires and only then install switches or sockets. If only the replacement of switches or sockets is carried out, then new ones can be replaced.
How to connect the open circuit breaker

This type of circuit breaker consists of an insulating pad (mantle), an on / off mechanism and a cover with a button or key. Installation of such a switch is as follows:
- dismantle the switch to get to the mechanism and the junket. For this, we carefully remove top cover using a slotted screwdriver;
- we remove the mechanism of the switch in order to get the plate itself;
- we put the pad onto the previously planned place on the wall and mark the places where the holes for the fasteners will be. Usually there are two of them on the podrozetnik and they are diagonally from each other;
- with the help of a drill we drill holes and drive in dowels;
- put in place a junket and screw it to the wall;
- it remains to put the mechanism in place and secure it.
Important! All work on the connection of the circuit breaker must begin with a power failure on the switchboard.
- having secured the switch and having disconnected the network, proceed to connecting the wires. To do this, clean the ends of the wires 2 to 2.5 cm from the edge and insert them into the terminals, then tighten the screws that fix the wires inside the terminals.
Important! To know how to connect the light switch correctly, remember the following. Wires are connected in a certain order, and the labeling of wires will help in this: white or brown is the phase, black or blue is zero, yellow, green or yellow-green is the ground. In addition, the marking for the connection will be indicated on the switch itself.
- fixing the wires in the terminals, replace the cover and fix it. Using a tester, we check the quality of the connection, and if everything is in order, we turn on the electricity on the shield.

As already noted earlier, external switches can be either with one key or with two keys. In how to connect a two-button light switch, there is nothing complicated. The difference between a two-key and one-key is the number of zero wires. In the two-switch switch there are two, and each is connected to a separate key, while the phase is common for the entire switch.
How to connect the hidden switch

Unlike external switches, the hidden ones have a slightly different design. The difference lies in the podrozetnik and decorative cover. The receptacle has the shape of a bowl, into which the entire mechanism of the switch is placed. And the decorative cover is made in the form of a frame or a small panel. The installation method is also different.

Important! The concealed switch and sub-socket are sold separately. In addition, there are different podrozetniki for gypsum board and for brick and concrete walls. When buying, you should remember this.
Connecting this type of circuit breaker will require a little more effort and time. The reason for this is the need to carve walls and cut a fairly large niche for the juniper. Of course, these actions will have to be performed only in the absence of ready-made strobes and niches. But to do them from scratch, the following actions are performed:
- in the spot on the wall for the switch, we cut out a large circular niche. This can be done with a special bit for the drill or perforator - the crown. The nozzles themselves come in different diameters, but for our purposes a crown, which is slightly larger than the switch pad, is suitable;
Important! Before connecting the double light switch hidden wiring, it is necessary beforehand to cut a hole in the wall into two holes and connect them together. As a result, you get one solid niche, into which you can put a special double podrozetnik.
- wires to the switch are laid along the shtroba, which breaks through the wall in advance with the help of a perforator;
- now we put in place the junket and put the wire through the special hole inside the jigsaw pod. In concrete or brick wall You can fix the inner receptacle inside with gypsum plaster. In gypsum cardboard, the podzoletnik is fixed by means of two screws, screwing them all the way in, fixing special clamps, which hold it in place;
Important! If the replacement of the switch is carried out in a room where the wiring is completely diluted and connected to the mains, first all must be de-energized. Only after this, you can proceed with the installation work.

- fixing the sub-socket and having wires in it, it is possible to install the switch itself into place. For this you will have to partially disassemble it, namely, remove the decorative cover and keys. You can do this with a slotted screwdriver, gently picking one of the keys. After removing it, you can remove everything else. As a result, only the mechanism with the metal fastening plate should remain;
- now connect to the wire switch. This is done in the same way as in the case of an external switch. But there is one difference. In the case of external wires, the cut was cut under the switch. For a hidden switch, leave a small supply of about 10 cm, and only after that clean the ends;
- after connecting the wires, carefully put them inside the podrozetnik and install the switch mechanism in place. Then fix it inside;

Important! The market sells switches with two different mounts. In the first case, the fixation is performed using two spacers, which are bred to the sides by tightening the fixing screws. In the second - with the help of two screws, which are screwed directly into the plastic podrozetnik.

- having fixed the mechanism of the switch, we check the quality and the correctness of the connection by the tester, and if everything is in order, we put on the decorative frame and place the keys in place. Then we apply voltage.
Installation of switches is one of the simplest electrical installation works. Its implementation does not require special skills, but it is also not worth negligence. If you have never done anything like this, it's better to be safe and consult a specialist.
You can carry out wiring work to connect such switches yourself, for which you should consider all the features of the device, wiring diagrams and other nuances.
The design of modern switches is simple, but it is fragile enough.
Often it is represented by the following elements:
- Key - The element that is used to make use of the switch. It is worth noting that it is quite easy to remove it, since it is attached to the stubs. A small impact will remove the key itself from the seat.
- After the key was removed, you can see the screws securing the switch to. They keep the case on the seat.
- Also, in the case there are screws, which are designed for fastening electrical cable. They also conduct electricity when unscrewed or twisted when the circuit is de-energized.
When considering the design, it is necessary to turn off the electricity supply and check the presence of voltage by means of an indicator. Plastic parts of the structure do not conduct electricity, but inside there are elements that are energized.

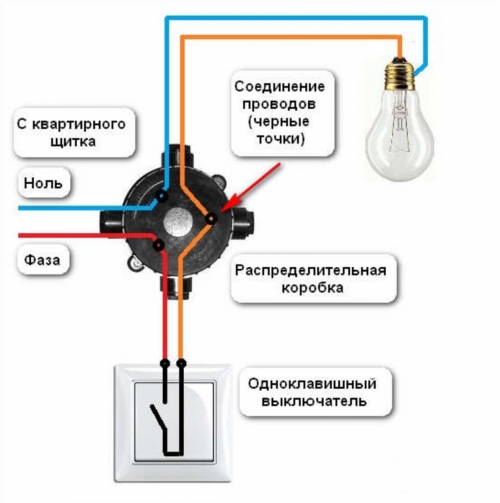
Connection diagram

In order to conduct correct connection switch, you should pay attention to the connection diagram.
Often it consists of the following elements:
- Machine, which can be located in an apartment or on an erasable area. It operates with a short circuit or a strong voltage jump, allows you to de-energize one or several rooms, depending on the type of power scheme that was used.
- , in which the electrical cable is often connected or branched.
- Switch.
- The consumer of electricity.
The detailed wiring diagram is as follows:
- With apartment flap or machine 2 cables are fed: one phase and zero.
- Zero immediately goes to the electricity consumer.
- Phase goes to the one-button switch.
- In the closed state the circuit is open, the phase terminates at the switch.
- The second part circuit breaker through the box goes to the energy consumer.
- When you turn on the chain is connected.
Similarly, the usual consumer of energy is connected. The scheme is simple, and its creation does not need to have special skills or knowledge.
A feature of connecting a switch with 1 key is the supply of just 1 wire with a phase to the switch and its output, for example, to a lamp. In order to carry out work protective circuit breaker, one should also bring a "zero" to the consumer of electricity.
Necessary tools and materials
voltage indicator
In order to conduct work independently you need to have the following tools:
- Indicator - A special device that allows you to determine the presence of current in the conductor. Without this tool, no work is done with electricity. The cost of the indicator is not high.
- Screwdriver It is necessary to conduct the analysis of the switch and the cable clamp in the landing nests. When choosing, it is worth considering that manufacturers often use curly bolts. The screwdriver must have a handle made of insulating material. The longer the rod, the greater the protection of the screwdriver.
- Pliers It will be necessary to clean the cable and fit it to the landing nests. Use pliers also need with handles that are made of insulating material.
Also, do not forget that the nest for the case must be precisely adjusted to a certain size. Depending on the material from which the base is made, it is possible to use a perforator or other tools to form a notch.
In the course of the work, the following materials may be needed:
- Cable, which is selected taking into account the emerging load.
- Insulation material, which is represented by an insulating tape.
- Junction box.
- The switch itself.
Having the above materials and tools available you can start working.
Step-by-step installation instructions

The installation of the connection scheme under consideration is carried out in several stages.
At the same time, you should first think over the location of all the elements, take into account their features:
- The first step is the location of the junction box. When choosing the location, you need to consider the following:
- Must be located away from water or a source of moisture.
- If possible, the junction box is recessed into the wall. For her, we create a niche.
- When choosing the location, you need to take into account the location of all the elements of the chain and choose the shortest way to connect them. After the location was chosen, we carry out the installation of the junction box.
- The next step it is possible to name the creation of a shroud for a cable or a protective box, if it is not deepened. The cable is laid and carried through the junction box. When cutting the cable from the power source, the consumer and the switch, leave a reserve. The connection to the power supply is the last one.
- The third stage you can call the creation of a landing niche for the switch box. The most suitable place is chosen and an opening is formed, which is precisely adjusted to the dimensions of the housing. If you mount from above, just outline the location. After that, we perform the following works:
- We put the box in a niche and hold its fastening with screws that need to be screwed to the stop.
- The ends of the cable that were previously cleaned should be shortened to the desired length, inserted into the seats and clamped with screws. Do not leave long ends, as they can come into contact, and a short-circuit will occur. However, very short ends are also a problem: if the cable is burnt out over time it needs to be cleaned and its length may not be enough. These nuances should be taken into account when carrying out work.
- The bare cable inside the case can not be left. We conduct their isolation and divorce in different directions.
- We connect the cable to the consumer.
- We connect the cable to the energy source, which must be de-energized.
- We isolate all the connections that are.
- Install the key in place.
- Turn on the power supply. If there is a machine, he will be beaten with an error. When you first turn on, you should be near the machine for some time in order to be ready to quickly de-energize the circuit. In the same way, a simple circuit with a mechanical interrupter is organized.

Safety precautions
Special attention when working with electricity, you should pay attention to safety.
In its consideration, the following nuances can be noted:
- All works Only the circuit is de-energized. Do not rely on your accuracy and attention.
- After de-energizing the circuit you need to make sure that no one will turn it on accidentally. For this, you can close the flap on the key, put a person who will stand next to him.
- Despite, that the machine was switched off, it is worth checking the absence of current in the circuit. It can be because the machine is faulty, or that there were branches that did not pass through the machine when creating the chain. This is often found in old houses.
- Despite the de-energizing of the circuit, it is possible to contact the connected conductor to the power circuit only with a screwdriver.
- Job It can only be performed if the room humidity is normal.
- Cable can not be laid in damp walls.
You can do the above work yourself for one or several hours. When doing work, do not rush, because you can make mistakes. Particular attention should be given to the cable connections and strive to make them as small as possible. This is due to the fact that it is the junction sites that are considered the main vulnerability of the chain.
Pass-through switches make the process of switching on and off the lighting more convenient and have the following advantages:
- The interconnected switches can be connected to each other using a two-wire cable. This practice allows you to avoid pulling stranded wires, which reduces the number of costs and simplifies the connection process.
- Single lamp control system from several locations at once, in itself adds convenience to this process, making it much more comfortable.
In this case, such devices have several drawbacks:
- When installing two-key models in the scheme, six contacts will be used at once, which will increase not only the number of wires, but also will affect their extent. Accordingly, three-key models have in their device nine contacts and have the most complicated principle of connection.
- Switches of this type, in view of the specifics of their device, do not have a fixed value responsible for the state. Whether it is on or off will depend on the position and condition of other similar devices connected to the same light source. Such a system requires a certain amount of time to get used to it.
Self-connection

Connection of a single-key switch
To connect a one-button or two-key switch, you will need to pre-prepare tools and materials in accordance with the following list:
- a knife with a sharp blade;
- nippers;
- screwdrivers of different types;
- pliers;
- contact with the insulator;
- insulating tape;
- wires;
After all the preparations have been completed, you can proceed with the installation process.
To install a one-button switch, you need to play the following algorithm:


Connection of a two-button switch
A number of nuances arise if you plan to connect a two-key through-switch. In fact, there is nothing complicated in this, since there are no fundamental differences in the schemes.
The connection of such a device is carried out by means of a double circuit of a one-button switch, which is described in detail above. To put it simply, each of the keys of such a device will be equal to the connection of two independent one-key pass-through switches.
The number of used wires increases in proportion to the growth of the used keys, otherwise, the connection technology remains unchanged.
Varieties

The classification of these devices does not differ in principle from that used for dividing conventional switches.
The main feature of the division, as well as the selection criterion is the number of keys:
- With one key.
- With two keys
- With three keys.
- Cross type with one or two keys.
A cross-variant is suitable for such situations, if there is a need for remote control illumination from three or more different points.
However, there is another classification that divides devices into different types of control systems, then the choice is made only on the basis of individual preferences of users:
- Standard Devices with keys.
- Innovative models with a touch panel that functions similarly to the screens of modern smartphones.
- Devices, in which the keys are replaced by a rotary mechanism.

Before carrying out self-connection of the pass-through switches, it is recommended to familiarize yourself with the following tips given by experienced users:
- To connect a single device or system, use wires from only one manufacturer, since different firms can use different colors for identification, which can lead to confusion or improper connection.
- Cross switch, which is responsible for the management of the lighting system of three or more places, it is not necessary to buy ready-made. Such a device can be manufactured independently on the basis of a two-key version of the device, for this, it is necessary to mount two jumpers in it, and also to replace several keys with one large one, although you can simply glue them with glue.
- A weighted approach is required when choosing the number of keys on the device. If the room does not differ large dimensions, then it is best to limit yourself to two lighting control points and two two-button devices, respectively. This is due to the fact that the more keys on the switch, the more funds it will have to invest and the more difficult the installation technology will be.