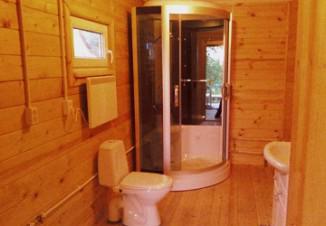
Shower tray in a wooden house. How to install a shower in the house
Nothing so saves space in the bathroom as a small shower cubicle, and the last few years it's very fashionable to install it in the bathroom country houses and cottages instead of baths.
Installation of a bulky heavy bath or even a Jacuzzi will cost quite a lot, and you can not do without one's help. But a compact shower can be put on its own, it's not at all difficult, if you show due diligence.
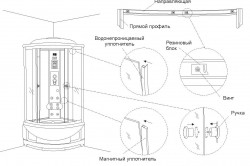
Many companies are engaged in the manufacture of shower cabins, so the assembly may be slightly different. And since you can not follow all of them, we will consider the assembly of a standard shower cubicle: with a holder, a shower hose rack, a tray, walls, a drain, watering cans.
Preparation, list of tools:

- Drill, drill.
- Keys: Tubular and carob.
- Screwdrivers: slotted, cross.
- A sharp knife.
- Building level (spirit level).
- Shurupovort.
- Construction and assembly pistol.
- Crimper is a wiring tool.
- Hardware, screws, nuts.
- Pipes and hoses suitable for the shape of metal-plastic.
- Adhesive sealant.
- Sewage siphon.
- Fittings for water pipes.
- Gloves, iso-tape.
Before self-installation of the cab, be sure to read the instruction manual.

Prepare a place for a shower in advance. If required, lay a wooden or wooden plank floor for waterproofing. If you are not sure that the parquet can withstand the weight of the cabin and the person inside, fill the floor with a cement screed.
After reading the instructions, no matter how meager it was, you will find out. But during the first assembly do not use glue (just temporarily fix the parts), so you will see the complete serviceability of the individual parts and the presence of small parts.
Stages of work
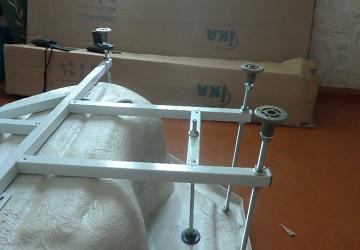
Assembling the pallet:
- We turn the pallet, fasten 4 legs-studs to the seats.
- The pallet is fastened only after we put on the legs of the nut and washer.
- We find on a short support in advance soldered nut, attach it to the central leg.
- To fasten the legs, tighten the nut more tightly, thread the washer, from above the lock nut and tighten it to the limit.
- In order not to be skewed, do not tighten bolts to the limit.
- The legs are leveled using the lock nut.
- Now, install brackets for the pallet screen.
- We fix the pallet according to the level.
- The pallet is ready.
Securing the siphon
The next important part is fixing the siphon. Its design and material can be very different, so carefully study the instructions at this stage! By the way, if you do not give due attention to this moment, it is incorrect to establish air valve, then you will enjoy the ambrosia of the sewer pipes.
We mount the siphon to the bottom of the cabin. Release better tighten with a water and gas wrench.
For tightness, use a little glue sealant or paste for waterproofing.
How to fix panels
The fastening is performed in steps:
- In advance, we check the conformity of the panels by placing them side-by-side. Where there are more holes for self-tapping screws, there is a top. The edges are rounded at the bottom. We set the glasses in the guides;
- Lifting the panel, spread the bottom of the frame with a sealant, rub off the excess glue;
- After installing the glass, tighten the screws on the presser feet;
- We engage self-tapping screws, attach the arch from above and below;
- We put the silicone seal on the glass panels "petal inwards";
- Under the lower parts of the guide and the rim of the pallet, we smear with silicone. Fasten. Do not touch the screws!
- With silicone sealant, we patch the joints of the side panels for complete insulation;
- We put a little silicone on the rim of the pallet. Carefully, do not touch the place of water drain! Then, attach the side panels to small screws and washers;
- One of the side panels is attached to the pallet, in the latter there are special holes for the screws;
- In the same way, we fix the second panel;
- The place where the back cover is joined to the side cover with glue;
- Check the coincidence of the holes for fixing the screws of the rear panel, after, insert the back panel and screw the screws;

If you are not sure of the correct location of the screws and bolts, do not twist them to the limit. You can always go back and fix it. The main thing - do not forget.
Many models of cabins mean a separate complete assembly of panels. Do not have to alternately glue the sealant arch, etc.
The space between the finished panels and the pallet is highly recommended to be greased with a sealant. Especially if the gasket is not provided for this.
How to put doors
Now most often use sliding doors on rollers, so we will consider the option of fixing them:
- screw the rollers into the upper and lower parts. The first to failure. Second - delay during installation;
- seal the "petal" outward on the door;
- check whether there is a tight closing of the door flaps, tighten the bolts as necessary;
- we attach plastic plugs to the screws for the door rollers.
How to mount the top:
- We connect the roof with a watering can, fan, backlight and speaker. The assembly of the top part in almost every model is unique, so carefully read the instructions. for convenience, we fix the speaker with hermetic glue;
- The hose from the shower head is fixed from the outside;
- We install additional parts: mirrors, glass shelves, etc.
When the exterior finish is finished, we check the correctness of the cabin, and close the pallet with a screen.
Connection to the self-contained water supply network by one's own hands
Required Tools:
- the independent management unit;
- pump and water supply network;
- water battery.
Process:
- We fix the electric pump on the cable, which will keep it suspended from above the water.
- To provide warm water, we conduct an external electrical cable.
- For the water supply itself, you need a hydro accumulator (modern version) or a pneumatic tank. Let's consider both devices:
- the first option is storage water equipment. Is able to maintain constant network pressure. Here the pump will start running much less often;
- the second option is installed as high as possible (in the attic or under the roof) - this capacity is up to 300 liters in volume.
A tank of this type provides a constant head, and an automatic mode activates the pump if necessary.
Principles of operating a shower in a private house:
- To prolong the life of injectors or small accessories, constantly polish, clean them from dirt and rust;
- After the next use of the cabin, rinse the mixer clean water, dry with a towel;
- Do not disassemble the mixer parts without disconnecting the water supply! To avoid flooding the house;
- Regularly wipe the electric wires with bulbs in the cabin, they are exposed to high humidity;
- Carefully choose a siphon for the pallet and do not forget to fix it well with a sealant.
If you are not sure of the strength of the floor, it is better not to buy a cabin with a large pallet. Most of the mass falls on him. Also, if your shower booth has a low pan, do not close the drain plug with a stopper to avoid a flood.
In home. A luminous cabin is installed easily in a private house and with your own hands. Let's talk about shower cabins and consider how to choose a shower for a private house.
Now it's hard to surprise anyone by the decision to replace the bath with a shower cabin, rather, on the contrary, the apparent reluctance to install a cabin causes bewilderment, as are arguments presented as arguments. The assortment of offered variants of shower cabins allows, solving, what shower cabin to choose, take into account a wide variety of desires.
Questions and answers
How to choose a shower for a private house?
When the question arises about installing a shower in a private house, it will not hurt to take into account some information. So, the very concept of a shower cabin is generalizing. In fact, it will be more correct to take into account the fact that they (shower cabins) are divided into shower boxes, shower cabins, shower corners (curtains, doors as the simplest option).
In short: the most difficult and at the same time the largest is the shower room boxing. It is the most autonomous, does not need to be attached to the walls, it is enough to connect the drain hose and provide water supply (leveling the base by default). The dimensions of this box from 150 * 200 m to 220 * 250 cm, height 200-220 m.
Showers cabins have smaller dimensions - from 80 * 80 cm and a little higher, with side walls, a mixer built in, but often there is no roof.
Showers corners and even easier, these are almost external doors installed on a pallet. Side walls and a mixer are not provided, from the role of existing tiled walls. Dimensions - from 80 * 80 cm and a little more.
How to install a shower in a private house?
Private houses assume a free lay-out, and hence large areas of the bathroom. In this case, you can afford to buy a shower box for more comfort.
If, on the contrary, the preference is given to the shower (rather than the bathroom) is given because of the tightness in the sizes, then the shower corner and the cabin will be at hand.
The installation of a shower in a private house is more problematic than in an apartment, because the main difficulty is to ensure the drainage of water. The more difficult it is, if earlier waste pit there was not. Alternatively, temporary containers are used to collect sewage water. However, this option is applicable only in the warm season. (Note: in apartments, more attention should be paid to the pallet waterproofing and the quality of the hose connection in order to avoid flooding the lower floors).
The shower box in the house is easier to install, it does not require additional installation, except as a check on the level of the base. For better outflow of water, it is recommended to build a low catwalk, according to the laws of physics, the higher the drainage, the faster the water will drain.
In the case of the installation of a shower enclosure, attention should also be paid to the base, and also to keep in mind the availability of the drain hose for cleaning and repair. Since the cabins do not always have a strong frame (loosen from the dynamic load), it is advisable to firmly secure the rear walls.
Despite the fact that the option with showers is the most economical in terms of cost and space, it is the most labor-intensive of all the options considered. Since in this version there are no rear walls, much attention should be paid to the connection of the pallet with the wall, providing 100% waterproofing.
Self-contained shower in a private house without running water
In summer, in a private house, you can organize a self-contained shower, independent of the availability of running water and sewerage systems. Naturally, such a system is installed in the local area and is a pallet with doors and a water tank installed on top. To ensure better water flow, a place to install such a structure should be selected on a hill.
What is the water pressure?
It is important to take into account the water pressure in the house when deciding on the installation of the shower. To effectively use the functions of the selected shower enclosure, the average value should be within from one and a half to two atmospheres. As a rule, water pressure in the private sector is normal, due to a smaller number of consumers. In the event that there is an individual well, there will be no problems with water pressure in winter or in summer. The other side of the medal is the use of a water pipe for irrigation, which drastically reduces the pressure of water in the summer. At this time it is recommended to install water pumps (pumps), which will provide a sufficient level.
How to install a pallet on a wooden floor?
In a private house with wooden floors the installation of the shower tray has some features. The tree is naturally afraid of dampness, especially direct exposure to moisture. In addition, such floors are difficult to cover perfectly in terms of level. First, when installing the pallet, carefully check the level. As a rule, the legs of the pallets are screwed, due to which it is possible to provide the required height. To ensure waterproofing, it is recommended that the area under the shower be lined with linoleum. In addition, it is necessary to isolate qualitatively the drain hoses and the joint of the pallet with the wall, if any.
Which shower is easier to collect?
The smallest number of parts for assembling at the shower corners. All that needs to be done for installation: install, secure, isolate the pallet. Then add the sashes, securely fastening them to the walls.
How much does it cost to install a shower in the house?
More complex in the assembly are shower cabins and shower boxes. Despite the fact that their cost ranges from 20 to 40-50 thousand rubles, do not save on the installation. Often these are complex plumbing devices, in the assembly of which only a specialist will understand. As a rule, the cost of quality assembly and installation, which, in addition to installation and binding, includes connection to sewerage, depending on the complexity and size of the cabin, from 4,000 to 6,500 rubles.
What is cheaper to put in a private house: a bath or a shower?
To solve this problem, the following calculations are required (in each individual case). The cost of the finished shower box with the functions of the sauna ranges from 3000 dollars (shower-sauna Potter A-805 100x100x200 cm) to 5000 dollars for the model of those companies.
To calculate the self-construction of a traditional bathhouse in the house, it is necessary to take into account the costs of building materials, if the premises are supposed to be separately standing, facing ceramic tiles and the cost of acquiring and installing a water boiler and gas equipment. Plus the services of the construction team. As a rule, financial expenses in both cases are equal. The difference is only in terms of obtaining the final result.
Is it possible to install a shower in the winter in a private house?
The installation of a shower enclosure in a private house does not depend on the weather conditions, if earlier, for other plumbing needs, a quality plum was organized. In this case, the entire complexity of installing the shower in winter will consist in organizing additional wiring for draining and qualitative connection of the shower tray to it.
What kind of shower - choose for yourself.
It is necessary to pay attention to the building material from which the parts are made. It is best if the pallet is made of cast iron - strong, durable, and does not thunder under the streams of water. Shutters - from hardened impact-resistant glass (however, this is the most expensive option)
Thinking, what shower cabin to choose, consider additional functions. There are models equipped with steam generators, due to what the cabin turns into a sauna.
What kind of shower cabin should I choose for convenience?
If a private house requires a compact solution, it is better to take a small corner booth, which is easy to assemble with your own hands, using an improvised tool. More convenient will be a rectangular cab, deep sump which will partly replace the bath. Shower cabins are represented by a variety of options of both forms.
The main advantage of the shower cabin is its small size, thanks to which it is possible to place the cabin in a small room. Before choosing it, measure the place where the cabin will stand. In addition, determine the size of the space that is required for you.
A kind of shower is a shower corner. Its main difference in price and lack of side walls. The walls of the bathroom perform their functions. Shower and shower tray is included in the set of this shower corner. In this case, the pallet must have a raised surface, withstanding heavy loads.
The design of the shower enclosure consists of a wall, a pallet, a roof and a door. Installation is the connection of the sewage and the cabin, the supply of electricity and water, then the unit is ready for use. The size of the pallet itself is different, depends on the wishes. When there are also children in the family, it is better to choose a deep pallet that can also be used as a bathroom.
The skeleton of the pallet must necessarily be made of metal, because it will withstand heavy weight. Today, the most popular are pallets made of acrylic. They almost instantly heat up when exposed hot water. In addition, such products do not darken, are not subject to corrosion. For pallets made of acrylic, aluminum profiles are usually used, which are adjustable in height. The walls of the cabin can be acrylic and glass.
Here it is impossible to give something priority, and for some indicators, glass will be preferable. For example, it does not turn yellow over time, it will not appear scuffed. But the cost of glass booths is much higher than plastic ones. Almost all models of shower cabins provide for the presence of hydromassage functions - vertical, spinal, lateral and cervical. Most the best option The cab is the presence of swivel massage jets. More expensive copies are equipped with radio, bath, electronic scoreboard. The most important advantage of a shower over a simple classic bathroom is the much lower consumption of water consumed, the compactness and space saving of the bathroom.
A shower is always a practical choice.
Bookmark this site
- Kinds
- Selection
- Installation
- Finish
- Repairs
- Installation
- Device
- Cleaning
How to install a shower in the house
- Which shower booth to choose
- List necessary tools and materials
- Installation of the shower tray and installation of the shower canal with own hands
- Installation of side panels, doors and roof in the shower with their own hands
Now it has become fashionable in the bathrooms of apartments and houses to install a bathtub rather than a shower. This saves space, looks beautiful, easy to operate, economical, functional. You can use the shower every day. However, recently more and more people began to build their own homes. But what about to install a shower in a private house? Call specialists and pay for installation about 30% of the cost of the cabin or try to do it yourself and get a sincere pleasure from the work done by yourself? In fact, it is not difficult to install a shower enclosure on its own.
The shower cubicle, compared to the bathroom, saves space, looks beautiful, easy to operate, and economical and functional.
The main thing is to be patient, to buy a shower in the store, to prepare the necessary tool, to familiarize yourself with the rules of its installation and to awaken the desire to cope with the installation by yourself. But there is one problem. Basically, they are buying now not expensive Italian cabins, but preferring cheaper analogues from China. Instructions to them are attached scant, the bundle does not always coincide with the one that is declared by the manufacturer. Often I have to buy necessary material. In addition, many owners of private homes often want to save on the installation of the cabin. Why pay for what you can do yourself?
It is necessary to describe in detail what tools and materials will be needed, both with our own hands, so that its use brings only joy and makes living in a private house more comfortable.
The rules may differ depending on the type of cabin and the materials of its manufacture. Below is a description of the installation of a shower enclosure with standard equipment (shower stand, shower holder, shower tray, sink, watering can, wall).
Which shower booth to choose
When choosing a cabin, it is necessary to take into account:

- The size. The cabin must be free so that there is no discomfort during operation. In it you will have to raise and lower your arms, bend over. The optimal size is not less than 80x80 cm. The main thing is that the chosen cabin fits into the space allocated for it. Also, you need to leave 40 centimeters per perimeter for installation and maintenance of the cabin in the future.
- Form (there are round and semicircular, rectangular, square).
- Quality of glass elements. They should have a thickness of at least 6 mm. Then the cabin will be more shockproof.
- Decor shower cabin (you need to rely only on their taste preferences).
- Functional (different types of massage, Turkish bath, contrast shower, tropical rain, etc.). It is better to dwell on simpler variants. Just pay attention to the number of shower heads. It is desirable that there are two of them: manual and cascade.
- Height of the cabin. To the height of the cabin in the store you need to add a centimeter 30 to the installation and height of the podium.
- Pressure. It is desirable that the water pressure and the pressure of the cabin coincide (for your own house, it is optimal up to 3 bar).
Back to contents
List of necessary tools and materials
To install a shower, you need a set of tools and materials. It should be noted that the list may vary slightly depending on the model of the cabin, the available connectivity, the features of the structure of the house. You will need:

- drill with a set of drills;
- a set of horn and pipe keys;
- screwdrivers (cross and splined);
- screwdriver;
- building gun;
- level;
- roulette;
- electroassembly tool;
- hardware, screws, nuts;
- pipes from metalloplastika and flexible hoses;
- a siphon for the water drain;
- fittings for connection of water supply networks;
- adhesive sealant;
- insulation tape;
- gloves.
Back to contents
Installation of the shower tray and installation of the shower canal with own hands
To install a shower in a private house with your own hands and subsequently safely operate it, you must remember three things:
- Before the installation of the cabin, it is necessary to bring water, sewerage and electricity, as well as ensure good ventilation.
- Carefully read the instructions attached to the cockpit. That's where you can find everything detailed instructions on installation of this model of the cabin.
- Prepare a place for the installation of the cabin.
Tip: Before starting the cab installation, it is better to assemble the purchased booth without applying a sealant to check the presence of all parts and fasteners.
So, all materials and tools are prepared, the instruction is thoroughly studied, the place for the shower cabin is released. Now you can start work.
A feature in a private house with their own hands is that there are not yet special conditions for the operation of plumbing equipment. They will have to be organized on their own. So, if the house is wooden, and the floor in the house is wooden or parquet, it is necessary to make its waterproofing. Planning the device of the bathroom, you need to take into account the weight of the cabin with the person inside, so you will have to install reinforcing beams or pour the cement screed. For the insulation of the floor in the bathroom will need a waterproofing mastic, ruberoid, extruded polystyrene foam. For finishing it is better to use ceramic tiles.
Then it is necessary to provide well-functioning ventilation and to work on the walls in the room where the cabin will be installed. It would be good to provide them with additional steam and waterproofing and to cover with an antiseptic. The same goes for the ceiling. This is done very easily. The reflecting thermal insulation is fixed. On the thermal insulation on top are attached rails. To the rails with the help of special screws are attached KVL sheets (xylitol fiber sheets). They are attached in two layers, so that the structure is stronger.
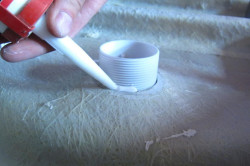
The sealant will help increase the sealing at the junction of the pallet and sewage pipe.
In the ceiling it is necessary to provide a place for drawing, lighting and wiring. The dimensions of the holes will depend on the size of the equipment that is purchased in advance in the store for installation. In order not to miscalculate with the dimensions when conducting communications, it is better to purchase a shower cabin, a wash basin, a fan, built-in lamps, mixers, sockets in advance.
So, the preparatory activities are over. It's time to go to the main part. First you need to remove the apron from the pallet. It is useful only at the end of the work. If you fasten the screen at once, it will not be possible to get to the back side of the cabin and ensure the installation of communications. The screen should be installed when all hoses are connected.
Then - attach the drain hose to the sewage and fix it with a sealant. A sealing gasket must be installed in the drain hole of the pallet. It should be treated with silicone sealant. The suction unit is secured with screws.
Where possible, you need to fix the braces. They are included. Treat the place of connection of the pallet and the sewer pipe with a sealant. Allow it to dry and pour water into the pan. If it does not leak, then everything is done right. Next, you just need to adjust the legs of the pallet and use the level (1.5-meter) to make sure that the pallet is horizontal.