How to connect a double switch. Wiring technology. One switch for two lamps
Installation and connection of a two-key light switch is relevant in those cases when it may be necessary to change the intensity of lighting the room or control the lighting of various areas of the interior. Adjust the amount of light can be by changing the number of working lamps with the help of such a device. Since this product has two keys, it can control the operation of two groups of fixtures. As a rule, two-key light switches are installed together with chandeliers that have more than two lamps in their composition.
Another situation in which the use of such devices is preferable is their use for inclusion from one place of light in different rooms or corridors.
It is necessary to say at once that the circuit for connecting the two-switch switch is in many respects similar to the analogous scheme used for.
Thus, the scope of such devices is very extensive, but in all cases the same scheme of their connection is used. In order to understand how to connect a two-button switch, you should familiarize yourself with its device and the principle of operation.
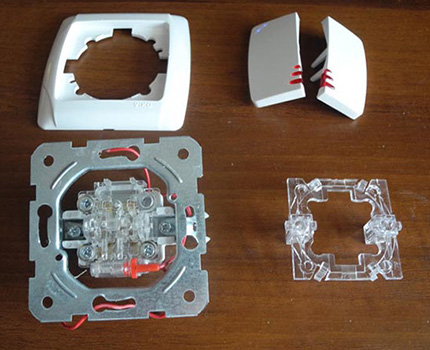
The design of a two-button switch
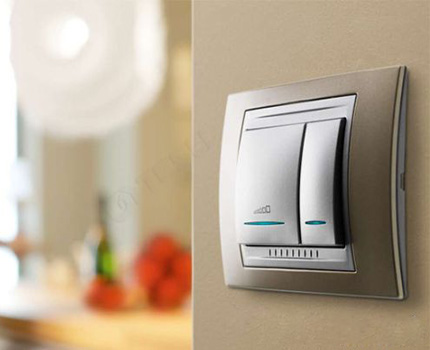
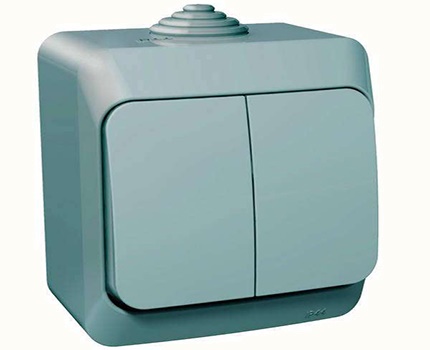
Classification of these devices is quite simple. There are built-in and overhead models intended for use, respectively, with concealed or open wiring. Among the additional functions that these devices can be equipped with, you can highlight the backlight. Switches equipped with backlighting are easy to find in a dark room, so they are very easy to use.
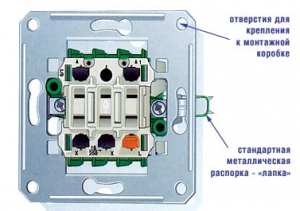
The design of the two-key product is simple enough and in many respects similar to the internal arrangement of a single switch. The only difference is that there is a separate contact for the second group of consumers. Structurally, the two-button switch consists of the following basic elements:
- Working part. Unlike single-key models with two terminals, such a switch is equipped with three contacts. One of them is incoming and two are outgoing. The lead-in contact is designed to connect a phase conductor junction box. Outgoing contacts of the working part serve to connect wires to them, which are used to power consumers. Typically, the body of the operating part of the switch is labeled, making it easy to determine the type of each terminal. This part of the device design must be installed in such a way that the common terminal is located at the bottom.

- Decorative frame.
- Two keys (can be equipped with windows for lighting).
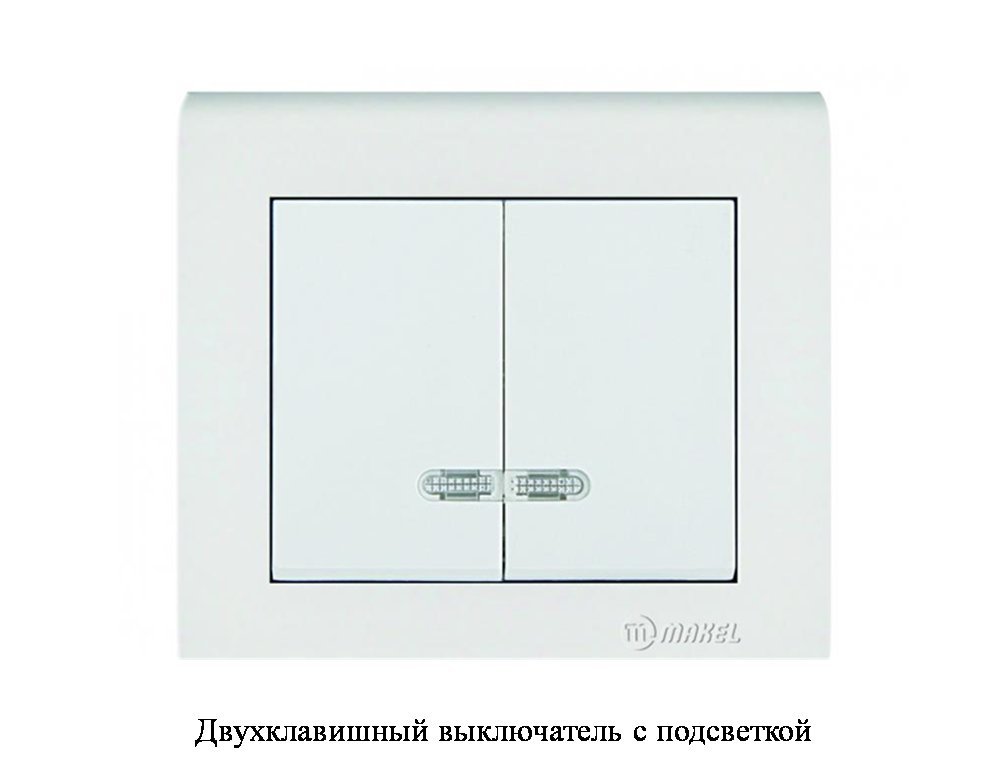
If the design of the device provides illumination, then it includes a small electrical circuit, which includes an LED (or neon lamp), a resistor and, sometimes, a capacitor. This electrical circuit is connected to the switch contacts. The principle of its operation is quite simple. Since the current-limiting resistor has a sufficiently large resistance, when it is short-circuited by the switch contacts, the current in the illumination circuit does not flow. When the working contacts are opened, a small current limited by the resistance of the resistor flows in the illumination circuit, enabling the LED to burn.
Switches with illumination have received very wide distribution now.
The general scheme of connection
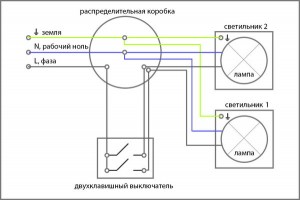
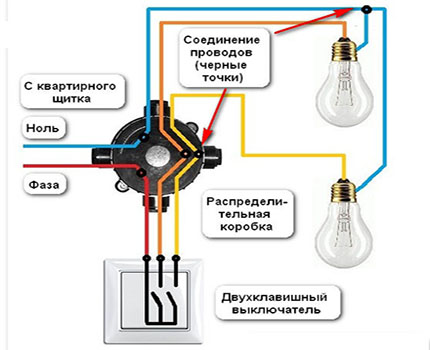
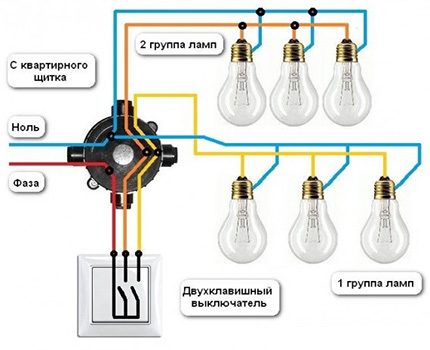
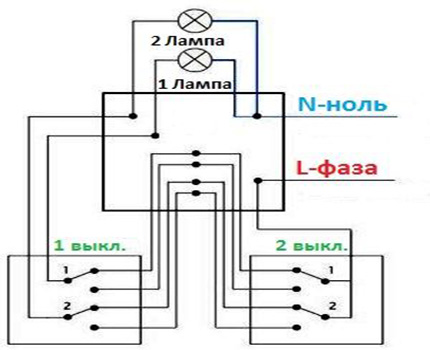
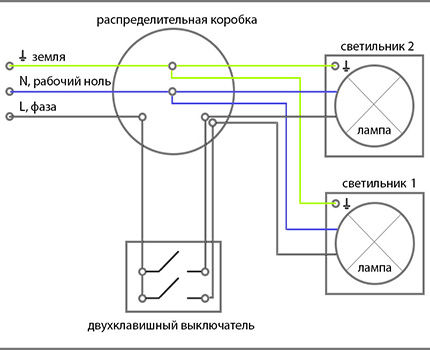
The connection diagram of the two-key light switch is shown in the figure.
![]()
The grounding wire, which is depicted in the figure, is present in the electrical wiring of not all buildings. If you connect powerful household electric appliances, such as a cooking surface or a washing machine, their bodies try to ground at least to the electrical meter panel, then in the lighting circuits there is usually no ground. To improve the security of the use of wiring in such conditions it makes sense to install at the entrance to the apartment or.
The circuit diagram of the double-circuit-breaker shown in the figure has two separate lamps as a load, but often this connection is used to control each circuit-breaker key with a chain of several series-connected lamps.
How to connect the device
The main rule that must be observed when installing all switching devices is the need to install them in such a way that, when disconnected, the phase conductor circuit breaks. This should be done, first of all, so that when changing the light bulb, it's enough to just turn off the switch without resorting to the use of the input automaton.
The fact is that a large number of cases of human injury by electric current occurs precisely in the performance of such works. Such cases, unfortunately, often occur, despite the fact that for the emergence of a dangerous situation, it is necessary not only to confuse the wire to which the switch should be installed, but also to incorrectly connect the bulb holder.
As for working with any electrical wiring elements, when installing and connecting two-key switches, you should adhere to the safety rules, the main one of which is the need to disconnect the voltage in the network for the duration of the work. Since the junction boxes in most cases are located at a height, an important element when working with them is the use of a reliable ladder or stand.
In order to properly install such a device, you must follow the following procedure:
- With the help of the input device, the supply of electricity to the apartment is cut off. This can also be done with the help of an automaton responsible for a group of consumers, which includes the necessary lighting chain.
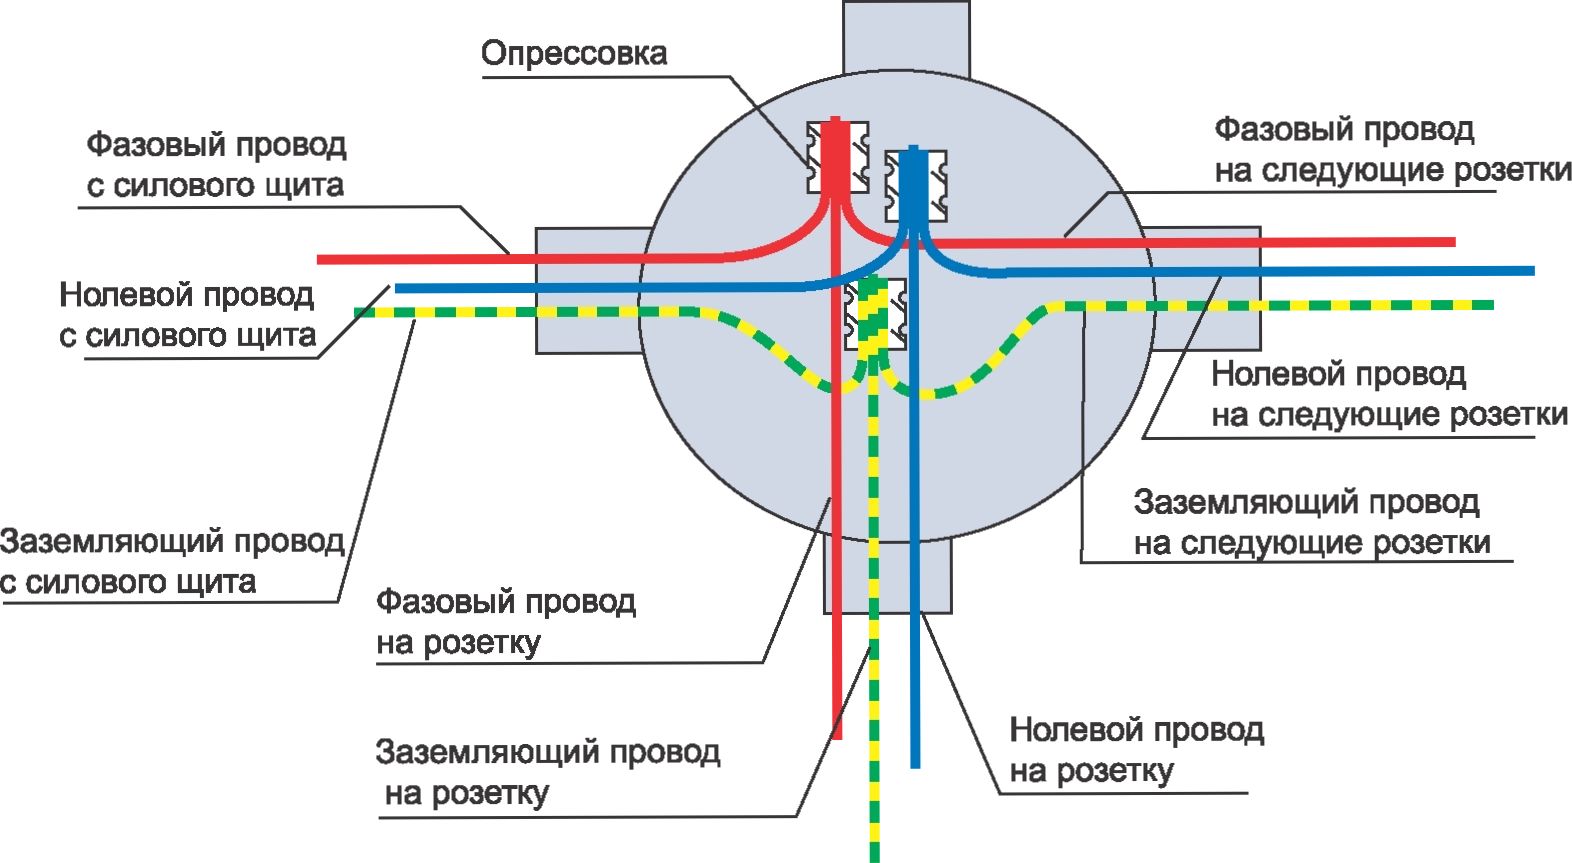
- Wires coming from the consumers that need to be connected to the mains, phase and zero from the input shield, and also three wires coming from the switch are brought into the junction box. It should be borne in mind that, if necessary, copper and aluminum wires it is necessary to use terminal blocks. This situation arises quite often in houses of old construction, where the internal wiring was done with aluminum wire.
- All zero conductors in the box are interconnected.
- The phase wire from the entrance to the apartment is connected to the conductor, which will be connected to the incoming terminal of the two-key light switch.
- Each of the phase wires serving to supply individual consumers is connected to the corresponding outgoing circuit-breaker wire.
- All connection points are reliably isolated. To make insulation of connections in the junction box, it is preferable to use glass-fiber insulating tape, as one of the most resistant to temperature effects.
- From the switch its keys are removed, after which the working part is detached from the frame.
- The corresponding wires are connected to the terminals of the working part. For convenience, it is advisable to use cables whose cores have a different color marking. If the design of the device provides a backlight, then the contacts of its circuit are connected to the terminals of the switch.
- With the help of sliding paws the working part is installed in the jar. It is important to make sure that the turned on position of the device corresponds to pressing the top of its keys.
- With the help of special grooves or bolts, a decorative frame is mounted.
- The keys are set.
In practice, the connection of a double switch is not much more complicated than connecting a single-key device.
Mounting knife
Combination pliers
Terminal blocks
Electric Wires
Mounting box
Double switch
Insulating tape
Screwdriver (cross and flat)
Double-breaker connection scheme
The grounding and neutral wires directly pass through the junction box. In it, their ends are divided into two parts each, which connect to two lamps.
Only the phase conductor passes through the junction box to the double switch. From the switch to the lamps there will be two separate wires.
Installation of electric wires
The installation of electrical lines with the connection of a two-way light switch takes place according to the above scheme.
There can be only one difficulty. If the room has already been repaired, the wires must be installed in special corrugated pipes or cable ducts. But, when the building is only being built or being repaired, the wires are installed under the plaster.
When connecting wires to the network, you must turn off the electricity on the shield.
How to connect a two-pole switch
Remove the insulation at the ends of the wires at a distance of 10 cm.
On the double switch we are looking for terminals or clamps for the phase and output wires. The clamp L is for the phase conductor, on the opposite side another clamp or terminal for the output wire.
Wires are connected to terminals or clamps.
We install the breaker device in the junction box.
If the switch has a frame and the keys that are removed, they need to be removed.
We install the base of the double-switch.
Attach the frame and the switch buttons.
This completes the connection of the double breaker.
Switch dvuhklavishny little differs from its one-button "brother", it has almost the same structure. In addition to the housing, it contains input / output terminals or screw terminals. The only difference is in the number of keys.
The input terminal block receives a current, then wires are connected to it with contacts that contact each key individually. The contacts are connected to the output terminals / terminals to which the cable is to be connected. Its function is to connect the lamp and the switch.
The main feature of the two-button switch is that it can control a number of lamps: 2, 4, 10 and even more, but not 3 or 5.
Installation of a two-button switch is expedient in such cases:
- when connecting a chandelier with several groups of lamas;
- when you want to install a lamp in a room close to the street: one lamp will light the light in the corridor, and the other - outside;
- when connecting a separate bathroom: one lamp will illuminate the bath, the other - the toilet.
Installation
The setting of the two-key switch is as follows:
1. The first thing to be assembled is the elements called pre-installation: the junction box, which will connect the wires, the receptacle for the switch (the electricians call it the junket) and the protective device. The essence of the latter is simple - to protect the system from short circuits and other things.
Do not forget to turn off the apartment before work!
2. Laying the necessary wires, without the presence of which we will not succeed. The must-have list includes:
- the supply wire, which is pushed to the junction box from the protection device, and then sent to the sub-socket;
- wires from our chandelier or other light sources.
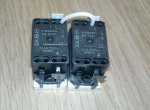
3. Mounting the protective device. We used a two-pole switch, the choice of which depends directly on the power of the light bulb. Now you need to remove the insulation layer.
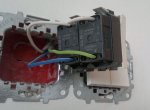
4. Installation of the switch. Again, the wires measure the right size, all the extra mercilessly cleaned. We connect the wires to the terminals. We take into account that in blue we have a zero, and yellow indicates ground. The remaining vein (light) will serve us to transfer the phase.
Make sure that the input and output phases coincide. If the blue wire is on the top at the top, at the bottom it should be there.
5. Setting the switch. Next, we have a podrozetnik, which we successfully mount. Do not forget to clean the wires! The next step is to connect the two-switch switch to these wires. On its reverse side, one can usually see a diagram. So we follow a specific symbol. In our case, Latin L stands for a suitable phase, for other veins there are special contacts. Thus, the switch is connected.
We consider the circuit of connection of the switch
And we are all ready for the final stage. On photo of the circuit for connecting a two-button switch it is clear what we should get at this stage:
- the junction box in which we placed the wires;
- actually the switch;
- sources of electricity;
- wire for washing.
We remind you that the switch in a two-key variation has one contact for connecting more . The phase from the junction box is connected to the input; The outputs are responsible for the operation of the bulbs. There are three contacts and clamps exactly the same.
Before connecting the two-key light switch according to the scheme, remove the insulation. In the power cable, a wire that has a brown color is a phase, blue is traditionally denoted zero. We remind you that no other options except those when the breaker breaks the phase do not fit! So we decided for your own safety and convenience, so that the light bulb can be changed without harm to health by turning off the light.
Otherwise, there is a risk of getting a current charge.
In the case of a switch with two keys, a common contact is used for the phase conductor. We connect the phase of the supply cable to the common contact. Then connect the zeros of the cables for power and lighting devices. In other words: we must connect the wires of blue (blue) color from the supply cable with the appropriate wire leading to the light sources. The red wire is intended for the phase to go to the switch.
If you want to diversify your apartment interesting solutions, you can see what other switches are in this article. Quite an interesting and modern solution will be installing the remote switch. More information about this you can find out
No house or apartment can be used without lighting. Its availability is one of the critical requirements to the arrangement of the house.
We all know very well that it consists of two elements:
- The luminaire.
- The switch.
The first element provides the creation of light. In fact, it is the most important. Of course, it could simply be plugged into an electrical outlet and it would glow all the time. However, we do not need this, because this is unreasonable, and we also need to save on electricity.
Therefore, a switch is used to control the luminaire. It connects or disconnects the wire that comes to the luminaire and supplies current to the lamps.
Actually, the main character of our article will be a two-key switch. It works on the same principle as equipment with one or three keys.
Device
In order to understand what this element of the electrical network is, consider its structure. After that, we'll look at how to connect the two-key switch.
This element consists of:
- housing;
- input and output terminals;
- two keys.
Elements of a double switch
It is worth mentioning that some types of current disconnectors can have screw terminals instead of terminals. The whole scheme is that a current is applied to the first terminal or terminal.
Next, two wires and contacts are connected in parallel, which open and close the keys. It's clear that each contact has its own key. These contacts are then connected to the output screw terminals or terminals. Actually to the terminals or terminals it will be necessary to connect the cables that connect the two-key switch and the luminaire.
A similar structure has a single-key disconnector. In fact, the two-key switch consists of two one-button switches that are in the same housing.
A remarkable fact is that some models of a two-key switch consist of two separate single-key connectors. They are called modular.
The whole principle of the two-key switch, which can be easily connected, is the opening and closing of the wires, which are suitable for individual lamps in the luminaire or individual luminaires.
Clamping and screwless terminals on switches
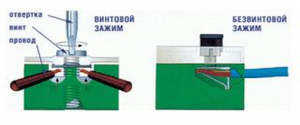
It is worthwhile to consider the elements through which the cable is connected. The terminal blocks are special mechanisms that have self-clamping terminals. They are very convenient, as it is enough to clean the wire and insert the end into the terminal.
As for the screw terminals, they are a special shoe, into which a stripped cable is also inserted. However, its fixation occurs by tightening the bolt.
Useful advice: it is better to choose the two-key switch that is equipped with terminal blocks. The disadvantage of screw clamps is that such a connection is weakened with time. As a result, it becomes necessary to constantly check the contact and constantly screw the screw.
Also a two-key switch can be included. Lighting makes it easy to find this element of the lighting system in the dark. The glow of the indicator light indicates that the network is closed and the light must be on.
Benefits
This structure of this switch provides one of its main advantages. It consists in that one switch can control a robot of several lamps or fixtures. That's why the two-button switch is very popular and many people are interested in how to properly connect it.
The features of its connection will be considered below. Now we will note, what other advantages this switch can boast.
One is to adjust the brightness of the light in the room.
This is achieved through the inclusion of individual lamps or fixtures. Of course, this feature can not boast of a one-button switch, since it includes all the lamps of the chandelier at the same time. As a result, it is unlikely to create a romantic atmosphere in the room or to give light to a separate part of the room.
Helpful Hint: if you use a detacher with one key and want to control the lighting level, you will need to buy and mount a dimmer. It is also called a dimmer.
With the above advantages comes another - saving electricity and money. Of course, some chandelier bulbs consume less electric current, than all the light bulbs.
There is also savings on the cable. After all, up to a two-button switch, only one cable is installed. In the event that you attempt to replace it with two one-button switches, you need to lay two separate cables to both switches.
The inclusion of a part of the bulbs will not allow you to blind your eyes, because the amount of light will not be enough for this. But what happens if you light up all the lamps at the same time in the dark room thanks to the work of the one-button disconnector, you know well. Sensations are unpleasant.
The two-button switch is beneficial for use in humid environments and on the street, because it is much easier to make protection for moisture or shock in one housing than doing it in different small buildings.
The importance of its installation in such environments lies in the fact that the number of switches is reduced and at the same time the number of potential hazardous points decreases. This is also the reason why many people buy and are interested in how to connect a two-button switch.
If it is used in a humid environment, a special casing is mounted under the housing. If the environment of use is the yard or streets (here it may be exposed to physical damage), then the connector body is made of metal or impact-resistant plastic.
Scope of use
Thanks to this number of advantages and its structure, the two-key switch is used in any rooms where a chandelier is mounted for several lamps, in various office and industrial premises, as well as on the street. In doing so, it can be used to regulate the operation of luminaires in various rooms. For example, in the bathroom and toilet, corridor and pantry.
Helpful Hint: the switches that enter the lighting system of these rooms are always mounted outside the bathroom and toilet. This principle is mandatory for execution, and it is registered in the PUE.
As you can see, the scope of using a two-button switch is very wide, and it has many advantages. In the following we will consider how to connect a two-key switch.
Connection diagram
In order for you to understand the whole logic of work on, we submit a scheme for its connection.
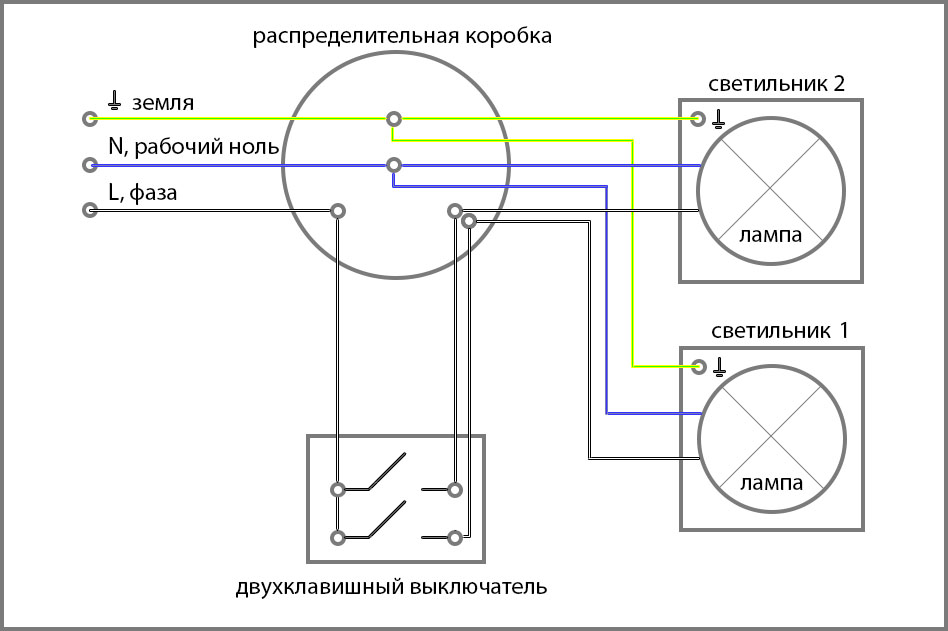
Connection scheme for a two-button switch
From the diagram it is clearly visible that only a phase wire will be laid to the two-switch switch. As for the neutral and grounding electric wires, they will immediately connect to the luminaires.
From the switch itself, there will already be two separate cables, and each of them is connected to separate light bulbs or separate luminaires.
Connection of electric wires that will go to the two-key switch or from it, as well as to the luminaire, is carried out inside the junction box. That is the scheme that determines how you can connect in your home double switch.
Required Materials
Now you can proceed to the very process of connection. For this we need to stock up:
- Electrical wires (cross section should be at least 1.5 square millimeters). Their length is determined by measurements.
- Double switch.
- A mounting box in which the switch will be placed.
- Terminal blocks.
- Insulating tape.
Instruments
As for the tools, their list should consist of:
- screwdrivers for cross and flat splines;
- a mounting knife or a device with which the insulation will be removed;
- side cutters;
- level;
- pliers;
- hammer and chisel (in case you need to make a small stroba or a hole for the jar).
Installation of electric wires
It is worth noting that, before connecting the light switch, which is double, you need to lay the wiring. If the house is only being built and there is a hidden wiring installation in it, then there are no difficulties. The wiring itself is installed even before the plaster is applied. After that it is necessary to connect the switch and the lamps to the wiring.
Laying of all wires is carried out according to the scheme that we placed above.
It is clear that if it is planned to implement open installation wiring, each cable that must be connected to a two-key switch and a luminaire is laid in separate cable ducts or corrugated tubes.
If the house is used for many years and the existing electric wires do not fit, then they need to be changed. In the event that they were installed in an open way, there will be no problems. When they were hidden under the plaster, you will have to make new shtroby and lay new cables.
Other preparatory work
When the correct cables are placed in their places, they begin to connect them. I would also like to note that it will be very correct and safe if you turn off the power supply in the house or apartment before you do any work to replace the wiring and before you connect the double switch.
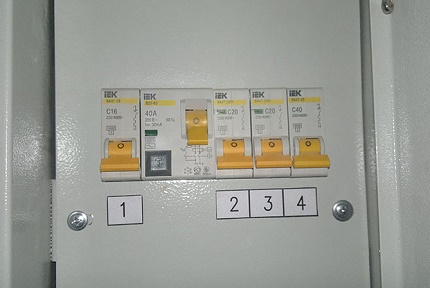
It is worth noting that it will be sufficient to disable the automatic switch, which stands at the beginning of the branch, intended to supply current to the lighting devices.
If in the switchboard all automatic switches are signed, this is very good, because you immediately turn off the right one. Otherwise it is necessary to experiment by determining the required automaton. This is noted from time to time in those videos that talk about how to securely and correctly connect a double switch.
And so, when everything preparatory work made and the wires are placed according to the scheme, you can proceed to connect the two-key switch.
Connection Features
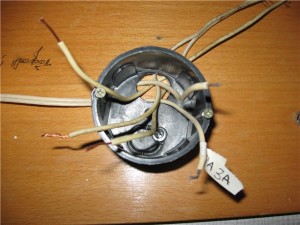
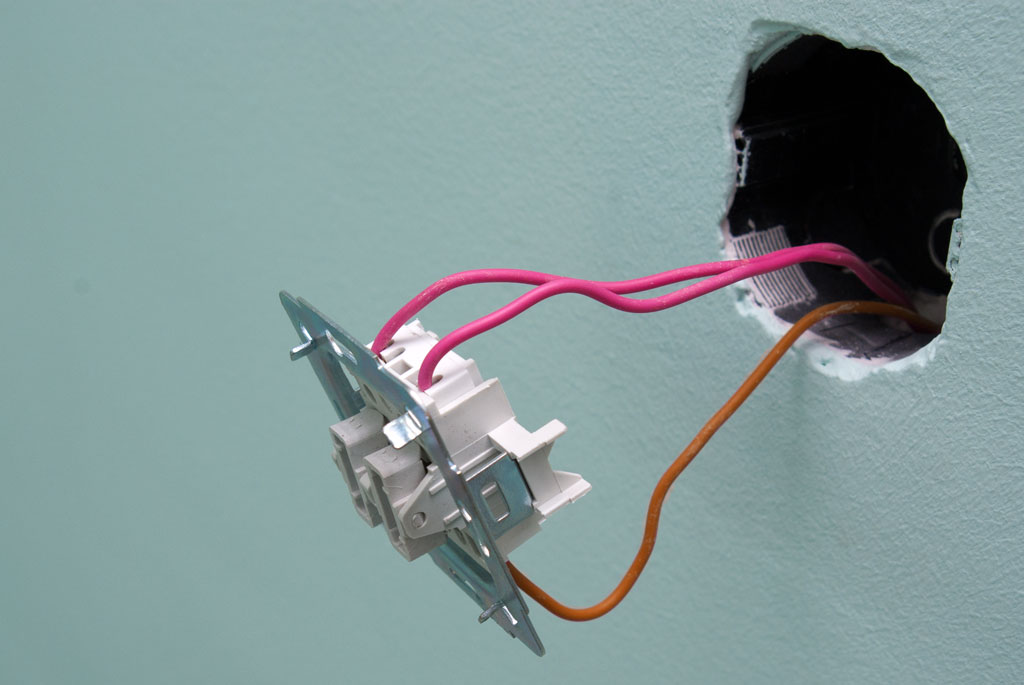
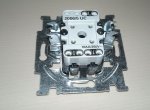
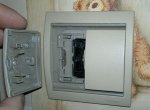
Wristwatch with inserted wires
First, prepare the ends of the wires that need to be connected. We have three wires: one phase input and two output (they will be connected to individual chandeliers or lamps). The ends of the electric wires are cleaned, that is, the insulating material is removed on a segment that is equal to 10 centimeters.
Two-key switches are used when necessary to control two electric lighting devices simultaneously and from one point. They also adjust the brightness of the lighting. Simply put, connecting a light switch with two keys creates additional convenience for the user.
The internal arrangement of the two-phase circuit-breaker differs from the single-phase switch by the presence of two output terminals instead of one. More specifically, it consists of such elements:
- mechanism and decorative panel;
- one input terminal;
- two output terminals;
- two keys.
The terminals are special clamping mechanisms. To connect the wire, just clean it, insert it into the terminal block and tighten it with a screw. The input or common terminal is located separately and labeled as L.
FROM the opposite side there are two output terminals. They can be designated as L1, L2 or 1,2. Some models may have screw terminals instead of a terminal block. It is undesirable to use them, since the fastening can be gradually weakened and it will have to be squeezed.
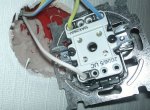
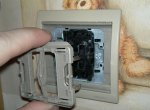
The main difference of the switch with two keys from the one-button fellow is that it manages a pair of lighting devices
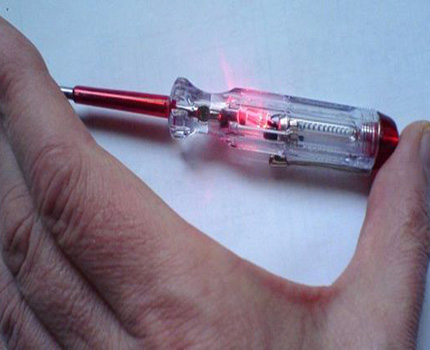
You need to install the device so that when you turn it on, press the upper half of the key. To determine the top and bottom of the element, you can use the indicator - a special screwdriver, which works on the closure. To do this, take a nail or a piece of wire and touch it to one contact, to another put an indicator, holding the thumb on top.
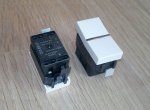
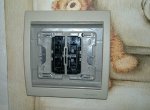
The device of the switch with two keys is slightly different from the one-key switch. The main components of the device: mechanism, keys and decorative body
If the light inside does not burn, then the breaker contacts are open. When the keys are on, it should be lit. It remains to note top element.
Step-by-step description of the work process
In addition to standard models, the switch of two keys can additionally be equipped with a backlight, an indicator. The backlight helps to identify it in the dark, and the glowing indicator will make it clear that electrical network is serviceable and is closed. They also produce models with impact-resistant and moisture-proof enclosures. They can be installed in the bath, bathroom or on the street.
There are also pass-through switches. They have the same structure, except for the additional terminal. Such devices are connected to one or a group of fixtures and allow you to control lighting from opposite ends of the room. For example, when entering the bedroom, you can turn on the light, and when you go to bed, turn it off near the bed.
Image Gallery


How to choose a location for installation
There are no standards for the placement of the device by law. Their installation implies convenient use for adults and children. And if before the usual practice was to place the device at a height of about 2 m, now the switch is often placed at the level of the lowered hand of an adult's hand. Thus, the element becomes available for almost all residents of the house.
Place the switch better so that it is accessible to everyone except the smallest ones
The only place where the switch placement can have any restrictions is a bathroom or a bath. Here you need to consider the placement of a washbasin and an open shower. When operating the device, it should not fall under the water drop.
Preparing for installation
Whichever electrical installation work you have to do, the first thing to do is to de-energize the network. For a second you must not forget that electricity is dangerous. In addition to the current, illiterate wiring can cause electrical equipment damage or fire in the house.
Rules of conduct when working with electrical networks:
- be sure to de-energize the network;
- do not touch the connected devices with wet hands;
- do not use metal braces to secure the wiring;
- do not overload the electrical network;
- the damaged wire should be replaced with a new one, and not repaired;
- perform work only with a tool with insulated handles;
When working with electricity, you can not touch water pipes or gas pipes.
When starting an independent connection, you must:
- take steps to comply with safety regulations;
- familiarize with the laws of marking wires;
- check the network for compliance with the marking.
Any owner of the house to replace and connect the switch is unlikely to want to invite an electrician. In addition, to perform this task, there is no need for complex instruments and instruments. To install, you need:
- mounting knife;
- insulation tape;
- hammer and chisel;
- pliers;
- indicator screwdriver, as well as curly and straight.
If the installation has to be carried out in a new location and the house has buried wiring, a drill with a "crown" or a perforator may be useful.
Without a screwdriver-indicator, not a single electrical installation work
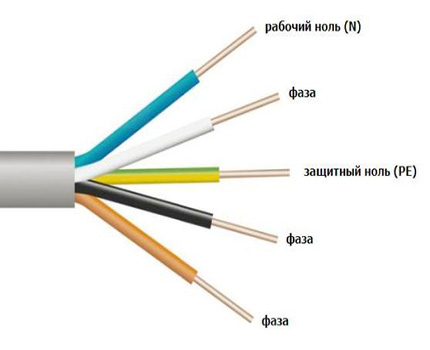
Color marking of electrical wires
Without knowledge and observance of marking, it is absolutely impossible to proceed with installation. It is used to create safe conditions and reduce the time spent on the work.
Correct labeling from the manufacturer will help to avoid problems with the identification of conductors
To form the correct connections, the following notation is used:
- zero - always and without exceptions blue;
- protection is also strictly one color - yellow-green;
- phase - predominantly brown or red.
These are just the basic combinations. In addition, to avoid confusion in the identification, alphanumeric marking is used.
If the work reveals the absence of visual signs, then it is necessary to mark the wiring by itself using a multi-colored shrink tube or color insulation.
How to independently identify the conductors
Blindly trust marking is not worth it. These designations have changed their standards more than once. Therefore, when proceeding to business, it is necessary to additionally check the nature of the conductors. To do this, use an indicator screwdriver and a multimeter.
If a single-phase electrical network without a grounding system is installed in the building, the indicator will determine the phase or zero. By turning off the electricity, the conductors are stripped off and retracted so that they do not touch each other. After turning on the power supply, a screwdriver is brought to the wires. The light in the indicator will flash, when touching the conductor of the phase, and from touching zero will not light up.
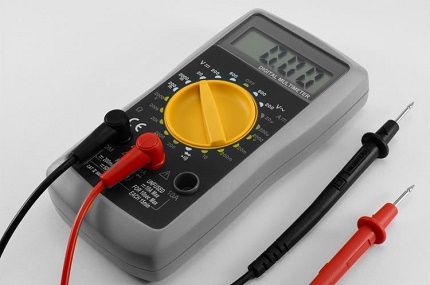
The multimeter is a multifunctional test and measurement device that performs the work of at least three control devices: voltmeter, ohmmeter and ammeter
To analyze the network, in which there is a third, protective conductor, use a multimeter. Setting the range to alternating current to a value of over 220 volts, bring one tentacle to the phase, the other is fixed on any of the conductors. When in contact with a neutral wire, the device detects a voltage within 220 volts, with a protective one - a bit lower.
Dismantling of the old electrical switch
To have access to the fastening elements, you need to remove the keys and the decorative panel. To do this, use a screwdriver or a thin knife to pick up the first key and gently pull it out. So do the second one. Next, remove the decorative cover. In some models they are unscrewed.
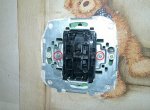
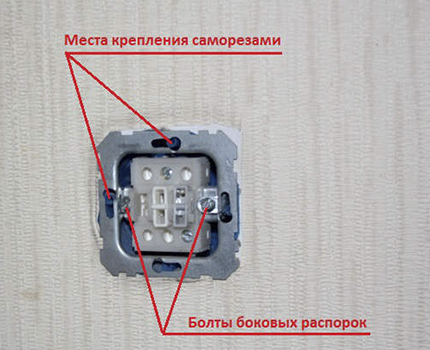
The basic rule of safety when working with electrical wiring and wiring devices is the disconnection of the mains voltage for the period of production
Then remove the mechanism itself - it can be fastened with clamping paws or screws. Unplug the conductors and, if necessary, dismantle the old junket.
Image Gallery
Installation of elements with closed and open wiring
The installation of switches in newly built dwellings is reduced to connecting the element to a previously conducted electrical network. In the old house, where the old wiring already requires replacement, you have to make new fines and lay the cable. And when the wiring is open, each cable is fed to the switch in the insulating corrugated tubes, cable channels.
From the way of laying wires in the house depends on the subsequent choice of the model of the switch, and the method of its installation. The device, which is suitable for open wiring, consists of a flat receptacle, an internal mechanism, an insulating decorative cover. The design does not hide in the deepening of the wall, but completely protrudes above the surface.
The arrangement of switches for open and closed wiring differs only in the shape of the juniper. In overlaid devices, it is a thick plate of dielectric material
The installation begins with the installation of a podzetetnik - flat bottom. Implement it with the help of suitable fasteners. For different wall surfaces, screws or dowels, screws, screws can be used.
Next, after connecting the wires, fix the mechanism of the switch, put on the decorative insulating cover. In it, the manufacturer has already thought through the hole for the conductor. The cover itself is put on by hiding the mechanism, and fixed with the help of latches.
For installation of a two-phase circuit breaker in premises with hidden wiring use podrozetniki (mounting boxes) in the form of a small bowl. A hole is cut in the wall or a small groove is made of a suitable size.
Reliably fix the mounting box in the wall helps clamping clamps: when tightening the screw they are slightly spread out and rest against the wall surface
During installation, ensure that the device is fixed smoothly, without distortion. Dipstick can be installed side by side - any required amount - and fixed using gypsum mixes. Then to meet the podrozetniku hollow out the depths, sufficient to lay the wire.

Dashboards have special mounts that help them to cling to the "neighbors"
How to connect electrical wires correctly
The junctions are the weakest links in the electrical circuit. Not surprisingly, most of the problems occur there.
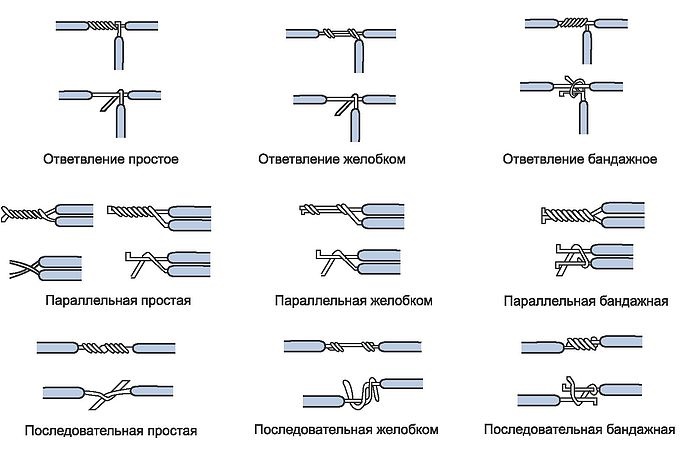
The easiest way to connect wires independently with twists with additional fixation of electrical tape is not reliable. In case of poor performance, this is the most common cause of a circuit break (+)
When connecting the switch, all connection methods are not necessary to consider, here are the most basic:
- Manual twisting is a very common method that requires subsequent isolation.
- Terminal block - widely used as a connecting link. It consists of copper clamps, clad in a plastic case.
- Soldering - though it helps to create a quality grip, but the laboriousness of the process does not contribute to its popularity.
It should be said about the shrink tube, which helps to isolate the connection points and even strengthens them a little.

Heat shrinkable tubing, when heated, tightens around the wire, creating a reliable protection
Connection diagram and step-by-step actions
With the old system of electricity supply, the power is supplied to the house from the electrical panel, via a two-wire cable. The ground loop is placed on the transformer to which the neutral conductor is connected. Despite its simplicity, this method has a significant drawback - a low level of security.
In the two-switch switch, the phase is connected with one wire, and each lamp to a separate terminal
In the switch housing, one of the three-wire phase conductors is connected to the common terminal block (L). For this, the wire is wound into the terminal hole and tightened with a screw. Two other phase conductors are connected to separate contacts, and then lead to the junction box and connected to the phases of the luminaires.
When connecting a multi-lamp chandelier to a two-button switch, the lamps are divided into two groups
The wiring connection must be carried out in a special box. She hides from the look of inaccurate weave and serves as an insulator. For correct connection you need to do the following:
- The conductors coming from the luminaires and the two-phase circuit breaker, as well as the power supply line, are put into the box, the insulation coating is removed from the 2-3 cm section.
- Connect the phases of the main supply cable and the switch.
- The incoming neutral wire is connected to the neutral wires of the luminaires.
- The phases that depart from the switch are connected in turn to the conductors of the phases coming from the lighting devices.
Only the phase wire is connected to the switch. It is strictly prohibited to connect it to a neutral wire. Otherwise, an ordinary bulb replacement can become a dangerous procedure.
Any wire it is better to bring with a reserve, stacking surplus for a design. It is not permissible to leave open wires, even inside the elements. All bare areas must be carefully insulated. Do it better with textile tape.
Example of connection from a nearby outlet
Let's consider a variant of connection of the control device by two fixtures according to the following scheme:
The location near the outlet and the switch is a common situation for small domestic apartments. Let's see how to connect a double switch in this case.
Image Gallery


Installation of a pass-through two-phase circuit breaker
To control several lighting devices from different ends of the room, use a two-phase pass-through switch. It looks like internal device on two passage single-key, united in a common decorative case. There are two groups of terminals in it, which open the supply of current from one pair of electrical wires to the other.
In carrying out loop-through connection It is important not to confuse the pairs of conductors so that both switches close the contacts of one of the two electrical circuits
How to install:
- The phase conductor from the wiring box is routed to terminals 1 and 2 (right), which are connected together in the circuit.
- From the switch, there are already four phases that lead to the box, and then to the second switch.
- From the switch No. 2, two phases pass (not intersecting). They lead to the box, where they connect to two independent conductors leading to the fixtures.
When performing the installation, you can first conduct one pair of wires, and then the second, so as not to confuse them, otherwise the circuit will not work.
Connection to power supply system
Determine that the wiring is carried out exactly on new system, you can by cable laid. It will be three-core with single-phase power supply or five-core with three-phase power supply. One of the wires of single-phase power supply will be a phase marked with a brown or red color, the other with a neutral (zero) marked in blue, and the third with a protective wire marked with a yellow-green color.
To facilitate identification, alphanumeric characters are used:
- A, B, C - phase;
- N is neutral or zero;
- PE - protective.
The difference of this connection scheme is in the additional protective conductor PE, which is output directly to the fixtures.
The wiring diagram of the TN-S wiring accessories involves a connection to the earthing system
After connecting the wires to the working mechanism, they are pressed closer to the body, and then installed in the sub-socket. Fasten in the mounting box with clamping lugs or bolts. Put on the decorative case and keys.
Before assembling the whole structure, turn on the light and make sure the lighting system is working
Video to help self-electricians
The available video for the installation of a simple electrical circuit you can see here:
When carrying out the installation of the power network or its components, it is necessary to carry out the above instructions correctly. If you still have doubts about how to properly connect a light switch with two keys to the network, it is better to contact a professional.