Warm floor on the loggia. We choose the appropriate system. Preliminary preparation for installation
When creating a warm balcony (loggia), the landlord must perform the following activities:
- install glazing;
- perform wall and ceiling insulation;
- perform the insulation of the floor;
- lay the finish coat, for example, tile, laminate or other.
The warm floor on the balcony (loggia) can be made in two versions - electrical and water. It is needed to heat the balcony from the bottom. There is no fundamental difference between the sexes installed in the rooms and the balcony (balcony), and it is better to answer which of the proposed options is difficult.

There are simply some peculiarities that need to be considered when installing them, and depending on what type of finish coating will be used - laminate, linoleum or carpet. Only after this, you can begin to equip the warm floor on the balcony with your own hands.
Electric Floors
The warm floor on the balcony can be operated from electric power or from a liquid coolant, for example, water.
Cabling system
The simplest system used for warm floors, including those where the laminate is to be used, is the cable heating system. In this system, the role of the heating element is played by a special wire with high electrical resistance. For all its external simplicity, the cable system has some significant drawbacks.
In particular, for its arrangement it is necessary to provide waterproofing of the balcony plate and arrange two cement ties. As a result, the height of the floor can be raised by 10 to 15 cm, which is not always permissible, especially if a laminate is used.
Otherwise, the door will be formed at the entrance from the room to the balcony, but the warm floor on the balcony will work and provide its heating.

To the disadvantages of the cable heating system, with which the balcony is insulated, it is also possible to attribute the fact that the presence of screeds creates an additional load on the slab. It should be noted that this is not always permissible in houses of obsolete housing stock, for example, in houses built in the middle of the last century, before starting work it is better to invite an employee of a local housing company and consult about the load capacity of the balcony plate.

In addition, the warm floor on the balcony (loggia), you can operate after installing the cable heating system at least a month after the completion of work. This is due to the fact that the screed reaches a set of design strength within 28 - 30 days. Otherwise, it can be destroyed.
Mats
Another way to insulate the balcony floor is heating mat. With their help, you can minimize the loss of height.
The height of the floor changes by 1.5 - 2 cm.
Mats can be mounted in the structure, with which the tiles are fixed to the warm floor on the balcony. For laying mats, there is no special need for equipping the base of the balcony (loggia). When using this method of fixing, the floor can be started to operate, at the latest, in a week.

The mat is a grid, with a mesh size of the order of 1x1 cm, a cable is fixed on it, which ensures the transformation of electrical energy into thermal energy. This is facilitated by a heating element (vein) made of nichrome or other material having a high resistance.

The laying of heating mats, with which the insulation of balconies are performed, will not be difficult. Its difference from the cable system lies in the fact that the heating element does not require additional efforts for its installation and start-up. It can be cut into fragments of different sizes, while the integrity of the cable is not violated.

But, this heating system It is subject to the risk of damage when a heavy object falls on its surface. Care must also be taken when laying the floor covering.
Film heater
Warming with the use of an infrared film floor is used to heat rooms with a small area and various floor coverings, for example, laminate. The principle of its operation is based on radiation in the infrared range. It heats and surrounding objects including, walls, furniture, etc.
Film floors can be mounted in both a dry and wet way.
This type of insulation can be used together with any floor covering, for example, carpet. In this type of heater, strips are used that contain a carbon paste, which are joined together by lavsan. Pasta, is a pencil with different additives. As a conductor for the supply of electricity used copper wires. The infrared heater operates from a standard voltage of 220 volts.

To lay the film, it is necessary to arrange the screed on the surface, which is laid heat-reflecting film. If you intend to use tile, artificial stone as a finishing coat, then as a substrate it makes sense to use a solid substrate.

The sequence of laying the film is as follows:
- foundation device;
- laying of the heat-reflecting substrate;
- styling, cut into strips of film;
- installation of a temperature regulator;
- applying a special tool to the film fix the terminals for power supply;
- contact group is poured with bitumen or other insulating material.

Water heated floor
In addition, electrical heating systems are widely used and water. In fact, this radiator is installed in a concrete screed.
By the way, some heat engineers say that insulation in this way is optimal for a warm balcony (loggia). The popularity of its use is related to the ease of installation, relatively low cost of materials and the possibility of laying almost all types of flooring on top of them, among them laminate, artificial stone,

At the first stage it is necessary to perform the base device, for this it is necessary to remove debris from the surface and if there is an old coating, for example, a tile. If the floor has significant unevenness, it makes sense to arrange a cement screed. When it is manufactured, it is necessary to mark the location of the temperature joints and the warm floor on the balcony with your own hands can begin to collect.

After preparing the surface of the base, it is necessary to lay mineral or basalt cotton wool. The fact is that under the balcony slab, there may be an open space and in the cold season it gets cold and creates the preconditions for freezing the water heater and it will be better if the protective measures are applied in advance and then the warm floor on the balcony with your own hands made will be work smoothly.

The heater tube is fixed to the base with special fasteners. Thus, he will be provided with stability. Often, as a reinforcing element can be used a mesh made of a rod 5 mm thick and mesh size 150x150 mm.
The device of a water floor, can be executed in the form of a spiral or a snake.
Let's sum up the results
What is the best way to produce a warm floor, this question does not have a single answer, everyone should make a choice based on their technical and financial capabilities. Before choosing a warm floor on the balcony (loggia), you need to decide what flooring will use - tile, laminate or linoleum. By the way, before laying a laminate, it is necessary to lay a substrate of a soft material, for example, foamed polyethylene.

By the way, experience shows that the warm floor on the balcony to build with their own hands is not so difficult, for this you need to be able to work with your hands and observe the requirements of the assembly instructions heating elements.
Before you begin to equip the heated floor on the balcony with your own hands, it is advisable to collect and analyze information about the possible suppliers of this product.
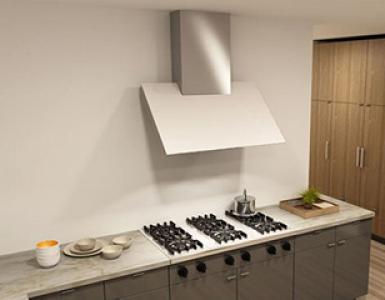
Warm floors on the balcony - a very comfortable solution. In this article we will consider in detail what kind of heated floors is best for this case, how to insulate the floor and the balcony, and of course we will give the instructions for installing the underfloor heating system with your own hands with photos and video materials.
The area of the balcony / balcony in any apartment is a significant part of the total living space. Leaving it not lived-in, it's like giving up a tenth of your salary. But to give the balcony the status of living quarters, it will be necessary to organize a warm floor there.
Kinds of warm floors
There are three types of warm floors:
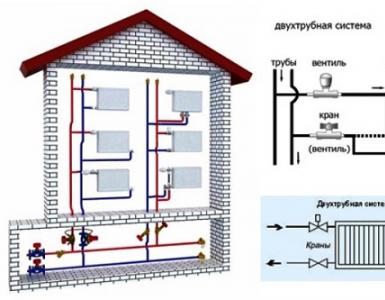
- Water warm floor. In such a system, the coolant will circulate through the pipes located in the screed. Water-heated floors have a visible appeal - hot water can be taken from the central heating system. But in fact there are such "pitfalls", the overcoming of which is similar to the "Pyrrhic victory":
- Lack of autonomy. It is impossible to heat the floor until the heating season starts.
- The temperature of the coolant in the batteries is ≈90 ° C, and in the water warm floors it should not be more than 27 ° C. Those. a complex system of mixing cold water is required.
- Legal aspects. Legislation prohibits the connection of water heated floors to the central heating system without the special permission of the housing and communal services.
- Electrical Underfloor Heating. There are two versions: film (or infrared) and cable. In cable heating floors, the heating element is a special cable that is poured into the screed. This type of floor heating is ideal for tiles.

The film warm floor, due to the specific operation of the heating element, much more effectively manifests itself without screed. And this option is optimal for soft floor coverings: laminate, linoleum, carpet.
For the reasons mentioned above, we will consider the device on the balcony of only electric warm floors on the balcony.
Warming of balcony / loggia
The warm floor on the balcony will work effectively only with good insulation. The realization that it is necessary to insulate not only the floor, but the walls and ceiling, the most important component at this stage. Heat should not only be produced, but also preserved. And without qualitative thermal insulation, this can not be achieved.

Here are some important rules if you do this work for yourself:
- Do not trade for mineral insulators. They are afraid of water and very fragile. The only representative of this line, which will give odds to any other thermal insulator - froth glass. But its price, has overtaken its positive reputation.
- From polymer heat insulators, stop on EPS (extruded polystyrene foam). By its physical characteristics and performance characteristics, it is not equal.
- Window frames on the balcony should be double-glazed.
- When installing the frame on the walls of the balcony / loggia, use the bar. In contrast to the metal profile, it does not conduct heat, which will prevent the appearance of cold bridges.
For the thermal insulation of the balcony walls, you will need:
- Sheet EPS, 50 mm thick.
- Foamed polyethylene foam.
- Drywall.
- Beam 50x50 mm.

The order of work is as follows:
- On the walls a lath made of timber 50x50 mm., with a pitch between the elements of 60 cm.
- Between the beams are fastened EPPP sheets.
- From above everything is closed with foamed polyethylene foam. Joints are glued with scotch tape.
- The entire structure is clad with GKL.
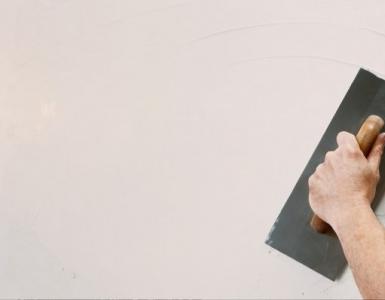
- Shpatlyuyutsya seams.
IMPORTANT: Walls are insulated only after the floor is insulated.
Warming of the floor
Regardless of which heating element is integrated in the floor, the insulation is carried out in the same way. This will require:
- Sheet extruded polystyrene foam, 5 cm thick.
- Multifolga.
- Special Scotch tape.
- Several bricks.
- Mixture for the preparation of masonry mortar.
Small explanations. Multifolga, this is a special roll insulation 2-3 mm thick, with glued on it with foil. Above, the foil is covered with a lavsan film.
Bricks are required in order to lay a gap between the frontal wall of the balcony and the floor. In this slot just fit the brick. For one running meter This gap requires 5 bricks.

Progress:
First, the floors are swept, and the masonry mortar is prepared according to the instructions on the package. Then a solution is applied to the bricks, and they are laid in a slot under the front plate. The remainders of the solution are coated with a masonry.
The solution seizes in about 3-4 hours, and during this time, it is better not to bricks.
The EPS boards are laid directly on the floor. If necessary, cut them with a construction knife.
From the top, on the EPPS, the multifolga is laid with its own hands. Each strip is laid back and forth. The bonding points of the strips are glued with a special adhesive tape. For convenience, as rough floors, you can lay sheets of plywood or OSB.

At this stage it is already possible to begin to install a warm floor on the loggia. And the same work for different types of floor heating ends.
Installation of a cable floor under the balcony
For the work you will need:
- Heating cable in mats.
- Corrugated tube.
- Thermal sensor.
- Thermoregulator.
- Wires.
- Damper belt.
- Dry mix for screed, recommended by the cable manufacturer.
The use of a heating cable in mats, in this case, is more preferable. In fact, it's the same cable, only the manufacturer fixed it on a polypropylene mesh. In large rooms, this is not very convenient, since it is required to bypass the location of stationary furniture and household appliances. And for the balcony, this option is optimal, because to fix the cable you still have to use the mounting tape or buy a grid.

The power of heating mats must be at least 200 W / m 2.
On sale there are sets of "Cable warm floor", in which there are already a thermal sensor and a thermostat. We recommend you to choose one of these sets that suits you in terms of heating area.
Progress:
Mats are rolled on the insulated floor, starting from the place of power connection. Laying mats in length or width is determined by location, depending on the size of the balcony. For example: the width of mats is 80 cm, and the dimensions of the balcony are 1.7 x 3 m. Taking into account rule: there should be a minimum of 5 cm between the heating cable and the wall., it turns out that it is preferable to roll out in length. To change the direction of laying mats, you must cut the grid.
 In the case of cable floors, a screed
 After placing the cable, it is necessary to integrate a thermal sensor into the floors. For this purpose, a groove from the mats to the thermoregulator is shattered in the wall, in which the corrugated tube is hidden. On the floor, it passes equidistantly between the turns of the cable, and is fixed to the grid. The distance from the wall to the end of the corrugated tube is 50 cm. The thermal sensor is pushed into it. The end of the pipe is sealed with an adhesive tape.
The power wires are connected to the cable, and the contact place is sealed with the bitumen insulator that comes in the kit. In the groove on the wall, you can lay and wiring up the thermostat.
Connection of power and wires from the temperature sensor is carried out according to the instruction, to the corresponding terminals. Then the temperature is set at the thermostat at 25-26 ° C, and the power is turned on. Within 3-5 minutes, check the operation of the system, the quality of insulation, and turn off the heating.
The final chord is the organization of the screed.
IMPORTANT: For the organization, use a mixture recommended by the cable manufacturer (if applicable). Often, propylene fiber is already included in the composition of such mixtures. It allows you to do without reinforcing the mesh. In addition, such mixtures are fast-drying and self-leveling.
On the perimeter of the balcony glue the damper tape.
The layer of screed above the EPPA must be at least 3 cm. Accordingly, if 1 m 2 of the screed, at a thickness of 1 cm, there are 15 kg of the mixture, then for 3 cm it will take 45 kg. For a 6 m 2 balcony, 270 kg of mixture is needed.
The diluted mixture is poured, starting from the far corner of the loggia. Having finished pouring the entire volume, the surface of the screed with their own hands pass a roller with spikes. It ensures the release of air bubbles from the surface layer.
After 2-3 days, the floors will be ready for laying the finish coat. Before the end of maturing screeds, it is forbidden to turn on floor heating!
Installation of infrared warm floor
We will install the film warm floor on the balcony using special sets, according to the area of the balcony. It will already include:
- Heating film.
- Thermoregulator with a temperature sensor.
- Set of wires.
- Bituminous insulation.
The thickness of the film must be a minimum of 200 W / m 2.

Cover the film, observe the following conditions:
- The distance to the walls should be 5-7 cm.
- Place busbars on one side.
- Cut the film only in specified places.
- The matte side should be facing up.
- Between the stripes, leave a distance of 1-2 cm.

Thermal sensor fits in the same way as in cable floors. Make sure the end of the corrugated tube is between the heating elements! Connect the power cables to the film according to the instructions. First, the layers of the film are severed by the knife, then the contact is pressed there, and the wires are connected last. Each contact group is closed with a bitumen insulator.
In principle, infrared heating is ideal for a warm floor on a loggia. In addition, its installation is slightly easier than cable, and the requirements for coverage are less.
The wires are led to the groove in the wall. Since there will be no screed, to disguise the wires, it is possible to cut a groove in the heat insulator with a depth of 4-5 mm.
The connection is made according to the instructions to the corresponding connectors. Then check the performance, in analogy with the cable warm floor.

After checking, the floors are covered with thick polyethylene film. It serves as a waterproofing agent against possible water ingress during wet cleaning. The film is overlapped 15-20 cm, and the joints are glued with scotch tape.
On such floors it is possible to lay a laminate and a parquet. And for soft coatings, such as: linoleum and carpet, from above it is necessary to put plywood, 6-8 mm thick. In this case, sheets of plywood are fixed only among themselves, with the help of reinforced tape.
Doing repairs in their apartment, people do not pay due attention to the balcony, and often simply forget about it. And in vain! If you make repairs on the loggia and insulate it properly, you will get an additional living room. Heating the balcony with a warm floor will help make the balcony suitable for living, even in winter cold. In a modern apartment problem, you can not neglect excess meters of living space. There are several options for a warm floor, in order to choose the necessary, you need to know about the advantages and disadvantages of this warm coating. This will help you make the right choice.
On the balconies of residential buildings, water floors can be found infrequently. This is due to some difficulties in the installation process. This type is optimal for private households and cottages, where there is own heating system and it is necessary to heat large areas. Thus, the water-heated floors provide the maximum efficiency.
Benefits:
The surface of the floor is evenly warmed over the entire area. Outwardly, the heating system is invisible. Does not require further maintenance and guarantees savings when paying bills for electricity. Economical in the consumption of electricity. The optimal ratio of heat transfer and financial costs. Provides the heating of large areas with minimal costs.
Disadvantages:
It is very difficult to set the right temperature. Lowers the pressure in the heating system. Greater likelihood of leaks, their search and elimination. The installation of such a floor is quite complex and requires certain skills. Needed additional pump for water circulation.
Electric floor: pros and cons
Electric floors are often used. This option is unpretentious in operation and is easily installed. Before installation, it is necessary to take into account all the nuances and familiarize yourself with the instruction. If you follow it exactly, the installation of an electrical floor will not cause any particular trouble. In addition, only observing all the subtleties, you can count on the greatest efficiency from use.
Benefits:
Low price and simple temperature adjustment. Even heating of large areas. Externally, the presence of a heating system is not striking. When installed in apartments and balconies, special skills and additional equipment are not required. Ability to quickly find and fix the problem. This can be done locally, without dismantling the entire system.
Disadvantages:
A large electricity consumption will have a big impact on electricity bills. When used, electromagnetic radiation occurs. It is not recommended to stay in a room with such a floor heating system for a long time.
Varieties of a warm electric floor
Currently, there are three different versions of the electrical floor. Each of them has its own design features, advantages and disadvantages. In order to understand this, it is necessary to dwell on each of them in more detail.
Thermometers - are mats with an already existing electrical cable. Thanks to the adhesive applied to the underside, the thermometers are very convenient to install. It's enough just to glue them to the floor. Adhesive side securely adheres to the floor surface. Mats are stacked as needed in one or two layers. Even bends are permissible, the inside of the cable remains intact. If necessary, you can cut the joint film.
Cable floor heating on the balcony with your own hands
Of the merits of this type of floor, I want to emphasize the ease of installation. Thermometers do not need floor leveling, they reliably lie even on old wooden floors. And the light weight of the coating ensures convenient transportation. With the installation process you can easily handle alone.
Among the disadvantages is low heat transfer and increased electromagnetic background. With frequent inclusions, a quick breakdown is possible.
Thermal cable - a wire heating system that is controlled by a thermostat. it the best option for small rooms, balconies and loggias. Due to the arbitrary laying of the cable, the maximum efficiency in operation is achieved.
It is divided into two types:
- Single-core - connects to the thermostat with non-heated mounting wires.
- Two-core - thanks to one mounting wire easy to install, and the efficiency of the work is much higher.
The advantages of using such a floor include the ease of controlling the heating elements and long term service.
Of the minuses, weighting of the balcony is noted, after laying it is necessary to wait for a long time until the cement slumps. To avoid possible shortages, finishing is only possible ceramic tiles.
Infrared Floor - floor covering, heated with special thermocouples. The option of floor insulation with the help of infrared film is the most convenient and unpretentious. Significant advantages of such floors include: water resistance and low power consumption. In addition, the air in the room is constantly ionized, and a simple installation only completes the positive picture.
Cons also present. These include mandatory grounding and the need for leveling the floor surface. If the room where the infrared floor is installed, aluminum wiring, then it is necessary to replace it with copper wires.
![]()
Install the warm infrared floor on the balcony
Installation of electric floors
For the work required the following tools and materials: sand, cement, wooden bars and slats, mounting tape, isolon, chipboard, spatula.
Before starting work, remove the old floor covering and level the base. Then you need to clean the slab from the construction debris, and it is best to wash it. For better adhesion, the substrate can be treated with a primer.
Prepare a cement-sand mortar in the ratio of 3 parts of sand to one part of the cement. Using the bars, make the formwork and fill it with the resulting mixture. Do not forget to carefully level the screed with the help of a rail. About a day later, the bars can be removed, and the resulting voids must be filled with a solution. Now it remains only to wait for the full drying of the screed (the maximum strength of the solution accumulates after 28 days).
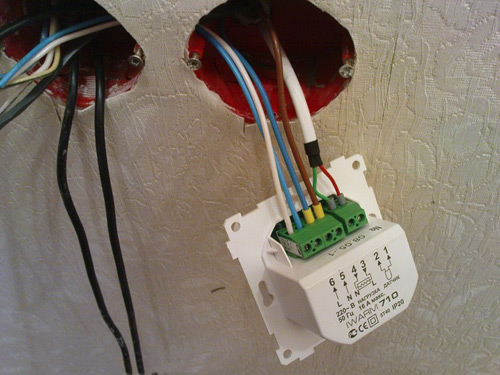
Direct installation of a warm floor begins with preparatory work. You need to choose a place for the thermostat and grasp the wall to install the box (the recommended height is approximately at the chest level). The second shtroba will serve for the installation of tubes, the size of approximately 2 x 2 centimeters. A layer of particle board is laid, then a layer of insulation. Then the insulated cable is placed under the electrical cable.
Note! Heat-reflecting material, should lie under the cable, and not vice versa! Then the heat will go up.
Before laying the cable it is necessary to fix the metal mounting tape with self-tapping screws, on which the cable is laid "snake". It is necessary to make sure that the loops are not in contact. Then the cable is fixed to the mounting straps. Thermal sensor is installed in the tube going from the thermoregulator box to the floor. The end of the tube is recommended to be sealed with adhesive tape. This will help avoid getting the solution. After that the shtroba plastered. It remains only to lay the cable and check the system.
Intervals between turns electrical cable are calculated by the formula: Д = S (m. kV.) х 100 / Dkab (m). It is interpreted as follows: D - the length of the pitch in centimeters, S - the area of the heated room in square meters, Dkab - the length of the electrical cable in meters.
Does the thickness of the screed affect the choice of heating elements
It all depends on what kind of electrical floor you want to use. For a cable floor, the recommended thickness of the screed is 5 centimeters. If you want to install thermometers or infrared, the thickness of the solution can be smaller. Also it is worth remembering that with the use of mats the height of the floor will increase by about 1 centimeter. And the infrared film is mounted immediately under the finishing coat.
Finishing is also of special importance, and depends on the type of floor chosen. Specialists recommend to lay cable floors under concrete, ceramic-granite, tile and stone covering. Infrared film successfully falls under the laminate, linoleum or carpet. Also, it should be borne in mind that wood coatings have less heat emission. Given these nuances, the question of how to make an electric warm on the loggia with your own hands, will cease to seem insoluble to you.
Installation of water-heated floors
Water floors are laid only on a carefully leveled surface. That is, before installation it is necessary to fill the screed. Before laying pipes, you need to lay a hydrobaryar and take care of the insulation. As the heat reflector, it is possible to use isolone or high-density foam. According to experts, 35 density will be enough. The pipe itself is laid on a special mat or brackets attached to the screed. Before you bookmark, do not forget to map out the locations.

Water floor on the balcony with your own hands
There are two ways of laying pipes: "spiral" and "snake". For small spaces, the second method will be optimally used. Remember that the distance between the turns should not exceed 15-20 centimeters. If there is a need, you can calculate the distance yourself. To do this, you need to know exactly the height of the floor. Heat pipes are given at an angle of about 45 degrees, forming in relation to the floor angle of 90 degrees. Crossing the edges, flows warm air completely eliminate the occurrence of cold zones. This is true for both water and electrical.
The brackets are fixed at a certain distance. For a straight line, an interval of 50-70 centimeters is considered optimal. On the bends, depending on the angle of refraction, additional fasteners may be needed. To ensure that the water pipes do not break when bending, it is necessary to put each into a special spring. The length of such a spring should not exceed 25 centimeters, and the inside diameter should be greater than the pipe by about 3 millimeters.
Pay attention to the material of which the pipes are made. Products made of metal plastic should only be in seamless execution! To check the quality, you can cut a small piece of pipe and try to remove the top layer. The harder the outer coating leaves, the better the product. After removing the plastic, you will see whether there is a seam on the pipe.
Do not blindly trust the sellers! It is better to check the quality of pipes by yourself.
If you still do not understand how to make a water-heated floor on the balcony with your own hands, the video presented on our website will help in the implementation of construction work.
The final stage
After the installation of the warm floor system is completed, a cement-sand mixture is poured on top. It is recommended to use linoleum or ceramic tiles for finishing. This will help get maximum heat dissipation from warm floors. But the wooden cover badly misses the heat.
When you plan to install warm floors on the balcony, you will not only be able to expand the useful area of your apartment. You will have a small corner, which can be used for personal privacy. And you can install a small couch, where you can stay overnight if you need a late guest. Perhaps the information given above will help you make the right choice. In any case, the decision is yours.
Video on installation of electric underfloor heating
 Cable floor heating on the balcony with their own hands Electric warm floor on the loggia with their own hands Installing a warm infrared floor on the balcony Warming the floor on the balcony with thermo mats Heating the balcony with an electric warm floor Fitting the fittings on the balcony for the warm floor Water floor on the balcony with your own hands Laying the laminate on the infrared floor
Warming of the loggia is an important stage in the improvement of your home, especially in the conditions of a modern rise in price utilities both for living space and heating. Warm floor on the loggia - saves much heat in your home, and this is especially important when you have a child growing up and there is a need for frequent washing, and work in such a room is more than pleasant. In order to preserve material resources, we will consider and compare the most common and economical options for installing warm coatings.
What is a warm loggia for?
A warm loggia is primarily the comfort of our life activity, and its ennobling has only one minus - financial costs, but what can you get now for free? But there really is a plus here.
- The warm floor is especially useful in severe winters or at low temperatures. Most people hang out their laundry on the balcony, as many things can not be hung inside the apartment, and not everyone can afford to wash it off every day. But in both cases the doors will be opened exactly, and in severe winter conditions this is a very negative factor, exposing your family members to an additional risk, so warming your loggia will be a huge advantage.
- Warm floors increase productivity in everyday life. However strange it may sound, this factor is really significant. Many owners often equip the working area on the loggia, where it is more convenient to grind something, popilit and no one interferes.
- Pleasant rest during the winter cold. Warmed loggia with your own hands is a good achievement, especially in the case of the reception of guests, now it will be much more comfortable to relax from everyday bustle. In the end, the warm floor under your feet creates an additional comfort in the house.
Warming floors
But before qualitatively insulating the floor, one should rationally approach the matter.
There are 2 types of floor insulation:
- Water heating of the floor.
This system of insulation implies circulation through pipes, built-in screed. It has both its pluses and minuses, but its disadvantages, unfortunately - are the advantages of the pluses.
First, the feed hot water comes from the central heating system, which at first glance is an advantage. But if you dig a little deeper, we find that floor heating is not completely autonomous and completely depends on the beginning of the heating season.
Secondly - the average temperature of the water in the battery is about 90 degrees, and when circulating in the loggia, it should not exceed 27 degrees. Therefore, you will need a complex system of mixing the flow of hot and cold water.
Thirdly - the installation of water heating of the floor requires the registration of special legal documents, as under the legislation, the tie-in for additional heating in the central heating system is strictly forbidden without the relevant permission of the housing office.
- Electrical floor heating.
Electrical type of heating is divided into two types: infrared (or film floor) and cable type of insulation. The heating element of the cable is a specific wire, which is filled with a screed. This kind of heating is well mounted under a tile or other hard coating.
The film electric floor heating is much more productive. It is installed without screed and is well adapted for soft coverings, such as carpet, laminate or linoleum coating.
Capital insulation of the floor of the loggia
Many of us like to spend time on the balcony with a cup of tea, reading a book. The truth is in the summer, and in winter the unheated loggia is always empty and before going there, we throw something warm on our shoulders. The only way out of this situation is to warm your floor before the onset of cold weather.
Before setting the type of insulation, you should determine the most convenient one for your room, whether it is water heating or electric. But in our case we will start with electrical heating, since it is more convenient to install and powered from the mains.
Cable view of floor insulation
The insulated electric floor (cable) can be conditionally divided into two parts:
- Cable.
- Control device.
The heating element is a wire that is completely filled with a cementitious screed, and outside there is a device for temperature control.
This type of insulation of the floors is easy to establish by oneself:
- We prepare the floor surface for installation.
- Maximize and eliminate all unnecessary.
- We lay the heat-insulating layer.
- At the top of the thermal insulation layer we attach the mounting tape.
- On the mounting tape, carefully loosen the current-carrying cord.
- We display a thermoregulatory device on the wall.
At the end of the first stage of the qualitative laying of the electrical insulation, we immediately go to the final part of the installation and decorating the insulated surface:
- The resulting heat-insulating structure is poured with a cementitious screed.
- We polish the floor with ceramic tiles.
If desired, the surface can be covered with parquet or hidden under a laminate, but from an economic point of view it is more expensive, and with practical - the tile is better combined with a cable electric heater of the loggia, since it has a high heat conductivity, due to which the floor heats up within 10-15 minutes .
Infrared view of the insulation of the floor
Infrared or film heating of the loggia, made by own hands, is considered the most practical, economical and convenient to install the type of floor insulation.
Film heating can be installed without affecting the screed, while we ease the load on the overlap. Infrared insulation is carried out with the help of a special thin layer of thermal film, penoplex and hides under the laminate, carpet or linoleum.
This type of floor insulation has a high heat conductivity and low financial costs, ensures the heat of the apartment and the comfort of the loggia, helps to withstand low temperatures.
Floor water insulator
Not insulated loggia - a fairly large area of the utility room, which is comfortable in the warm season, but because of frosts it is often idle. It can be heated in many ways, for example - to install a radiator, but in fact this is not the best solution. Although high-quality insulation of the floor requires a lot of effort and resources, but it is done once and several times increases the comfort of the premises, allowing you to spend time comfortably even in the persistent frosts. In addition, eliminates the eternal torment with the radiator.
Now let's move on to waterproofing the floors with our own hands.
To the note: if there is central heating near the loggia, the installation of the warm floor is much simpler.
Installation of water insulation of the floor is carried out in several stages:
Preliminary preparation for installation.
Before proceeding with high-quality installation, you need to carefully inspect the balcony plate for damage or collapse. To strengthen the structure can be using metal reinforcement with cement mortar, you can also add tile adhesive.
Align the surface of the plate.
The most important thing that can not be missed is the homogeneity of the completed construction of the insulated floor with the level of the living room. Therefore, we level the slab with a screed, not forgetting the measurements of the insulation, taking into account the upper flooring on the floor (under a soft surface, the construction is not recommended to hide, especially under the laminate).
If the floor surface is not uniformly connected to the floor in the living room, in this case the main thing is that the floor should remain flat. Do not forget that the screed on the floor should dry completely, it will take at least a week.
Installation of water heating.
We pass to the laying of the hydro-barrier, followed by the thermal insulation. For thermal insulation, a high-density foam foam, whose performance depends on future loads, will work well. The heat reflector is also a good option. After the thermal insulation we switch to the installation of the pipe, which we fix on the brackets, through the heat insulator tightly fixed in the screed.
- Before laying the pipe, mark the markings on which it will be laid. The most frequent variants of laying are a spiral or snake shape, with an intertube distance of 15-20 cm.
- Given the convenient interval, we screw the brackets into the coupler. With the direct arrangement of the pipe, the optimal distance between the brackets should be 50-60 cm, with bends - the brackets are much thicker.
- On the metal-plastic pipe it is desirable to put on a soft spring of a slightly larger diameter, since this design allows the pipe not to break in the bend.
- Warming the floor metal-plastic pipes - use only the seamless option. To check the quality of the pipe, cut off your piece of tube and clean it of plastic, the harder it is to make - the better the material. After cleaning, check the aluminum structure for a seam.
- We finish the insulation of the floor by pouring the entire structure with a cement screed.
For maximum conductivity of heat in the loggia, the dried screed is tiled with ceramic tiles. This material is ideal for this type of construction and is the final element that beautifully decorates your floor.
Owners of apartments are thinking - how to make a warm floor on the balcony or balcony? Everything is simple enough. The technology of mounting heating elements differs little from the installation scheme inside the apartment. For the device of a warm floor on a balcony it is possible to choose both electric system, and water from the centralized heating.
Electrical cable floor heating
Cable floor heating is an economical and effective option for a balcony or a loggia. This system ensures uniform heating of the entire surface. The adjustment of the heating intensity is carried out with the help of a thermostat. It is installed on the nearest wall and senses all information using a temperature sensor.

Such a scheme is quite effective, since it allows one to obtain economical system with minimal electricity consumption. Its significant drawback is the need to fill a thick cement-sand screed, which significantly reduces the height of the room.
The warm floor on the balcony with your own hands is laid in the following way:

Film infrared warm floor
Such an electric heated floor has many advantages, because its device does not need to fill an additional layer of cement-sand screed. It produces a significant load on the balcony slab, which is not always taken into account before its installation. Also floor heating of this type can be installed quickly enough. Given the small area of the balcony, the whole complex of works, together with the installation of tiles or other coatings, will take no more than 3-4 hours.
Warm floor on the loggia
The warm floor on the balcony with your own hands using a thin film is set as follows:

The device of a warm floor with application of centralized heating
The water-heated floor has many advantages, including high efficiency, economy and reliability. To ensure the operation of this system, you do not need to use electricity. It is enough only to connect the pipes inside the structure to centralized heating or a boiler (gas, electric or any other).

The water-heated floor is quite cheap, but its device may be difficult for some. During installation, you need to strictly follow the recommendations of experts to create an efficient and durable system. Water type underfloor heating is established in the following way:

After the successful testing of the warm floor, the screed is poured and then the appropriate floor covering is laid.
Video: Laying the cable floor heating to the balcony
Secrets of treating joint pain from our regular reader.
Hello!
My name is Gennady Alexeevich. I'm a stove man with more than 20 years experience. I am engaged both in repair and construction of Russian furnaces and fireplaces. The work is always performed very accurately and carefully, which negatively affects the condition of the joints. With age, the pain began more and more, right up to the point where I could no longer work. After a lot of both drug and folk ways treatment, I realized how serious my disease is, since there was no positive effect. Until I came across one tool, which I want to tell you about.
This is a unique mixture of the rarest and most powerful natural medicinal substances. This tool has proved its effectiveness not only to patients, but also to science, which recognized its effective drug. The pains in joints and back go for 10-15 days, as studies have shown. The main thing is to follow the instructions in the methodology clearly. Order the product in its original packaging , with a guarantee of quality can be on