Accessory electric switchboard. Branch for low-voltage and low-current networks
We analyze a number of reasons that led the access panel to an emergency condition.
If you have the same shield, then after reading the article I recommend that you immediately check it for such errors and eliminate them before it's too late.
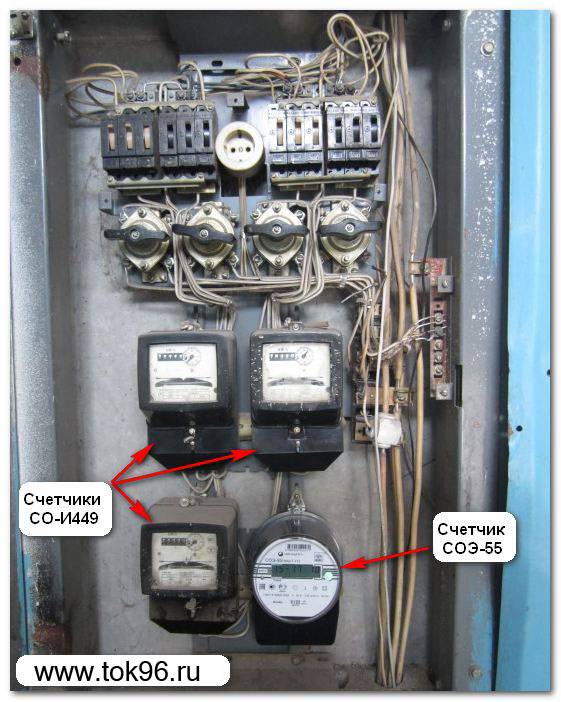
So, three weeks ago I was changing the old single-phase induction meter CO-I449 (1986) to the electronic two-rate SOE-55 (2014). The meter was installed in this driveway.
The scheme of such a shield

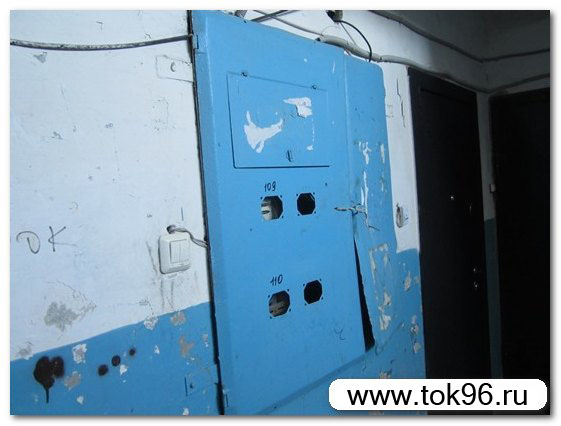
View from afar.
The fact is that this driveway is in an emergency condition. Frankly, that during work, I myself was scared to be there.
And now in order.
The house has tN-C grounding system i.e. zero working and zero protective conductors are combined into one conductor PEN, starting from the transformer substation and ending with the consumer.
The first thing that caught my eye was the common zero shoe.

It is connected to the main PEN conductor and the zeros of all four apartments. From poor contact and heavy load, their heating occurred. As a result, we see the bare, spiked zero conductors of all four apartments.

Next I paid attention to the phase conductor, which was connected to the packet switch of the apartment where I changed the counter. The wire, the terminal and the body of the circuit-breaker were melted. The reason is the same - poor contact and increased load.

This phase wire is connected to the terminal block of phase "B", where the main wire of phase "B" is connected. Throughout, he was melted, in some places even there was no isolation.

But the worst thing was that he touched the screw head of the terminal block of the "A" phase, i.e. another (non-identical) phase. Given that his isolation was muted, and in some cases it simply was not, it means that at any time a short circuit might occur. That's what I was most afraid of.
The photo below shows the location of the touch. Upon detection of this fact, I immediately carefully removed this wire, thereby eliminating the touch.

Zero pads apartments also have signs of heating. And in the fourth apartment (this is the same apartment in which I changed the meter) on one terminal 3 wires are connected at once: an introductory zero from the counter and two departing to the apartment. And this, by the way, is not permissible in accordance with GOST 25034-85 "Contact screw clamps".

The landlady of this apartment told me that she once "lost light". She called the electricians who quickly fixed the malfunction. As far as I understood, the contact was missing at the zero terminal, where outgoing zeros were connected to her apartment. The photo shows that the terminal was warming up. Apparently the screw was so stuck to the clamping plate. that electricians could not unscrew it, that's why these two wires were connected with zero, which came from the meter - so it turned out that at the moment 3 wires are connected at one terminal: an input zero from the meter and two leaving to the apartment.

A few words about group automata. In total there are 2 groups in the apartment, i.е. Two automatic machines with a rated current of 25 (A) with characteristic C are involved. One automatic device is a backup, although for some reason it is switched on. And so for each apartment.

The neighboring apartment situation with the condition of the wires is similar (heating, melting insulation). The rest of the two apartments on the site did not see this, but after learning that no one lives in them at all - this clarified the situation.
The reasons that led the shield into an emergency condition
We will analyze the mistakes that led the electrical wiring of the floorboard into an emergency condition.
1. Increase of capacities (loads) in apartments
Every year, the capacity (load) of our apartments increases, thanks to the acquisition of modern electrical appliances with low capacities (dishwashers, microwave ovens, air conditioners, electric kettles and cookers, electric heaters, washing machines, etc.). There is nobody to blame, because each of us tries to create comfort and comfort in our homes, buying modern equipment.
Fortunately, according to the Federal Law No.261 "On Energy Saving", we were forced to replace incandescent lamps with energy-saving lamps, thereby slightly reducing the overall housing load.
But do not forget that the needs of citizens 20-30 years ago and at the moment are somewhat different. But the projects of electric wiring of apartment houses were calculated according to the conditions of those times.
2. Cross-section of lead-in wires
If we take into account the fact that two groups of aluminum wires with a section of 4 mm2 go into the apartment, then group automatic machines with a nominal value of 25 (A) for them are, in principle, chosen correctly, although I would reduce them to 20 (A). According to the table for the selection of conductor and cable cross-sections, the long-term permissible current of aluminum conductors of 4 mm² is 27 (A).

But the lead wires that are laid from the main riser to the group automatic machines 25 (A) are made aluminum wires with the same section of 4 mm, which is an error.
Why?
Suppose that the first group will be loaded on 14 (A), and the second - on 16 (A). With modern electrical appliances this is easily realizable. It turns out that the input wires will flow a total current of 30 (A). And according to the table given above, the long-term permissible current of the wires of this section is 27 (A), naturally, the wires will begin to heat, the insulation will melt, etc.
It turns out that the mistake of designers is not the right choice of the cross-section of the input wires. They must withstand the total current of both groups, and we have obtained that they have the same cross section.
What to do next? My suggestions
Undoubtedly, you need to immediately remove all faults in the shield. There are two options.
The first is to call in the power grid, explain the situation with the shield and call the electricians to troubleshoot. They have to replace the melted wires from the main to the packet switch, and then their service boundary ends and for additional work they have to pay.
The second option is to immediately turn to specialists who will do everything qualitatively, and most importantly - correctly.
Here are my proposals for the shield, which were explained in detail to the hostess and her neighbors.
1. Replacement of the introductory packet switch on the input automaton
In any case, you need to get rid of the packet switch, and instead install a modern (modular) input automaton (single-pole or bipolar), the rated current of which must necessarily be coordinated with the power supply organization, so that the selectivity of its operation is respected in relation to the input protection devices installed in the ASU -0.4 (kV).
From my experience, I will say that the introductory machine will have a rated current of 32 (A) or 40 (A).
You should choose the manufacturer of automatic devices for your financial capabilities: you can install expensive ones from ABB or Schneider Electric, or you can manage inexpensive brands like IEK, EKF or TDM.
2. Substitution of group automata
At present, group automatic machines of the AE-1031 type (single-pole) are installed. They are, so to speak, already obsolete, but that's not the point. They are very unreliable, when they are loaded, a large number does not pass the test, especially for thermal protection.

Introductory and group machines are installed on a standard DIN-rail, which is attached to the housing of the storey board in place of old machines.
3. Get rid of aluminum wires
Currently aluminum wires section up to 16 sq. m are prohibited for use in the residential sector (PUE, p.7.1.34), therefore installation must be carried out only copper wires.

Input wires from the bus terminals to the group machines can be performed copper wire PV-1 4 sq. M or 6 sq. M. You can use other permitted wire grades.


4. Replacement of the apartment zero pad
The old zero shoe needs to be replaced with a zero isolated DIN rail rail (SCHN), for example, here is one.

5. Optional (optional)
If the first four items are mandatory, then this paragraph is more recommendatory. I suggested that the hostess should at least conduct a visual inspection of the electrical wiring of the apartment (general condition, heating, wire connection quality, etc.), starting from group automatic machines in the floor panel and ending with sockets, switches, junction boxes. Also, it would not be bad to measure the insulation resistance of the group lines, which are made of old aluminum wires.
6. Layout of the floor board
Here's a new connection scheme in the floorboard for one apartment - a minimum of investment, everything is simple and reliable.
Click on the icon and your friends will read this article
Instructions
Familiarize yourself with the location and purpose of the doors of the access stitch. Usually there are three. On the left are two doors: horizontal, and below it - square. For the first of them there are automatic machines, and for the second - electric counters. On the right is one vertical door, behind which are placed low-voltage devices, for example, antenna amplifiers and splitters, telephone terminals. Sometimes there are shields of a different configuration.
Examine the locks of each of the doors. If they are equipped with projecting plates rectangular section, you can open any of them using pliers. The horizontal position of the plate corresponds to the vertical position of the tab (the lock is open), and vice versa, when the plate is positioned vertically, the tab is in a horizontal position (the lock is closed). During the capital repairs The front panels of the access panels sometimes change to new ones, where locks are installed, similar to those used in mailboxes. In this case, tenants are most often given out keys only from the door with automatic machines. Open and close it the same way as a mailbox.
When any of the doors is open, observe the following rules. Do not touch any metal objects inside the shield, even if you are certain that there is no high voltage on them - this may not be the case. Do not attempt to disassemble any items that do not belong to you. This applies even to the meter through which your apartment is connected - often it is the property of the electricity supply organization. Do not perform any actions aimed at stopping or rewinding the counters, do not remove the seals from them. Do not turn off the automatic devices through which other apartments receive electricity, except when necessary, for example, because of a fire or received by someone from the neighbors of electric injury.
In the presence of electronic meters with controls, you can, by opening the corresponding door flap, click on the buttons located on them in order to find out the consumption of electricity for the previous months, at different times of the day. Do this carefully so as not to touch the live parts located next to each other. The procedure for controlling the counters using the buttons is described in its instructions. You can not rewind or stop it from the keyboard. Do not press the buttons on the neighbors' counters.
If it is necessary to repair the wiring, open the door behind which the machines are located. Find among them two, marked with the same numbers as your apartment number. Preliminarily shutting down computers and other devices that do not tolerate sudden de-energization, check through which machine the chandeliers feed, and through which - the sockets. In an emergency situation, it is necessary to switch off the automatic devices immediately, without waiting for the shutdown of the computers.
Please note that the call and socket between the doors bathrooms are usually fed through the same machine as the chandeliers. During the repair of the wiring, a person should be standing next to the guard to ensure that no one comes to the shield and resumes electricity supply. Unplug and switch on the machines carefully, so as not to touch their clamps and bare wires.
After completing work with the devices located in the shield, be sure to close all its doors and lock them on the locks.
To diagnose and repair certain units and aggregates Opel must remove the instrument panel. If you want, you can do it yourself. It does not require any equipment, only a staff tool.
You will need
- - a set of spanners and carabiners, end caps;
- - screwdriver and pliers.
Instructions
When receiving electric trauma, starting from the 2 nd degree, after rendering first aid to the victim, it is necessary to immediately hospitalize. For this, it is best to call an ambulance.
How to give first aid in case of electric shock
In case of electric injury of the 1st degree, the victim himself can stop the current effect, as he does not lose consciousness and does not experience very strong pain and muscle cramps. However, in the case of electric trauma of the 2nd, 3rd and even more so of the 4th degree, the help of other people is necessary.
First of all, it is necessary to de-energize the wiring as soon as possible. If, for some reason, this is difficult, it is necessary to pull the victim from the current source. At the same time, the person who provides assistance should take measures to avoid getting hit by the current itself. In no case should you take up exposed skin or metal objects on the victim's clothing. It is best to use rubber gloves, and in their absence - wrap your hands with some kind of insulating material. It is also desirable that the one who pulls the victim from the source of current, was in rubber shoes or at least stood on an object that does not conduct electricity (for example, on a dry board or on a rubber rug mat). While one man produces these manipulations, the other must, without wasting time, call an ambulance.
Then it is necessary immediately to proceed to artificial respiration by the method "from mouth to mouth" and indirect massage of the heart. This must be done until the victim has recovered and begins breathing on his own or before the arrival of an ambulance. Further treatment is performed by doctors, depending on the severity of the affected lesion and the general condition of the victim.
Sources:
- access shield
- How to protect the electrical board?
Hello, dear readers and guests of the site "Notes electrician."
In this article, I want to make out a number of reasons that led the access panel to an emergency condition.
If you have the same shield, then after reading the article I recommend that you immediately check it for such errors and eliminate them before it's too late.
So, three weeks ago I was changing the old single-phase induction meter CO-I449 (1986) to the electronic two-rate SOE-55 (2014). The meter was installed in this driveway.

I described the scheme of such a shield in the article about. In my case, the shield is similar, only it is not arranged on 3 apartments, but on 4.

View from afar.

About the replacement of the counter, I will not tell, on this topic read the following articles:
![]()
The fact is that this driveway is in an emergency condition. Frankly, that during work, I myself was scared to be there.
And now in order.
From my experience, I will say that the introductory machine will have a rated current of 32 (A) or 40 (A).
You should choose the manufacturer of automatic devices for your financial capabilities: you can install expensive ones from ABB or Schneider Electric, or you can manage inexpensive brands like IEK, EKF or TDM.
2. Substitution of group automata
At present, group automatic machines of the AE-1031 type (single-pole) are installed. They are, so to speak, already obsolete, but that's not the point. They are very unreliable, when they are loaded () a large number does not pass the test, especially for thermal protection.

3. Get rid of aluminum wires
At present, aluminum wires of up to 16 mm² are prohibited for use in residential areas (PUE, p.7.1.34), therefore installation must be carried out only with copper wires ().

4. Replacement of the apartment zero pad
The old zero shoe needs to be replaced with a zero isolated DIN rail rail (SCHN), for example, here is one.

5. Optional (optional)
If the first four items are mandatory, then this paragraph is more recommendatory. I suggested that the hostess should at least conduct a visual survey of the electrical wiring of the apartment (general condition, heating, etc.), starting from the group automatic machines in the floor panel and ending with sockets, switches, junction boxes. Also it would not be bad, which are made of old aluminum wires.
6. Layout of the floor board
Here's a new connection scheme in the floorboard for one apartment - a minimum of investment, everything is simple and reliable.

It will be approximately like this.

In the above diagram it is desirable to establish an introductory and group RCD ().

P.S. About all that was said above, the owner of the apartment and her neighbors were explained. Unfortunately, so no one called me back. A few days ago I happened to pass by this shield and did not see any changes there ...
I want to write a little about those nuances that need to be considered at the time of connection or perekucha floor plate when you move the apartment to a new posting. In fact, there are a lot of nuances, and one could even draw explanatory sketches, but I'm too lazy to do it :) Let's turn to the floor guard: it's the repair of the apartment's electrician that is coming to an end. I hope that this article will also be so popular that I will be spilled by everyone who is not too lazy, similar to the previous ones about the plan for electricians.
Electricity comes to our apartment with a floor plate. The exception is very old houses, in which the riser of the house goes in the mine inside the house, and the guard with the counter costs in the apartment. The floor panel usually contains two important things: an introductory machine, the task of which is to limit the power allocated to the apartment, and the meter to account for the consumed electricity. And most importantly - in the floor panel there is balance-sheet distinction property. Usually, the management company of the house is responsible for the state of the electrician to the terminals of the input automaton, and after the introductory automaton the owner of the apartment.
There are two options in working with floor flaps. Option one: house - new building. In this case, you practically do not need to do anything. You will have everything you need in the floorboard: an introductory machine, a counter, a fireproof RCD, and you will be given a contract for the electricity supply of the apartment, where the allocated capacity (".. power xx kW, limited to an automatic machine in yy A") and the border (".. is delimited at the terminals of the input machine / switch"). You will receive a three- or five-wire (single or three-phase input, when ordering from me it is better to specify in advance), and the only thing you can do is replace the regular components of such a shield with branded ones. Or absolutely nothing to do: this is common property - if something happens, then let them understand.
But with second option - second home - will have to understand in more detail. So let's take care of them. First, in the old shields from the houses built by the USSR there was no such thing as a "dedicated capacity". The food of the apartments in this case is single-phase. Usually in such a shield stood:
- Bucket (breaker) in front of the counter to turn off the general power of the apartment. It can be in the form of a rotary switch, which it is better not to touch: they, if rotten and lost the strength of the case, beautifully explode when trying to turn them off, or a huge switch immediately at all to the entire floor.
- Counter - with it everything is clear. Most likely it will have to be changed, since it will be of low-grade precision and single-rate.
- Collective RCD (in houses built in the 90s and 00s) to ensure the electrical safety of the apartment.
- Group feed line automata. The standard set of these machines: 16A to the whole world of the apartment and usually the outlet of the bathroom (in the bathroom-toilet-kitchen block), it is powered by the line of light; 16A on all sockets in the apartment and, if the house with electric stoves, then from 25 to 40A on an electric stove.
And most importantly - what is there no PE protective conductor (previously it was called "grounding"). Our task in the remaking of electricians is to bring our part of the floor panel into the proper form. Again we disassemble everything by the points.
1. Split the riser into PE and N. So, first, you need to figure out whether you can go to full-fledged three-wire or not. In the Rules on this subject, the following is written. We can divide zero by PE and N only if its cross-section is at least 16 sq. Mm, if the riser is aluminum, or at least 10 sq. Mm, if the riser is copper. This rule is dictated by a completely banal consideration: if there is an accident with a phase closure on the housing, the riser must withstand a certain short-circuit current, until an introductory or group automatic machine is established and the emergency line is turned off. In this case, the riser must withstand this short circuit: if the riser zero burns out, the accident will be larger and in two variants. Option one: the zero riser will burn out, and in a part of the apartments it will reach 380 volts of power. This is fraught with burn-out of a part of home appliances and, possibly, a fire: for example, some kind of small charge for a cellular in a plastic case can catch fire. Option two: those who have similarly connected PE to zero riser, on the cases of all devices will be the phase. Watch for manipulations: the phase went through the electrical appliance, returned to zero. By zero returned to zero riser, which has no more contact with the riser. To zero the riser we have PE connected. The phase joyously rushes through the PE to all grounding contacts of the sockets. Hello, death.
Estimate the possibility of separation as follows. If the house with electric stoves - then with a probability of 95% you can safely connect PE to the zero riser and enjoy life. If the house is with gas - then with a probability of 80% the riser will be very feeble and it can not be used to connect PE. In this version, the shield is assembled as usual, with RCDs and diphas, and the protection works in fact: it strikes someone with a current, and the RCD is immediately disconnected. On how to perform this separation, I'll write a little later.
3. Taps from the riser. It is necessary to audit the bends themselves from the riser: whether they have a normal length and a section for connecting the input automaton, or not. In very old houses, the packages were generally connected by a loop, and this connection must necessarily be remade!! A good tone is usually the installation of new nuts (or other clamps) on the riser pipe and the organization of its own taps.
2. An introductory machine. As I wrote above, there was no specific dedicated introductory automaton. If your house is relatively fresh - you will still find it. In this case, you put a new one of the same value as the old one. And in case there is no introductory machine, you can call a local electrician, an engineer, to contact management company and try to figure out its value. Reasonable denominations should be as follows:
- 25-32A for houses with gas (a frail riser);
- 40-50А for houses with electric stoves.
The exception is the intermediate series of houses with electric stoves, where the machine on the stove was 25A, not 40A. The stand is still frail there, and in this case it is not recommended to overstate the value of the introductory machine; it can be selected in 32A.
3. The counter. Most likely you will have to refinish or change the counter, because you will need to replace the old aluminum wires that are suitable for it. For this, Energosbyt is called up: you need to call them and tell them that you want to replace the counter or that the seal on it is broken (you can say that everything was smoking, they called an emergency, it came, ripped off the seal and reconnected the connection to the counter - and now it needs to be done again to seal). Usually this does not cause problems: comes a little aunt or boy, put a seal and go.
4. Fire RCD. This is an RCD with a leakage current of 100 or 300 mA. Its task is to protect your apartment shield and the lead-in cable to the apartment. The idea is the following: in the event of a fire (or other emergency) in your apartment or floor hall, the insulation of the lead-in cable or one of the wiring cables deteriorates. This RCD responds to a large leakage current and disconnects your apartment. Therefore, this RCD, if you put it, must stand in the floor panel: in the housing shield it will have nothing to protect.
5. Cable entry to the apartment. Since we make a new flap in the apartment, we need to throw out all the old group machines and lay a new cable into the apartment. Usually, for this purpose, an ordinary plastic box is used, which is nailed in the floor of the hall. Up to a heap in this same box it is convenient to lay and input of a weak point. There is enough box of 40x25, but you can also build something like 60x40: neighbors can also come in handy. The input cable goes directly from the floor plate to the apartment
And now we will discuss some points of this whole alteration.

A) Connecting the PE to the riser. Usually in all shields, zero has direct contact with the body of the flap, as shown in the photo to the left. Pay attention, this time I got a very good example: the zero of the riser is clamped with a small shyboy, and the body of the shield is not even cleaned up - who can say what quality is contact there?
Therefore, it is highly desirable to get rid of the excess connection on the PE path and connect directly to the zero riser. And this connection must be made by a separate clamp; It is not possible to plant a working zero tap and pull PE out under one screw for safety reasons.
If you want to do good to neighbors, then you can take a piece of wire in 10-16 sq.m., take a metal shine (for example, an ordinary brass rod), screw it with some metal screws to the body of the shield (let it have contact with it) , and to bring on it the above-described wire from under the nut. Note that this is exactly what is done in homes like P44 with electric stoves, here is an old photo:. On the top of the shield is a "shinka" in the form of a welded bar with screws. And from the stand nut to it goes the wire. In this case, you can use it directly without additional inventions.
B) Taps from the riser. Now the requirement for them is the following: for each introductory machine - their own taps. Here's another photo from the old photos:. Here, four entrances to four apartments are gathered together under one nut. That's the right decision. If you can not sort out all the floor boards at once (and that would be ideal: to cooperate with neighbors, to throw out the entire stuffing, sew two or three DIN-racks in the guard and put up-to-date machines), then make two personal outlets directly from the riser.

And here is a living example of such hilling. It was a Moscow shield, quite clean and neat. We called the ZhEKovsky electrician, who did everything necessary: he put two separate nuts (N and PE) on the riser zero, and a new branch was taken from the third phase of the riser by a third nut. It remains to add an introductory machine and a fireproof RCD - Profit!
So, in words, ideally you should get the following scheme:
- Taps from the riser, separation of PEN into PE and N;
- Introductory machine;
- Counter;
- Fire RCD;
- Cable entering the apartment.
Dare!
If you are interested in the information from this post and you want to contact me (or order /), then write to me at the post office or call +7-926-286-97-35
. I respond to the name "Electroshoman".
Inattentive, stupid and insolent prodavans and managers, I will stiffly stub, if they do not look in, but rather rush to call.
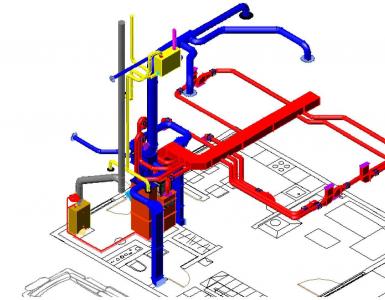
Electrical shield…. What is it? This is the beginning of the entire electrical part of the building, and no matter what it is, a huge factory in a megacity or a modest grandmother's house in the village. Everywhere there is electrical shield.
In this article we will get acquainted with the most common electrical panels that can be found in everyday life. For example, let's take the most common apartment building.
So, where does the electrical part of the house begin? Depending on the project, from the power that is supplied to the house, the electrical part begins with an electrical panel. In the electrical panel, there may be an ASU (input / distribution device) or a main switchboard (main switchboard). It is these installations that receive power cables from the transformer substation (TP).
In the main switchboard and the ASP are introductory circuit breakers or switches with fuse-links. Further, after the introductory machines there are waste automatons that feed the standoff cables. Also in the Main Switchboard and the ASP are the meter, automatic switches and automation for lighting the front doors, the street, the basement and the utility rooms. Also, the lighting board (SHCH) and the emergency lighting panel (SCHO) can be installed in each front door (entrance) individually.
In each parade, on each flight of stairs installed floor switchboards. The floor boards (SHCH), depending on the project, are equipped with electricity metering devices (meters), pre-account automatons, outgoing machines for protecting electrical wiring and consumer equipment.
Most of the floor electric boards are arranged approximately equally, and consist of 3 main parts: subscriber, accounting and low-current parts. In the subscriber part of the electrical panel there are automatic protection devices and an input RCD (protective shutdown device), in the part for accounting - a meter, in the low-current part there are television and telephone cables, the Internet.
In modern floorboards (SHE), the subscriber and accounting sections are combined into one common compartment.
Recently, during the repair of apartments, most apartment owners equip themselves in their apartment, a separate distribution board. On the stairwell, in the floor electric board there remain only the metering device and the introductory machine. What is the advantage of an apartment switchboard?
In most apartments, no matter when they were built, according to the project, the entire electrical part of the apartment is divided into two or three group-group lighting, a rosette group and a group for lighting the bathroom and kitchen. These same projects were typical in the 70-90's. They use these projects to this day, without taking into account the fact that the load on the rosette groups is not the same as before.
Almost everyone who bought an apartment in a new building or who makes repairs in the old fund, produce a full one for a new one, and accordingly the number of automatic machines increases to 10-20 pieces, depending on the number of consumers.
Not particularly going into the electrical layout of the apartment layout, consider the most common variant of the shield for a 2-3-room apartment.
1) The input automaton is 32 A
2) Room lighting - 10A (16A)
3) Corridor lighting - 10A
4) Lighting the kitchen, bathroom - 10A
5) Sockets kitchen - 16A (diff. Automatic)
6) Oven - 16A
7) Boiler electric - 20A
8) The conditioner №1 - 16А
9) The conditioner №2 - 16А
10) Washer - 16A (20A)
11) Sockets number 1A 16A (differential automatic)
12) Sockets socket # 2 16A (differential automatic)
13) Sockets socket # 3 16A (differential automatic)
Electric boards can be configured in different ways, depending on the qualification of the electrician (most often the customers trust the distribution of loads to the installer, since the project for the apartment few people does), from the wishes of the customer.
Many electricians, in order to save the customer's money, put one common on all rosette groups, and the outgoing rosette groups themselves protect automatic switches. In addition, in switchboard there is a "zero" bus and a "ground" bus.