How to put a mixer in the bathroom. Simple homework - install faucets
Assembling a bathroom faucet and its subsequent installation is a sufficient simple task that any adult man can handle. We want to consider the components of the bathroom faucet and describe the rules for their assembly, installation and connection.
Types of mixer designs

In the bathroom, as in other sanitary or household units of any modern housing, hot and cold water supply is used.
As you know, the temperature of hot water is high enough, cold water has a very cool temperature, and for most needs, a medium-temperature fluid is needed, which will allow for normal hygienic or economic procedures.
To obtain the flow of required heat, mixers are used which allow mixing of cold and hot water in the right proportions.
We are talking about the bathroom, so we are primarily interested in the possibility of taking a bath or shower, washing hands, washing, etc. This involves the presence of a mixer, which can provide a fine-tune the operation of the crane with minimal effort from the user.

In addition, it must be taken into account that at least two types of sanitary ware are possible in the bathroom, since the water intake points are also almost always two - a bath / shower and a washbasin. Sometimes, of course, there are devices serving both these points at the same time as the gander of a tap, but this is more of an exception and an example of how to do it is not worth it.
So, in the bathroom can be installed mixers of two types:
- Washbasin unit. They have two entrances (hot / cold water) and one outlet (gusak tap). Designed for installation on the hole in the side of the bowl of the washbasin, less often - for wall mounting;
- Devices for installation in a shower cabin or in a bath zone. They have two entrances and two exits: one on the gander of the crane, the other on the shower head. Sometimes, in addition to the tap and shower, there is an additional watering can with a flexible hose. Can be mounted on the wall (most often) or on the side of the bath.
Important!
Mounting the mixer on the sink and the side of the bath does not have any significant differences, so it only makes sense to install it on the wall and wash it as examples of various works.
Also it should be remembered that mixers within each type are divided into a number of subspecies, moreover, each manufacturer uses some of its constructional developments and solutions. Nevertheless, these designs do not fundamentally differ, and their installation, respectively, too.

Important!
We will consider common models, the assembly and installation of which reflects general rules similar works.
Installation work
Wall-mounted shower mixer

To service baths and showers, wall-mounted mixers are most often used.
This is due to a number of advantages and features of this type of installation of sanitary ware, among which you can note the following:
- Easy installation, maintenance and replacement of the device. The product is fixed and connected by only two union nuts, which greatly facilitates its installation and dismantling;
- When connected to the water supply, there are no flexible hoses that have always been a weak link in any system;
- There are no hard-to-reach areas or hidden communications, which are often observed in the designs of mixers built into the bowl.
Consider what constitutes a bathroom faucet with a wall mount.

In the diagram, we see an ordinary two-valve case, into which the crane-axleboxes (3) for hot and cold flows with flywheels (4) are being twisted for control stop valves. Streams of water are found in the middle, where there is a switch-divertor (8), which directs the total mixed flow either to the gander (7) or to the shower head hose (16).
On the back of the housing there are two inlet openings, which are located opposite the jacks for mounting the crane-book. On the branch pipes there are union nuts with gaskets (1), due to which connection is made.
Important!
The distance between the inlet holes on the body of the device is not regulated, so the final pipe connections must be pre-positioned at the correct distance, which depends on the mixer model, but is usually 150 mm.
So, let's look at how to assemble a bathroom faucet with a wall-mounted installation with your own hands:
- Check that the water outlets are at the correct distance (see the drawing of the bathroom faucet that we purchased), and also located on the same level;

- We take the body of the product, we twist the crane-axle boxes with lambs, the divertor and install the gander. All connections must be provided with rubber or paronit gasket seals. For the correct assembly, use the manufacturer's instructions;

- We take adapters-eccentrics 1 \\ 2 - 3 \\ 4 ˝ and wind the thread on the thread from the pipe side clockwise. Then we apply the sealing paste and twist the parts into the pipes, tighten the key and set them according to the distance;

- We screw on the thread of eccentrics so-called. reflectors - decorative lining, hiding the place of connection;

- Apply the mixer, put on the union nuts and tighten them first to the stop with your hands, then with the adjustable wrench. We tighten without fanaticism, so as not to transfer the rubber seal;

- We connect the shower head, fix the shower bracket with dowels;

- Turn on the water and check the operation of the device.

Important!
Connections equipped with union nuts and rubber seals, wrap the pack or tape FUM should not be.
Onboard mixer

Now let's talk about installing the on-board model, that is, one that is fixed on the side of the bathroom or the sink. There are many models here, which have very different quality and price, but the installation principle is approximately the same.
First, it is desirable to assemble the body: install valves and valves (switch knob for single-lever models), and also fasten the gander. Then from below it is necessary to connect the hoses and insert the rubber gasket.

Now pass the hoses into the mounting hole and insert the base of the mixer into it. On the other side of the sink screw the fastening nut or clamp, tighten the fastener so that the device is firmly on the board.

The return ends of flexible sub-assemblies are connected to water pipes. We do not confuse hot and cold water, on imported and most modern Russian cranes cold water on the right, hot on the left.

Important!
Connect flexible hose connections gently and do not overtighten.
Otherwise, the gaskets can be pinched and damaged.
Conclusion
Installing a faucet for a bathroom or a shower is easy. Knowing the rules of installation and the stages of work, you can easily cope with this task, and the video in this article will help you not to be mistaken.
In the implementation there is a huge choice various mixers wall installation. But they all differ only in design, in terms of technical specifications there are no fundamental differences. This greatly simplifies the installation process, makes it possible over time to replace old models with new ones without a large amount of additional work. In the article we will consider examples for all occasions: repair of outdated communications for new faucet, the dismantling of the old and the installation of a new one.

The quality of the adoption of water procedures depends not only on the correct installation, but also on the choice of the installation site and the concrete mixer model. If you already have an outlet for the socket outlets, you can not change the location. This issue must be solved at the stage of repair of the premises. The choice of the mixer should be approached in a balanced manner at any stage. In order to help in making the best decision, we give brief comparisons of the mixer varieties and their performance characteristics.
![]()
| Parameter name | Operational characteristics |
|---|---|
| Mixers for bathrooms can be made of bronze, brass (the most expensive options) and silumin. To protect against corrosion and improve the appearance of the surface can be nickel plated or chrome plated. If you choose expensive device options, you should consider their weight. This means that all fittings must be chosen from strong metals, the widely used silumin in these cases is not suitable. This material has an extremely low resistance to fatigue cracks, with prolonged exposure to even minor loads, will necessarily give a crack. The weight of mixers made of strong alloys silumin fittings can not stand, keep this in mind. |
| Can have two cranes or be operated by one. The second option is inside the cartridge, the performance of these elements does not always meet modern requirements. Do not buy cheap mixer options with Chinese cartridges, do not create for your own money additional problems. The most reliable is a mixer with two ordinary cranes. By the way, such mixers are very easy to repair yourself. |
| It can be fixed to the wall or on a special stand on the case. There are universal options, the watering can be installed both on the wall and on the mixer. Keep in mind that to fix the watering can on the wall you will have to drill additional holes for attaching the bracket. |


Experienced plumbers recommend installing faucets with two valves of medium price category. Such devices work for many years without repairs, while the quality of water for the duration of operation has no influence. And the water in domestic homes is far from ideal.


Installation of a new mixer in the bathroom on the wall
Let's start with the simplest version: the algae are made, the distance between them is standard 15 centimeters. Horizontally, the conclusions are approximately at the same level. All small errors can be eliminated by adjusting the eccentrics.
Step 1. Check the completeness of the mixer. There must be all elements of the device, eccentrics and seals.


Step 2. Turn off the water, remove the plugs from the sockets. Clean the threads, remove any dirt. If plumbing has not been connected to the pipes before, they should be washed. To do this, put a water collecting tank at the bottom, cover the sockets with a cloth to prevent a strong horizontal jet and completely open the water tap. Strong pressure will remove from the pipes all dirt and foreign objects. If this is not done, then during the use of the bathroom it will be necessary to disassemble the mixer for cleaning.

Step 3. Wrap the eccentric FUM tape.


We strongly recommend using a tape, not a traditional pencil. It perfectly holds water, for reliable sealing threaded connections there is no need to tighten them much. Above we have already mentioned that eccentrics from silumin negatively react to great efforts. But the tape has one unpleasant property - it can only be used once. If you have not tightened the sealer, then you can not get old. It is completely removed, and a new material is used for sealing.


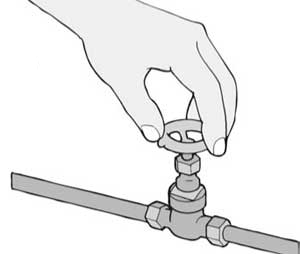
Application of plumbing paste on linen


To find out the approximate amount of the wrapped tape, screw the eccentrics into the thread without the seal. See if there is a large gap between them, how much they stagger. If the screwing is normal, then it is necessary to wind 5-6 rows of tape, if the eccentrics noticeably stagger, then rows 10-12 will be required.
How to install eccentrics correctly? This is a very important point.

Important. Never install mixers with force, we have already said that silumin will necessarily crack over time. There will be leaks, will have to deal with repairs. In addition, the cracked eccentric can completely break off, part of the thread remains in the socket. It is very difficult to get it out of there. We'll explain how to do this below.

Practical advice. Often there are situations where the length of the threaded part of the eccentric is so large that it does not close with decorative caps, you see a gap between them and the wall. It's very ugly, do not let this happen. Before beginning installation, tighten them without a sealant, replace the decorative caps and press the mixer. If there is a problem - shorten the thread. Do this carefully, cut the thread only at right angles to the axis. Be sure to correct the first coil with a triangular file. To check, run the thread with a nut with a suitable diameter and pitch. Ideally, the eccentrics should be tightly pressed against the wall by the nuts securing the mixer.

You can meet other recommendations for leveling the mixer. Screw it to the eccentric, put on the body level. Then rotate the key one of the nuts, due to the fact that the body is attached, through the lever, both eccentrics will rotate at once. We do not recommend using this method. Why? First, it takes a lot of effort to turn the nut to rotate two eccentrics at the same time. This can not be done, we have already mentioned why. Secondly, this nut can cut a rubber gasket, we also talked about the consequences. And, thirdly, thread with FUM-tape can not be twisted, it can only be tightened. Otherwise, there may be a leakage failure.


Features of installation of mixers on the open water supply system
Mixers in the bathroom can have a hidden or open connection of cold and hot water, the latter option exists in houses of old construction and at the present time is almost not used.

In addition to problems of an aesthetic nature, external wiring has a very significant drawback: condensate is constantly accumulating on cold pipes, often so much that drops fall on the floor and furniture. Such phenomena do not decorate the bathroom, we do not recommend installing mixers on open wiring. If you have such a variant of engineering networks, you should not be too lazy and hide the pipes.

There is a lot of work to be done, there will be a lot of noise and debris from the walls, you have to deal with plastering or other finishing works. But the end result is worth it.

On open pipes condensate will accumulate
The technology of installing a mixer in the bathroom on the open water supply system differences from the above does not. The only thing is to check the strength of fixing the sockets of the pipelines. They are fixed by dowels, often the length and diameter of the hardware is selected without taking into account the loads.
And another tip. It is not necessary to mount in this way heavy mixers, plastic fittings are not designed for heavy loads.

How to replace a broken eccentric on a mixer
We have already mentioned repeatedly that the quality of the eccentrics is far from desired, in connection with this, the appearance of leaks due to cracks is quite common. The same problems can arise when replacing the old mixer, when they unscrew old adapters they crack.

How to minimize the likelihood of unpleasant situations?
- Do not use excessive force when unscrewing old eccentrics. Keep the key in the closest proximity to the thread, rotate it in a strictly circumferential manner, do not allow any pressure on the sides.
- With your free hand, press the eccentric, "drown" it in the thread. During the screwing, the resistance force should gradually decrease. If this does not happen and with each turn it is necessary to apply increased efforts, then tighten it a little and start to unscrew again. Move the key to the left to the right, gradually increasing the twisting.
- If you change the eccentricity due to the fact that they are slightly cracked and allowed to leak, then you need to exercise increased care and not allow complete breakage. Press the free end of the element against the thread, very slowly unscrew, do not allow any distortion.
Unfortunately, not always these recommendations help to avoid breaking off of eccentrics, often the threaded part remains in the socket. It is quite difficult to unscrew it from there, but it is possible. The work is much easier to do if the FUM tape was used for sealing instead of the tow. During the sealing of threaded joints by means of a tape, unlike a pack, it is not necessary to tighten the eccentrics with great force. Accordingly, twisting them is much easier. This is another reason for using such a sealant.
There are two ways of unscrewing the threaded part of the eccentric from the socket.


The first - using a hacksaw blade for metal.

Step 1. Carefully cut with a hacksaw groove in the broken thread. Do this very carefully, try to minimize the thread in the socket and never cut it completely. If the groove will damage the thread to the full depth, then there will definitely be leaks.
To ease the work, break off the end of the hacksaw blade without the teeth. Note that during the sawing, the teeth are facing towards you, and not vice versa.
Practical advice. The work will be much easier if you have a good hacksaw. Never buy a canvas on which only the teeth are black, and the rest of the metal is white. Due to staining, manufacturers only mimic the hardening process, the hacksaw does not have the required hardness. The fact that the canvas can be heated by heating with an open flame or currents of high frequency. Both technologies are possible only with the heating of the whole cloth, and not just a narrow strip of teeth. To heat high-frequency currents part of the canvas is impossible by physical laws. And when the flame is heated only by the teeth, it is impossible to withstand the hardening regimes.
Step 2. Try using a screwdriver to break off a broken piece of thread and slightly loosen it. If it is not possible, cut the second groove in the same way in the same way.
Step 3. Remove the sawn strip, it will have to be broken off. We have already said that it is forbidden to completely saw the thread on a broken piece. Pull it with the tip of the screwdriver and try to bend and remove the hammer. Silumin, from which the eccentrics are made, the metal is fragile and after several attempts will retire.
Step 4. With the tips of the pliers unscrew the broken piece, it should easily exit. Clean the thread in the socket of the sealant residues, check the condition, drive it with a new eccentric.
This way of removing the fractured part is quite laborious and unsafe - there is a high probability of damage to the thread in the socket.
Video - Broke the eccentric. How to pull it out?
Step 1. Choose any metallic tapered object with sharp edges, the width of the faces should be equal to the internal diameter of the broken threaded part of the eccentric. A large triangular file is great, if it is not, then you can cut out such a device from a steel strip with a Bulgarian. By the way, it is always useful to the home master.

![]()
Step 2. Insert the smaller tapered part into the hole and push it forward until the sharp edges are taut in the body of the thread.
Step 3. Hammer neatly tap on the reverse side, the edges should be made in the metal small grooves.
Step 4. With one hand, press down on the free end of the device, and the second slowly start to unscrew. You can use any suitable keys or pliers. The main thing is to move the thread from the place, after that it is unscrewed easily.
This method allows you to maintain the thread of the socket in the integrity, re-tightening the eccentric is not a problem. And you can not worry about tightness, everything will be fine.

These types of devices can only be mounted on solid bases. If the walls are finished with lining, plasterboard, panels, etc., then the mixer can not be installed on them. Consider this feature even at the stage of repairing the bathroom. If you are doing major overhaul of old premises, then immediately heat the cold and hot water supply pipes. In doing so, several conditions must be met.


Video - How to install a mixer in the bathroom on the wall
After finishing construction works on the finish of the bathroom, the task of mounting the mixer becomes actual. The main purpose of this unit is the mixing of cold and hot water. Actually after the installation, the mixer should evenly mix the water. At the outlet, you get the optimum flow of water that meets your requirements.
If your bathroom faucet has stopped functioning properly, then in this case you need to adhere to a special strategy. Beforehand it will be necessary to implement dismantling of the old mixer.
![]()
Preparatory work

Before installing the mixer in the bathroom, take care of purchasing a set of locks, a new water mixing mechanism, you will also need a sealing tape and a wrench. After all the above set of tools and consumables is purchased, you can turn off the water and use a wrench to unscrew the union nuts that hold the mixer to the main. After removing the mixer, look inside the conductive pipes. Remove from the outer and inner parts of the pipe all objects that may impede the capacity. Now you can move on to installing a mixer in your bathroom.

Stages of mounting the mixer in the bathroom

It is important to take into account that the supply cold water should be on the right, and hot on the left. The installation height of the mixer from the floor level should be 600-800 millimeters.

After the completion of the preliminary work, you should start screwing the eccentrics. It is important to maintain 150 millimeters between the inlet fittings of the water main. In case of error, use the transitional eccentric. The sealing material must be gently wound around the eccentric threads and screwed into the inlet fittings.

At the next stage, the mixer body is screwed. Be sure to check its horizontality. The fixing nuts must be twisted without applying excessive force. In order to hide the place of connection of the mixer to the water main, you must fasten the decorative cups. To avoid water leaks, seal the gasket after installation. Now you can carry out the final installation of the mixer. Tighten the fixing nuts for more reliable grip. Try to do the job neatly. To avoid damaging the chrome plated mixer cover, before tightening the nuts, place a soft cloth under the sponge of the key.

Check your work, you can by supplying cold and hot water in the main. If there is a leak, then tighten the nuts slightly. For a good example, see the video of the mixer installation.

The next step is to set the gander by. You just need to tighten the nut with the key. Also note that before installing the hose of the watering can to the body of the mixer, you must first install the gasket. The watering can be screwed to the hose by analogy.
Each of us has faced such a problem as a mixer replacement. This can happen due to the wear and tear of the old one, or if you are doing repairs and decided to install a new crane.
You always have the option to invite a specialist who will install you, but you will have to pay for this service, but you can install it yourself, and you can spend the saved funds for other needs. The installation of the mixer is not so difficult.
In this article, we will describe in detail how to properly install a mixer in the bathroom and present a video instruction on this topic.
Now there are two main models of mixers - they are lever and valve. Each option has its own advantages and disadvantages:
- Leverage- very easy to use, but adjust the water temperature is very difficult, especially when you have hot water comes from a boiler or gas column. Also very frequent problems with the shower switch.
- Gate valves- This model is familiar to everyone. Plus, these mixers - more accurate adjustment of the water temperature, as well as a more durable shower switch. The disadvantage is the valves themselves, or rather the fact that because of them very often drips from the gander and frequent replacement of the gaskets is required.
There are other models, more of which you can learn on this one. If you want to know how to choose and install a bathroom faucet with a shower,. Also when choosing a bathroom faucet pay attention to the following nuances:
- The coating of the mixer (chrome) should be ideal. Any defects in the coating will further accelerate the destruction of the coating and spoil the appearance of the mixer.
- Must be heavy, then it is made of brass. Only made of brass mixer durable.
- Check the equipment.
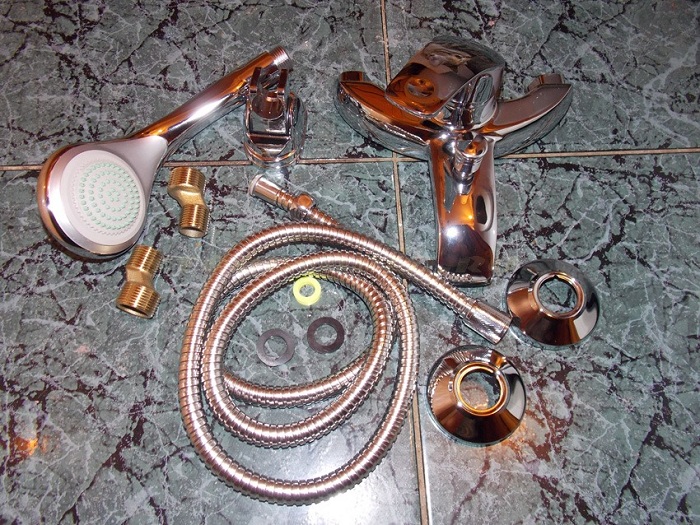
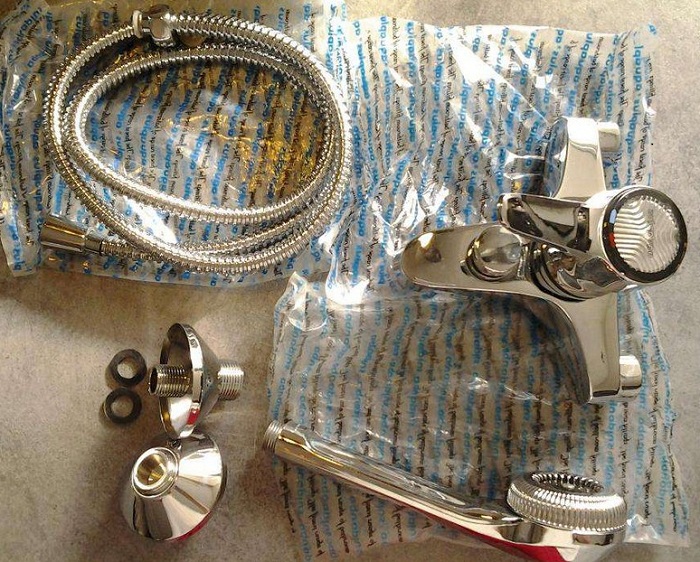
The following parts are included in the complete set of the mixer:
- The body of the mixer;
- Gander;
- Going under the shower;
- Decorative ceiling;
- Watering can;
- Shower hose;
- Gaskets;
- Wall mount (if the valve is a lever).
Even the most reliable mixer can allow leakage if improperly installed or used for a long time. Find out if and if this is possible.
Did you know that there is a mixer with a water sensor? More about it, its advantages and disadvantages.
Preparation for work
You will need the following set of tools:
- Adjustable wrench;
- The gas key;
- Fum-tape - fluoroplastic sealant;
- Drill;
- Hexagon No. 10;
- Roulette.
A wrench is better to use the second number, you will be much more convenient when installing. Drill, if you have to install a wall shower fixing. You can also rewind the paste with a special paste, but for a beginner it will be easier to work with a tape tape.
When installing the mixer, in fact, only one side of the eccentric is needed to be rewound, which is screwed into the corner in the wall, and everything else is assembled strictly on the gaskets, and the rewinding in these connections will not help at all.
Installation instructions
- We overlap the water.
- We fasten the eccentrics.
- We put on decorative plafonds.
- We fasten the body of the mixer.
- Mount the gander.
- We install the transition to the shower hose.
- We fasten the shower hose and watering can.
- If you want to attach a shower attachment to the wall.
And now consider each step mounting the mixer in the bathroom with your hands in detail.
Most people have the most problems with the first item. Well, if you had before the mixer, which broke down and you just change it. Then you have everything ready you just need to screw the mixer body and everything.
If the installation of eccentrics is required, then we rewind the tape with a half inch thread, wind the seal strictly clockwise and make from 4-10 turns it all depends on the thickness of the fuma you acquired.
After that, screw into the floor an inch corner, which is hidden in the wall. By twisting it with a gas or a wrench, eccentrics are installed so that the distance between the centers was strictly 15 cmso that the mixer can easily be screwed.
If you have the screws fastened during installation, then you have done well. If the nuts are tightened with tightness, then this promises major problems. At some point, a nut or brass sleeve will burst, which holds the nut, so that better to correct the eccentrics.
Now you can open the water and check to see if we have any leaks. If everything is OK, then we continue the installation. If not, then you need to fix the problem.
After installation of plafonds, we screw the mixer body. To do this, in the nut on the body of the mixer, inserts gaskets, and screw the nuts to the eccentric.
 First tighten the nuts by hand, then tighten the nut with a wrench, making 1-2 turns. Strongly tighten it is not necessary, otherwise you can cut the gaskets and then you will have to install new ones.
Now we screw the gander to the body. It is screwed only by hand and the keys are not used. To do this, with effort, we press the gander into the hole intended for it, and then the nut can easily be screwed.
If there is a leak from under the gander, it is no use to tighten the key with a draw-off or gas, we must produce replacing the gander with a new one.
Further we make installation of transition under a shower hose which also serves as a fastening for it. It is screwed by a three-quarter nut to the hole from above on the mixer. Preliminary having enclosed in a nut a lining, wind and tight tight from the hand.
 What to do, if ? Learn all about the causes of the problem and how to solve it.
What are the attractive tap water heaters Aquatherm, Delimano and others and why they are chosen instead of traditional mixers? Find out,.
With lever mixers, some older models may have a special tee transition (moon) for connecting shower hoses. It is mounted between the gander and the body of the mixer.
To the shower we screw the shower hose. To do this, in the nut on the hose we put a half inch gasket and tighten by hand. If required, you can pull up a little key.
 To the hose we screw the watering can, without forgetting to install the gasket into the nut on the hose. We twist it strictly by hand.
On the shower hose, the nuts are different in form - elongated, conical, and the other is standard. The cone nut is screwed to the watering can, and the usual nut to the mixer.
And the last - install wall mount wall. Only the lever cranes are equipped with the fastening. In the faucet mixer, the watering can is located on the mixer.
Take a look at the process of installing the mixer in the bathroom with your hands in this video:
Important details
When twisting the nuts with a key, be sure to place a piece of a rag between them, so you will not scratch the mixer. If the mixer is damaged, the key to it automatically disappears warranty.
Before installation, tighten hexagon # 10 brass plugs on the mixer, which are pressed ¾ body nuts.
Install the mixer in the bathroom yourself - not a very complicated matter, the main thing is to carefully and carefully perform each item when installing the mixer. As a result, you will enjoy a new mixer on the wall, which you could install yourself.
Bathroom repair is not only the overhaul of walls, ceiling and floor, replacement of sanitary ware and communications, but also installation of a mixer. You can replace it or install it from scratch, the essence of the process does not change, the difference is only in the algorithm of actions.
To avoid complications with assembly and disassembly with installation works, it is better to get acquainted in advance, from what parts it consists. If the involvement in the repair of specialists is not included in your plans, then the advice of our experts, like in the bathroom on the wall to install a mixer, will help you understand this.
As visual materials, photos and video instructions are attached to the article.
What does the mixer consist of?
Before you dismantle and install the plumbing, you need to understand how it looks and what parts it consists of. In addition, knowing how it is staffed, it is possible to avoid unscrupulous sellers. The packaged bathroom faucet consists of the following elements:
- Housing. Its standard scheme is as follows: two nozzles for supplying hot and cold water, two sockets and spouts;
- Shower hose. This part of the system that connects the mixer body to the shower head (nozzle). Since this part - the most often failing, it is not recommended to save on it.
The choice of shower hoses is huge: from plastic products with metal winding, to advanced models with anti-twisting protection and a silicone layer on metal braid.
- Shower head (also called a shower head). Shower heads from the most simple with two or three standard modes, up to half a dozen functions for creating a soft aerated, massage or jet jet, "economy" mode and many other nice shower possibilities.
- Eccentric. This kind of shower adapter is of an elongated, rounded shape, one end of which is attached to the mixer and the other to the pipe. The length and size of eccentrics is individual for each model.
- A gander, called a spout or a twist. The most common models of gander are J, C and G-shaped.
- Decorative ceiling.
- Rubber or silicone gaskets.
Nuances for installing a mixer in the bathroom with your own hands video
However, the check of the assembly is not always enough, because to ensure complete confidence in the absence of the marriage of the purchased goods, it is necessary to verify the integrity of the threads of eccentrics and fixing nuts. Assembly instruction is included in the complete set of sanitary ware. It is quite easy to assemble and disassemble it, you can see this by looking at the video tutorial on the assembly.
Criteria for choosing a bathroom faucet
How to install a mixer on a wall, what are the most common methods? Firstly, it is a replacement of the old one, and secondly, installation during the repair.
In order to replace the old plumbing with a new one, it is necessary first of all. It is not difficult to do this, as today's product range offered by sanitary ware shops gives an opportunity, taking into account financial possibilities, to choose a model of both domestic and foreign production. Below are the characteristics that you should pay attention to when buying:
- The weight. Even if you are not a specialist and can not distinguish stainless steel from brass, the quality of the product can be determined by its mass. Too light a product testifies to its small thickness and fragility of the device.
- Metal. If the consultant in the store offers a choice of silumin and brass mixer model, give preference to the second one. Silumin does not have high strength, its composition is an alloy of silicon with aluminum, its products have a minimum weight and can be deformed during installation.
Many beginners make a standard mistake, choosing products from it because of the low price. The highest viscosity of the alloy is provided by brass models, which do not allow the clamping nut to burst under easy deformations and installation. In addition, brass instruments are less prone to corrosion.
- Dimensions. This characteristic refers not so much to the dimensions of the mixer as to its correspondence to the installation site to the wall in the bathroom. If the model is incorrectly selected (too long or short, massive or, conversely, a miniature tap and other inconsistencies) or does not correspond to the mounting location, it can not only look ridiculous, but also quickly fail.
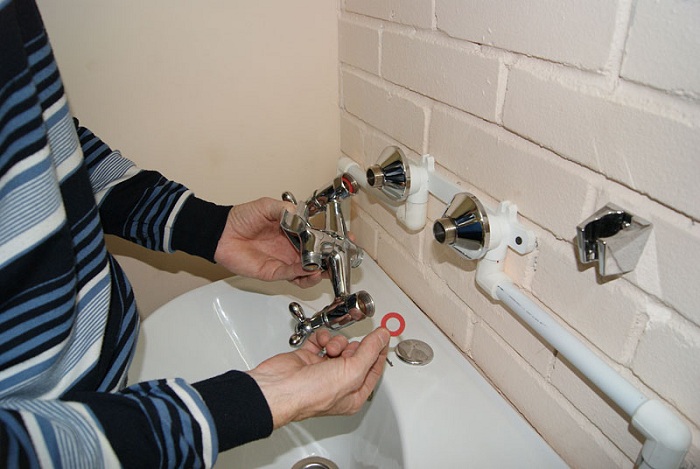
Dismantling of the old mixer
Remove the old mixer in the bathroom - the task is fairly simple. To do this you will need pliers and keys - gas and drawbar. Dismantling is performed in several steps:
- Shut off the water supplied both on the main line, and from the electric boiler or gas column;
- Lower the water remaining in the system;
- Remove the tap from the wall. Do this with extreme care, trying not to break the thread of the fitting in the wall;
- Clean the thread on the plastic pipes in the wall from the winding.
Mounting the mixer
Installation of the faucet in the bathroom with your hands is as follows. Pre-connect the body with a shower hose, watering can and gander. Such manipulations are possible even without a tool, because the process of how to install it yourself does not present any complexity.
For direct mounting we will use the so-called foamed tape, a special semi-transparent sealing material, although in the old way one can use an ordinary pack with sealant or ordinary sunflower oil. The level of screwdriving eccentrics we verify with the help of a building level - this is perhaps the most difficult task when installing a mixer in the bathroom.
For screwing on metal-plastic pipes on the wall of eccentrics, we wrap them with a ribbon or a pencil. Usually the distance between the holes in standard models is 15 cm. If for some reason this distance has been violated, eccentrics will help to remove the imbalance.
After that, you can proceed with fitting the mixer body. If the hull becomes easy, the eccentrics were installed correctly. Now it is necessary to remove the body and screw the decorative ceiling. At the same time, make sure that they are as close as possible to the wall.
Installation and installation of a mixer in the bathroom with your own hands video
We fasten the case. When installing it, there is no need for additional use of winding, since its function is performed by the gaskets that come with the device. We tighten the nuts with the key. If the tightening is done correctly, the key should make a creaking sound. To sufficiently tighten the nuts, start the water, and pull as long as necessary to stop the water from dripping. Now you can connect the gander and shower head.
Mounting the mixer on a bare wall
When installing it on a new wall, tiled with tiles, you need to do the following:
- Check the distance between the central parts of the fittings. If strictly parallel, it should be exactly 150 millimeters.
- The end of the fitting must be flush with the tile.
- The height of the mixer above the bathroom should be at an acceptable height, with the criterion of the installation level being the side of the bath.
Mounting Tricks
Knowing some of the nuances will help you cope with the task no worse than an experienced master. Here are some of them:
How to install a faucet in the bathroom if the pipe on the wall curves the video
- Proper use of the patch is easy, to do this, wind it thread tight in the direction of tightening. Be careful not to twist the tows into bundles.
- When installing sanitary ware together with water pipes, you need to perform the height markup. It is from 15 to 20 cm above the upper side of the bath.
How to properly install a mixer in the bathroom on the wall, not requiring a call of the master and financial costs. In addition to invaluable experience, this process will help you grow in your own eyes. Remember: if you want to do something qualitatively, make it yourself!