A table made of plastic pipes. A beautiful and inexpensive table made of pvc pipes. Shelf-rack in the bathroom of pipes
Recently, PVC products are in great demand. Firstly, due to a wide variety of design, secondly, accessibility, and, thirdly, such items can be done on their own.
This article will tell you how to make a table using PVC pipes. As a countertop, the door is used, so our table will be very large.
I like to listen to music, and I like to play music more. The basic principle of creating music with pipes is to beat at one end to create a wave of pressure. The length of the tube determines the wavelength, and different wavelengths create different notes. I had many questions that could be answered. How many notes do I need to play different songs?
Notes may be too high or too low for good sound on the pipes? But I never need all these keys to play anything. For Mary was the Little Lamb, I only need three notes or pipes. The most remarkable thing about this project is that everyone can make different decisions and come up with a personalized tool to meet their needs.
Choice of materials
1. Hollow or solid. First of all, it depends on what the table will be used for. If you do not plan on it hard work, you do not need to use extra strong materials. If you need stability, get a solid door or a finished countertop, the latter option will cost more. Consider that the solid door is much heavier than the hollow.
The first thing to find out is how long each pipe should be. You can find charts with slightly different numbers, but this will be a good starting point. Note that the diameter of the pipe does not change the note, but only the tone. The real world does not seem to work so well. Thus, even with a straight pipe it is necessary to make adjustments.
Of course, with the help of such an instrument, as we do, the pipes are not straight. Do not hesitate to use this background to develop a plan for your own tool, and then proceed to design and build the steps below. This can get confused when you start drawing several pipes one above the other, but this can help to use different colors for each channel. Two straight angular elbows create a turn for switching directions. The final result of planning all the pipes led to the list of details above. With a tool with 11 notes and pipes that are close to each other, the minimum width of the entire instrument should be about 40 inches. Adding videos to the bottom will allow you to flip it. Start by creating a frame so that when you get to building the pipes, they can be cut to fit the space, and they will be maintained. Set the vertical 2 × 4 into the rear corners of the plywood and connect with the two screws each from the bottom of the plywood. Now place the top panel on the top of the vertical 2 × 4 with the rear edge aligned. Note that the leading edge is slightly overhanging to accommodate the support from the corner boards. To fit the 2 × 4 corners, hold the 32-inch boards next to the frame at the desired angle and mark with a pencil at the top of the plywood and along the front edge of the 2 × 4 vertical and the bottom of the top panel. Cutting along the pencil marks will result in one corner cut at the bottom and a point of 90 degrees at the top end. The diagram above. Attach the corners with two screws through the bottom of the plywood and one screw through the top panel for each corner plate. To make holes for the pipes on the top board, you will need a large drill with holes. There are different types of fixed and adjustable wells. Your holes should be large enough to allow the pipes to slide. On the other hand, the pipes were well held in place. Folding holes after assembly, you do not need to worry about drilling in your desktop or creating a special attachment to hold it. Now you can turn the frame around and attach the rollers. Be sure to lock the wheels before the game, especially if you are on a solid surface. Avoiding glue makes the job easier, much less messy and for some reason sounds better than when gluing pipes. Since you have already planned this length on your graphic paper, you do not need to worry about the actual length until you reach the final section. Start by placing the elbow 90 ° on the plywood, just below the left hole, with one side up. You can measure from the inside of the elbow, where the end of the pipe will seep, up through the hole to the top side of the top panel. Now add to this the distance the pipe will extend to the clutch. This is the length of the first section of the pipe. Use any tool that you like best, and observe all precautions. After each cut, be sure to clean the plastic shavings from the pipe and remove the plastic "fluff", which can remain on the edge of the cut. As soon as the pipe is cut in length, turn the coupling one way, lower it through the hole and turn it in the elbow. Make sure that the clutch sits on the top board. If not, shorten the tube enough to make it happen. This is important, because you want the top board to take all the power from the game, not lower. Now you are ready for the next section of the pipe. Keep the measurement and cutting according to your plan, which may be different from mine. If you follow my plan, the next section of the pipe should be 6 long and point to the front edge of the instrument from the elbow. Now put the elbow at the end of the second section, pointing to the left. If you set one more elbow to the left of the tool, leaving the space inside 2 × 4, you can determine how long the next section will be. The shaft is about 30 inches. Next - turn, which you do, cutting a 3-inch pipe and pressing on it two elbows. Hold the U-turn on a flat plywood, then add another 30-inch tube to the right, and then another turn. Always cut the last section too long by a few inches and place the fitting on the end, as if you had finished. Press the top of the clutch at the top of the tool to see which note you created. Make sure that the trigger bounces off the clutch when creating a note, rather than allowing it to stay away, as this will affect the note. I have an electronic tuner that my sister used for her violin, which is very easy to determine if the note is high or low, and how far away. If you do not have an electronic tuner, you can also use a piano or any other instrument tuned to a reliable standard. But there are some skills needed to determine how well the pitches match only your ear that few people have. With the pipe too long, your initial note will be too low or flat. Now remove the fitting at the end and the last length of the pipe from the turn and cut some length. Assemble the tube and fitting 45 ° to check again. It will be very tiring the first couple of times. But do not worry; you better understand how much to cut than you do. If you find that your note is too high or too sharp, you cut it too much. Just install the last branch section for future use and start again. The next four pipes are almost identical to the first, except that the first part of the pipe will be down, it will be slightly shorter, so that the rear and fourth pipes will lie on top of the previous pipeline. The process of setting is the same. Then use the U-turn to go forward and backward before going straight ahead. Use the images for reference. Note that when setting higher notes, you can add less extra length before setting, but small length adjustments will have a greater difference in pitch. If you want to paint the pipes and the frame with different colors, first you need to do a disassembly. The easiest way to do this is to remove the first vertical pipe for each note with a 90 ° elbow at the bottom. This will allow you to remove the connecting tube and tube down through the hole together and take out the remaining sections from the tool in one piece. You can collect them outside the frame for drawing or leave them separately. In a very large area, for example, in a garage or driveway, lay out a lot of newspapers and carefully distribute the sections of the pipes so that they retain their shape. Use two layers to make sure they overlap your pipes. As soon as you dry, turn all the pipes to draw the other side. The frame can also be spray painted, or you can use a brush. In any case, always glue the discs or remove them during painting. In addition, if you want to leave the unpainted interior of the pipes, you can insert a short piece of pipe at both ends of each pipe, and then remove them after the paint is dry. After the paint has completely dried, you can carefully assemble the pipes, again starting with low notes. Be careful not to scrape off the paint from the dropped pipes when reinstalling them through the holes. Now the main part of your tool is done. You can continue to use whatever you used during the setup to play on your instrument, and you can be perfectly happy with that. However, for the best results you will want to create some custom paddles. The instrument will sound better, and you can look cool while playing too. The evolution of my oar was moving from the packaging foam wrapped in duct tape, flip flops, slippers covered with socks, to foam rubber on sticks. My current design is a polystyrene foam pad with a polycarbonate backing glued to the wooden handles and wrapped and decorated with a multi-colored adhesive tape. But understand that my design and yours can continue to develop after writing this article. Softer materials help to fully contact the top of the coupling, creating a better pressure wave. And the porous surface, like a sock or foam rubber, seems to soften the beginning of the note and avoids creating a "weak" sound. This will provide support foamed rubber, while it will remain strong and flexible. So get four feet of half-inch wooden dowels. If you are already a manufacturer, you should have a lot of glue and adhesive tape. The blades must have a width of about three centimeters to fully cover the pipe couplings without hanging over the following note. Length is less important, but a longer playground will be more forgiving when you play fast and not aiming perfectly. The end is a full round shape, and the back corners are rounded slightly. Cut two pieces of foam rubber and two pieces of plastic of this shape. Now use a thin, but complete application of the glue to attach the plastic to one side of each rubber mold. If after gluing the edges do not align perfectly, simply run the belt grinder around the edge to clean it. Now for the pens. It was more convenient for me to use two dowels next to each other and slightly warp. Smoothen and narrow the last three inches or near each dowel to have a good surface for gluing to the plastic. Place the flattened ends on the plastic and a little apart with each other so that the other ends can be connected to each other, one on top of the other. Place the pins in place and repeat for the second comb with a swirl in the opposite direction. After the glue has completely dried, wrap the handles and close the back and sides of the blades with adhesive tape. Be creative and use different colors according to your personality. It seems, in fact, there should not be any explanations necessary for the reproduction of such a simple instrument. Basically, you just get to the tops of the pipes with the paddle, and the notes go to the other end. The next tip is to place your hands on the sides, while the elbows are bent approximately 90 degrees. Use your forearms and wrists to bounce off the oars from the top of the pipes, making sure to keep the paddles at the correct height and that they are as flat as possible when they contact. A full, flat contact is important for creating a good wave of strong pressure. And the rapid removal of the oar from the pipe by bouncing allows you to fully open both ends of the pipe, creating the correct resonance. To see what can happen when the pipe is not fully open at both ends, try this. Ask a friend to hold tightly to the end of one of your pipes, completely closing it. Now hit the tube with a paddle, of course, using your best technique. Please note that the final note is exactly one octave lower than usual. Thus, a partially coated pipe from an unruffled oar will create a tangled note with mixed frequencies. Now, what do you want to play? If you have a beginner in piano music, you can play directly from the note, believing that there are no sharp objects or apartments. Once you master simple things, you can try something more interesting, for example, songs that you hear on the radio. Trail and error, when you continue to try different notes, while the song does not sound right, it can sometimes work, but it can be frustrating, especially when you realize that you need a note between two consecutive notes on your instrument-these silly black keys again. But since any other note will sound wrong, if you do not configure with the help of sharp objects and apartments. If you have music for the song that you want to play and it does not have any sharp objects or apartments in the key signature at the beginning, then your instrument should work if you have notes that are going high enough and low enough. If there are sharp objects or apartments in the key signature, you first need to transfer the records. Obviously, this will be much broader.
- The sketch is my drawing, which looks directly to the front of the instrument.
- You can see the tops of pipes indicating the marks and lengths, and the pipes - down.
- The arrows indicate how many times the pipe goes in each direction, as indicated.
- Attach with two screws on each side.
- Now you are ready to start building pipes!
- Start with the lowest note on the right side of the instrument.
- This will be the longest note and will lie mostly on plywood.
- You do not have an oar yet, so use whatever is convenient, like a trigger.
- Now you can compare your note with the standard.
- I like to attract my things, which means drawing it all.
- Start with high notes.
- You do not even need to customize it, like most tools, ever.
- The first advice is to use good oars, which we have already considered.
2. What fastenings are required? First, the desktop caps, and secondly, the cross-shaped and T-shaped connectors. For greater economy, instead of using the latter, you can solder the pipes. Pay attention, with the connectors the tables will look more aesthetic.
3. Choose pipes. They need to be found in the sanitary ware shop, of course, there are special furniture, but they will cost more for the price. Such tubes are stronger and will last longer.

Preparation
We will need the following tools:
- hacksaw / crosscut saw for cutting pipes
- punch / screwdriver to attach the legs to the table top
- 15 screws with thread on 1,251,5
- PVC cement or small self-tapping screws for durability
Prepare the materials:
- 5 end and desktop plugs
- 4 cross-shaped, T-shaped and T-shaped four-way connectors
- pieces of pipe: 5 to 7.5 cm, 10 to 30 cm, 4 to 50 cm, 4 to 75 cm.
The plug and fastenings can be bought both in the plumbing as well as in the furniture store. The latter will cost more, but have a longer service life. You can purchase plumbing pipes and furniture fasteners, as all sizes are compatible.

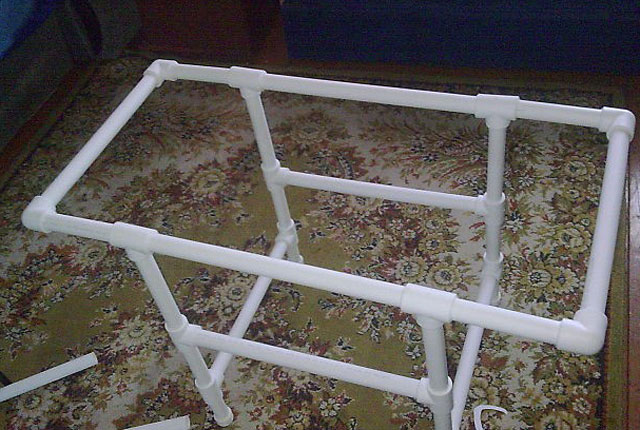
Assembling the frame
For convenience, the table legs are located on 3 sides of the table and for stiffness are connected by 2 horizontal slats. First, we collect each side separately, then we connect them together.

Important! First, we collect without cement, so that we can fix it, then we disassemble and fix it. After the processing of PVC cement, the elements are no longer disconnected. For fixing, it is necessary to cover with cement the inner side of the fixing hole or plug, insert the pipe and press it for 30 seconds.
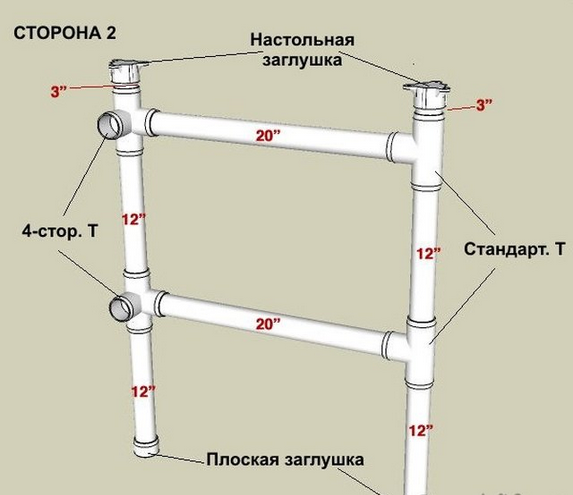
1. Let's start with the narrow side. We connect successively, a 30-centimeter pipe, a T-shaped fastener, another such pipe and fastener, a 7.5-centimeter piece and a desktop plug.
2. We repeat the same thing, only instead of the usual fasteners we use quadrilateral ones.
3. We fix the resulting legs with 50-centimeter tubes
4. The second narrow side is completely symmetrical to the first
5. For the last side, repeat 1 point, but instead of the T-shaped, we take the cruciform connectors.
6. In the holes of the connectors we insert pipes of 75 cm

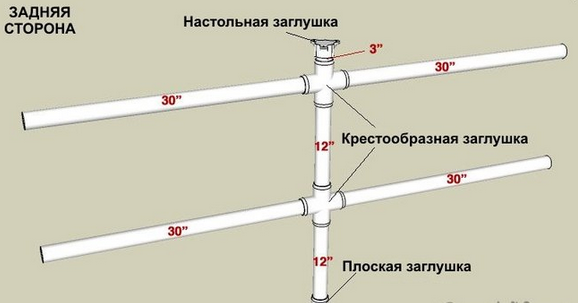
7. We connect the sides with the back. The frame is ready. 
Completing the assembly
The last thing you need to do is attach the countertop. The task is more complicated if you have chosen a hollow door. Its design consists of wooden slats and cavities filled with cardboard, foam, or unfilled at all. We can not determine where the bars are, so if the door is filled with cardboard, we'll use screwdrivers for the screws.

First, turn the door face down. Put the frame down with desktop caps, set it in the center. Note where the holes should be. With the help of a perforator or a screwdriver, screw the screws.

If you hit the cavity (the screw came in easily), insert the screwdriver. If necessary, increase the depth of the hole. If you hit the bar (the screw went in the same way), then everything is in order. Now remove all the screws, place the PVC construction and secure it.
Our table is ready. Now it can be painted or varnished. This will prolong the service life, because waterproof paints, varnishes and other coatings will protect the table from unnecessary dirt.
Building a house or repairing an apartment is always accompanied by a bunch of leftovers from consumables. Repair of the pipeline is also not an exception, because after the replacement of metal pipes on plastic remains a lot of scraps, as well as connecting elements - fittings, which many owners simply throw away.
However, there are also such creative people who, from such rubbish, can make solid and original furniture, for example, tables or chairs, as well as other household items such as an organizer. In this article, we will discuss in detail some of these ideas from PVC pipes.
Children's chair made of plastic pipes with their own hands
Polypropylene is a hypoallergenic and non-toxic material, therefore it is possible to make various children's furniture from it, without worrying about the health and well-being of the child. Embodeling ideas from plastic pipes with your own hands, you can easily assemble a table, an arena, a chair, etc.
One of such simple projects can be a comfortable highchair, which is assembled from pipes and fittings like a designer. The size of each part will depend on the size of the desired result, but below we give an instruction in which we will tell how to make a chair for a five-year-old child.

To make a chair you will need the following materials and tools:
- Adhesive for PVC;
- Approximately 3 meters of polymer pipe;
- 6 t-shaped fittings;
- 8 corner fittings (90 °);
- Durable fabric;
- A saw with a small tooth;
- Sewing machine;
- Scissors.

Building a chair:
- The first step is to cut the pipe into pieces: 7 pcs. at 33 cm (A), 4 pcs. 20 cm (B), 4 pcs. for 13 cm (C) and 2 pcs. 18 cm (D);
- Take the two pieces of A and fix them at each end along the corner fitting;
- In each of the fittings, insert all the elements of B;
- For each element B, fit the T-shaped connectors, turning their perpendicular part perpendicular to the element A;
- Pair the T-shaped fittings together with the A elements. As a result, you should have parallel stool legs;
- Insert all elements of C into the free ends of the fittings;
- Next, you need to put the structure so that the ends of the legs "look" at you;
- Take the two corner fittings and put them on part C, located closer to you;
- Put two T-pieces on part C, located farther away from you, unfolding them so that the central connections look at you;
- Next, it is necessary to connect inserted fittings with parts A parallel to the legs of the chair;
- In the free ends of the T-shaped fittings insert parts D and put on them corner fittings, turning them "face" to each other;
- We connect them with element A, finishing the back of the chair;
- From the fabric, make a seat by pulling it between parallel rails;
- Glue all joints, after which, allow the stool to dry.
Office table with plastic frame
Buying even the cheapest office table can be a big problem for some people, so we'll tell you how to make a table of plastic pipes. This project differs from the previous one in its complexity, that's why you will have to think over some parts yourself, but we will try to explain everything to you as much as possible.
First of all, you need to determine the size of the table. In our case, we take the finished countertop (915x2030 mm), under which we will assemble the frame. When choosing a table top for your own table, pay attention to its weight and follow the rule: the less weight, the better for your table. The best solution for the countertop is a hollow door leaf. Also, you can assemble the countertop yourself, using flat boards, fasteners, a saw and a drill.
First of all, prepare 12 meters of plastic pipe and cut it into the following parts:
- 5 parts of 7, 5 cm;
- 10 segments of 30 cm;
- 4 parts of 50 cm;
- And 4 pieces of 75 cm.
Of the other frame parts, you will need the following:
- 4 T-shaped fittings;
- 4 four-way fittings;
- 2 cross fittings;
- 10 plugs for pipes and fittings.
Having prepared all necessary details, it is possible to begin to collect a table from polypropylene pipes. The first assembly is best done without the use of glue, and after assembly, one by one, glue all the connections together. Assembly begin with the construction of the sides of the frame, which will rest on the countertop.

Next, gather the back part, which will connect the two already assembled. To give the table additional stability, we recommend that the back wall of the third leg. When assembling the table, carefully monitor the parallelism of all the elements in order to obtain an even design.
At the final stage, it is necessary to connect all the parts in a single construction, having received the frame of the table. Check it for strength, correct irregularities, then glue all joints.
To fix the table top:
- Place the countertop on the floor, turning it face down;
- Place the frame on top so that the top plugs fit snugly against the countertop;
- Circle the surrounding plugs;
- Unclip the plugs from the pipe and screw them to the table top in the marked places;
- Set the frame of the table, and on it, put the countertop so that all the plugs are in their proper place.
As a result, you will have an excellent table made of PVC pipes with your own hands.
Racks for cottages
After repair in the house can remain not only polypropylene pipes, but also a metal profile from which you can try to make a shelving for a dacha without using welding. For work we need only a tape measure, a pencil, a screwdriver and a hacksaw for metal.
First of all, you need to design a future rack. Draw a diagram on paper, observing all dimensions. Then you can buy the profile to the existing one, and also find several sheets of plywood with a thickness of 15 mm. You can also make a rack of PVC pipes with your own hands, I use a scheme for the profile.

Let's analyze the manufacturing process on a concrete example:
- Take the profile and cut it into parts: 4 vertical racks, 8 front and 8 rear bars;
- Collect 4 frames, which in the future should become shelves;
- Using self-tapping screws, fix the frames on vertical posts;
- At will, you can tie the rack to the wall and paint it, then, lay the plywood on the frames, making the shelves.
Various elements of interior from PVC pipes
To decorate the interior, as well as create useful designs of PVC pipes, you can use very short lengths of pipes. So from short pipes it is possible to make organizers, where in the holes it will be possible to add shoes, writing accessories and other small things.
Also, you can easily make wine shelves from PVC pipes with your own hands. To do this, simply glue a few pipes, and screw the resulting structure to the wall. Similarly, you can make a holder for glasses. To do this, it is enough to cut the plastic pipe along, after which, fix it on the wall. The hole in the hole is perfectly inserted into the slotted hole, and the rigidity of the polymer pipe prevents it from falling out.


If there is not enough room for outer clothing in your house, the hanger made of plastic pipes is an excellent solution to this problem. You can construct and assemble such a hanger, starting from the examples with a table and a children's chair.
In conclusion, I want to say that plastic pipes are cheap and easy raw materials for creating various elements of decor. Any created object can always be painted, covered with sparkles, or decorated with various elements, for example, seashells glued to the glue. Polypropylene rings can also be used for seasonal decoration of an apartment, for example, for a new year you can make a wall panel and fill it with New Year's attributes, for example, balls and figurines.
As you can see, in order to create a cozy atmosphere and decorate an apartment, it is not necessary to spend a large amount of money, because the main thing is a creative approach that will create the desired result with minimal expenses.