Installing the hood in the kitchen with your own hands: how to securely connect and fix it
When cooking, the air in the kitchen needs constant recirculation. Stove steam, burnt milk, food smells, or just foggy windows are no fun, even if you've done a great renovation. Today we will tell you how to install a hood in the kitchen to get rid of these problems. Everyone can connect it if you know the rules of grounding and wall mounting. It is also worth deciding in advance which type of kitchen hood is right for you, and what should be the power of the device. Let's start with this.
Installation of the hood in the kitchen will depend on the type of model chosen. There are the following types:
- suspended (also called flat and standard) - mounted under the cabinet above the stove;
- built-in - installed inside the wall cabinet, so they fit perfectly into any design;
- wall-mounted - mounted on the wall above the stove, they can have a different case design;
- corner - installed in a corner;
- island hoods - designed for a kitchen with an island (you can fix it anywhere by hanging it from the ceiling).
- Flow - pull polluted air from the kitchen into the ventilation shaft. This method of ventilation is called air extraction (exhaust mode). It is the most efficient and productive.
- Circulating hoods - pass air through the carbon filters in the housing, getting fresh air at the outlet. Such a model does not require ventilation in the kitchen in the apartment, so its installation can be called simpler, but less effective in terms of cleaning.
- PVC plastic air ducts are strong, light and silent, as they create almost no air resistance due to their smooth surface. There are both rigid narrow plastic boxes and flexible pipes.
- Corrugated aluminum pipe is a fairly simple material for do-it-yourself installation, it can be freely bent to the desired size. Another quality of corrugations is the absence of hum or vibration, unlike hard boxes. However, an important drawback of such an air duct is an ugly appearance, so figure out where to hide the ventilation, for example, in.
Advice! Regardless of the type, the installation of a kitchen hood above the hob is only possible at a height of 70 cm, and above the gas stove you need to retreat 80 cm.
Hood operating mode
In addition to the type of attachment, hoods differ in ventilation modes.
Required power
An important parameter when buying a hood is its cleaning performance, which is measured in cubic meters per hour. As you might guess, this value shows how many cubic meters of air the hood will pass through itself in an hour of operation.
According to the standards established in Russia, the air in the kitchen must be updated 12 times per hour. Therefore, you can easily calculate how much power you need using this simple formula:
Kitchen area * Ceiling height * 12 times
It is also worth considering the margin for power loss due to bends in the duct, the length of the ventilation shaft and other parameters. To do this, add 30% to the result.
For example, if your kitchen has an area of 6 square meters. m. and a ceiling height of 2.5 m., then the calculation will look like this:
6 * 2.5 * 12 * 1.3 = 234 m3
Advice! Also, when buying, you should take into account the noise emitted when the ventilation is on, which manufacturers indicate in decibels. Do not buy models that emit noise over 50 dB. There are almost silent hoods with two fans or one external. In addition, some models are equipped with a sound-absorbing housing.
Grounding and grounding
Before telling how to make a hood in the kitchen, it is worth mentioning electrical safety. Since a lot of grease splashes and moisture accumulates inside the case, the risk of electric shock increases if the hood is not properly connected to the mains.
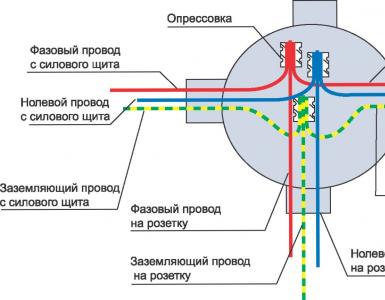
Therefore, a do-it-yourself kitchen hood must be connected to the network with three wires: phase, ground and zero. The standard ground wire is yellow with a green stripe. Before installation, provide grounding for safe use of the electrical appliance.
If the house has a ground loop and euro-type sockets are installed, there will be no problems: when connecting, the wire is connected to the ground terminal, which is indicated by strips of different lengths or the word Ground (GND). If the equipment does not have a ground connector, then you can make it yourself by screwing the wire to the metal part of the case. 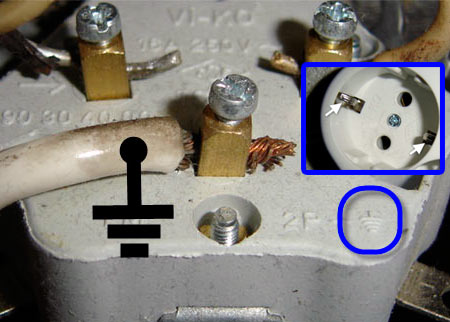 Euro socket with connected grounding in Russia is found only in new apartments
But many may not find euro-sockets at home, and they will ask themselves the question: how to connect the hood in the kitchen if there is no grounding? In this case, you can do the zeroing yourself, but in no case connect the neutral wire to pipes and batteries. You need to connect it to a deaf neutral.
To do this, open the electrical panel with meters and find a walled pipe in the wall where the wires come from (be careful, the wires are 220V!), or a special bus, as shown in the photo. Most likely, you will find a ready-made pin on it and already thrown neutral wires. This is the deaf neutral, the pipe is perfectly grounded. It is necessary to lead a stranded wire with a cross section of at least 2.5 mm2 from it to the kitchen, and connect the hood through a 6.3A automatic separator. 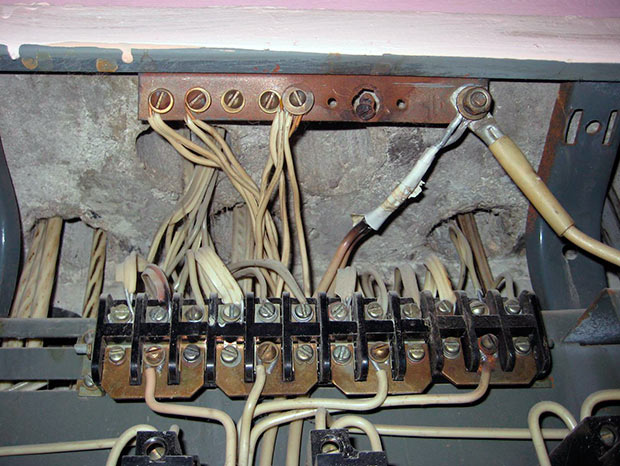 Zero bus on the shield in the entrance
Note! If there are already wires connected to grounding, then in no case turn them off! This may result in an electric shock. Throw your wire over the others and tighten the nut. If there are no wires and the pipe is smooth, strip it and fasten the wire contact to the clamp. If you do not understand this matter, it is best to contact a professional electrician.
Ventilation in the apartment
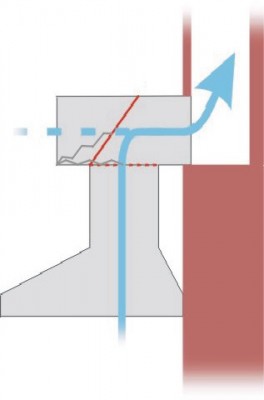 Scheme of a self-made anti-return box with a valve Installation of exhaust ventilation in the kitchen almost always violates the standard ventilation of the apartment. Often, for its installation, it is recommended to punch an additional hole for air exhaust, but this will not solve all the problems. The fact is that if you increase the window of the ventilation shaft, then its cross section will remain the same, so the quality of air exchange will not improve.
The way out of this situation is quite simple: this is the installation of an additional box with a clapper valve, the device of which is shown in the photo.
As you can see, there are 2 holes on the box. The valve is marked in red. When it is closed (in a horizontal position), air can easily exit through the window, providing natural ventilation to the kitchen.
When pressure builds up while the fan is running, the valve changes its position and closes the first window, thereby ventilating with the hood.
The main advantage of such a connection scheme is the absence of reverse thrust and the preservation of natural ventilation when the hood is turned off.
The valve is adjusted with a weak and thin spring. In the diagram, it is shown by a broken line. A lightweight material such as aluminum or plastic is best for the valve cover.
Duct selection
There are several types of kitchen ducts for household ventilation: 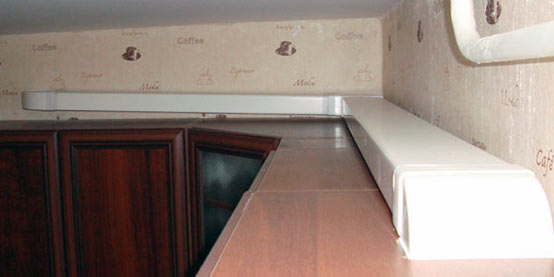 Plastic air duct is more compact and inconspicuous
The installation process of the hood
Of course, the installation of a kitchen hood with your own hands depends on its type and location of the ventilation shaft. First, we will consider installation using the example of a built-in device in a cabinet.
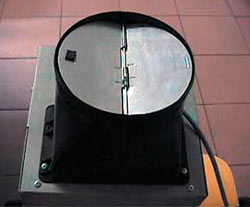
Anti-return mechanism
Duct connection

Advice! When installing ventilation, try to minimize the number of pipe bends so that the air draft remains good enough. With each turn, power is lost by about 10%.
Wall mount without cabinet

Conclusion
About 2 times a year, you need to clean the hood from burning to prevent fire. Now you know how to mount the hood for the kitchen and you can easily do it yourself. At the same time, do not forget to follow the safety rules for electrical work, and if you are not strong in them, it is better to invite an electrician.