Tile hatch: how to make
In the bathroom, secret hatches are most often installed, they help to hide the plumbing. The hatches can be installed over toilets, under baths or sinks. Outside, ceramic tiles are glued to the structure, as a result, the door becomes invisible. It is not difficult to install the hatch; today there are various designs on sale. They are easily assembled and then finished with tiles. Hatches can be metal, lightweight plastic, if you have experience, you can make them yourself from drywall.
The hatch allows easy access to meters or taps to shut off water.
Types of hatches
Several options are used:
- Ceiling mounted on the surface of the ceiling, are reliable and easy to use. They are equipped with good locks that will not open under their own weight. Most often they are made of aluminum.
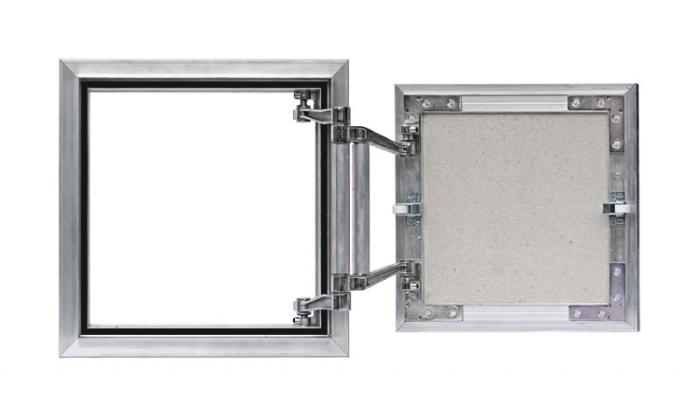
- Wall hatches are considered the most common. They are mounted on wall surfaces, usually behind toilets, under sinks, and bathrooms. The hatches are most often finished with ceramic tiles, they turn out to be hidden. Such hatches for tiles are available in various types. They can be metal, plastic, doors can be made with your own hands from drywall or moisture-resistant plywood. Hinges are selected different, although preference is given to clamping. For some designs, hinges may not be used, but in any case, the door must fit snugly against the frame.
- Floor hatches are usually made of metal, they are mounted on the floor surface. They are rarely used in the bathroom, if only utilities pass under the surface. The structures are made durable and reliable, with a long service life.
Inspection hatches can be classified according to materials of manufacture:
- Plastic are the most common, they are used for wall mounting. The sizes of the doors can be different, as well as the shape. The structure consists of a sturdy frame, hinges and a door. It is fastened in place with self-tapping screws, after which it is decorated if necessary. The weight of the structure is small.
- Metal hatches can be divided into steel and aluminum. The former are used for floor mounting, while the latter are used for wall and ceiling mounting. Their reliability is high; a special polished surface is provided.
- Homemade plywood and drywall hatches. This option is the cheapest, but you need to have some experience to make it. For reliability, you will have to mount a metal frame, it will be the basis for the revision viewing window. For homemade hatches, you can use hinges or magnetic locks, in some cases they may not be required. Such windows are usually installed under the bathrooms. Outside, the hatches are finished with tiles.
Back to the table of contents
Installation
Before starting work, it is necessary to prepare all materials and tools that may be required:
- hatch of the selected type (it is best to purchase a ready-made structure in the form of a frame with a door on pressure hinges, which, after installation, will be flush with the wall);
- finishing tiles, which will be pasted over not only the hatch, but also the surface of the adjacent wall;
- tile adhesive;
- container for mixing glue;
- notched metal spatula;
- rubber spatula;
- colored grout;
- plastic crosses-separators;
- galvanized metal profile;
- self-tapping screws for metal;
- self-tapping screws for drywall;
- moisture resistant drywall;
- building level;
- plumb line;
- metal ruler;
- simple pencil;
- knife for cutting drywall.
Back to the table of contents
Invisible hatch
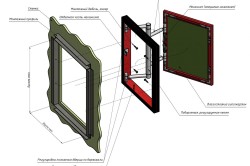
Above the toilet in an ordinary small toilet in a city apartment, you can use a ready-made invisible inspection hatch, for example, "Euroformat-R". Ordinary ceramic tiles are suitable for external decoration, and the walls of the bathroom are finished with it. The hatch is located on the wall, it is placed at a convenient height behind the toilet. A metal frame is used for fasteners. It hides all utilities, leaving only a convenient window for checking the meters and the general condition of the pipes.
The hatch for tiles "Euroformat-R" is easy to install.
First, the niche behind the toilet is completely removed, the condition of the pipes is examined. If necessary, pipes are replaced. A secret hatch for the bathroom is selected in the store. Manufacturers today offer various models, you need to buy one so that it is convenient to take meter readings and have access to valves and taps if necessary. The hatch should be located at a comfortable height. The peculiarity of the toilet bowl fixture and its type are taken into account.
The next step is to install the frame. This will be a false wall, which, after installation, is sewn up with moisture-resistant drywall. A galvanized metal profile is used as a material for the frame. It is ideal for plasterboard structures. First, with a building level and a plumb line, markings are made on the ceiling, floor, on the walls behind the toilet. Next, the guide profile is attached to the floor and ceiling, horizontal and vertical slats are installed. It is necessary to immediately mount the frame for the inspection hatch, it must correspond to the parameters of the window. If the counters are located at a great distance from each other (and this is not uncommon), you can install 2 windows or move the counters. But one should not hope that one of them can be reached. This will be extremely inconvenient in the future.
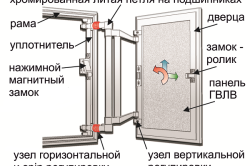
It is best for a small bathroom to use a hatch with a pressure lock.
In this case, after installation, it will not be visible, the wall will turn out to be integral. First, profiles for the frame, lintels for fasteners are exposed. It is important to mark everything in advance, since the hatch should fit tightly to the frame, no gaps should remain. Before installation, the hatch is opened, after which the structure is screwed to the frame with self-tapping screws. First, 2 vertical opposite sides are attached, after them - 2 horizontal ones. This allows the structure to be aligned as needed.
After the hatch is mounted, and there are no special tricks here, it must be fixed to the profiles along the already existing holes. Then you can start sewing the false wall with plasterboard. For a bathroom or a bathroom, it is necessary to use a special moisture-resistant GKL sheet or take a regular wall sheet, which is pre-impregnated with special compounds, for example, "Aqua-stop". The hatches under the tiles are not sewn up with plasterboard, but their surface should be flush with the rest of the finish so that the tiled surface is even. For fastening drywall, special self-tapping screws are used, all sheets must first be cut out for convenience. It is important to check immediately that the inspection hatch opens and closes freely.