How to connect two light bulbs to one switch
Situations where one switch controls two lighting fixtures at once are quite common. The only difference is that sometimes it is necessary to act simultaneously on both lamps with one switch, and in other cases it is necessary that each lamp lights up separately. And this means that in the first case we need a single-key switch, and in the second case we will have to install a device with two keys. Let's talk about each of them separately and consider in detail how to connect two light bulbs to one switch.
The ability to connect two light bulbs to one switching device at once allows you to save materials, time and effort, because you do not have to install a second switch, lay extra wires, hammer additional holes and strobes in the walls.
Preparatory work
No matter how many keys your switch has (one, two or three), the preparatory work will be the same.

To begin with, in the room it is necessary to mount a common junction box and a mounting box for a switching device, it is also called a socket box in another way:
- If the walls in your room are made of PVC, plasterboard, wood or MDF panels, install a special bit with serrated edges on the drill and make a hole. Insert the mounting box into it and fix it to the wall with self-tapping screws.
- In the case of concrete or brick walls, make a hole with a hammer drill or drill with a nozzle that works with concrete surfaces. But in this case, the mounting boxes must also be fixed with a plaster or alabaster mortar.

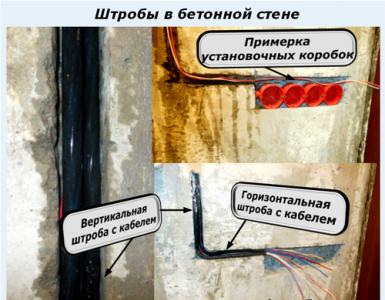
As a rule, the installation of holes is carried out simultaneously with the laying of the strobe. This is done purely for aesthetic reasons, there is a lot of dirt from such construction work, and it’s better to spray and clean it once. Strobs are such grooves in the wall surface, into which the connecting wires will then be laid. They can be done using various tools:
- Hammer and chisel. This is an old grandfather's method, its advantage is the complete absence of the cost of acquiring a tool (every man has a hammer and a chisel). The disadvantage of this method of gating is that it takes a lot of time and effort.
- Bulgarian. This tool is often referred to as the worst of the best. It is convenient that strobes can be made quickly and without much effort. But it is from the grinder that there is a lot of noise and dust, besides, it is not possible to make strobes of the same depth along the entire length, and it is almost impossible to work as a grinder in the corners of the room. So choose such a power tool as a last resort.
- Perforator. All that is required is to purchase a special nozzle for it - a strobe or a spatula. In all other respects, there are no shortcomings, quickly, conveniently, the grooves are more or less even.
- Wall chaser. For this type of work, this is the perfect tool. Works efficiently, safely and quickly. The strobes are smooth, there is no dust, since the strobe cutter is connected to a construction vacuum cleaner. It is convenient for them to work, the tool does not make much noise. The only downside is the high price. But there are services where you can rent a wall chaser.
Briefly about wall chasing using the tools listed above is described in this video:
It is necessary to lay two-core wires into the strobes made and fix them with cement or alabaster mortar.
So, the preparatory work is over, the boxes are mounted, the wires are laid, you can connect the light bulbs and the switch.
Switch device
Before connecting two light bulbs to one switch, let's take a closer look at the design of this switching device. It is simple, and having dealt with the design, you can easily cope with the connection diagram later.

The main component of the whole mechanism is the working part, which is directly installed in the socket. It looks like a metal structure, a drive is fixed on it, with the help of which the device is switched on and off. If we consider in detail, then the drive, in fact, is a moving contact, which, changing its position, closes or opens the circuit between two fixed contacts.
One of these fixed contacts is called the incoming one and must be connected to the phase wire from the mains. The second contact is called outgoing, it is connected to the phase wire going to the light bulbs. With the correct position of the switch, these two fixed contacts must be open to each other, the device is considered disconnected, there is no circuit between the mains supply and the lamp, the lamp does not light. As soon as you press the switch key, the movable contact closes two fixed contacts between themselves, through the closed circuit formed from the mains, voltage is supplied to the lamp, and the lamp is on.
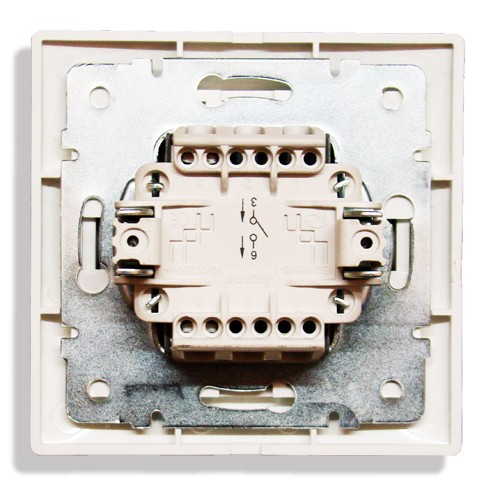
For safety, the working part of the switch is placed in a housing made of dielectric material (porcelain or plastic).
The second component of the switches is protection, this is a frame and keys, usually they are made of plastic. The key is fixed on the drive of the working part, with its help a person presses, thereby changing the position of the movable contact, and thus controls the lighting. The frame performs the function of protection against accidental contact of a person with the contact part of the switch, which is energized. It closes and isolates it all, that is, there is no possibility of touching the working parts. The frame is fixed with plastic clips or screws.
The difference between the 2-key switch is only that it has two outgoing contacts. Each of them must be connected to the phase wire of one of the two bulbs.
Scheme with a two-gang switch
Before you connect the wires to the circuit, you must have installed:
- Two lamps for one bulb. For example, one in the kitchen, the second in the hallway.
- Junction box under the ceiling (below the ceiling level by 15-30 cm). If there is already a junction box in the room, you can use it. The main thing is that there is not a lot of switching and that it is convenient for you to work.
- Socket for a two-gang switch. As a rule, it is installed at a distance of 90-100 cm from the floor level.
- Between all these elements, wires in strobes must be laid. Please note that in the case of a two-gang switch from the junction box, a three-wire wire must be suitable for it.
Now we need to electrically connect all this so that voltage comes from the power source to the light bulbs.

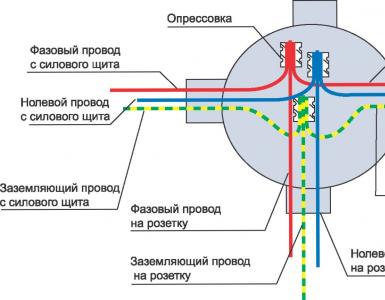
Two cores of wire from the mains come to the junction box - zero and phase. Using an indicator screwdriver, determine the phase core. Touch the screwdriver in turn to both cores. If you touch zero, the indicator window will not light up. If the window lights up, then you have found a phase core. Carefully mark it with electrical tape.
Now, to make connections, de-energize your workplace. It is necessary to turn off the machine, which is supplied with voltage. Now, in many houses and apartments, entire shields are being installed, in which automatic machines are located that turn off each room, respectively. If you don’t have one yet, then you will have to turn off the water machine for the apartment. Check the absence of voltage and get to work.
There are three wires in the socket. Strip the insulating layer on them by 1 cm (this is done with a knife). Connect one core to the incoming contact of the switch, connect its other end in the junction box to the phase wire of the mains supply. Connect the other two wires to the two outgoing contacts of the switch. Accordingly, connect their second ends in a junction box with phase conductors from one and the second lamp.

Now you can place the working part of the switch in the socket, fix it, install the protective frame and keys.
There will be one more connection in the junction box, connect the zero wires coming from the fixtures to zero from the mains.
There are two contacts in the lampholders - one side for connecting the zero core, and the central one, the phase is connected to it. Make these connections.
Check that all contacts are reliable, but we advise you to insulate the places of twists after you make sure that the switch is working correctly. To check the assembled circuit, apply voltage to the apartment (that is, turn on the introductory machine). Both keys of the switching device are in the off position, the lights in the kitchen and in the corridor are off. Press one key - the light in the kitchen came on, turn on the second - there was light in the corridor. Also turn off the first and second keys in turn, the light went out first in the kitchen, then in the corridor. Everything is working correctly.
Turn off the input machine again and insulate the twist points in the junction box with an insulating tape, you can also put PVC tubes on top.
The double switch circuit is discussed in detail in this video:
Scheme with a single-gang switch
Everything is absolutely the same, only in this case four two-wire wires come to the junction box - one from the mains, the second from a single-gang switch, and two from light bulbs.

The following connections are made in the box:
- the zero core of the network wire is connected to the zero cores of incandescent lamps;
- the phase conductor of the network wire is connected to the conductor going to the input of the switch;
- the conductor from the output contact of the switch is connected to two phase conductors of the light bulbs.
This scheme is used when incandescent lamps are installed in different directions. If in one direction, then to save wires, the second bulb can be connected from the cartridge of the first.
As you can see, there is nothing complicated. If you are more or less familiar with electrical engineering and physics, then you will be able to independently connect two light bulbs to one switch.