How to connect a socket with a do-it-yourself switch
The electrical wiring of any room consists of three mandatory elements - lighting devices, switches for controlling lamps and sockets for connecting equipment. And if in public places we are not very concerned about what, where and how it is connected, then at home we want maximum convenience, aesthetic appearance and at least a little savings. In terms of economic effect, an advantageous device is a socket with a switch in one housing. What is this benefit, we will consider below, and also talk about the design features of such a device, its varieties, disadvantages and how to connect a socket with a switch to a common electrical network.
What are the advantages and disadvantages?
 The main advantage of such a device as a socket and a switch, combined in one housing, is the saving of labor and material costs. If you were to install these devices separately, you would have to mount two holes for mounting boxes in the wall, buy and install two sockets, lay two separate two-wire wires to the switch and socket. In the case of installing the unit, you will need one three-core wire and one socket (only it will not be round, but of a special oval shape), which will at least slightly reduce your time and labor, as well as financial costs.
Sometimes an additional advantage of a device in which a socket and a switch are combined in one housing is the same height of their location.
The disadvantage of this combination is that if any one device fails, the entire unit must be replaced.
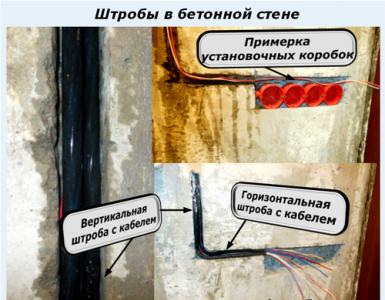
Another disadvantage is that it is problematic to install a block of switches combined with a socket in a concrete wall. For such a device, the hole will need not be round, but oval; it will be more difficult to knock it out in concrete.
Where is the best place to install?
It is very convenient to install such a unit in those places where you do not need to constantly connect electrical appliances to the outlet.
Before you connect a double switch for the corridor and the nearby combined bathroom (bathroom with toilet), think about whether to install a common block with an outlet? One key turns on the light in the corridor, the second in the bathroom, and the socket can be used to connect a hair dryer, electric drill, vacuum cleaner, and charge a mobile phone.

A block in which a socket with a one-button switch is suitable for installation in garages, sheds, basements, gatehouses, change houses and other outbuildings. In this case, one key of the switch is enough to turn on the lamp in the room, and the socket is useful for connecting a power tool, kettle, fan or radio.
In other rooms (hall, kitchen, bedroom, nursery), connecting a combined socket-switch block is unlikely to be appropriate. It will not have that aesthetic appearance to fit into the overall interior. After all, the light switch is usually installed at the entrance to the room. Imagine how ugly it will be if the cord of a TV, computer, refrigerator or air conditioner is stretched here, to the outlet.
Therefore, before connecting a block that combines an outlet with a switch, think carefully about where you want to put it, and whether it is needed there.
Varieties

There are several block options on the electrical goods market, where a socket and a switch with one, two or three keys are located in a single housing. They differ in price, installation method (internal or external), can be equipped with additional functions - lighting or various kinds of protection (from children, moisture, dust).
- Indoor unit consisting of a switch and an ungrounded socket. This is the simplest and cheapest model. However, with modern equipment of household appliances, the lack of grounding is a minus.
- Indoor unit with a switch and a socket with grounding. The switch key may have a special light indication, which will help you easily find the switching device in the dark.
- Outdoor unit with a single-gang switch and a socket equipped with a special plastic cover and IP 54 degree of protection (against the ingress of dust and water).
Exactly the same models can be using a triple or double switch.

According to the location of the switch and the socket themselves, the blocks are divided into horizontal (switching devices are located nearby) and vertical (the switch is located on top of the socket).

Outdoor units are used for installation with open electrical wiring, when the switch and socket are not recessed into a special hole, but are fixed with a bracket on the wall surface. The wires in this case are laid along the walls, they can be laid in special plastic boxes, put into corrugated pipes, or simply openly attached to the walls on porcelain insulators.
Internal blocks are used for hidden wiring. The device itself is inserted into the socket located in the wall junction box, and the wires are laid in special strobes inside the walls.
When choosing sockets combined with switches, give preference to models made of high quality plastic and grounded.
If there are small children in the house and in order to prevent them from getting to know electricity on their own, choose models where the outlet has special protective shutters. They close the contacts, and if the child starts to poke something metal into the socket, at least the possibility of it getting energized will be excluded (the curtains open only when two pins of the plug are inserted at the same time).
Device
Before connecting the block switch with a socket, let's talk a little about its design.
![]()
Consider the example of a switch with two keys:
- In the middle of the socket there is a screw with which a protective curtain from children is attached. Unscrew this screw and remove the curtain.
- Carefully remove both switches.
- The upper plastic cover of the common body is fastened with two screws, unscrew them and remove the cover.
- Now it is clearly seen that the device consists of a conventional socket and a two-button switch, they are placed in one housing.
- The switch has an incoming contact, to which a phase from the mains is suitable, and two outgoing contacts, the phase wires of the lamps are connected to them.
- The socket consists of a receptacle into which a plug is inserted. This socket is connected to the contact part, where there are two terminals, they are connected to the phase and neutral wires from the mains.
Installing the outdoor unit

This block has its advantages and disadvantages. It is easier to install and replace this design, and it is also faster to detect malfunctions in the operation of the device by its appearance - these are positive aspects. The only disadvantages are that in the interior, open wiring and outdoor units do not look so beautiful. Therefore, most often such devices are used in garages, baths, sheds and other utility rooms.
- Always start any work related to electricity by de-energizing the room where you will work. Turn off the voltage and use an indicator screwdriver to check for its absence.
- Disassemble the unit body by removing the top (or front) cover.
- The back cover with the core must be mounted on the wall. Attach it to the place of future installation and mark the fastener points with a simple pencil. Set the block aside for the time being, drill the marked places, drive in the dowels. Now you can fix the core of the block with screws.
- Then the electrical part is performed (how to connect the unit to the mains will be discussed below), it remains only to put on the top cover and fix it with screws.
Important! If the outdoor unit is installed on a wooden wall, install a paronite gasket between them. In case of heating of the contacts and further ignition of the insulation, the paronite will prevent spontaneous combustion of the wooden wall.
Installing the indoor unit

The case of the switching device recessed into the wall is not so conspicuous, it does not spoil the general interior appearance, therefore the method of closed wiring and the indoor unit is used much more often, especially in residential premises.
- Work similarly begins with relieving tension in the room and checking its absence.
- Using an electric drill with a special nozzle, drill a hole in the wall for the socket.
- Choose a special plastic socket, one-piece for two installation locations. Fix it in the wall hole with alabaster.
- Insert the core of the block into the socket box, make all the necessary electrical switching, after which the case must be securely fixed in the socket box. This is done with the help of spacers.
- It remains only to install the top plastic cover.
How to install and connect the indoor switch-socket unit can be viewed in this video:
Wiring diagram
The simplest scheme is to connect a single-key switch with a socket in one block.

A three-core wire is laid from the junction box to the installed unit.
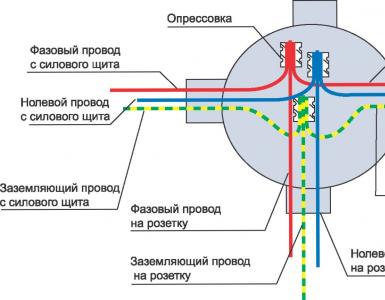
In the junction box, the following switching is performed:
- The neutral wire of the mains is connected to the neutral wires going to the outlet and to the lamp.
- The phase from the network is connected to the phase wire of the outlet.
Now the switching actions that need to be performed in the block itself:
- Phase and zero came from the junction box to the outlet, connect them accordingly to the desired contacts.
- Next, the phase from the socket is connected with a jumper to the incoming contact of the switch.
- Another wire is attached to the outgoing contact of the switch, it will be connected in the junction box to the luminaire phase.
Note! In the case when the socket is grounded, you will need a wire consisting not of three, but of four cores.
If the plug-in unit has a two-button switch, then:
- the phase from the socket is connected by a jumper to the incoming contact of the switch;
- two phase wires are connected to the outgoing contacts of the switch, they go to the junction box, where they are connected to the phase wires coming from the cartridges of two lighting fixtures.
Otherwise, the connection diagram of a two-gang switch with a socket is similar to the one-key option considered above, the only difference is that the zero of the supply network must be connected to the zero wires going from the junction box to the socket and to two lamps.
This video explains in detail the various connection options:
- When choosing a model of a combined socket with a switch, give preference to a product that has two teeth on its legs. In the wall, such blocks are fixed more reliably and firmly.
- If there is a need to connect several household appliances at the same time, use the socket block. Most often it is used in kitchens where a refrigerator, extractor hood, dishwasher, electric kettle, TV are constantly working.
- When you buy socket boxes, choose models in which the walls inside are ribbed. When mounting the switching device, the expanding legs will cling more reliably.
With all the disadvantages and advantages of such a combined unit, you are now familiar. Know how to install and connect such a switching device. Decide for yourself whether you need such a socket model with a switch or not. We repeat once again, for utility rooms this is a very convenient option, for a living room it is better to use a separate option.