Automatic cabinet lighting. Shelf lighting with LED strip. Recessed furniture lamps
Before moving on to the instructions with photo and video examples, I would immediately like to draw your attention to the fact that we will not consider options with halogen lamps. This is due to the fact that you can make lighting in the closet with your own hands faster and without damaging the shelves if you glue LED strip in the right places. This installation option will be more reasonable and safer. Next, we will look at step-by-step instructions with photo and video examples that will clearly show you how to install LED shelf lighting in a wardrobe, kitchen and even bookcase!
Step 1 – Preparing for installation
So, before you start creating LED cabinet lighting with your own hands, you need to think through a few important points:
- In what place will diodes be most effective for lighting shelves, and at the same time will not create inconvenience?
- How will the lights be turned on/off and where will the light switch be placed?
- How will the LED backlight be connected to a 220 Volt home network?
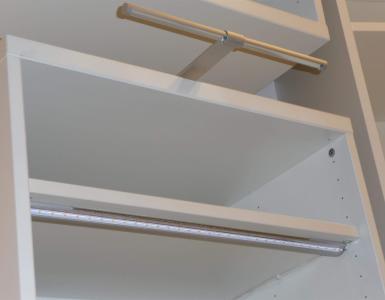
We recommend placing the LED strip above the shelves, as shown in the photo below. With this placement, the diodes are least susceptible to mechanical damage and, moreover, the illuminated area will be well covered by the backlight. 
As for the light switch, it can be neatly placed under one of the shelves or placed on the outer side wall of the cabinet. You can also make automatic lighting for the sliding wardrobe - so that the LED strip turns on when the door is opened. There are ready-made sets of lamps equipped with special motion sensors that respond only to door opening. In our example, we will consider another alternative option - installing limit switches that will turn off the lighting in the closet when the door is completely closed. 
Well, the last question is the connection option. Since the LED strip operates on 12 Volts, it must be connected to a power supply. The latter, in turn, is plugged into a socket, but you can also run a separate cable to illuminate the shelves in the cabinet. In this case, it is recommended to go along the ceiling and wall to the location where the cabinet is installed. Having solved all the preparatory issues, you can sketch out the lighting scheme, buy all the necessary materials and move on to creating LED lighting. 

Step 2 – Basic Process
To make it more clear to you how to make lighting in a closet yourself, we will provide step-by-step instructions with photo examples of each installation stage:
- Measure the required length of the tape and cut a suitable piece. Don't forget that it is only allowed in designated areas, as shown in the picture below.


- Attach a 10*10 mm plastic corner at the location where the LEDs are installed. With its help, you can make sure that the tape does not spoil the overall appearance of the shelves.

- To route the cable into the closet, make a hole in the most inconspicuous and convenient place using a special crown. An important point is that so that the chipboard sheet does not tear out and the contours of the hole are even, first drill a hole with a crown no more than 5 millimeters deep, and then drill the entry from the back side.


- If you decide to highlight all the shelves inside the cabinet, be sure to drill small holes in the corner, as shown in the photo below. This is necessary so that the cable can be routed to the very top.

- Stretch the wire and hide it in special cable channels, which are best attached to liquid nails.


- Pour the diode strip around the corner and connect it to the power supply. We have already talked about that.

- Install the limit switches yourself in the appropriate places, connect them to the lighting and check whether the lighting you created works.


That's all the installation instructions. As you can see, illuminating the shelves inside a wardrobe with your own hands is not at all difficult, and besides, a diode strip in this case will be the best option for a lamp. By the way, if you want to organize this type of lighting in a kitchen or bookcase, or on a shelf under a mirror in the bathroom, then in this case the tape can be glued along the ends of the shelves, which will create a more original appearance of the furniture. In this case, the glass shelves will look something like this: 

How to place lamps on the ceiling


The lighting can be installed in any type of cabinet: traditional, wardrobe, kitchen furniture, bathroom cabinets and even shoe racks.
Types of cabinet lighting

In the modern furniture market, a variety of types of lighting for cabinets are presented. This makes it possible to choose the option that seems most acceptable to the owner of the furniture.
There are four main types of cabinet lighting:
- halogen lamps;
- LED lights;
- fluorescent lamps;
- LED Strip Light.
Halogen cabinet lighting

Halogen lamps are the most common way to organize lighting in a closet. They are designs based on halogen lamps.
A halogen lamp is an incandescent lamp filled with a special gas (iodine or bromine vapor). It allows you to extend the service life of the product and significantly increase the heating temperature of the spiral - up to 500.

Despite their brightness, halogen lamps have a number of significant drawbacks:
- high heating temperature can melt the material from which the cabinet is made, as well as cause the evaporation of harmful substances. Therefore, halogen lamps are rarely built-in;
- they must not be touched by hands, otherwise greasy marks may remain on the lamp that cannot be erased;
- The halogen cabinet light is sensitive to even small power surges.

The best option for halogen lighting for a cabinet is several overhead lights placed on its visor.
LED cabinet lighting

LED lighting combines several advantages at once: efficiency, durability, safety and high quality lighting.
LEDs are semiconductor devices with an electron-hole junction that generates light by passing electricity through it. This is the safest and most environmentally friendly lighting option.

LED lamps can be made in the form of a set of three or more individual light bulbs, as well as in the form of a line - a long lamp with several diodes arranged in a row.
Unlike halogen and fluorescent lamps, LEDs do not tend to get very hot. Therefore, they are ideal for organizing built-in lighting in cabinets made of any material (including chipboard), since they do not cause melting of the material and do not lead to the evaporation of phenol and other harmful substances.
Fluorescent backlight

Fluorescent lighting is used quite rarely. As a rule, it is used to illuminate the space in front of mirrors or as part of a trampoline rod.
Fluorescent lamps are gas-discharge light sources. The principle of their operation is to generate ultraviolet radiation by discharging current in mercury vapor. They are converted into light radiation using a special substance - phosphor. As a rule, it is a mixture of calcium halophosphate with other elements.

The main disadvantage of such lamps is the mercury content, which can cause serious harm to human health if the product breaks.
Mercury is classified as a class 1 toxic substance, so disposal of burnt-out fluorescent lamps in the usual way is unacceptable, as this causes damage to the environment.
Cabinet lighting with LED strip

The LED strip is a flexible board with contacts on which small diodes are located in a row. It is one of the most convenient lighting options and is often used for decorative purposes.
LED strip is sold in skeins of 5 meters or by meter. It is recommended to take accurate measurements before purchasing a backlight.
There are different options for LED strips that allow you to realize almost any idea in organizing furniture lighting:
- self-adhesive - it can be independently attached to various surfaces;
- waterproof - ideal for cabinets installed in rooms with high humidity, such as bathrooms;
- multi-colored RGB tape is an interesting option for decoration. In such a tape, you can change the color of the light bulbs using a controller.
Methods for installing lighting devices in a cabinet

The process of installing cabinet lighting requires care. It is advisable to think through its scheme in advance.
If lighting is installed from the mains, then the cable can be laid in two ways:
- open - directly on the ceiling and wall;
- closed - using a cable channel.

Depending on the installation method, the following types of cabinet lighting are distinguished:
- mortise - built into pre-cut holes. Most often they are placed in canopies and separate sections of furniture. For a decorative function, lighting can be installed on the facade of the product;
- overhead – attached in those places where it is necessary. They can be of very different shapes - square, round, oval, triangular and rectangular.

If bright illumination is required, it is advisable to use overhead lights - they are more powerful than recessed ones.
Mortise structures are good to use for decorative purposes, but they are much harder to mount.
Installation locations of lamps in the closet

It is important to decide on the location where the lighting will be located. There are many options for its installation, depending on the purpose of the installation:
- on the doors. Such lighting performs more of a decorative function than a practical one. It can be used not only in a new cabinet - installing lighting on the doors of old furniture can significantly refresh it. As a rule, an LED strip is installed along the contour of the door;
- on the shelves of the closet. Lamps on the shelves illuminate their contents. These can be lamps of any type, except halogen ones - they get very hot and can damage things stored on the shelf;
- on the tramp rod. This solution allows you to illuminate the most spacious and deep compartment of the cabinet. It is made in the form of one long fluorescent lamp or LED strip;
- on the cabinet cornice - the protruding upper part of the product. This is a universal option, in which both the space in front of the cabinet and its internal contents are moderately illuminated. Traditionally, cornice lighting is done using several spotlights;
- in the lower base of the cabinet - used to illuminate the lower compartments, such lighting is especially relevant for shoe racks.

Illumination installed along the inner contour of the cabinet is gaining popularity - it allows you to illuminate almost the entire depth of the furniture.
Cabinet lighting controls
When choosing a backlight, pay attention to the control method.

Sliding wardrobe with translucent doors and internal lighting in the interior of the room
Sliding wardrobes for many years have confirmed the convenience and rationality of their use and have taken their rightful place in almost every apartment. However, the depths of the cabinets where clothes are folded or hanging often require additional lighting to find the right thing, or, conversely, without disturbing the peace of the household, highlight only one shelf or section. The most convenient way to do this is to use backlighting. In this case, it is necessary to clearly understand the purpose for which it is installed.

Black and white wardrobe with a figured side shelf and top lighting

Light wardrobe with additional lighting in the interior of the dining-living room

Beautiful unusual lighting for a mirrored corner wardrobe

An interesting idea for lighting each individual zone in the dressing room
Before talking about the pros and cons of lighting cabinets, those who want to install it need to understand its necessity. It is clear that the placement of lighting along the outer edge of the furniture will not play any functional role, but will remain a decorative design. There is no need for it even if the depth of the cabinets is small, and all manipulations with things can be done without additional lighting.

Huge wardrobe for a dressing room with additional internal lighting of individual zones

Sliding wardrobe with multi-colored LED illuminated shelves for an unusual living room
Among the advantages that illumination of sliding wardrobes gives, it is worth noting the following:
- does not take up much space;
- creates a unique flavor in the room;
- provides convenience when searching for things or placing them on shelves;
- saves time;
- provides an opportunity to illuminate exactly the area in which things are located, without using other lighting devices.

Large mirrored wardrobe with lighting for a loft-style bedroom
Another advantage is the ability to independently mount lighting. In addition, you need to take into account that the internal lighting allows you to maintain order in the cabinets and clean up in time: remove the cobwebs, wipe off the dust or detect mold or fungus on the inner surface of the cabinets in time.

Additional lighting for the bedroom at the top of the built-in closet on the entire wall
As for the shortcomings, here we can note the complexity of lighting control.
Types of lighting: pros and cons of options

Halogen lamps for furniture

Battery-powered LED light with motion sensor for closet
Not all lamps are suitable for interior lighting of furniture. For ease of use, preference is given to two types of fixtures: overhead and built-in. At the same time, halogen and LED lighting fixtures have become the most popular.
| Type of lighting | pros | Minuses |
| Halogen | Increased light output. Evenly distributed light that maintains brightness throughout the entire life of the lighting fixture. Compact design. High degree of security. |
They get very hot and are a fire hazard. Strength is low. React to voltage changes. The service life is relatively short. |
| Luminescent | They don't heat up. High light output. Long service life. Brightness that does not blind the eyes. Various color composition. |
Limited power with significant size. Difficulty connecting. Dependence on external temperature. |
| LED | Slight heating. Energy saving. Durability. Fire and environmental safety. |
Relatively expensive. They do not provide scattered light. Requires expensive switching power supplies. |
| Any configuration is possible. Easy to install. High reliability. Operates on low voltage Safe. |
Poor color rendering ability. The need to connect power supplies. |
What to especially pay attention to when choosing lamps and fixtures

Sliding wardrobe with built-in lighting in the interior of the room
When choosing lighting fixtures, you need to take into account a number of features that will help you choose the “right” one, exactly the one that will decorate your apartment.
- It is important to take into account the characteristics of the room where they will be installed. If the interior is already decorated, then the lamps and lamps are selected taking into account the existing design in such a way that they organically fit into it.
- Do not forget about taking into account the area and illumination of the room: luxurious huge chandeliers or cascades of lamps hanging from the ceiling are unacceptable for small rooms: they will visually make the room even smaller. A modest small lamp will look just as ridiculous in a huge room with high ceilings.
- Particular attention should be paid to the selection of lamps:
- their power;
- energy saving opportunities;
- brightness;
- color scheme.
- It is important to determine the price of the purchased product by establishing a certain “price corridor” within which the choice of lighting device will take place.

A variety of furniture lamps and fixtures for every taste for any interior
When choosing a lamp or lamp, you should proceed from the possibilities of the family budget, rationality, quality and aesthetics.

Convenient lighting of internal shelves using LED technology
What is special about kitchen lighting, and how to apply it in the interior?

Illumination of kitchen units using LED lamps
Today, various sources are used to illuminate furniture in the kitchen: halogen, fluorescent and LED lamps and LED strip, and increasingly the latter is preferred.
The tape comes in different sizes and densities, in addition, it is necessary to consider:
- LED color available in a wide range of shades; in some cases, the brightness can be adjusted;
- if the kitchen furniture is dark in color, lighting under the bottoms of wall shelves and cabinets will emphasize the elegance and refined taste of the interior;
- properly selected lighting will fulfill its immediate functionality and will look great as a decorative design for a kitchen set;
- will bring a certain zest to the design of the room where the kitchen unit is installed, lighting the top and bottom of the wall cabinets.

Illumination of the work surface using LED strip installed on hanging cabinets
DIY selection and installation

The main stages of self-installation of an LED strip in a room
Before you begin installing wardrobe lighting, you must, of course, choose the most appropriate lighting option. Practice shows that the most acceptable lighting sources for sliding wardrobes are fluorescent and LED lamps or LED strip. They ensure safety of use, save energy and are characterized by low installation complexity. But the simplest and most efficient way to illuminate furniture is to install an LED strip. In this case, it is necessary to take into account:
- acceptable tape length;
- lighting solution;
- the need to purchase a 12W power supply.

LED strip for furniture lighting
Decorating with LED strip, in addition to the indicated advantages, allows us to determine another advantage: there is no need to spoil the surface of the furniture to install it.
Despite the fact that the installation of such a light source does not require serious skills in working with electricity, this does not mean that they are not needed at all. Therefore, if the owner is not at all comfortable with technology, it is better to seek help from a specialist.
However, if you have the desire, you can master even very difficult moments, but installing an LED strip is not such a thing.

Approximate diagram of connecting an LED strip to a power source
The tape is mounted as follows.


Installation instructions for LED strip for additional lighting
Advice. To avoid power losses, the length of the wire should not be more than three meters.

Attention! It is worth remembering that the transformer heats up during operation. Therefore, when securing it, you must comply with fire safety requirements.
- In order not to spoil the appearance of the furniture and protect your household from troubles, you need to take care to hide the wires and cables.
Shaping the interior of an apartment using lighting will bring originality to its design, indicate the taste preferences of the owners and their desire to live in comfort and beauty.

Beautiful built-in wardrobe with additional lighting for a romantic bedroom

Unusual wardrobe with photo printing and additional lighting
Video: do-it-yourself lighting of a cabinet with LED strip in an aluminum profile
This article describes step-by-step the process of installing and connecting halogen lighting in a wardrobe, and also provides recommendations for selecting the cross-section and permissible wire length for connecting 12-volt lamps when using an electronic power supply.
To power halogen furniture lighting, a voltage of 12 volts that is safe for humans is often used, since touching such a bare wire is practically not felt. Despite the low power of the lighting fixtures (in our case, the total power of the lamps is 60 W), the current in such circuits is much greater than in 220-volt circuits of similar power. Let's calculate the current in the primary circuit of the power supply (220 V). In our case, the current is 60 W/220 V = 0.27 A. The current in the secondary circuit (12 V) is 60 W/12 V = 5 A.
As you can see, the current in the secondary circuit is 18.5 times greater than in the primary circuit. Therefore, it is necessary to carefully consider the selection of the cable section for this type of lighting. In the selection of the section, it is also important which transformer is used to lower the voltage: electronic or induction. In our case, an electronic power supply is used. For such a unit, the permissible length of wires in the secondary circuit (12 V) should not exceed two meters.
To select the wire section for the secondary circuit, use the instructions in the documentation for the transformer, or be guided by the values \u200b\u200bgiven in this table.
Table for selecting the cross-section of a copper cable up to 2 meters long, depending on the total load power:
Preparation for work
To install wardrobe lighting we will need the following materials:
- two-core copper wire, s = 0.75 mm 2 (we select the cross-section according to the table) - 5 m;
- halogen lamps (P = 20 W) - 3 pcs.;
- electronic AC transformer 12 volts (P = 20-60 W) - 1 pc.;
- switch - 1 pc.;
- terminal blocks (I = 3 A, s = 4 mm2) - 9 pcs.;
- self-adhesive cable staples - 10 pcs.
To complete the work you will need the following set of tools:
- flathead screwdriver;
- indicator screwdriver;
- side cutters;
- soldering iron;
- Double-sided tape;
- soldering kit (rosin, solder);
- ladder.
Let's get started
Connection diagram for halogen lamps:

When ordering a sliding wardrobe, seats for halogen lamps were prepared in advance.

Connect the wire to the switch. To do this, you need to open its case. We do this by carefully prying it around the perimeter with a screwdriver.

We remove the outer layer of insulation from the cable with side cutters, strip the wire strands and twist them.

We tin the wire strands and apply solder to them.

Initially, the switch was supplied with a section of wire and a plug for the socket. Since the native wire was not the right length, it was decided to remove it and solder the new wire to the existing terminals. This allowed us to avoid additional connections.
Clean the switch terminals. We tin them and solder the wire strands. It is important that the rosin does not come into contact with the switch contact. If this happens, it can be removed by wiping the contact with alcohol.

Carefully lay the wires inside the switch housing and assemble it.

Now it is important to decide on the location where the switch will be installed. Since it does not represent a great aesthetic value, it would be logical to install it in an inconspicuous place. In our case, the gap between the right wall of the cabinet and the wall was chosen. We place the switch on the cabinet wall with double-sided tape.

In order to hide the wire behind the cabinet wall, we secure it with self-adhesive staples. To do this, remove the protective layer from the adhesive surface of the bracket and stick it on the cabinet wall. After this we fix the wire. We install the staples at intervals of 0.5 meters.
We install halogen lamps in the holes in the top cover of the cabinet.

Since the gap between the ceiling and the top cover of the cabinet is quite small, it is extremely inconvenient to work there. Therefore, we will collect the parts in a place convenient for us. And then we will transfer everything assembled to the cabinet.
We measure a piece of wire from lamp to lamp and cut it off. There should be two wires in total: from the left to the center (wire No. 1) and from the center to the right (wire No. 2).

We strip the ends of wire No. 1 and attach the terminal block to them. This will be the point to attach the leftmost light fixture.

We twist two wires (No. 1 and No. 2) together and connect them with a terminal block. This will be the terminal block for connecting the central lamp.
We connect the ends of wire No. 2 to the 12-volt outputs of the electronic transformer using a terminal block. Which wire goes where doesn't matter. This will be the terminal block for connecting the right lamp.

As a result, we get a wire with terminals connected in parallel.

We fix the terminal block on the 220 V wire, which was previously laid in the wall to connect the cabinet lighting. To do this, be sure to remove the power from the wire!

We supply power to the wire. Using an indicator screwdriver, we determine the phase on the input wire. After turning off the power supply, we make the final connections. The phase will go through the switch to the electronic transformer to the wire marked L. We connect the neutral wire from the transformer (N) through the terminal block to the neutral wire of the existing 220 V wire. We carry out the installation according to the previously indicated scheme. Having connected all the wires, we secure them to the cabinet lid using brackets. The power supply can be secured with double-sided tape.

We arrange the terminals so that wires from halogen lamps can be connected to them.

We connect the lamps to the terminals. Which wire goes to which terminal does not matter.

We check the completed work. We serve food. We turn on the lamps using the switch.

Result of work
Lighting works correctly. The wires are hidden behind the top cover of the cabinet, the switch is not visible, but it is convenient to use. During long-term operation, the wire does not overheat, since the cross-section is correctly selected. Thanks to the compact placement of wires on the top lid of the cabinet, it will be easy to clean. Since the wire is secured with staples, there is no risk of disturbing the electrical connections during cleaning.
Glass shelves with LED lighting are not only beautiful, but also convenient. By choosing the appropriate brightness of the LEDs, you can get a purely decorative effect or use the shelves as night lighting. Interior designers widely use such shelves in their practice to visually increase the space of a room.
Despite the apparent simplicity of the design, truly high-quality and beautiful lighting requires a number of technical solutions.
Installation materials
To make LED strip lighting for shelves with your own hands, we will need:
- Glass shelf;
- the tape itself;
- 12V power supply;
- soldering iron, installation wires;
- drill or screwdriver;
- aluminum U-shaped profile.
Features of LED lighting for glass shelves
External edge processing
Since glass has a low refractive index of light, it acts as a light guide. If you install a diode strip on the back side of a glass shelf, the LEDs will be projected onto the front edge. When using high-power LEDs, a shelf located at eye level can even be blinding.
For a beautiful, uniform glow, the outer edge of the glass shelf should be frosted. The simplest way to matt is to sand the edge with fine sandpaper, which will create a lot of scratches. Light reaching this area will be reflected many times, providing a uniform glow over the entire surface.
Installation of LED strip
 You can attach the LED strip directly to the back wall using double-sided tape. The disadvantage of this installation method is the illumination of the surrounding space. To focus the light, a U-shaped aluminum profile is used. In hardware stores you can purchase a special profile for such shelves.
As a budget solution, it is acceptable to use an ordinary U-shaped aluminum profile.
 Such a profile will also serve as an additional heat sink. There is no need to fix the profile to the body. If desired, you can attach the structure directly to the glass shelf by applying a drop of glue or liquid nails at two or three points.
Business design
The use of lighting in display cases and retail cabinets can significantly change the conversion of potential buyers.
How to make LED lighting in a trade cabinet with a unique design? In addition to the classic luminous edge, you can apply a pattern on the glass surface itself that will glow, attracting attention.
By combining reflective materials with a piece of diode tape and ordinary glass, you can create creative solutions.

Interior lighting
In addition to illuminating glass furniture elements, diodes are widely used to illuminate the interior of cabinets. For LED cabinet lighting, the recommendations for choosing LED strips remain the same.
Features of installing light on the interior of furniture - the need to automate the switching on of diodes when the door is opened. This can be achieved using a simple button built into the end of the door leaf. The only condition is that the button must be a trip type. That is, when pressed, the contact opens.

Choosing the right LED strip
If you plan to make glass shelves with LED lighting in the bathroom or kitchen, it is not recommended to use an ordinary LED strip due to the risk of condensation and short circuits.
There are three main classes of protection for lighting strips:
IP 33– ordinary, for indoor use.
IP65– has a silicone coating for conditions of high humidity, for example in the kitchen.
IP67/68– complete waterproofing, can be used even in showers and swimming pools.
Matrices are well suited for decorative light cmd 3528. Low power allows you to power such a tape from any 12V power supply with a power of 1-2A, saving on an expensive power driver.
Making shelf lighting yourself not only significantly saves your budget, but also allows you to apply individual design and technical solutions.