How to make a TV antenna from beer cans. How to make an antenna from a beer can with your own hands How to make an antenna for a TV from cans
In summer cottages, a television signal can rarely be received without amplification: it is too far from the repeater, the terrain is usually non-uniform, and trees get in the way. For normal “picture” quality, antennas are needed. Anyone who knows at least a little how to handle a soldering iron can make an antenna for their dacha with their own hands. Outside the city, aesthetics are not given so much importance; the main thing is quality of reception, simple design, low cost and reliability. You can experiment and do it yourself.
Simple TV antenna
If the repeater is located within 30 km from your dacha, you can make the simplest receiving part in design. These are two identical tubes connected to each other by a cable. The cable output is fed to the corresponding TV input.
The design of an antenna for a TV in the country: it’s very easy to do it yourself (to enlarge the size of the picture, click on it with the left mouse button)
What is needed to make this TV antenna?
First of all, you need to find out what frequency the nearest TV tower is broadcasting on. The length of the “whiskers” depends on the frequency. The broadcast band is in the range of 50-230 MHz. It is divided into 12 channels. Each requires its own length of tubes. A list of terrestrial television channels, their frequencies and parameters of a television antenna for self-production is given in the table.
| Channel number | Channel frequency | Vibrator length - from one end to the other end of the tubes, cm | Cable length for matching device, L1/L2 cm |
|---|---|---|---|
| 1 | 50 MHz | 271-276 cm | 286 cm / 95 cm |
| 2 | 59.25 MHz | 229-234 cm | 242 cm / 80 cm |
| 3 | 77.25 MHz | 177-179 cm | 187 cm / 62 cm |
| 4 | 85.25 MHz | 162-163 cm | 170 cm / 57 cm |
| 5 | 93.25 MHz | 147-150 cm | 166 cm / 52 cm |
| 6 | 175.25 MHz | 85 cm | 84 cm / 28 cm |
| 7 | 183.25 MHz | 80 cm | 80 cm / 27 cm |
| 8 | 191.25 MHz | 77 cm | 77 cm / 26 cm |
| 9 | 199.25 MHz | 75 cm | 74 cm / 25 cm |
| 10 | 207.25 MHz | 71 cm | 71 cm / 24 cm |
| 11 | 215.25 MHz | 69 cm | 68 cm / 23 cm |
| 12 | 223.25 MHz | 66 cm | 66 cm / 22 cm |
So, in order to make a TV antenna with your own hands, you need the following materials:

It would be nice to have a soldering iron, flux for soldering copper and solder on hand: it is advisable to solder all connections of the central conductors: the image quality will be better and the antenna will work longer. The soldering areas then need to be protected from oxidation: it is best to fill it with a layer of silicone, or you can use epoxy resin, etc. As a last resort, seal it with electrical tape, but this is very unreliable.
Even a child can make this homemade antenna for a TV, even at home. You need to cut the tube to the length that corresponds to the broadcast frequency of a nearby repeater, then saw it exactly in half.
Assembly order
The resulting tubes are flattened on one side. With these ends they are attached to a holder - a piece of getinax or textolite 4-6 mm thick (see picture). The tubes are placed at a distance of 6-7 cm from each other, their far ends should be at the distance indicated in the table. They are secured to the holder with clamps; they must hold firmly.
The installed vibrator is fixed to the mast. Now you need to connect the two “whiskers” through a matching device. This is a cable loop with a resistance of 75 Ohms (type RK-1, 3, 4). Its parameters are indicated in the far right column of the table, and how it is done is on the right side of the photo.
The middle cores of the cable are screwed (soldered) to the flattened ends of the tubes, and their braid is connected with a piece of the same conductor. Getting the wire is simple: cut a piece from the cable slightly larger than the required size and remove all the sheaths. Clean the ends and screw them to the cable conductors (it’s better to solder them).
Then the central conductors from two pieces of the matching loop and the cable that goes to the TV are connected. Their braid is also connected with copper wire.
Last step: the loop in the middle is attached to the rod, and the cable going down is screwed to it. The barbell is raised to the required height and “adjusted” there. To set up, you need two people: one turns the antenna, the second watches TV and evaluates the picture quality. Having determined where the signal is best received from, the home-made antenna is fixed in this position. To avoid having to struggle with “tuning” for a long time, take a look at where your neighbors’ receivers (over-the-air antennas) are pointing. The simplest antenna for a summer residence is made with your own hands. Set and “catch” the direction by turning it along its axis.
Watch the video on how to cut a coaxial cable.
;
Loop from a pipe
This do-it-yourself antenna for a summer residence is a little more difficult to manufacture: you need a pipe bender, but the reception radius is larger - up to 40 km. The starting materials are almost the same: metal tube, cable and rod.
The bend radius of the pipe is not important. It is necessary that the pipe has the required length, and the distance between the ends is 65-70 mm. Both “wings” should be the same length, and the ends should be symmetrical about the center.

Homemade antenna for a TV: a TV signal receiver with a reception radius of up to 40 km is made from a piece of pipe and cable (to increase the size of the picture, click on it with the left mouse button)
The length of the pipe and cable is indicated in the table. Find out what frequency the repeater closest to you is broadcasting on, select the appropriate line. Saw off a pipe of the required size (diameter is preferably 12-18 mm, the parameters of the matching loop are given for them).
| Channel number | Channel frequency | Vibrator length - from one end to the other, cm | Cable length for matching device, cm |
|---|---|---|---|
| 1 | 50 MHz | 276 cm | 190 cm |
| 2 | 59.25 MHz | 234 cm | 160 cm |
| 3 | 77.25 MHz | 178 cm | 125 cm |
| 4 | 85.25 MHz | 163 cm | 113 cm |
| 5 | 93.25 MHz | 151 cm | 104 cm |
| 6 | 175.25 MHz | 81 cm | 56 cm |
| 7 | 183.25 MHz | 77 cm | 53 cm |
| 8 | 191.25 MHz | 74 cm | 51 cm |
| 9 | 199.25 MHz | 71 cm | 49 cm |
| 10 | 207.25 MHz | 69 cm | 47 cm |
| 11 | 215.25 MHz | 66 cm | 45 cm |
| 12 | 223.25 MHz | 66 cm | 44 cm |
Assembly
The tube of the required length is bent, making it absolutely symmetrical relative to the center. One edge is flattened and welded/sealed. Fill with sand and seal the other side. If there is no welding, you can plug the ends, just attach the plugs to good glue or silicone.
The resulting vibrator is mounted on a mast (rod). The central conductors of the matching loop and the cable that goes to the TV are screwed to the ends of the pipe, and then soldered. The next step is to connect a piece of copper wire without insulation to the braided cables. The assembly is completed - you can start “setting up”.
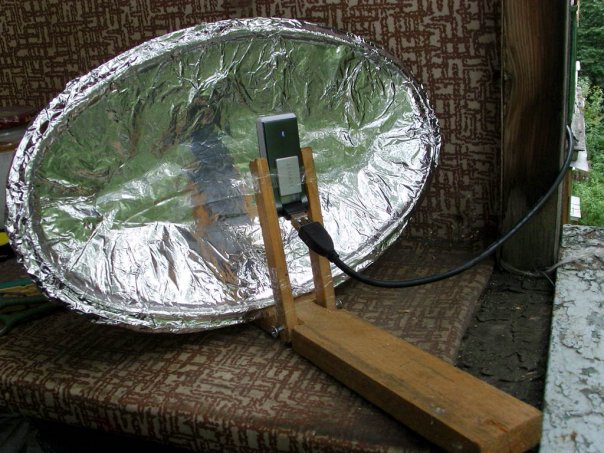
Beer can antenna
Even though it doesn't look serious, the image becomes much better. Tested many times. Try it!
Outdoor antenna made from beer cans

We collect it like this:
- We drill a hole (5-6 mm in diameter) in the bottom of the jar strictly in the center.
- We pull the cable through this hole and take it out through the hole in the cover.
- We fix this can on the left on the holder so that the cable is directed to the middle.
- We pull the cable out of the can by about 5-6 cm, remove the insulation by about 3 cm, and disassemble the braid.
- We trim the braid, its length should be about 1.5 cm.
- We distribute it over the surface of the can and solder it.
- The central conductor sticking out 3 cm needs to be soldered to the bottom of the second can.
- The distance between the two banks must be made as small as possible and fixed in some way. One option is duct tape or duct tape.
- That's it, the homemade UHF antenna is ready.
Terminate the second end of the cable with a suitable plug and plug it into the required socket on the TV. This design, by the way, can be used to receive digital television. If your TV supports this signal format (DVB T2) or has a special set-top box for your old TV, you can receive a signal from the nearest repeater. You just need to find out where it is and point your television antenna there, made with your own hands from tin cans.

Simple homemade antennas can be made from tin cans (beer or beverage cans). Despite the frivolity of the “components,” it works very well and is very easy to manufacture
The same design can be adapted to receive VHF channels. Instead of 0.5 liter jars, use 1 liter jars. Will receive MV band.
Another option: if you don’t have a soldering iron, or you don’t know how to solder, you can do it easier. Tie two cans at a distance of several centimeters to the holder. Strip the end of the cable by 4-5 centimeters (carefully remove the insulation). You separate the braid, twist it into a bundle, and make a ring out of it, into which you insert a self-tapping screw. Make a second ring from the central conductor and thread a second screw through it. Now at the bottom of one can you clean out (with sandpaper) a spot to which you screw the screws.
In fact, for better contact, soldering is needed: it is better to tin and solder the braid ring, as well as the point of contact with the metal of the can. But it also works well with self-tapping screws, however, the contact periodically oxidizes and needs to be cleaned. When it starts snowing you will know why...
DIY digital TV antenna
The antenna design is frame. For this version of the receiving device you will need a cross made of wooden boards and a television cable. You will also need electrical tape and a few nails. All.
We have already said that to receive a digital signal you only need a decimeter terrestrial antenna and a corresponding decoder. It can be built into televisions (new generation) or made as a separate device. If the TV has the function of receiving a signal in the DVB T2 code, connect the antenna output directly to the TV. If your TV does not have a decoder, you will need to purchase a digital set-top box and connect the antenna output to it, and connect it to the TV.
How to decide on a channel and calculate the perimeter of the frames
Russia has adopted a program according to which towers are constantly being built. By the end of 2015, the entire territory should be covered by repeaters. On the official website http://xn--p1aadc.xn--p1ai/when/ find the tower closest to you. The broadcast frequency and channel number are indicated there. The perimeter of the antenna frame depends on the channel number.

For example, channel 37 broadcasts at a frequency of 602 MHz. The wavelength is calculated as follows: 300 / 602 = 50 cm. This will be the perimeter of the frame. Let's calculate the other channel in the same way. Let it be channel 22. Frequency 482 MHz, wavelength 300 / 482 = 62 cm.
Since this antenna consists of two frames, the length of the conductor should be equal to twice the wavelength, plus 5 cm for the connection:
- for channel 37 we take 105 cm of copper wire (50 cm * 2 + 5 cm = 105 cm);
- for channel 22 you need 129 cm (62 cm * 2 + 5 cm = 129 cm).
Assembly
It is best to use copper wire from the cable that will then go to the receiver. That is, you take the cable and remove the sheath and braid from it, freeing the central conductor of the required length. Be careful not to damage it.
- for channel 37: 50 cm / 4 = 12.5 cm;
- for channel 22: 62 cm / 4 = 15.5 cm.
The distance from one nail to another must correspond to these parameters. Laying copper wire begins on the right, from the middle, moving down and further to all points. Only in the place where the frames come close to each other, do not short-circuit the conductors. They should be at some distance (2-4 cm).

When the entire perimeter is laid, the braid from a cable several centimeters long is twisted into a bundle and soldered (wound if soldering is not possible) to the opposite edge of the frame. Next, the cable is laid as shown in the figure, wrapping it with electrical tape (more often, but the laying route cannot be changed). The cable then goes to the decoder (separate or built-in). The do-it-yourself antenna for receiving digital television is ready.
How to make an antenna for digital television with your own hands - another design - is shown in the video.
Oddly enough, but sometimes a device made with your own hands from improvised means is more effective than a special device. This applies to television antennas. We have all encountered poor reception of broadcast channels. We climbed onto the roof and tried to point the stationary antenna in the right direction - the result was zero. This mainly applies to residents of the private sector or household plots in small towns.
And rarely did anyone think that it was possible to radically improve the situation by having empty beer cans on hand. I enjoyed it and can put it to good use. In literally a matter of minutes, with minimal knowledge and experience, you can become the happy owner of a real TV antenna, which is not inferior in quality to industrial designs.
Many people don’t think about how the TV shows and what it needs for it. We just sit opposite him and enjoy our favorite films or analytical programs. However, there are times when, being in nature, you really want to watch a football match of your favorite teams, but you don’t have a catching device with you. This situation can happen both in the country and in the city center, when the wire is either blown away by the wind or is cut off by malicious hooligans. It is necessary to quickly respond to a serious situation and find the right way out. To avoid missing football, you need to have a few aluminum cans with you. And it doesn’t matter with what content: beer, lemonade, soft or low-alcohol drink. Any will do.
Even in ancient times, the Greeks called the antennae of insects antennas. And it’s not surprising, because they have a lot in common, as practice has shown. Thanks to such antennae, living creatures picked up signals, thereby understanding what was happening around them. The task of television antennas is almost the same: to catch radio waves and amplify them.
Catching devices are divided into two types:
- indoor;
- external.

Outdoor homemade antenna
An outdoor antenna is a wire that is connected to the TV at one end and goes out to the roof at the other. Experts agree that the longer the cable, the better the reception. Receiving room devices vary in shape. The most popular are stands with two branches that visually resemble insect antennae.
If you decide to make your own antenna from beer cans, you should take care of purchasing them. Sometimes there is not much choice, and you have to be content with what is in the store or already in the trash. However, you need to know the following. Cans can be either completely aluminum or with tin inserts. This may affect the way the cable is attached to them. Aluminum is practically impossible to solder, so they resort to using self-tapping screws. Tin cans are another matter. A few moves with a soldering iron and the receiving device is ready for use. The presence or absence of iron elements can be determined using a magnet. Aluminum will not be attracted, but tin will be attracted.

It is worth noting that the larger the volume of the can, the better the reception. Therefore, you need to opt for liter copies. In their absence, you can be content with half a liter or even 0.25 ml. If beer cans are not available, old aluminum pans can be used.
The cable can be found:
- flat two-core;
- coaxial, including a core and a screen.
If you have options, you should opt for coaxial, which is best suited for these purposes. In this case, such a cable must be divided at one end separately into a core (central conductor), and separately into a screen.

The holder can be a regular stick. The length should accommodate two cans plus a distance between them of about 10 centimeters. A hanger for sweaters and jackets is suitable. This design can easily be hung on a curtain rod, attached to shelving, or suspended from exotic deer antlers (if available).

Antenna mount can be the most basic
It is worth noting that the most optimal location for the receiving device is considered to be close to the window. Reception will be much better than with an antenna located deep in the house.
To make a simple antenna using empty beer cans it will take only 10-15 minutes. However, it is worth stocking up on the following tools and materials:
- two beer cans. Moreover, in volume they can be half a liter, 0.75 ml or liter. You can be content with smaller volumes;
- insulating tape or tape;
- screws - self-tapping screws (2 pieces);
- antenna cable;
- plug;
- stick (trempel);
- screwdriver;
- soldering iron with rosin or tin.

To make an antenna, simple steps are taken that will not take a lot of effort, energy and free time, and also do not require special knowledge. So let's get started.
- First you need to decide on the cable length. This indicator is influenced by the intended location of the future receiving device. You can install the antenna from inside the room, near a window or in close proximity to the TV. You can take the structure outside and install it on the roof. Typically, the cable length ranges from one and a half to five meters.
- One end of the cable is equipped with a plug, the second end is freed from the inner core somewhere at a distance of 5 to 10 centimeters.

How to strip a TV cable
- The braid is unraveled and twisted apart from the main core.

- Under no circumstances should the braid touch the main core. This leaves 2 cm of the insulating plastic layer.
- Beer cans are being prepared - they need to be emptied. Empty jars are thoroughly washed with water and dried well.

- We connect clean, dry cans to the cable using one of the selected methods.

- Basically the TV antenna is ready for use. All that remains is to build the structure. Any slats, small planks, trempel (hangers), plastic tubes can be used. We attach our beer cans to these simple holders using adhesive tape or tape. The gap between the banks is selected experimentally. We connect the newly created antenna to the TV. We loosely attach the cans and begin to move them along the plank (boards, sticks) and wait for the signal to become optimal. As soon as we “caught” the best signal, we reel in the banks seriously. The minimum distance from which you should start moving the cans varies, depending on the volume. If you have 0.75 liter cans, movement begins from a distance of 7.5 cm. To make it convenient to move around the room with a cable, it should be tied to the same stick using insulating tape or regular tape.

- The TV antenna is ready. The final touch is to plug it into the TV socket, determine its optimal location and watch programs in high-quality images.
Useful video instructions for making antennas from cans:
Antenna reception range
It is worth noting that beer cans are the most affordable material for making a television antenna. However, such a receiving device also has certain disadvantages, which include, first of all, the real inability to receive signals at decimeter waves. Such antennas will not support the meter range due to their characteristics. The technology for creating an antenna from beer cans is also suitable for creating similar devices from metal tubes. But first you need to decide on the broadcast frequency. This indicator is directly related to the size of the metal cylinders. The broadcast band occurs at frequencies from 50 to 230 MHz and is divided into 12 channels.
| Broadcast frequency | Cylinder length |
| 223.25 MHz | 66 cm |
| 215.25 MHz | 69 cm |
| 207.25 MHz | 71 cm |
| 199.25 MHz | 75 cm |
| 191.25 MHz | 77 cm |
| 183.25 MHz | 80 cm |
| 175.25 MHz | 85 cm |
| 93 25 MHz | 147 - 150 cm |
| 85.25 MHz | 162 - 163 cm |
| 77.25 MHz | 177 - 179 cm |
| 59.25 MHz | 229 - 234 cm |
| 50 MHz | 271 - 276 cm |
Frequency also affects the length of the vibrators and the size of the cable for the receiving device. A frequency of 50 MHz assumes a vibrator length of 271 - 276 centimeters, as well as a wire ratio of 286 centimeters to 95 centimeters.
Before you start making a television antenna from beer cans with your own hands, you need to decide initially where the antenna will have a permanent location. When choosing an outdoor location, care should be taken to ensure that strong gusts of wind and adverse weather conditions do not negatively affect the operation of the receiving device. Despite the fact that aluminum is not afraid of corrosion, you still need to cover its surface with a tsapon-varnish compound.

Tsapon-lacquer
Some resort to more effective measures, creating something like a cover. For this you will need a regular plastic bottle. The following steps are being taken:
- Using a sharp object, cut off the neck and bottom of the bottle.
- A hole is made in the place where the cable comes out.
- After connecting the cable, the hole is treated with hot water.
Not only beer cans made of aluminum are used to create a television receiver. You can use other tins as a basis, for example, canned peas, olives or legumes. They are much more convenient to use, since they can be soldered. However, the main disadvantage is the possibility of rust occurring in high humidity. This is worth knowing and taking into account when making an antenna device.

Antennas can also be made from tin cans
To create an antenna, you need:
- completely cut off the lid;
- if there is a varnish coating or coloring substances on the can, it should be thoroughly cleaned of them;
- the core is soldered to the first jar, the screen to the second;
- the resulting device is attached to a stick and secured with adhesive tape or tape.
Helpful information!
To prevent rainwater from accumulating inside the cans, make several holes in the side where the cans are directed toward the ground.
To create an antenna from such material yourself, you should have:
- television cable;
- pipes made of steel, aluminum, brass, copper;
- metal strips;
- textolite;
- barbell

From the above material you can build a completely serious device. The assembly principle is practically no different from the can version. Let's decide on the procedure:
- Tubes are taken and their ends are flattened.
- On a piece of textolite there are two cylinders, the distance between which should be about 7 centimeters.
- They are attached to metal strips using clamps.
- As for the wire, it is soldered in the same way as when using beer cans.
- It is best to treat the soldering area with nitro varnish, epoxy resin or silicone.
- The antenna is carefully attached to the rod.
- The free end of the wire is taken and a connector is soldered to it, which is then inserted into the TV socket.

Conclusion
There is a technology for making useful things with your own hands, without spending significant money and a lot of free time. We are talking, among other things, about using beer cans to create a receiving device. You can spend a quarter of an hour and enjoy television programs of decent quality.
How to make an antenna from beer cans: step-by-step instructions with photos and videos
5 (100%) 3 votesSo, imagine this situation: in the evening you decided to watch your favorite TV program, and suddenly the TV stopped showing - the cable TV was turned off. Or another case: you arrived at the dacha, already prepared for a vacation and discovered that you forgot to buy an antenna for the TV - not a single channel works. What to do in this case? The answer is simple - you need to make an antenna for the TV with your own hands from scrap materials, because most likely the cause of the breakdown is in this device. Next, we will look at the simplest manufacturing options, which will require a minimum of available parts and time.
Idea #1 – Use beer cans!
This version of a homemade television antenna is the simplest and fastest to manufacture. The maximum number of channels that you can catch is 7, but this figure can vary significantly depending on the region, terrain features and distance to the TV tower.
To make a TV antenna from beer cans, you will need the following materials:
- 2 small self-tapping screws, also called “bugs” (not needed if you have a soldering iron);
- 2 prepared beer cans (empty, washed and dried);
- from 3 to 5 meters of television cable (can be taken from a failed device);
- soldering iron and tin (for better fixation of contacts), availability is optional;
- screwdriver;
- wooden trempel (hanger);
- electrical tape or tape.
Finding all the materials in the house will not be a problem, so having prepared them, we immediately get down to business.
In order to make a homemade antenna from cans, you need to complete the following steps:
- We prepare the cable. First, at a distance of 10 cm from the edge, you need to make a shallow circular cut and remove the top layer of insulation. Having opened access to the screen, we collapse it into one bundle. After this, we cut off the middle insulating layer, exposing the copper core of the cable by a few cm. At the second end of the wire there should be a regular antenna plug.
- We prepare the jars. There will also be no difficulties with containers that will act as signal receivers. First you need to choose the optimal dimensions of beer cans. It is better to use liter ones, but if these are not available, containers with a volume of 0.5 and 0.75 liters will also cope well with the task.
- Let's make contacts. At this stage, the twisted cable screen is fixed to one can, and the copper core itself is fixed to the other. Fixation is carried out by bedbugs using a screwdriver or a regular screwdriver. However, it is recommended to fasten the wire not with bugs, but with a soldering iron. The result should look like this:

- We assemble a homemade antenna for a TV. The signal receiver is ready, now we make a supporting structure, which we use as a trempel or a regular hanger. Under no circumstances should it be made of wire or metal. Using electrical tape, we fix the containers to the trempel (as shown in the photo). We draw your attention to the fact that the banks must be strictly on the same straight line, otherwise the homemade product will not work and receive the signal stably.

- Setting up an antenna for the TV. Now you need to experiment with the optimal distance between the cans, as well as where to hang the device and its position so that the homemade product catches many channels. We turn on the TV and determine exactly how the receivers should be located and where is the most suitable place for their work. This completes the technology for creating the device.

As you can see, the whole process is quite simple and does not represent anything complicated. The optimal distance is 75 mm between the ends of the cans, and the best installation location is near a window or on an external mast. In individual cases, the distance between the banks can be made larger or smaller.
Visual video instructions for creating a simple antenna from cans
Idea No. 2 – Use wire
Another equally good option that is advisable to use in the village is a homemade antenna made of copper wire with an amplifier.
All you need for production is:
- amplifier (suitable from an old device, for example, a non-working or disassembled antenna);
- two pieces of wire 180 cm each, it is advisable to choose thick and stiff so that the wind does not damage the device;
- a piece of metal (or wood) plate 15*15 cm;
- electric drill with a set of drills (a welding machine is desirable);
- small bolts;
- hammer;
- iron pipe;
- a television cable of suitable length with a plug (sold in radio stores, not expensive, can be removed from a non-working device).
So, to make your own TV antenna from copper wire, you need to complete the following steps:

Please note that in the photo examples, both the amplifier, the reflector, and the wire are covered with paint. Painting protects the structure from corrosion and other adverse factors, significantly extending the service life of a homemade TV antenna.
Idea No. 3 – Home HDTV device
If the first 2 options worked at a frequency of no more than 270 MHz, then the next manufacturing method will allow you to enjoy a higher quality picture, because The signal range can reach up to 490 MHz. The only part that is unlikely to be found among household items is a matching transformer from 300 to 75 Ohms. You will need to buy it in advance at a specialized store, but some plugs already contain this part.
Although, there are instructions on the Internet for making a homemade transformer, you can find and use it, this will significantly improve your skills in assembling homemade antennas.


Materials you will need:
- Scotch
- Cardboard
- Stationery knife
- Foil
- Stapler
- Scissors
- Marker
- Roulette
- Glue (pencil or PVA)
Having prepared all this school kit, let's get down to business!
First you need to draw (or print on a computer) this diagram:


Now, according to the diagram, we cut out all the spare parts, including the necessary pieces of foil:


After this, you need to make a reflector with dimensions of 35 * 32.5 cm (height and width). Cover one side with foil.


In the middle we cut out two identical rectangles, which are necessary in order to completely assemble the signal catcher for a homemade antenna for a TV. The rectangle should be 3.5 cm long, its purpose is to maintain the distance between the reflector and the auxiliary parts.


We glue the parts onto the rectangle, and when the glue sets, we drill holes for the television cable.


We connect the transformer and cable using twists, tape or a soldering iron. A more powerful TV antenna is ready for use! It should also be noted that this homemade version is only suitable for indoor use, because The paper will quickly become wet from being used outdoors.
Assembling a digital antenna from a TV cable and a cardboard box
Another option for a powerful device made at home:
HDTV antenna made from improvised means
Idea No. 4 – Apartment option
There is another way to make a powerful antenna for a TV from improvised materials, which is suitable for both outdoor and indoor use.
To make the device you will need the following materials and tools:
- 4-meter copper wire, cross-section 4 mm2;
- board of arbitrary thickness, 55 cm long and 7 cm wide;
- wood screws;
- ruler or tape measure;
- a simple pencil;
- screwdriver;
- soldering iron;
- antenna plug.
So, first, we transfer the drawing to the workpiece and drill holes in the board: 
Then we transfer the drawing data to the board and drill in the appropriate fastening points. 
Next, the copper wire must be straightened and cut into 8 equal pieces of 37.5 cm each. 
In the middle of each of the 37.5 cm sections, the insulation must be removed (as shown in the picture). To do this, use a sharp knife; a stationery knife is perfect. 
We cut off 2 more pieces of wire 22 cm long and divide them into 3 equal parts, bend them slightly and, again, remove the insulation in these places. 
We bend the prepared wire in exposed areas. We draw your attention to the fact that for those segments that are bent in half, the distance between the ends must be 7.5 cm (the optimal value for receiving a signal from a homemade television antenna). 
Next, we attach the plug to the finished homemade product, and connect the television cable to it. 
 This concludes the manufacturing process. We select a suitable location and direction where signal reception is best, and install the device.
We tried to select the simplest instructions. We hope that now you know how to make a home TV antenna with your own hands! We draw your attention to the fact that today on the Internet you can find many other options in which inventors come up with more and more new manufacturing options, using, for example, copper and aluminum tubes, disks, electrodes... The choice of components for assembly is usually determined only by their availability, so don’t be afraid to experiment and come up with your own original manufacturing methods.
Related materials:
In this article I want to tell “the whole truth” about the beer TV antenna. Let's figure out whether an antenna made from beer cans is a myth or reality. On the Internet, the most common option is the following: two banks are separated by 7.5 cm and connected to the central core and braid of a 75 Ohm television cable. However, this option only works well with a strong signal and with a short cable, i.e. essentially in ideal conditions, when a TV tower is visible from the window of the room, or the TV signal transmitter is located several kilometers away. What if you need an antenna that picks up a signal at a distance of 30 km? Is it possible to make a correct and most importantly simple antenna for digital television from beer cans? Can! The antenna turns out to be quite broadband. Receives the entire UHF range and strong VHF signals.
First of all, you need to delve a little deeper into the theory. From the point of view of a “classical antenna,” what are two beer cans separated by a distance of 10 to 120 mm? We take two standard sizes of beer cans: 0.5 l (can height 168 mm) and 0.33 l (can height 115 mm) and begin to calculate the relationship between the sizes of the cans and the frequencies of UHF TV channels. Two beer cans from a classical point of view (antenna theory) can represent either a split half-wave vibrator or a split wave vibrator. I won’t bother you with technical calculations; I’ll immediately give a table of applicability to television bands. Who is interested in calculations, see the book from the old 60s: Karl Rothhammel "Antennas", in the relevant sections. Pictures from the same book.
So, we are primarily interested in the UHF range (this is where digital television is broadcast in the DTV-T2 format). In the UHF range, two 0.5l cans. from beer are a split wave vibrator. Let's look at the parameters of the wave vibrator.
Considering that the diameter of a beer can is in the region of 1/10 of the wavelength, we can roughly determine from the graph (mentally we continue the lines): shortening coefficient K = 0.75 and the input impedance of two beer cans is about 600 Ohms (there is no exact data on this matter I have, but I want to believe that it is so) It turns out that the design replicated on the Internet, this is the antenna

not correct by agreement.E then the emitter with an input impedance of 600 Ohms is connected to a 75 Ohm cable without any matching. As already mentioned, this design only works in the immediate vicinity of a television tower. And we want to receive in difficult reception conditions.
///Added 03/27/2019. The antenna of two cans in the picture above is not entirely incorrect, it is quite possible, but it does not quite fit the frequency range. Two 0.5 liter cans, like a HALF-WAVE VIBRATOR, correspond to frequencies somewhere in the region of 250-400 MHz. There are no terrestrial digital television channels in this frequency range. Such a HALF-WAVE split vibrator has a resistance of 60-70 Ohms, which is quite consistent with the RK-75 cable. It will receive, but a strong signal, and in these conditions it is easier to receive digital TV simply with a regular plug. We want more, and we begin to consider two banks as a WAVE vibrator, the antenna operating frequency immediately goes into the desired UHF range, but the resistance of the vibrator increases tens of times!, and the reduction cable is the same 75 Ohms. Without appropriate approval, we significantly underestimate the capabilities of the can antenna.
I didn’t pay attention before, but in the picture the size is indicated as 0.75m! plus cans 2x0.17, i.e. The antenna span should be 1 meter according to the picture. Damn... is this a half-wave vibrator with a frequency of 150 MHz, like the 6th channel of meter waves?! Or wave at 300 MHz... so there is no TV broadcasting at these frequencies. In short, there is some strange size in the picture. If the distance between the banks is 7.5 cm, it still doesn’t go anywhere, but it can still be better!
 ///
///
The right beer antenna.
Finally, we move on to a homemade design of a simple but effective antenna from beer cans. We will need (in parentheses the quantity is indicated for an antenna array of 8 beer cans):
- beer cans 0.5l - 4 pcs. (For an advanced version of the antenna array 8 cans);
- aluminum single-core wire with a diameter of approximately 2.5 mm - 1 m. You can use a wire of any diameter (for a grid of 8 cans you need about 2m);
- transformer 300 Ohm/75 Ohm 1 pc. It can also be called “matching device 300/75” or “adapter for telescopic HT antenna”. In the store it costs about $0.5;
- self-tapping screws with press washer 6 pcs. (for grille 14pcs);
- dielectric base, board, plywood sheet, plexiglass, etc. dimensions 150*300mm. (For grid 150*1000)
A diagram of a simple antenna for digital television DTV-T2 made from beer cans is shown below. To points a a" a 300/75 transformer is connected. The figure shows the dimensions for UHF channel 33. The first multiplex in the city of Miass, Chelyabinsk region is on this channel. If necessary, you can recalculate the dimensions to another frequency.

Distance BETWEEN the wires that connect the upper and lower level banks should be 13-14mm, with a wire diameter of 2.5mm. In this case, the wire line has a resistance of about 300 Ohms. This is necessary for approval. If the wire has a different diameter, you need to recalculate the distance BETWEEN conductors, it should be approximately equal to 5.1 wire diameters. (for a wire with a diameter of 2mm, the distance between the conductors = 10mm)
/// Added 03/27/2019. I was asked why in the drawings the size between the wires is different, sometimes 20, sometimes 14 mm? I agree, I missed it. See picture below. to get a power line resistance of 300 ohms, you need a certain distance between the wires, because If we use what we have at hand, then the size D" must be recalculated to suit your wire diameter. Between the wires M, and in the center of the wires D" are also different values. Formula indicated, resistance Z=300 Om, substitute the diameter of the wire used, calculate D". You can recalculate, you can take it from the table (see figure below).

Top level beer cans with Rin~600 Ohm. connected in parallel to the lower level banks Rin~600 Ohm. The total resistance at points aa" is about 300 Ohms, which is consistent with the resistance of a two-wire line. In this design, the distance between the upper and lower level banks, in principle, can be taken as another 0.3λ - 0.6 λ, The main thing here is that the antenna feed point is exactly in the middle between banks. The width distance at the extreme points of the cans should be 0.75 of the average wavelength. Let me remind you that 0.75 is a coefficient. shortening the wave vibrator.
Practical implementation of the design of an antenna made from beer cans for receiving digital television.
We mark the board and clean the aluminum. wire from insulation.

We clean the edge of the can from varnish. Use an awl to make a hole for the self-tapping screw. Screw the can from the inside self-tapping screw, he with his hat will press the wall of the can against the aluminum. wire.
Added 11/23/2018: There is flux in stores for soldering aluminum; it is better to solder the can to the wire if the structure will be used outdoors. And after soldering, secure the can with a self-tapping screw.

To tighten the self-tapping screw with a press washer from the inside of the can, we make a technological hole on the opposite side for a screwdriver. No need to drill. Using a stationery knife, make cross-cuts and bend the resulting petals inside the jar. Make slits in the bottom of the jar to allow water to drain.

We screw the cans to the supporting plate. The self-tapping screw presses the wall of the can against the wire. The width of the edges of the cans should be spaced at a distance of 0.75 wavelengths. Distance between wires 13-14mm ("Between" is size M, see above drawing of an antenna made from beer cans. with a wire diameter of 2.5mm). It should look something like this.

Now you need to connect a 300/75 transformer exactly in the middle of the cans. Just like in the photo. There are almost all stores that sell TV antennas.

The transformer screws need to be connected to the wire. A short connecting wire is passed through the board. From the side of the cans we press with a self-tapping screw and ensure contact of the communication line with the connecting wire.

The transformer is attached to the opposite side of the carrier plate. The connecting wire is bent under the screws of the transformer.

Connect the TV connector to a 75 Ohm cable and then to the TV. The cable can be connected with a connector if the antenna will not be used outdoors. If the antenna is intended to be installed outdoors, the television cable must be soldered. The design of the antenna in the photo is intended for use in a place protected from precipitation (attic of a summer house), so everything is assembled with screws, without the use of soldering. Instead of a transformer, you can use a U-shaped elbow, but the antenna will be more narrowband.
The correct antenna made from beer cans according to the drawing is ready.

During the tests, channels from 23 to 60 were taken 15 km from the TV tower and with a 10-meter drop cable. The antenna made from beer cans was compared to the Kharchenko antenna (Gain without a screen is about 6 dB), in the form of a figure 8 with a rhombus side of 1/4 wavelength. From beer cans it turned out to be more broadband, all UHF channels (DTV-T2) andwith satisfactory qualitymeter range channels. The Kharchenko antenna only picks up the UHF range. Cuff. The antenna gain from 4 cans of beer is 5.8 dB (in theory). The disadvantage of an antenna made from beer cans: high windage and large dimensions, compared to the same 8-piece from Kharchenko. Due to its broadband, an antenna made from beer cans catches more industrial noise, which affects the analog signal; for digital DTV_T2 this is not a disadvantage. Kharchenko's Eight for digital TV, not by much, but still better. But in this case, we are primarily interested in the unusual design.
For difficult reception conditions, you need to connect an amplifier from a Polish antenna instead of a 300/75 transformer. You can increase the number of cans to 4 floors, in Rothhammel’s book, in the section “Power supply for multivibrator antennas”,There are diagrams and calculations, but this design is much larger in size. Here are drawings of an antenna made from beer cans. Please note that the distance between the wires is different.

In this design, the distance between connection pointsa a" and upper/lower floors it is fundamentally important - a quarter of the wavelength, taking into account the coefficient. shortening of a two-wire communication line 0.25λ* 0.95 = 0.24λ. These are quarter-wave transformers that “sort of” convert 150 Ohms (4 parallel-connected floors of banks of 600 Ohms each) into the 300 Ohms we need. /// added 03/27/2019 quarter wave tr. are calculated by the formula Ztr = square root of (Za * 2 * Z), where Za = 300 Ohm, this is the upper part. Z =300 is the output to the matching device. coefficient 2 takes into account that it is as if the two previously discussed antennas are added in parallel. Ztr=root(300*2*300)=424 Ohm. Again, we look at the resistance of the two-wire line, in order to get Ztr = 424 Ohm, we need to place the conductors at a certain distance,

///
The upper and lower banks are connected with crossed lines, which allows the signals to be added in phase. The distance 0.48λ is again half the wavelength, taking into account the shortening of 0.5 λ* 0.95. Cuff. antenna gain from 8 cans of beer is 8.6 dB (theoretically).
You can use the map of the TRRS website to find your region, double-clicking on the green TV tower opens a window with digital TV frequencies.

Enjoy watching TV in digital quality.
I’ll tell you about another antenna that, in my opinion, is easier to manufacture. Still, for many, an antenna made from beer cans is not an object of aesthetic admiration.
Literature: Karl Rothhammel "Antennas" section VHF antennas / Multivibrator antennas
08/2015-03/2019 When copying material, please do not be shy and refer to the original article.
Other additions:
03/26/2019 Picture of how to replace a jar with a V-shaped vibrator. The remaining dimensions are retained.
Despite the rapid development of the Internet, television remains the main source of information for the majority of the population. But in order for your TV to have a high-quality picture, you need a good antenna. It is not at all necessary to buy a television antenna in a store, because you can make it yourself and save a lot of money.
You can find out how to make high-quality antennas for various broadcast bands and what materials to use by reading our article.
There are many types and forms of television antennas, the main ones are listed below:

- Antennas for receiving a “wave channel”.

- Antennas receiving a “traveling wave”.

- Loop antennas.

- Zigzag antennas.

- Log-periodic antennas.
 Array antennas
 - Array antennas.
Antennas for digital television reception
The whole world, including our country, has switched from analogue to digital broadcasting. Therefore, when making an antenna with your own hands or buying it in a store, you need to know which antenna is best suited for receiving DVB-T2 format:

- Indoor antenna- suitable for receiving a signal in DVB-T2 format only at a distance of up to 10 kilometers from the repeater. In principle, at this distance, even an ordinary bare wire inserted into the antenna connector of the TV and directed in the desired direction can receive the signal, but for a more stable and stable signal, it is better to use an indoor antenna.

- Crow antenna- capable of receiving a digital signal at a distance of up to 30 kilometers. This type of antenna is installed outside the home and does not require a clear focus on the repeater. But in cases where the distance from the signal source is more than 30 kilometers or there are interference generators nearby, it is advisable to point the antenna at the TV tower.

- Antenna type DIPOL 19/21-69- receives a signal at a distance of up to 50 kilometers. Requires installation at a height of 8-10 meters and a clear direction to the signal source. In conjunction with an amplifier, it is capable of receiving a digital signal at a distance of up to 80-100 kilometers. The excellent characteristics of this antenna make it one of the best options for receiving a signal in the DVB-T2 format at a remote distance from the repeater.
If you live not far from a TV tower, then you can easily make a simple antenna for receiving a signal in DVB-T2 format with your own hands:
- Measure 15 centimeters of the antenna cable from the connector.
- Remove 13 centimeters of outer insulation and braid from the cut edge, leaving only the copper rod.
- Referring to the TV picture, point the rod in the desired direction.
The antenna is ready! It should be noted that such a primitive antenna is not capable of providing a high-quality and stable signal at a distance from the TV tower and in places with sources of interference.
DIY antennas
Let's look at several options for television antennas that you can make yourself from scrap materials:
Beer can antenna
An antenna from beer cans can be made in literally half an hour, using the materials you have on hand. Of course, such an antenna will not provide a super-stable signal, but for temporary use in a country house or in a rented apartment it is quite suitable.
 Beer can antenna
 To make an antenna you will need:
- Two aluminum cans of beer or other drink.
- Five meters of television cable.
- Plug.
- Two screws.
- A wooden or plastic base on which the jars will be attached (many people use a wooden hanger or mop).
- Knife, pliers, screwdriver, insulating tape.
After making sure that you have all the above items in stock, do the following:
- Strip one end of the cable and attach the plug to it.
- Take the other end of the cable and remove 10 centimeters of insulation from it.
- Unravel the braid and twist it into a cord.
- Remove the plastic layer from the insulating rod of the cable to a distance of one centimeter.
- Take the jars and screw the screws into them in the center of the bottom or lid.
- Attach a rod to one can and a braided cable cord to the other, screwing them onto screws.
- Attach the jars to the base using electrical tape.
- Attach the cable to the base.
- Insert the plug into the TV.
- Moving around the room, determine the location of the best signal reception and attach the antenna there.
There are other variations of this antenna, with four and even eight banks, but no obvious effect of the number of banks on the signal quality has been identified.
You can also learn how to make an antenna from beer cans from the video:
Kharchenko zigzag antenna
The antenna received its name in 1961, after the name of its inventor Kharchenko K.P., who proposed using zigzag-shaped antennas to receive television broadcasts. This antenna is very well suited for receiving digital signals.
 Antenna Kharchenko
 To make a zigzag antenna you will need:
- Copper wire with a diameter of 3-5 mm.
- TV cable 3-5 meters.
- Solder.
- Soldering iron.
- Plug.
- Insulating tape.
- A piece of plastic or plywood for the base.
- Fastening bolts.
First you need to make an antenna frame. To do this, take the wire and cut off a piece of 109 centimeters. Next, we bend the wire so that we get a frame of two parallel rhombuses, each side of the rhombus should be 13.5 centimeters, make loops from the remaining centimeter to fasten the wire. Using a soldering iron and solder, connect the ends of the wire and close the frame.
Take the cable and strip its end so that you can solder the rod and cable shield to the frame. Next, solder the rod and cable shield in the center of the frame. Please note that the screen and the rod should not touch.
Place the frame on the base. The distance between the corners of the frame at the junction with the cable should be two centimeters. Make the size of the base approximately 10 by 10 centimeters.
Strip the other end of the cable and install the plug.
If necessary, attach the antenna base to a stand for further installation on the roof.
You can watch more detailed instructions for making the Kharchenko antenna in the video:
Coaxial cable antenna
To make the antenna you will need a 75 ohm coaxial cable with a standard connector. To calculate the cable length required for the antenna, you need to find out the digital broadcasting frequency and divide it in megahertz by 7500, and round the resulting amount.
 Cable antenna
 Once you have the cable length, do the following:
- Strip the cable on one side and insert it into the antenna connector.
- Step back two centimeters from the edge of the connector and make a mark from which you will measure the length of the antenna.
- Having measured the desired length, bite off the excess with pliers.
- In the area of the mark, remove the insulation and braiding of the cable, leaving only the inner insulation.
- Bend the cleaned part at an angle of 90 degrees.
- Set up your TV with a new antenna.
You can visually consolidate the information by watching the video:
Satellite antenna
It’s worth mentioning right away that to receive a satellite signal you need a tuner and a special set-top box. Therefore, if you do not have this equipment, then creating a satellite dish with your own hands will not be possible, since you yourself can only make a parabolic reflector:

- Plexiglas parabola- produced by heating. The plexiglass is placed on a blank that follows the shape of a parabolic reflector and placed in a chamber with a high temperature. After the plexiglass softens, it takes the form of a blank. After the plexiglass has cooled, it is pulled out of the mold and covered with foil. The disadvantage of such production of a homemade parabola is that the costs of its production exceed the market value of a factory reflector.
- Sheet metal reflector- made from a sheet of galvanized iron, meter by meter in size. The leaf is given a round shape and cuts are made from the edge to the center in the shape of the petals. After this, the sheet is placed on the curved reflector template and the “petals” are fastened with spot welding or rivets.
- Mesh reflector- made from frame and mesh. First, a template is made, the parameters of which are calculated using the formula. Radial parabolas are made from copper wire using a template. The wire cross-section is selected based on the antenna diameter. For example, for an antenna with a diameter of 1.5 meters, use a wire with a diameter of 4-5 mm. It is also necessary to make circular belts. The diameter of the belts changes in increments of 10-30 cm. After making the frame, it is covered with fine copper mesh.
All of the methods listed above can be considered seriously only out of sporting interest, since making a parabolic reflector by hand is a very labor-intensive and expensive process. In addition, it is very difficult to accurately calculate the parameters of a satellite dish at home. Therefore, we advise you not to be original and buy a complete satellite dish.
Antenna amplifier
If the place where you live has a weak television signal and a conventional antenna cannot provide a high-quality picture on your TV, then an antenna amplifier can help in this situation. You can make it yourself if you have a little knowledge of radio electronics and know how to solder. 
Amplifiers should be installed as close to the antenna as possible. It is better to power the antenna amplifier via a coaxial cable through a decoupler.
 Isolation power circuit
 The decoupler is installed at the bottom of the TV and is supplied with 12 volt power from the adapter. Two-stage amplifiers consume a current of no more than 50 milliamps; for this reason, the power of the power supply should not exceed 10 watts.
All connections of the antenna amplifier on the mast must be made by soldering, since the installation of mechanical connections will lead to their corrosion and rupture during further operation in an aggressive external environment.
There are times when you have to receive and amplify a weak signal in the presence of powerful signals from other sources. In this case, both weak and strong signals arrive at the amplifier input. This leads to blocking the operation of the amplifier or switching it to a non-linear mode, mixing both signals, which is expressed in the overlay of the image from one channel to another. Reducing the amplifier supply voltage will help correct the situation.
Please note that UHF amplifiers are greatly influenced by signals in the meter range. To weaken the impact of meter signals, a high-pass filter is placed in front of the UHF amplifier, which blocks meter waves and transmits only signals in the decimeter range.
Below is a diagram of a VHF antenna amplifier:
 VHF antenna amplifier circuit
 - The gain is 25 dB. at a voltage of 12.6 volts.
- Current consumption is no more than 20 milliamps.
- The back-to-back connection of diodes D1 and D2 protects the transistor from failure due to a lightning strike.
- The cascades have a common emitter.
- Capacitor C6 provides correction for the constant response of the amplifier in the high frequency region.
- To stabilize the transistor mode, the amplifier is covered by negative feedback from the emitter of the second transistor to the base of the first.
- To avoid self-excitation of the amplifier, an isolation filter R4 C1 is used.
We also suggest that you familiarize yourself with the circuit of the decimeter amplifier:
 UHF amplifier circuit
 - Antenna amplifier of the UHF range 470-790 megahertz.
- Gain 30 dB. at a voltage of 12 volts.
- Current consumption is 12 milliamps.
- The cascades have a common emitter and microwave transistors with a low intrinsic noise level.
- Resistors R1 and R3 provide temperature compensation for the transistor mode.
- The amplifier is powered via a coaxial cable.
You can see the operating principle of the antenna amplifier in the video:
Now, having familiarized yourself with the diagrams and armed with a soldering iron, you can safely begin making an antenna amplifier.
We hope that our article about television antennas was useful to you!