How to sew up a roof. What materials can be used for roof overhangs? Installation procedure
Do-it-yourself filing of the roof cornice allows you to protect the roofing pie from external influences and give the roof an attractive appearance. Currently, there are many options for plating. We will focus on the most popular in this article.
Binder Features
Work on sheathing the roof overhang is recommended to be carried out after the installation of the truss structure, but before the arrangement of the crate for laying the roofing. Before filing the eaves, it is necessary to lay the waterproofing of the roof and it is desirable to perform roof insulation from the side of the attic. In addition, it should be noted that it is preferable to sew up the roof overhang before the start of external insulation of the walls of the house, so as not to damage the wall covering during work with the eaves.
At the first stage of work, the protruding parts of the rafters should be sawn off in one line, which should be parallel to the adjoining wall of the building.

The overhangs of the pitched roof are sewn up in such a way that gutters can be installed and ventilation of the roofing pie can be ensured. For these purposes, various materials and mounting technologies can be used.
Material selection
Traditionally, roof sheathing is done with edged and planed boards. To make the roof look aesthetically pleasing, you should use boards that are the same in thickness and width. In addition to the board, various materials are widely used today, which should:
- provide reliable protection of the eaves of the roof from moisture, frost, precipitation;
- provide the necessary ventilation of the roof;
- have resistance to external influences and durability;
- have aesthetic appeal.
Popular materials for arranging a cornice overhang include:
- lining (wooden and PVC);
- soffit (vinyl and aluminum);
- corrugated board.
Edged and planed board with a thickness of 1.5-2 cm is a practical material for mounting the filing, which makes it possible to ensure high-quality and uniform ventilation of the roof. To do this, the elements should be stuffed with a gap of 1-1.5 cm.

Wooden lining. This material should be chosen with great care: the roof eaves filing is operated outdoors, respectively, the lining must be made of high-quality medium-moisture wood and have a sufficiently large thickness - this will avoid warping.

It is recommended to use wooden lining that has been stored outdoors for at least a month, as its humidity corresponds to that of the environment.
PVC lining. It is an inexpensive and easy-to-install material. Moisture resistant lining is designed for a long service life. For the installation of this material, you should immediately purchase U-shaped plastic strips for sheathing the edges and special corners for attaching joints.
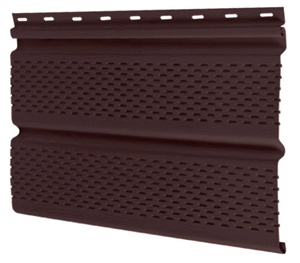
Soffit. This is a special aluminum or plastic panel with which the roof eaves are hemmed. Outwardly, the soffit resembles siding, but it is made of thicker plastic and is equipped with perforations, which allows you to create the necessary air ventilation under the roof. The advantages of aluminum and plastic soffit include high weather resistance and durability. UV stabilizers are added to plastic for the manufacture of spotlights.

Soffit panels are cut along the length of the cornice overhang and installed perpendicular to the wall.
Decking. Profiled sheet of galvanized steel with a color polymer coating is usually used for filing roofs made of the same material. The profiled sheet has a sufficiently high rigidity, is resistant to external influences and extreme temperatures. Corrugated board panels are cut according to the size of the cornice overhang. The ventilation gap of such a filing is equal to the height of the corrugated sheet wave.

Eaves sheathing frame
The roof eaves are hemmed after the roof frame is installed and the protruding edges of the rafters are adjusted to size. After sawing off the rafter legs, the first board of the crate is mounted along the line, which later serves as a guide for work in the following stages. Next, you should complete the sheathing of the overhangs, choosing the appropriate type of construction.:

Do-it-yourself filing of the roof eaves includes the creation of a roof overhang box. In both versions of the sheathing device, it is performed in the same way: a board is stuffed onto the crate along the gable, it is required to measure the distance from it, which should correspond to the width of the overhang. Then the board is nailed parallel to the gable wall.
Binder installation
Sheathing the roof eaves with soffit requires the use of a J-shaped strip, which is fixed with self-tapping screws along the eaves and along the wall. Soffit sheets are mounted between the slats. The length of each panel must be equal to the distance between the mounted strips minus 6 mm for thermal expansion of the material. If the roof overhang exceeds 900 mm, subtract 12 mm. The frontal board is closed with a special frontal bar. The use of soffit and special elements make it possible to create a durable, functional and attractive roof overhang.

Before sheathing the roof eaves with an edged board or wooden clapboard, the material cut to size should be impregnated with antiseptic, fire-resistant and water-repellent compounds. This allows you to extend the life of the binder.
The width of the edged board is adjusted depending on the size of the overhang. Elements should be mounted in 10 mm increments, creating ventilation gaps. If the cornice overhang is sewn up with clapboard, the planks are laid with a tenon-groove connection, and special ventilation grilles should be installed every 1.5 meters.
To sew up the roof overhangs with corrugated board, it is necessary to screw the pre-cut sheets to the frame parallel to the wall and along the eaves. Self-tapping screws are used as fasteners. The junction of the wall and sheet material is closed with an inner corner and a frontal bar. The inner corner should be attached to the profiled sheet, the frontal bar - to the frontal board. The fastening of the outer corner is carried out along the outer joints of the profiled sheet.
Along the pediment, the corrugated board is mounted along the wall, along the outer edge of the roof overhang. Then the corners and the end plate are installed. To provide air access for roof ventilation, the width of the corrugated sheet should be 2 cm less than the width of the overhang. It is important to take into account that the filing, made of metal sheet, is prone to corrosion in places where moisture accumulates and its service life is inferior to other options for finishing the cornice overhang.
No wonder people have said since ancient times that the main thing is a reliable roof over your head. Professional roofers also confirm that only a reliable, durable roof ensures comfortable living in the house. Moreover, the reliability and durability of this complex structure, sometimes depends on seemingly very insignificant elements.
For example, the roof eaves, despite their small size and percentage of the surface area of the slopes, this element performs important functions that affect the service life, insulating ability and strength of the roof. In this article we will talk about the device of the roofing cornice of the house, how to form it and the optimal size.
Roof eaves - an important element of roof structures, this term refers to the lower parts of the roof slopes, which are their continuation. Installation of cornices is carried out during the arrangement of the truss system by increasing the length of the rafters or by installing fillies. From above, the cornice, like the entire area of \u200b\u200bthe slope, is covered with roofing material, and from below it is sewn up with the help of lumber, spotlights, and siding. In the construction of the roof of the house, it performs the following functions:
- Protects the walls of the house from moisture. The cornice overhang of the roof protects the upper part of the outer walls from the ingress of atmospheric moisture and dirt, while maintaining their attractive appearance and integrity.
- Prevents the runoff of melt and rain water on the foundation blind area. The device of the roof eaves is such that it carries out streams of water and blocks of snow sliding off the slope, further from the foundation of the house, preventing erosion and destruction of the blind area.
- Gives the roof a finished, neat look. Roof overhangs, being a continuation of the slope, give the structure a more proportional look, harmoniously completing the architectural design of the house.
Note! Installation of cornices is an obligatory stage of roofing work, which is required by the technology of roof construction, regardless of its type, shape and type of waterproofing coating. Even flat roofs have a small extension protruding beyond the outer walls of the building.
Kinds
Many homeowners are interested in whether it is possible to decorate a roof cornice with their own hands, since its visual device seems extremely simple. Experienced craftsmen believe that this is a job even for a non-professional. The main thing is to understand the purpose and types of cornices. In the design of pitched roofs, the following 2 types of overhangs are distinguished:
- Fronton. The gable overhang is the part of the roof slope that protrudes beyond the outer walls of the house from the side of the gable. As a rule, this type of cornice has a short length and is formed by a crate and a frontal bar that gives it a shape.
- Cornice. A cornice overhang or cornice is called the lower part of the slope, starting from the intersection of the roof plane with the outer load-bearing walls. These cornices are usually much larger than gable cornices as they prevent splashes of water flowing down the slope from hitting the wall finishes.
Important! In fact, the cornice is an extension of the rafter legs. Since the overhang is at the bottom of the slope, the minimum snow load falls on it. However, the installation of a gutter or snow retainers changes the distribution of loads, so it can be subjected to significant pressure.

Formation methods
Before you make a cornice for the roof, you need to understand the structure of this element of the roof structure, as well as how to form it. The installation method of the overhang depends on the design and type of roof, on the length of the slopes. The most common technologies with which you can form a roof cornice are:
- Extension of rafter legs. The easiest way to form a roof overhang is to use rafter legs that are longer than the pitch. The more you want to get an overhang, the longer the bars from which the rafters are made should be. The disadvantage of this method is to increase the weight of the frame, and, consequently, the load on the foundation.
- Building rafters with filly. To form a roof cornice, you can build up the ends of the rafter legs with the help of fillies - lighter and cheaper elements from a thinner edged board. Thanks to fillies, the frame has less weight, despite the large cornice.

Professional craftsmen consider it appropriate to use fillies to form an overhang if the length of the slope exceeds the standard size of lumber. Usually the length of the boards from which the roof frame is made is 6 meters. If the roof slope is 6 meters or more, the installation of the cornice is carried out using fillies.
Optimal size
It is often difficult for non-professional craftsmen to determine what size a cornice should be made. This is indeed a very important design decision, because if it is too small, then melt or rain water from the slope will fall on the cladding of the outer walls, on the blind area of the foundation, leading to destruction, as well as damage to the appearance of the structure. When choosing the length of the cornice, the following factors are taken into account:
- Climatic conditions. The optimal size of the roofing cornice depends on the amount of precipitation in winter and summer. In snowier regions, roofs with a wide eaves are traditionally used to protect walls and foundations from snow. For example, alpine chalets located in the mountains usually have cornice overhangs at least 1 meter wide.
- Roof pitch. The greater the angle of inclination of the roof slopes, the smaller the eaves can be made. This is due to the fact that with a flat roof, the trajectory of falling snow and water goes far from the outer walls of the house. If the slopes are steep enough, then it is better to make the eaves wider to protect the structure from splashes of water that can reach the wall during heavy snowmelt or heavy rains.
- proportions of the house. A wide eaves with a sloping roof make the building visually lower, squat, distorting the optimal proportions. A narrow overhang with a high, steep roof, on the contrary, stretches the silhouette of the house.
Important! The minimum allowable width of cornices is 45-50 cm, but this is clearly not enough for regions with high snow load. If necessary, the size of this structural element is increased to 1 m.


Hemming material
Installation of overhangs is carried out at the final stage of work on the assembly of the truss frame. As soon as the crate is ready, the rafter legs are trimmed in level, and then the frontal (wind) bar is fixed at their ends. To protect the lower surface from the penetration of moisture or the settlement of birds overhang, the eaves are filed. This task can be accomplished using various materials:

Remember that the ventilation of the under-roof space is an important factor affecting the life of the truss frame. Therefore, experienced craftsmen for filing overhangs recommend using spotlights. It is better to use models with central perforations that provide an average level of ventilation.
Hemming methods
In order for the eaves overhang not only to perform its functions qualitatively, but also to look aesthetically pleasing, neat, it is necessary to hem it correctly. To do this, it is not enough to choose high-quality material, you also need to decide on the method of filing, which depends on the slope and length of the slope. There are two methods:
- Diagonal lining. This method consists in filing the cornices with soffits so that they are parallel to the slopes. Thus, roofs with a large slope, but a small slope length, are hemmed. The diagonal method is considered more time consuming.
- Direct hemming. This option differs in that the roof cornice is closed with spotlights using a box located at a right angle to the outer wall of the structure. Direct filing takes less time, but it is more expensive in terms of building materials.


Video instruction
The construction of the roof involves several stages of construction work. At the final stage of the process of erecting a roof, it is the turn of filing the roof eaves. This process is quite painstaking and deserves special attention, since the final appearance of the building largely depends on its quality and the selected materials.
- When the work on building the house and laying the roof is already almost completed and there is very little left until the moment when the new house takes on a finished look, the turn of the cornice comes.
- Referred to among professionals as a box, the roof eaves, in contrast to the foundation and the quality of the masonry, can be seen with the naked eye in every photograph of the commissioned object. Therefore, special requirements are imposed on this stage of work.
- It is at the final stage that gutters and snow plows are installed, and the ledges are also filed. In addition to the purely aesthetic side of the issue, with the help of the installation of cornices, the problems of reliable protection of the facade of the building and the durability of the entire structure as a whole are solved.
- This design at the edge of the roof allows you to regulate the temperature inside the premises, and also reliably protects the external elements of the building.
- The design of the box must necessarily include ventilation elements necessary for the space under the roof. It is also on these roof design elements that the gutters are subsequently attached.
- Depending on the type and shape of the roof, the cornices are also different, but whatever the angle of the roof and the size of the ledge, the overhangs must be hemmed without fail.
Roof filing: step by step instructions

The process of filing the roof itself is not too complicated, the sequence of actions is understandable on an intuitive level, and it is not so difficult to do it yourself. You just need to take into account the nuance that these works are important to carry out very high quality. And this means that preparatory work is indispensable.
- It is necessary to take care of the issue of filing the roof eaves after the installation of the rafters and during the laying of the crate under the roof surface. All rafters need to be trimmed along the same length, sawing off all that is superfluous. Do not forget that in the end the line of the rafters should be clearly parallel to the outer wall of the building. If suddenly the outer box has a wider width in some part, and less in some, it will be very noticeable from the outside and the external impression of the house will suffer greatly.
- In the practice of high-quality construction, it has long been customary to saw off the rafters strictly vertically and sew up this section in the same way as a box. After the alignment of the rafters is done, you can proceed to the flooring of the board or material chosen to create the lattice.
- Another, no less important point is related to the additional insulation of the house. Work on the walls of the building must be completed before the process of filing the overhangs on the roof begins. This moment is especially important if the sheathing is carried out horizontally, and not directly along the rafters. If you miss this nuance, then you simply will not be able to insulate part of the walls under a canopy, and this promises poor insulation in the fall and significant heat loss in the winter.
- Following the correct order of work, as a result, the roof eaves sheathing will come into close contact with the insulated wall.
The construction of roof overhangs: the choice of material

An important point in the preparatory activities is the determination of a suitable material. It is important to choose how to sheathe the eaves of the roof. Often, a material similar in structure is chosen as the basis for roof sheathing, from which the flooring has already been made. The cost for such work is determined not only by the size of the structure, but also by the selected consumables. Before buying, it is important to take into account the strength characteristics and the degree of durability of future boxes, then the filing of the roof eaves will be successful in all respects.
Consider the most common options for filing roof cornices with the features of the materials used.
Clapboard made of wood

- This material will allow you to perform work on the installation of roof eaves at a sufficiently high level. The choice of its types is diverse, since today this type of filing is offered by many leading manufacturers of building materials.
- However, when choosing a lining, it is important to understand that the cornice is made from it for outdoor use, which means it will be subject to aggressive external influences. Therefore, saving on quality in this case is unacceptable.
- You should also not use too thin material of this type. The wood must have the optimum moisture content and never be too dry. The most practical option would be a lining made at least a month ago, stored outdoors. In this case, the natural humidity will fully comply with the environmental conditions.
- When buying material, check that the boards are of high quality, without obvious defects. In the case of lining, any discrepancy with the declared qualities will be very noticeable in the form of cracks and knots on its surface.
- The new generation of wagon wood is an extra type material. Such a construction consumable is produced with strict observance of technologies with the rejection of low-quality material and is ideally dried before being delivered for sale. Be sure to pay attention to the difference in these materials when buying if you are building a house for yourself.
- The optimal moisture content of the lining should be about 30 - 40%, this will ensure high-quality installation of roof eaves. This parameter is easily checked with a moisture meter, which any self-respecting lumber merchant should have.
- An equally important factor is the type of wood from which the material for mounting overhangs from the roof is made. It is better to choose a lining that is durable and highly resistant to decay. For example, materials from spruce or larch have proven themselves perfectly. However, they do not belong to the category of cheap lumber, but pine lining is more economical in price and its wear resistance indicators are quite acceptable in practice.
- The size of the plate also matters. In any case, it is better to use material with a thickness of at least 15 mm, with a length corresponding to the size of the overhang. This approach will result in saving on unnecessary material consumption when cutting off excess parts.
- Also, do not forget that you will need special strips to mount the wood lining. They will need to stock up along with all the materials.
planed board

Another option for the material for filing the eaves is a planed edged board. It should be at least 2 cm thick. During installation, such a board is stuffed with a small gap of 1 - 2 cm in order to further ensure sufficient ventilation around the entire perimeter of the roof. Only such an arrangement will fully ensure the flow of air into the under-roof space. The difference between filing a cornice with a planed board and a lining is that in the second case, it is necessary to additionally cut out gratings for ventilation with a gap of 1.5 meters, which, of course, complicates the work.
Decking

- A good material for performing work is a profiled sheet. However, it is recommended to use it if the roof structure of the house requires precise overhangs. Often in such a situation, corrugated steel sheet with galvanization and polymer coating is used.
- Particular attention should be paid to the quality of the material used. The surface of the profiled sheet should not have scratches and chips.
- The shades of the sheets used are also essential for the aesthetics of the cornice. They should not differ in color, which can happen if different batches of material are used, even from the same manufacturer.
- A good wave height of the material will provide the necessary ventilation, but this is not always at hand. Often a very small level difference is sufficient. Too large waves can create conditions for precipitation to penetrate inside the roof structure, which, naturally, will lead to the gradual destruction of the frame.
- For the vast majority of roof structures, light corrugated board is chosen. Sheets with a thickness of 0.55 to 0.8 mm will be ideal. Materials of greater thickness, respectively, have an impressive weight, in addition, they are harder to mount, and the subsequent load on the structure will be unjustified.
- Profiled sheets must be chosen equal to the span length in order to mount the boxes for filing not from small panels, but from solid elements. However, it must be taken into account that independent cutting of corrugated board is not an easy task. It will take time and special equipment to solve it, so think carefully before you make a purchase.
Profiled sheets for roof filing are among the most affordable materials. In addition, they have excellent characteristics, which makes corrugated board in demand in construction.
Soffits

A separate category of material for filing a roof eaves is considered to be a material such as soffit. It is a ready-made kit that allows you to quickly and easily draw up ledges. Spotlights can be made from metal, plastic, copper and even wood. It is very convenient to use a ready-made kit, since its installation is not difficult.
Hemming the roof eaves along the rafters

Binder Features
Each specific roof has its own characteristics and requires an individual approach to installation. However, there are general points that are characteristic of all roofs that need to be considered separately. Such nuances make it possible to understand the basic rules for the construction of cornices and how to make them filed in certain cases.
If the work is done on the basis of the installed rafters, then the filing will have the same angle as the roof slope. This option is appropriate for roof structures with a slight slope. In this case, any selected material is stuffed onto the rafters strictly parallel to the wall. However, in order to perform such filing correctly, care must be taken that the bottom of the rafters forms a perfectly flat plane. Sometimes this has to be achieved with additional alignment.
Installation: step by step instructions

Leveling the surface of the rafters
- The selected material is cut into pieces strictly according to the size of the protrusions and treated with an antiseptic to protect against external influences. If it is planned to paint parts in the future, antiseptic treatment must be performed in advance before proceeding with the sheathing of the roof eaves.
- Next, you need to check how smooth the surface of the rafters is, and if this is not the case, achieve clarity with the help of boards overlapping those that already exist. An additional level can be fixed with nails or screws. It is important to mount the extreme strips strictly along the plumb line.
We fasten the boards with a cord
- All other structural elements are mounted along the cord. Be sure to maintain the allowable gaps between the panels, about 7 - 10 mm. This must be provided to take into account the natural stretching of the material under the influence of external conditions.
- To make the work easier, sections of boards with a length of at least 10 cm are attached to the rafters with the help of screws. First, the first and last boards are set along the length, and the twine is evenly stretched along them and the rest of the elements of the future cornice are attached.
We fix the boards with the help of an additional board
This mounting option is used more often than the first. The installation procedure is easier, and the frame as a result is stronger.
- First, a horizontal box is made from the edge of the rafters to the wall.
- For filing, a frame made of thick material is used. One edge is attached directly to the rafters, and where they fit the wall, a load-bearing board is provided, to which everything else is then mounted.
- This method of installation allows you to get a fairly rigid structure, which does not depend on the level of the wall.
We carry out sheathing
- When the frame is already fully prepared, you can proceed to sheathing with a board or clapboard.
- Since rain and snow fall on this part, frost is actively affected, the fastening of the filing must be especially reliable. The ideal option is to fasten it with screws, but it is better to use 2 or 3 fasteners if the width of the board allows such a frequency. Otherwise, the board will lead or twist over time.
- Sequentially, the boards are joined in a checkerboard pattern, which means that there will be no two joints nearby.
- It is important that the material - lining or edged board, be treated with a protective antiseptic agent on both sides before starting work. After installation, the material is also additionally processed from the ends, and then the attachment points and cuts are painted over.
Hemming the roof eaves with spotlights

The installation of spotlights does not cause any particular difficulties, filing the roof eaves with your own hands in this case is very simple. Nevertheless, you need to prepare everything very carefully and first study the instructions in order to build reliable roof protection.
Installation: step by step instructions and video
- First, we prepare the material, cut it along the width of the roof overhang. If its width is more than 4 cm, then it is necessary to install an additional horizontal bar in the middle.
- It is important to ensure a flat surface when fastening and structural strength. To do this, a board is attached to the wall along the length of the ledge, and bars are mounted to the rafters strictly according to the level. and already on top of the spotlight panel.
- In preparation, all boards must be adjusted horizontally.
- A profile is installed on a board attached to the wall. The connection is made with screws. The panels are inserted in turn into the profile, and the opposite sides are attached to the bars under the rafters. All this is secured by another panel for the profile.
- In conclusion, it remains only to close the edges of the panels along the overhang line of the corresponding profile.
The roof can be called one of the most complex structural elements of a building. It contains in its composition many different interrelated parts and parts. In addition to the roofing itself, such elements as the drainage system, filing the cornice, the arrangement of the ridge and ebbs are no less important. In our article, we will take a closer look at how to make an eaves overhang of a corrugated roof.
If you want to make a high-quality and durable roof, then you should not be limited to the arrangement of roofing. It is equally important to properly finish the cornice overhang. This constructive part of the roof performs not only aesthetic functions, but is also needed from a functional point of view. So, cornice overhangs are required to solve the following tasks:
- Home wall protection from the ingress of melt and rain water. The wider the overhang, the better the walls of the structure are protected from precipitation flowing from the roof. The decoration of the walls of the house, not protected by the cornice overhang, quickly dampens, cracks and loses its attractiveness.
- Removal of melt and rain water outside the blind area and foundation structures of the structure. That is why the width of the cornice overhang should be slightly larger than the width of the blind area around the house. Otherwise, moisture will leak under the house, eroding the foundation.
- Hemmed cornice overhang protects the truss system from getting wet at the bottom. If the overhang is not hemmed, then the wooden truss system will undergo damage and decay.
- aesthetic features. A hemmed cornice overhang completes the look of the house, hiding the elements of the roof structure.
Attention: the width of the eaves depends on the slope of the roof and the climatic features of the region. The lower the slope of the slopes and the greater the average annual rainfall, the greater the overhang should be.
Cornice device

According to building codes, the eaves are installed along the perimeter of the house. The overhang of the roof is the distance from the wall of the building to the edge of the slope. This value must be at least 500 mm. There are two types of roof overhang:
- Eaves overhang - this is the distance that is formed between the wall of the structure and the edge of the roof slope.
- Gable overhang- this is the removal of the roofing outside the walls of the house in the gable part. In this case, the base for the coating is formed either by removing the crate, or by using elongated runs.
Arrangement of the roof cornice is carried out by installing elongated rafter legs protruding beyond the walls of the house, or by attaching fillies. In the latter case, special bars of a smaller section than those of the rafters are used, which are attached to the lower part of the rafter leg.
Binder options

The sheathing of the eaves is primarily needed to protect against slanting rain during strong winds, which will lead to the wetting of the truss system. Very often, a special system of soffits is used for filing the cornice and gable overhang, but other materials can also be used for this, for example, by hemming this part of the roof structure with a metal profile. In this case, you can choose one of the following methods:
- Diagonal lining. With this method of installation, the metal profile is attached directly to the bottom of the filly or rafter leg. To do this, you will need self-tapping screws and starting strips. This technique is considered the simplest, but requires more materials. This version of the filing is suitable for roofs with a large slope of slopes, but a small eaves extension.
- Horizontal stitching consists in arranging a special box, which is hemmed with corrugated board in the lower part. To fix the horizontal filing to the walls of the house, it is necessary to attach a beam or use a wooden frame that is attached to a filly or rafter leg. This technique is more complicated to perform, but it allows you to much more effectively protect the walls of the house from getting wet.
When using corrugated sheeting, you get many advantages:
- firstly, you can accurately match the color of the cornice overhang to the color of the roofing part, which will ensure harmony and unity of the architectural image of the building;
- secondly, the polymer-coated metal profile is reliably protected from corrosion;
- thirdly, the strength and durability of this material is also important for the eaves of the house.
Mounting technology

Before hemming the roof eaves with corrugated board, work must be done on laying the roofing and installing the drainage system. For work you will need:
- fastening straps;
- remnants of profiled sheet;
- galvanized screws;
- wooden bars.
The stitching is done in the following order:
- All rafter legs or fillies need to be trimmed in length by cutting the ends. In this case, the ends of these elements must be cut so that they are parallel to the ground level.
- We attach the frontal board to the ends of the lower part of the rafters. At the same time, we carry out the installation of brackets for fixing the gutter.
- In the same horizontal plane with the frontal board on the surface of the house, we fix the timber. To fix it, we use anchor bolts.
- Next, between the beam on the wall of the house and the frontal board, we install connecting jumpers. The installation step of these elements is 400-600 mm.
- After the frame is ready, we proceed to install the guides for the corrugated board.
- Next, using self-tapping screws, we fasten sheets of profiled metal. At the same time, it is necessary to try to leave a gap of 2 cm between the profiled sheet and the wall for ventilation of the under-roof space.
If we compare the filing of the cornice overhang with the help of corrugated board and spotlights, then the only drawback of the first material is the lack of special ventilation perforated strips, so ventilation of the under-roof space will not be effective enough. If the design features of the roof require more efficient ventilation, then it is better to file the overhang using special soffits.
When the main stages of floor installation are completed, you can proceed to not so large-scale, but very important work. One of them is the filing of the eaves of the roof. The purpose of this stage of construction work is to create the final appearance of both the roof and the house as a whole.
Simultaneously with the sheathing of the overhangs of the cornices, the installation of gutters, as well as ventilation systems for the under-roof space, are also carried out.
roof overhang
The roof performs several functions, the main of which, of course, is to protect the building from the adverse effects of winds and moisture. It is necessary to protect not only the interior of the house from precipitation, but also its walls.
In order to prevent rain from destroying the upper part of the walls, and the wind from penetrating inside, the roof is created with a projection protruding above the walls. With the manifestation of fantasy, overhangs bring a peculiar zest to the design of the building, make it much more attractive.
Overhangs are planned and calculated simultaneously with the design of the roof itself. On the one hand, they increase the amount of load on the walls, and on the other hand, they become its integral part and continuation.
When choosing both the shape and the appearance of the overhangs, pay attention to several circumstances:
- features of the climatic conditions of the region;
- the geometric shape of the roof and its angle of inclination;
- the size of the blind area of the foundation;
- roof materials and filing for its overhangs.
The use of certain materials for roofing dictates the choice of a specific type of filing, and this introduces some changes in the weight of the entire structure and in the calculation of fastening.
The roof can have two types of overhangs:
- gable;
- eaves.
Gable overhang- these are the edges of the roof that protrude beyond the border of the front side of the building.
It can be either a balcony canopy or an insulated canopy located above the entrance or window or a small overhang - this depends on the size of the projected ledge.
The cornice overhang is arranged on the sides of the building on a pitched roof. On it are fixed devices for drainage. At the same time, often the rafters do not go beyond the boundaries of the walls, but join the Mauerlat.
The water outflow system is very important, because when it gets under a wooden beam, moisture causes irreparable harm.
Drainage options with drips or drips, with the use of special gutters or films protect the roof from rainwater or moisture from melting icicles. Ventilation windows protect wooden parts from decay and mold.
Overhangs may be absent only on flat roofs equipped with parapets.
Roof lining design features
Work on filing the overhangs begins after the installation of the rafters is completed, when it is necessary to lay the sheathing along the border of the roof covering.
Before hemming overhangs, the ends of the rafters should be sawn off clearly in a straight line. In this case, it is necessary to ensure that this line is parallel to the adjoining wall of the building.
Usually, the filing of the cornice is done with boards. To achieve an aesthetically appealing look, boards of the same width should be used for different sections of the wall. The ends of the rafters are cut vertically. The end part is sewn with a filing in the same way.
Having completed work on sawing along one line of rafters, it is necessary to nail the first dock of the crate from above. It will become a kind of guideline for the next stages of work.
External walls can only be insulated when the work on filing the roof overhangs is completed. If this sequence of work is violated while working with the eaves, the insulation may be damaged.
Sheathing materials
For filing the eaves, a wide variety of materials are used. All of them have different properties and appearance, but they must certainly meet specific requirements:
- reliably protect the eaves of the roof from frost and moisture;
- provide insulation;
- protect from precipitation;
- allow ventilation of the under-roof space.
In addition to the listed qualities, it is necessary that the material retains all the properties for as long as possible.
Decking- This is a galvanized steel coated with a layer of polymeric material. To date, the market is full of polymeric materials of different colors.
This material is quite rigid and resistant to mechanical stress, wind and other loads, and sharp fluctuations in temperature.
Ventilation of the sheeting from corrugated board is carried out through a gap equal in size to the height of the wave. You can also make panels yourself, while you should be guided by their width.
This will significantly reduce the amount of time spent on installation and the cost of filing.
 Soffits are special designs designed to facilitate the work of filing cornices. They consist of a bar and a finished frame.
These plastic panels are most often used for filing overhangs. Outwardly, the soffit looks like siding. The difference lies in the presence of a thicker layer of plastic in the spotlights and a special perforation, the purpose of which is the possibility of air circulation under the roof.
The obvious advantage of spotlights is the presence in this material of special substances - UV stabilizers, thanks to which they are reliably protected from the adverse effects of sunlight.
Soffits are made according to the taste of the customer from materials such as copper, aluminum, galvanized steel with a polymer coating, polyvinyl chloride (or PVC plastic).
Each type of soffit has special advantages.
Copper spotlights outwardly very attractive. Over time, they become even more presentable as a result of the natural patina.
Copper spotlights are fire-resistant, have a high level of strength. In addition, they do not require maintenance and have a long service life.
The disadvantage of this material is the relative high cost, since copper spotlights are made of steel using a special technology for applying a layer of copper - patination, oxide film coating, tin plating.
Aluminum spotlights very light, elastic, fire-resistant, retain their shape with temperature fluctuations, do not lose their brown color after prolonged exposure to the sun, they are easy to repair. Available in brown and white only.
Galvanized spotlights they have a high level of moisture and fire resistance, do not need maintenance and processing, do not change shape under the influence of high temperature, are very durable, tolerate temperature changes well, do not lose color (has a wood-like color). The disadvantage of this type of soffit is a significant weight.
Vinyl spotlights inexpensive, very light and comfortable, highly resistant to corrosion. However, they are impractical, because they expand when heated, are fire hazard, are not very durable, and they release toxic substances when heated. Produced in different colors.
All soffits are very convenient and easy to install. Collect from them a binder by force even for beginners. However, some aspects of the work require the advice of professionals: when it is necessary to adjust the desired size, pick up a complex configuration or lay out an intricate angle.
Soffit panels are cut along the length of the roof overhang, and they are installed perpendicular to the wall, and not along it.
Plain lining made of wood is used outdoors, as a result of which it is exposed to extreme climatic conditions. Therefore, the choice of wood must be taken very responsibly.
When buying a lining, you need to pay attention to the thickness: you should not buy too thin material.
Another important point is humidity. Wood should be of medium moisture: very dry or wet material is not suitable.
The best choice is a lining that has been stored for at least a month in the open air, the humidity of which is equal to the humidity of the external environment.
Edged and planed boards with a thickness of 1.5-2 cm enable uniform and high-quality air ventilation throughout the under-roof space.
When stuffing this material, a gap of 1 to 1.5 cm should be maintained.
Important point: when using a wooden filing, you need to take care of the ventilation system yourself, while the spotlights are produced perforated, moreover, to varying degrees - partial, full or in the center.
Binder device and its features, frame for filing
There are two types of overhangs.
In the first version, the firmware is performed directly along the rafters. The choice of this option is advisable in the presence of a not very steep slope or when it is necessary to increase the height of the building.
For this method of filing, it is necessary that the lower part of all rafters be located in the same plane. When the rafters are in different planes, alignment is carried out using additional boards.
They are overlapped on the rafters. After that, the first and last strips are installed, between which threads are pulled, which later serve as a level.

Then all other strips of the necessary material are mounted. With bilateral convergence of roofing slopes, the installation of rafter boards is carried out on both sides. Usually the length of the overhangs is 600 mm.
The second way is more popular. All used rafters are cut horizontally and vertically. A board is fixed at the bottom of the rafters, and a beam is attached to the wall.
It is located 1 cm above the frontal board in order to provide the possibility of moisture descent.
When the width of the overhang is more than 450 mm, it becomes necessary to install an additional board in the middle. When the roof slopes converge in one place, the board is nailed from the corner of the house to the corner of the roof.
In both cases, the roof overhang box is installed in the same way: along the wall along the gable, the board is stuffed onto the crate, then a distance is separated from it that corresponds to the width of the overhang, after which the board is nailed parallel to the gable wall.
Installation of corrugated sheeting
Roof overhangs are hemmed with corrugated board in the following way. The material is screwed to the frame along the cornice line (parallel to the wall) using screws.
At the junction points of the corrugated board and the wall, a frontal bar and an inner corner are installed. The bar is screwed to the frontal board, and the inner corner to the corrugated board.
The outer corner is fixed along the outer joints of the material. The corrugated board along the gable is installed along the walls, along the outer edge of the overhang.
Then the end plate and corners are fixed. For ease of installation and ventilation, the width of the corrugated sheet should be 2 cm less than the width of the overhang.
To install the soffit to the base, a J-shaped bar is used. It is fixed along the eaves and walls with screws.
Between the slats are soffit sheets. They are cut to a length that is equal to the distance between the slats in the shape of the letter J minus 6 mm (intended for thermal expansion).
In this case, with an overhang size of more than 900 mm, 6 mm should be deducted from both sides. The frontal board must be closed with a frontal bar.
So
- The function of roof overhangs is to protect against the effects of adverse factors and make the house look more attractive.
- The choice of filing depends on climatic conditions and roofing material.
- Overhangs are gable and cornice.
- Before starting work on filing the overhangs, the rafters must be filed.
- Many materials are used for filing, but spotlights are the most successful choice.
- Overhangs are hemmed in two ways.
- When installing a sheet of corrugated board, you must follow a certain sequence of actions.
Video instructions for installing spotlights: